One-Pot Greek Lemon Pasta Simple and Flavorful Meal

Looking for a quick, tasty meal? My One-Pot Greek Lemon Pasta is just what you need! With fresh flavors from lemon, garlic, and herbs, this dish comes together effortlessly. You can whip it up in one pot, making clean-up a breeze. Whether you’re aiming for comfort food or a light dinner, this recipe hits the spot. Let’s dive into this simple and flavorful meal that will impress everyone at your table!
Why I Love This Recipe
- Quick and Easy: This one-pot dish comes together in just 25 minutes, making it perfect for a weeknight dinner.
- Flavorful Ingredients: With the zest and juice of fresh lemons, garlic, and herbs, every bite bursts with Mediterranean flavor.
- Healthy and Nutritious: Packed with vegetables like tomatoes and olives, this pasta is not only delicious but also good for you.
- Customizable: Feel free to add your favorite vegetables or proteins, making this recipe versatile for any taste.
Ingredients
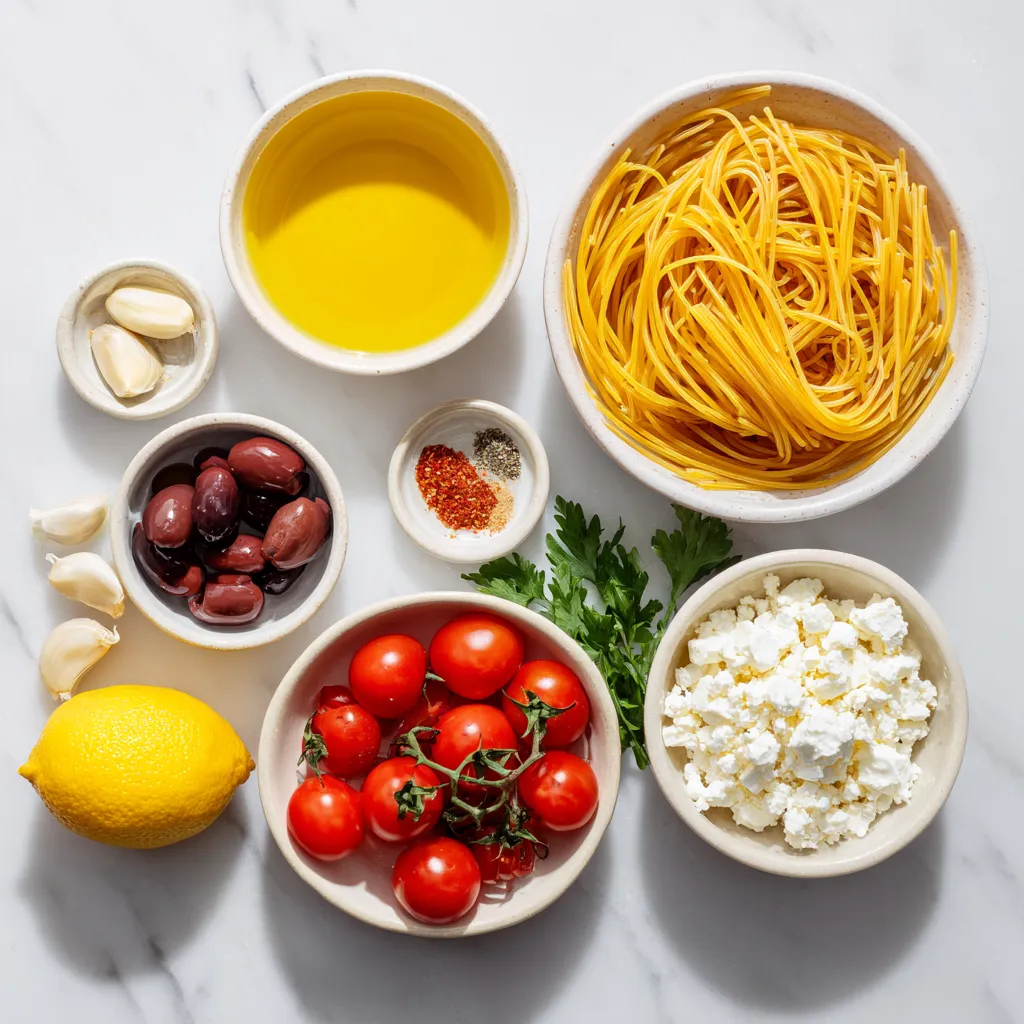
To make One-Pot Greek Lemon Pasta, you need a few key items. Here’s a list of ingredients to gather:
– Pasta choice: 12 ounces of spaghetti or linguine
– Key seasonings: 2 tablespoons of olive oil, 4 cloves of garlic (minced), 1 teaspoon of dried oregano, 1 teaspoon of dried thyme, and 1/2 teaspoon of red pepper flakes (optional)
– Essential liquid: 4 cups of vegetable broth
– Flavor enhancers: Zest and juice of 2 lemons
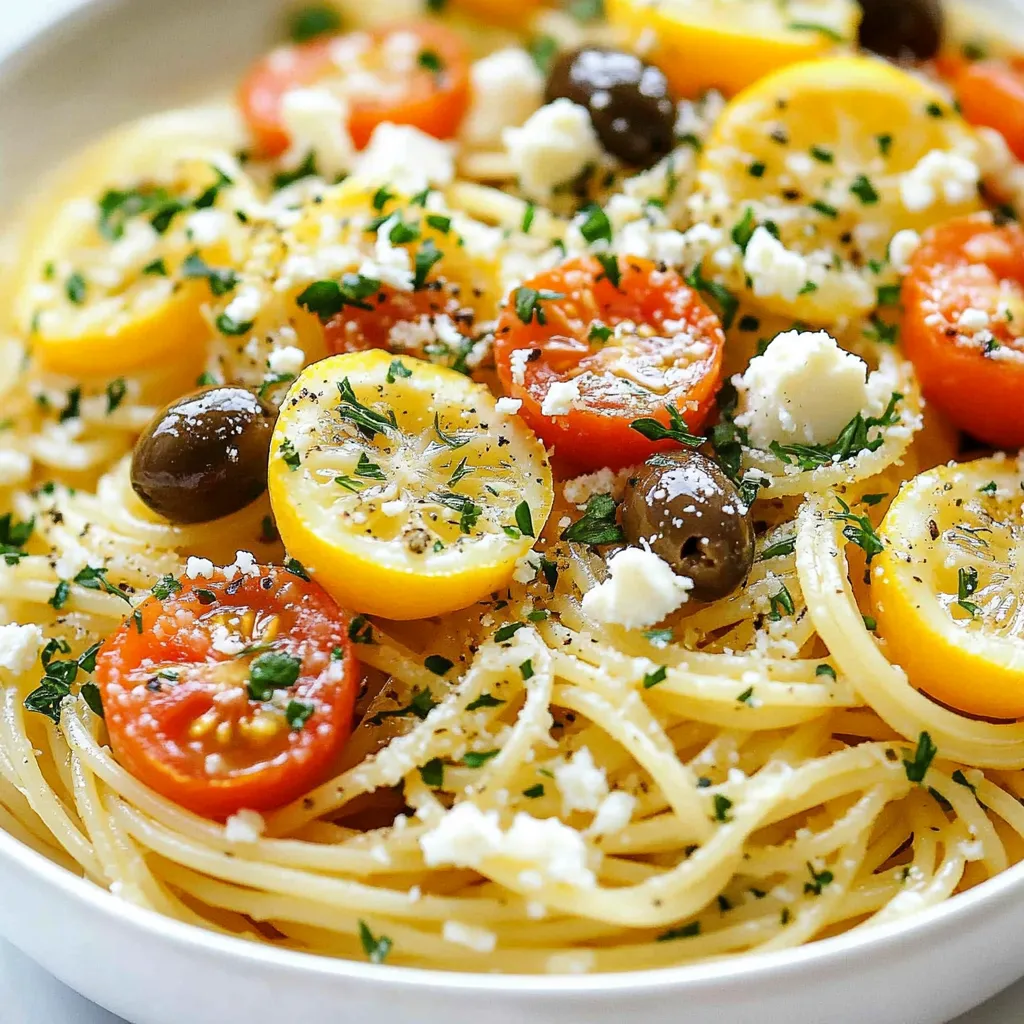
– Fresh additions: 1 cup of cherry tomatoes (halved), 1 cup of Kalamata olives (pitted and sliced), and 1 cup of feta cheese (crumbled)
– Garnish: Fresh parsley (chopped)
– Seasoning: Salt and pepper to taste
These ingredients blend perfectly to create a simple and flavorful meal. Using fresh lemon juice and zest gives the dish a bright taste. The Kalamata olives and feta cheese add a rich, savory element. Don’t forget to have fresh parsley on hand for that final touch!

Step-by-Step Instructions
Preparation Steps
1. Heating the olive oil and sautéing the garlic
Start by taking a large pot or skillet. Heat 2 tablespoons of olive oil over medium heat. Once hot, add 4 minced garlic cloves. Sauté for about 1 minute until the garlic smells great.
2. Adding seasonings and cooking
Next, stir in 1 teaspoon of dried oregano and 1 teaspoon of dried thyme. If you like spice, add 1/2 teaspoon of red pepper flakes. Cook this mixture for another 30 seconds. This step builds flavor and warms the spices.
3. Combining pasta with liquids and lemon
Now, add 12 ounces of spaghetti or linguine to the pot. Pour in 4 cups of vegetable broth. Then, zest and juice 2 lemons, adding both to the pot. Stir everything together well.
4. Simmering the pasta
Bring the pot to a boil, then lower the heat to medium-low. Cover the pot and let it simmer. This should take about 10-12 minutes. Stir occasionally until the pasta is al dente and most of the liquid is gone.
Finalization Steps
1. Stirring in cherry tomatoes and olives
Add 1 cup of halved cherry tomatoes and 1 cup of sliced Kalamata olives to the pot. Cook for an extra 2-3 minutes. The tomatoes will soften and add sweetness.
2. Mixing in feta cheese
Once the tomatoes are soft, turn off the heat. Fold in 1 cup of crumbled feta cheese. This adds creaminess and a salty flavor. Season with salt and pepper to taste.
3. Garnishing and serving tips
Finally, garnish your dish with fresh parsley. This makes your meal look pretty and adds freshness. Serve warm and enjoy!
Tips & Tricks
Cooking Methods
How to achieve the perfect al dente pasta
To cook pasta just right, follow these steps. Start with a large pot of salted water. Once it boils, add the pasta. Stir it right away to keep it from sticking. Check the pasta a minute or two before the time on the package. It should be firm but not hard. This is al dente, which means “to the tooth” in Italian.
Tips for avoiding sticking pasta
To prevent pasta from sticking, here’s what you can do. Use plenty of water when boiling. A big pot helps. Stir the pasta often during cooking. Adding a bit of olive oil can also help. However, it may make sauces less clingy.
Best practices for effective simmering
When simmering your pasta dish, keep these points in mind. First, bring the liquid to a good boil. Then, lower the heat to medium-low. Cover the pot to trap steam and heat. Stir occasionally to avoid sticking and ensure even cooking.
Flavor Enhancement
Suggestions for additional herbs or spices
To boost flavor, add fresh herbs like basil or dill. A sprinkle of parsley adds a fresh taste, too. You can also try fresh garlic if you love its strong flavor. For a spicy kick, add more red pepper flakes.
Substitutions for ingredients
If you don’t have an ingredient, here are some swaps. Use any pasta type you like; whole wheat works well. Swap vegetable broth for chicken broth if you prefer. If you can’t find Kalamata olives, try green olives. For a dairy-free version, skip the feta or use a vegan cheese.
Pro Tips
- Use Fresh Herbs: Fresh herbs like parsley or dill can elevate the flavors of your dish. Add them just before serving for the best taste.
- Customize Your Olives: Swap Kalamata olives for green olives or add a mix for varied flavors. This can change the overall taste profile of the dish.
- Adjust the Lemon: If you prefer a tangier flavor, feel free to add more lemon juice or zest. Taste as you go to achieve your desired level of acidity.
- Save Some Pasta Water: Before draining the pasta, save a cup of the cooking liquid. This starchy water can help adjust the sauce’s consistency if needed.

Variations
Ingredient Swaps
You can change this recipe to fit your taste. Here are some ideas:
– Vegetarian modifications: Add more vegetables like bell peppers, spinach, or zucchini. These not only add color but also boost nutrients.
– Protein options: If you want to add meat, chicken or shrimp work well. Cook the protein separately and mix it in after.
– Gluten-free alternatives: Use gluten-free pasta for a safe option. Many brands offer great taste and texture.
Serving Suggestions
Now, let’s look at how to serve this dish:
– Pairing with side dishes or salads: A light Greek salad pairs nicely. You can also serve with grilled vegetables for added flavor.
– Suggestions for sauces or dips: Try a yogurt dip or tzatziki on the side. This adds a cool touch that complements the lemony pasta.
Storage Info
Leftover Storage
To store your leftover Greek lemon pasta, let it cool first. Then, place it in an airtight container. You can keep it in the fridge for up to three days. If you want to keep it longer, freeze it for up to two months. Just make sure to label the container with the date.
Reheating Instructions
The best way to reheat this pasta is on the stove. Add a splash of vegetable broth or water to keep it moist. Heat it on low, stirring often to avoid burning. You can also use the microwave. Just cover the bowl with a damp paper towel. Heat for one to two minutes, stirring halfway through. This keeps the flavor and texture nice. If it seems dry, add a touch of lemon juice.
FAQs
Common Questions
Can I use a different type of pasta?
Yes, you can use any pasta you like. I recommend spaghetti or linguine. You can also try penne or fettuccine. Just adjust the cooking time based on the pasta you choose.
How do I know when the pasta is done?
Taste a piece of pasta to check if it is al dente. It should be firm but not hard. Usually, it takes about 10-12 minutes of simmering.
Is it possible to make this dish vegan?
Absolutely! To make it vegan, skip the feta cheese. You can add more veggies or a vegan cheese alternative for creaminess.
What to do if the pasta absorbs all the liquid?
If the pasta absorbs all the liquid, just add a bit more vegetable broth or water. Stir well and let it cook a little longer.
Can I prepare this dish in advance?
Yes, you can make this dish ahead of time. Just store it in the fridge. When ready to eat, reheat it gently and add fresh parsley.
In this post, I shared how to craft a tasty pasta dish. We explored pasta choices, essential seasonings, and key ingredients like lemon and feta. I provided step-by-step instructions to make cooking easy. You learned tips for perfect pasta texture and how to add your twist. Storing leftovers was covered to keep your meal fresh.
I hope you feel ready to create your own delicious pasta dish. Enjoy experimenting with flavors and ingredient

One-Pot Greek Lemon Pasta
Ingredients
- 12 ounces spaghetti or linguine
- 2 tablespoons olive oil
- 4 cloves garlic, minced
- 1 teaspoon dried oregano
- 1 teaspoon dried thyme
- 1/2 teaspoon red pepper flakes (optional)
- 4 cups vegetable broth
- 2 lemons zest and juice
- 1 cup cherry tomatoes, halved
- 1 cup Kalamata olives, pitted and sliced
- 1 cup feta cheese, crumbled
- to taste salt and pepper
- for garnish fresh parsley, chopped
Instructions
- In a large pot or skillet, heat the olive oil over medium heat. Add the minced garlic and sauté until fragrant, about 1 minute.
- Stir in the dried oregano, thyme, and red pepper flakes if using. Cook for an additional 30 seconds.
- Add the spaghetti to the pot, followed by the vegetable broth, lemon zest, and lemon juice. Stir to combine.
- Bring the mixture to a boil, then reduce the heat to medium-low and cover the pot. Let it simmer for about 10-12 minutes, stirring occasionally, until the pasta is al dente and most of the liquid is absorbed.
- Stir in the halved cherry tomatoes and sliced olives, cooking for an additional 2-3 minutes until the tomatoes soften.
- Remove the pot from heat and fold in the crumbled feta cheese. Season with salt and pepper to taste.
- Garnish with freshly chopped parsley before serving.


![- 4 chicken thighs, bone-in and skin-on - 1/4 cup honey - 4 cloves garlic, minced - 2 tablespoons soy sauce (or tamari for gluten-free) - 1 tablespoon apple cider vinegar - 1 tablespoon olive oil - 1 teaspoon grated fresh ginger - 1/2 teaspoon black pepper - Chopped green onions - Sesame seeds The main ingredients in this dish are simple yet powerful. Chicken thighs offer rich flavor and juicy texture. Honey adds sweetness that balances the savory notes. Garlic brings a punch that enhances every bite. The additional ingredients work together to create a delicious marinade. Soy sauce adds umami depth, while apple cider vinegar brings brightness. Olive oil helps keep the chicken moist during cooking. For seasoning, fresh ginger adds warmth. Black pepper gives a slight kick. The green onions and sesame seeds make for a lovely garnish, adding color and crunch. You can find the complete process in the Full Recipe. These ingredients blend to create a honey garlic glaze that makes this chicken dish truly special. Preparing the marinade To start, grab a medium bowl. Whisk together the honey, minced garlic, soy sauce, apple cider vinegar, olive oil, grated ginger, black pepper, and a small pinch of salt. Mix until all ingredients blend well. This sauce will give your chicken a sweet and savory flavor. Marinating the chicken Next, take your chicken thighs and place them in a zip-lock bag or shallow dish. Pour the marinade over the chicken, making sure each piece gets coated. Seal the bag or cover the dish. Refrigerate for at least one hour. For deeper flavor, marinate overnight. Preheating the oven While the chicken marinates, preheat your oven to 400°F (200°C). A hot oven helps the chicken cook evenly and crisp the skin. Baking the chicken After marinating, remove the chicken from the marinade. Don’t throw the marinade away; you will use it later. Place the chicken thighs skin side up on a baking tray lined with parchment paper. Bake in the preheated oven for 30-35 minutes. The chicken is ready when it reaches an internal temperature of 165°F (74°C) and the skin is crispy. Cooking the sauce While your chicken bakes, pour the reserved marinade into a small saucepan. Heat it over medium heat. Let it simmer for about 5-7 minutes until it thickens slightly. This will be your delicious glaze. Glazing and serving When the chicken is done, brush the thickened glaze over the thighs. Return the tray to the oven for another 5 minutes to caramelize the glaze. Once done, remove and sprinkle with chopped green onions and sesame seeds. Let the chicken rest for a few minutes before serving. Enjoy your Honey Garlic Glazed Chicken Thighs! For the full recipe, check the earlier section. - The best time to marinate chicken thighs is at least one hour. For deeper flavor, marinate overnight. - Use a zip-lock bag for even coating. Squeeze out air to let the marinade soak in well. - To get crispy skin, bake the chicken thighs skin side up. This allows the fat to render and crisp up. - Check the internal temperature with a meat thermometer. It should reach 165°F (74°C) for safe eating. - Pair your honey garlic glazed chicken with steamed rice or roasted vegetables. - For a nice look, garnish with chopped green onions and sesame seeds. This adds color and crunch. For the full recipe, refer to the instructions above. Enjoy your cooking! {{image_2}} You can switch up the protein in this dish. Chicken breast works well if you want less fat. For a plant-based option, try tofu. Just press it to remove excess water and cut it into cubes. You can also change the sweetener. If you want a lower sugar option, use maple syrup or agave nectar. These alternatives blend nicely with the other flavors. Make this dish even better by adding spices or herbs. Try ginger or chili flakes for a kick. Fresh herbs like cilantro or basil can bring a nice twist too. You can also play with acids. Lime juice adds a bright flavor, while balsamic vinegar gives a sweet tang. Try adding a splash during cooking for a new taste. Grilling the chicken gives it a smoky flavor. Just marinate as usual and grill over medium heat. It takes about 20 minutes, and you’ll get nice grill marks. If you own an Instant Pot, you can use it for this recipe too. Cook the marinated chicken on high for 10 minutes, then let it naturally release. This method keeps the chicken super juicy. For the full recipe, check out the complete instructions and details. To keep your honey garlic glazed chicken thighs fresh, store them in the fridge. Place the cooked chicken in an airtight container. It can last up to 3 days in the refrigerator. If you want to store it longer, consider freezing it. Wrap the chicken tightly in plastic wrap, then place it in a freezer-safe bag. This way, it can stay good for up to 3 months. When it's time to enjoy leftovers, reheating can be simple. The best way to reheat is in the oven. Set your oven to 350°F (175°C). Place the chicken on a baking sheet and cover it with foil. This helps keep the chicken moist. Heat it for about 15-20 minutes or until it's warm. You can also use a microwave, but use a lower power setting to avoid drying it out. Cover the chicken with a damp paper towel to keep moisture in. You can store your honey garlic glazed chicken thighs safely for a few days. In the fridge, they stay good for 3 days. In the freezer, they last for 3 months. Signs of spoilage include a strange smell, changes in color, or a slimy texture. Always check before eating to stay safe. For more details on how to make this dish, check the Full Recipe. Can I use boneless chicken thighs? Yes, you can use boneless chicken thighs. They will cook faster than bone-in thighs. Check the internal temperature to ensure they reach 165°F (74°C). How to make the glaze thicker? To thicken the glaze, simmer it longer. Cook it on medium heat until it reduces and becomes syrupy. You can also add a cornstarch slurry for extra thickness. How to make it gluten-free? Use tamari instead of soy sauce. Tamari is a gluten-free option that tastes great. Can I add vegetables to the dish? Yes, you can add vegetables. Try bell peppers, broccoli, or carrots. Toss them on the baking tray with the chicken. How many servings does this recipe yield? This recipe makes four servings. It’s perfect for a small family meal. Can I double the recipe for a larger group? Yes, you can double the recipe. Just ensure your baking tray has enough space. You may need to adjust cooking time slightly. For the complete recipe, check out the [Full Recipe]. This recipe uses simple ingredients like chicken thighs, honey, and garlic. You learned how to prepare and cook tasty chicken with an easy glaze. I shared tips to help with marinating and cooking for the best results. Feel free to explore variations and enjoy leftovers too. Try different flavors and cooking methods. Cooking should be fun and personal. Use your taste to create amazing meals. Enjoy making this dish with friends and family!](https://dailydishly.com/wp-content/uploads/2025/07/b9cba3e0-ee7f-4dbf-9eac-9b8411a1c4fd-768x768.webp)


![- 1 lb boneless, skinless chicken thighs - 1/2 cup cornstarch - 1/4 teaspoon black pepper - 1 cup panko breadcrumbs - 1/4 cup sesame seeds - 1/4 cup soy sauce - 1/4 cup honey - 1 tablespoon apple cider vinegar - 1 teaspoon ginger paste - 1 garlic clove, minced - Green onions, finely sliced - Toasted sesame seeds To make crispy sesame chicken, gather all your ingredients first. This helps you stay organized and enjoy the cooking process. The chicken thighs offer a tender bite while the cornstarch provides that essential crunch. Panko breadcrumbs and sesame seeds create a delightful texture and nutty flavor. For the sauce, soy sauce and honey blend perfectly. Apple cider vinegar adds a hint of tang, while ginger and garlic bring warmth and depth. These simple ingredients make a sauce that truly elevates your dish. Don’t forget your garnishes! Finely sliced green onions and toasted sesame seeds add a pop of color and flavor. When you plate your dish, it not only looks great but also tastes amazing. This is the key to making crispy sesame chicken irresistible. For the detailed steps on how to combine these ingredients, check out the Full Recipe. To start, mix the dry ingredients. In a bowl, combine 1/2 cup cornstarch, 1/2 teaspoon salt, and 1/4 teaspoon black pepper. This mix will help the chicken get crispy. Next, bread the chicken. Take 1 lb of cut chicken thighs. Dip each piece into the cornstarch mix, then into a beaten large egg. Finally, coat each piece with a mix of 1 cup panko breadcrumbs and 1/4 cup sesame seeds. Make sure the coating is even. This step is key for that crunchy texture. Now, heat oil for frying. In a deep skillet, add enough vegetable oil to cover the chicken pieces. Heat it over medium-high heat. Once the oil is hot, fry the chicken in batches. Cook for about 5-7 minutes until each piece is golden brown and crispy. Drain the fried chicken on paper towels. This keeps it from getting soggy. For the sauce, grab a separate saucepan. Combine 1/4 cup soy sauce, 1/4 cup honey, 1 tablespoon apple cider vinegar, 1 teaspoon ginger paste, and a minced garlic clove. Heat the mixture over medium heat. Stir and bring it to a simmer for 3-4 minutes. This thickens your sauce and blends the flavors nicely. Once the chicken is fried, drizzle or toss the sauce over it. Make sure each piece is well-coated. Enjoy your crispy sesame chicken! For more details, check out the Full Recipe. To make your chicken crispy, use cornstarch and panko breadcrumbs. Cornstarch helps absorb moisture, while panko adds crunch. - Use 1/2 cup of cornstarch. - Mix it with 1/2 teaspoon salt and 1/4 teaspoon black pepper. - Coat each chicken piece well before frying. Frying temperature matters too. Heat your vegetable oil to medium-high. The right heat cooks the chicken fast and keeps it crispy. - Fry in small batches. - Cook each batch for about 5-7 minutes. - Drain on paper towels to remove excess oil. To boost flavor, adjust the sauce. This sauce is a mix of sweet and savory, but you can change it to your taste. - Add more honey for sweetness or soy sauce for saltiness. - Try using fresh garlic and ginger. Fresh ingredients add a lively taste and aroma. Use 1 teaspoon of ginger paste and 1 minced garlic clove in your sauce. This makes it more vibrant and tasty. How you serve your chicken makes a big difference. For an attractive plate, use a large platter. - Drizzle extra sauce over the chicken. - Garnish with sliced green onions and toasted sesame seeds for color and texture. This makes your Crispy Sesame Chicken look as good as it tastes! For more tips and the full recipe, check the [Full Recipe]. {{image_2}} You can make Crispy Sesame Chicken lighter. Instead of frying, try baking. Bake the chicken at 400°F for 20-25 minutes. This method keeps the crunch without extra oil. If you want low-sodium soy sauce, use tamari or coconut aminos. Both give a similar flavor but with less salt. You can add spices to the coating for extra flavor. Try paprika or cayenne for a little heat. A pinch of garlic powder adds a nice touch too. To mix things up, use different sauces. Sweet chili sauce or teriyaki sauce can give a fun twist. You can also try a spicy mustard sauce for a zing. Pair your Crispy Sesame Chicken with tasty sides. Steamed broccoli or stir-fried vegetables work well. They add color and nutrition. You can also serve it with rice. Jasmine or brown rice both complement the dish. For a fresh touch, add a side salad with sesame dressing. Enjoy your meal with a mix of flavors and textures! To keep your Crispy Sesame Chicken fresh, refrigerate it right away. Place the chicken in a shallow container. This helps it cool down faster. Cover the container tightly with a lid or plastic wrap. This keeps the chicken from drying out. Use it within three days for the best taste. Use airtight containers for storing leftovers. Glass containers work great since they do not stain. You can also use BPA-free plastic containers. Make sure they are safe for food use. Label your containers with the date. This helps you track how long they have been stored. To enjoy your Crispy Sesame Chicken again, you need to reheat it carefully. The oven is the best choice. Preheat your oven to 350°F (175°C). Place the chicken on a baking sheet. Heat for about 10-15 minutes. This keeps the chicken crispy. The microwave is faster but can make the chicken soggy. If you must use it, heat in short bursts. Check after every 30 seconds to avoid overcooking. Yes, you can freeze Crispy Sesame Chicken! First, let it cool completely. Then, wrap each piece tightly in plastic wrap. Place the wrapped pieces in a freezer bag. Squeeze out the air and seal it. This prevents freezer burn. To thaw, move the chicken to the fridge overnight. This keeps it safe. You can also use the microwave for a quick thaw. Use the defrost setting, checking often. Once thawed, reheat in the oven for the best results. Enjoy your delicious meal again! For the complete recipe, check out the Full Recipe section. You can use chicken breasts as a substitute for chicken thighs. They are leaner but still work well. You may also try chicken tenders, which are tender and cook quickly. For vegetarian options, consider using tofu or tempeh. They absorb flavors well and provide a nice texture when cooked. Look for a golden brown color on the chicken. The coating should be crispy and firm. You can use a meat thermometer to check the temperature. Chicken should reach 165°F (75°C) to be safe to eat. If you do not have a thermometer, cut into a piece. The meat should be white with no pink inside. Yes, you can make the sauce in advance. Just mix all the sauce ingredients in a saucepan. Cook it over medium heat until it thickens slightly. Allow it to cool, then store it in an airtight container. When ready to use, reheat it gently on the stove. You can also microwave it for a quick option. This blog post recaps the steps to make Crispy Sesame Chicken. We covered the ingredients, cooking methods, and tips for perfect results. Whether you fry or bake, the key is achieving crispiness. I shared flavorful sauce ideas and garnishing tips to enhance your dish. Remember to store and reheat leftovers properly for best taste. With simple variations, you can easily adapt this recipe. Enjoy your cooking adventure with these helpful insights, and impress everyone with your delicious meal!](https://dailydishly.com/wp-content/uploads/2025/07/12f93f23-c091-4c02-8196-bfe71a37e11f-768x768.webp)