One-Pot Tuscan Sausage Pasta Quick and Flavorful Meal

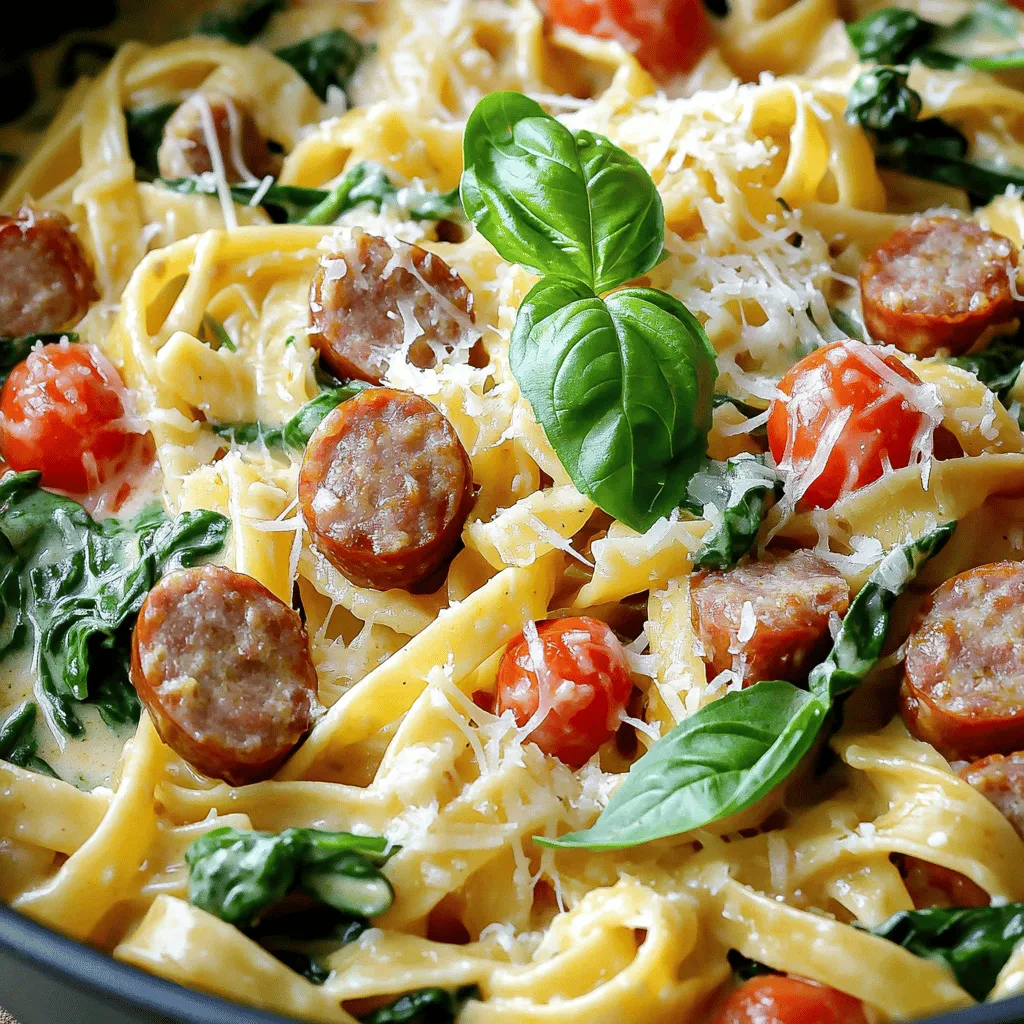
Looking for a quick and tasty meal? One-Pot Tuscan Sausage Pasta is the answer! Packed with savory Italian sausage, creamy sauce, and hearty noodles, this dish brings comfort to your table in just one pot. You’ll enjoy rich flavors with minimal fuss. Let’s dive into the ingredients and simple steps to whip up this delightful dinner that your whole family will love!
Ingredients
To make One-Pot Tuscan Sausage Pasta, you need a few key ingredients. Each one brings a special flavor to this dish. Here’s what you will need:
– 12 oz fettuccine pasta
– 1 lb Italian sausage (mild or spicy, casing removed)
– 1 tablespoon olive oil
– 1 medium onion, finely chopped
– 4 cloves garlic, minced
– 1 teaspoon dried oregano
– 1/2 teaspoon red pepper flakes (optional)
– 4 cups chicken broth
– 1 can (14 oz) diced tomatoes, undrained
– 1 cup heavy cream
– 2 cups baby spinach
– 1/2 cup grated Parmesan cheese
– Salt and pepper to taste
– Fresh basil leaves, for garnish
These ingredients combine to create a hearty meal. The fettuccine pasta cooks in the broth, soaking up all the flavors. The Italian sausage adds a savory kick. The cream makes it rich and smooth. Finally, spinach and basil bring freshness to each bite.
You can always adjust the spices to suit your taste. If you like it spicy, add more red pepper flakes. If you prefer a milder dish, skip them. Cooking is all about what you enjoy!
Step-by-Step Instructions
Preparation Steps
– Cooking Sausage
Start by heating one tablespoon of olive oil in a large pot over medium heat. Add one pound of Italian sausage, removing the casing first. Cook the sausage for about 5 to 7 minutes. Use a spoon to break it up as it cooks. The sausage should turn a nice brown color.
– Sautéing Aromatics
Next, add one medium onion, finely chopped, and four cloves of minced garlic to the pot. Sauté these until the onion is translucent, which takes about 3 to 4 minutes. This step builds a flavorful base for your dish.
– Adding Liquids and Spices
Stir in one teaspoon of dried oregano and half a teaspoon of red pepper flakes if you like some heat. Cook for another minute until you smell the spices. Then, pour in four cups of chicken broth and one can of diced tomatoes, including the juices. Bring this mixture to a boil.
Pasta Cooking Process
– Incorporating Fettuccine
Once boiling, add 12 ounces of fettuccine pasta. Make sure you stir it so all the pasta is submerged in the liquid. Reduce the heat to low and cover the pot. Let it simmer for 10 to 12 minutes, stirring occasionally. You want the pasta to be al dente.
– Simmering to Perfection
As the pasta cooks, keep an eye on it. Check for doneness by tasting a piece. When it’s just right, remove the pot from heat.
Finishing Touches
– Mixing in Cream and Spinach
Now, stir in one cup of heavy cream and two cups of baby spinach. Cook this mixture for another 2 to 3 minutes until the spinach wilts and the cream is warm.
– Seasoning and Serving
Finally, remove the pot from heat and mix in half a cup of grated Parmesan cheese. Add salt and pepper to taste. Serve hot and garnish with fresh basil leaves for that extra touch of flavor and color. Enjoy your delightful One-Pot Tuscan Sausage Pasta!
Tips & Tricks
Cooking Tips
Cooking Pasta to Al Dente
To cook pasta perfectly, aim for al dente. This means the pasta should be firm but not hard. Start by bringing your broth to a boil. Add the fettuccine and stir well. Cook for about 10-12 minutes. Check it a minute or two early. You want a bite that feels slightly firm.
Enhancing Flavors with Seasonings
The right seasonings make a big difference. I love adding dried oregano and red pepper flakes. They boost the flavor profile. Always taste your dish as you cook. Adjust salt and pepper to your liking. Fresh herbs, like basil, also add a nice touch at the end.
Serving Suggestions
Ideal Pairings and Sides
This dish pairs well with a simple green salad. A light vinaigrette complements the rich pasta. You can also serve crusty bread on the side. It is perfect for dipping into the creamy sauce.
Creative Serving Ideas
For a fun twist, serve the pasta in individual bowls. Top each bowl with extra cheese and a basil leaf. You can also add a drizzle of olive oil for a finishing touch. This makes the dish feel special and inviting.

Variations
Different Types of Sausage
You can choose between mild and spicy sausage for your dish. Mild sausage brings a subtle flavor. It is great for kids or those who prefer less heat. Spicy sausage adds a kick, giving your pasta a bold taste. You can also try chicken or turkey sausage as a leaner option. These alternatives still deliver great flavor while being lighter.
Substitutions for Dietary Needs
If you need gluten-free options, use gluten-free pasta. Many brands offer good choices that mimic traditional pasta. For those who avoid dairy, you can substitute heavy cream with coconut cream or cashew cream. These alternatives maintain a creamy texture without the dairy. Always check labels to ensure they fit your dietary needs.
Storage Info
How to Store Leftovers
To keep your One-Pot Tuscan Sausage Pasta fresh, let it cool first. Place it in an airtight container. Make sure to store it in the fridge. It will stay good for up to three days. You can also freeze it for up to three months. If you freeze it, use a freezer-safe container. This helps prevent freezer burn. Label your container with the date to track freshness.
Reheating Tips
When you want to enjoy your pasta again, you can reheat it in several ways. The best method is on the stove. Just add a splash of water or broth to a pan. Heat it over medium heat, stirring gently. This helps keep the pasta moist. You can also use the microwave. Place the pasta in a bowl and cover it with a damp paper towel. Heat it in short bursts, stirring in between. This method prevents dry spots. Always check that it’s hot all the way through before serving.
FAQs
Common Questions about One-Pot Tuscan Sausage Pasta
How long can I store this dish?
You can store One-Pot Tuscan Sausage Pasta in the fridge for up to three days. Use an airtight container to keep it fresh.
Can I make this dish ahead of time?
Yes, you can make this dish ahead of time. Cook it, then cool it down before storing. Reheat it gently when ready to serve.
What can I do if I don’t have certain ingredients?
If you lack an ingredient, feel free to swap it. For example, use any pasta shape you have. You can also use ground turkey instead of sausage.
Is it possible to make it vegetarian?
Yes, you can make it vegetarian. Replace the sausage with plant-based sausage or mushrooms. You can also add more vegetables for flavor.
You learned about making a tasty one-pot Tuscan sausage pasta. We covered key ingredients, cooking steps, and tips to make this dish great. You can choose different sausages or swap ingredients if needed. Don’t forget about storage and reheating to enjoy later. Experiment with flavors and share your taste with others. This dish is fun to make and easy to adapt. Enjoy your cooking adventure and delight in each bite!


![To make spicy black bean burgers, you need a few key ingredients: - 1 can (15 oz) black beans, drained and rinsed - 1/2 cup cooked quinoa - 1/2 cup breadcrumbs (gluten-free if needed) These ingredients form the base of the burger. The black beans provide protein and taste. Quinoa adds texture and nutrition. Breadcrumbs help bind the mix together. You can make these burgers your own with some fun additions: - Toppings Suggestions: avocado slices, lettuce, tomato, salsa, or spicy mayo - Spice Enhancements: jalapeño and garlic for extra kick Feel free to swap ingredients based on your taste. Want more heat? Add more jalapeño. Prefer a fresh crunch? Load up on lettuce and tomato. These spicy black bean burgers are not only tasty but also healthy: - Calories per serving: About 180 - Protein: 10g - Fats: 5g - Carbs: 28g This burger packs a punch of flavor while keeping a balanced profile. It is a great option for lunch or dinner. For the full recipe, check out the details above. To make the base, start by mashing the black beans. Use a fork or a potato masher. You want them mostly smooth, but keep some chunks for texture. This adds a nice bite to your burger. Next, add the additional ingredients to the bowl. Combine cooked quinoa, breadcrumbs, chopped red onion, minced jalapeño, minced garlic, cumin, smoked paprika, soy sauce, lime juice, salt, and pepper. Mix well until all ingredients are combined. If the mixture feels too wet, add a bit more breadcrumbs. This step helps hold the patties together. Now, it’s time to shape your burgers. Divide the mixture into equal portions, about four patties. Form each portion into a round shape. If you want them to hold together better, chill the patties in the fridge for 30 minutes. This makes them firmer. For cooking, heat a non-stick skillet or grill over medium heat. Drizzle a bit of olive oil to prevent sticking. Cook the patties for about 4 to 5 minutes on each side. You want them crispy and heated through. The smell will be amazing! When it’s time to serve, choose your toppings wisely. Avocado slices add creaminess, while lettuce and tomato add freshness. Salsa or spicy mayo can enhance the flavor even more. Pair your spicy black bean burgers with a side salad or some crispy fries. This makes for a delicious meal that’s both filling and healthy. You can find the full recipe above for more details on how to make these tasty burgers! To make your spicy black bean burgers great, focus on texture. Start by mashing the black beans well, but leave some chunks. This gives your burgers a nice bite. Chilling the patties is key. After you shape them, put them in the fridge for about 30 minutes. This helps them hold together better during cooking. Baking is a great alternative to frying. Preheat your oven to 375°F (190°C) and place the patties on a baking sheet. Bake for 20-25 minutes, flipping halfway. This method makes them crispy without extra oil. You can also adjust the flavors. Want more heat? Add more jalapeño or a dash of hot sauce. Feel free to mix in fresh herbs like cilantro for a fresh twist. Binding agents are crucial. If your mixture feels too wet, add more breadcrumbs. You can also use flaxseed meal or chia seeds mixed with water for a nice binder. Watch the moisture content closely. If you use canned beans, make sure to drain them well. Excess liquid can turn your patties into a mushy mess. For the full recipe of these tasty spicy black bean burgers, check out the recipe provided above. {{image_2}} You can change the taste of your spicy black bean burgers in fun ways. One option is the Southwest spicy black bean burger. For this, add corn, diced red pepper, and taco seasoning. This gives a bold, zesty flavor. Another tasty choice is the chipotle black bean burger. Mix in chipotle peppers in adobo sauce. This adds a smoky heat that spice lovers will enjoy. If you want a low-carb meal, try lettuce wraps. Instead of buns, use large lettuce leaves. They keep the burger juicy and fresh. You can also make black bean burger bowls. Simply place the patty on a bed of rice or quinoa. Top it with your favorite veggies and salsa for a hearty meal. Making these burgers fit your diet is easy. For gluten-free versions, use gluten-free breadcrumbs. This keeps the burger tasty without the gluten. If you’re vegan, skip the eggs and use mashed flax seeds instead. This keeps the burgers bound together while being plant-based. Whether you’re vegan or vegetarian, these burgers can fit your needs. You can enjoy them without missing out on flavor. For the full recipe, check here: [Full Recipe]. To keep uncooked patties fresh, place them in the fridge. Use an airtight container. They stay good in the fridge for about 2-3 days. If you want to keep them longer, freezing is a great option. Wrap each patty in plastic wrap or parchment paper. Then, put them in a freezer bag. They can last up to 3 months in the freezer. After cooking, let the black bean burgers cool down. Store them in an airtight container. This keeps them moist and flavorful. They can last in the fridge for about 4-5 days. When you want to eat them, simply reheat in a skillet or microwave. For the skillet, heat for about 3-4 minutes on medium. If using the microwave, heat for about 1-2 minutes, checking to avoid overheating. In the fridge, uncooked patties last for 2-3 days. Cooked black bean burgers stay fresh for 4-5 days. Always check for signs of spoilage. If you see mold or an off smell, it’s best to throw them away. Enjoy your spicy black bean burgers while they’re fresh! For the full recipe, check out [Full Recipe]. To make your spicy black bean burgers less mushy, focus on two main areas: ingredient adjustments and binding tips. - Ingredient adjustments: Use less black beans and add more breadcrumbs or quinoa. This helps absorb moisture and creates a firmer texture. - Tips for better binding: Chilling the patties for about 30 minutes in the fridge helps them hold their shape. You can also add a bit of ground flaxseed mixed with water as a natural binder. Yes, you can make these burgers ahead of time! Here are some best practices for meal prep: - Prep the patties: Form the patties and place them on a baking sheet lined with parchment paper. You can freeze them for later use. - Store in the fridge: If you plan to cook them within a day or two, simply cover the patties with plastic wrap and keep them in the fridge. If you want to substitute black beans, here are some great alternatives: - Alternative legumes: Use kidney beans, pinto beans, or chickpeas. Each will give a different taste and texture. - Other ingredients: You can also use lentils or cooked mushrooms for a unique flavor profile. These options provide good nutrition and maintain the burger's heartiness. For a full recipe, check out the Spicy Black Bean Burgers section above! You can create delicious spicy black bean burgers using simple, healthy ingredients. Start with black beans and quinoa, then customize them with tasty toppings. Follow clear steps to make perfect patties, and try different cooking methods. Remember the tips for texture and binding to avoid mushiness. Store uncooked or cooked burgers properly for later meals. In summary, these burgers are easy, versatile, and packed with flavor. Enjoy experimenting with your own twists!](https://dailydishly.com/wp-content/uploads/2025/06/fb468978-fb40-4fbf-9ebe-b248e91fb409-768x768.webp)

![- 1 pound large shrimp, peeled and deveined - 8 ounces linguine or spaghetti - 4 tablespoons unsalted butter - 4 cloves garlic, minced - 1 teaspoon red pepper flakes (adjust to taste) - 1 lemon, zested and juiced - 1/4 cup fresh parsley, chopped - Salt and black pepper to taste - 1/2 cup chicken broth or vegetable broth - Grated Parmesan cheese for serving (optional) Gather these ingredients for your Easy Shrimp Scampi. Start with fresh shrimp. Look for shrimp that is firm and has a nice pink color. Choose linguine or spaghetti for the pasta. Both work well in this dish. Unsalted butter adds a rich flavor to the sauce. You will need garlic for a fragrant base. Red pepper flakes give a nice kick. Adjust them to your taste. Use a fresh lemon to bring brightness to the dish. Zest it carefully before juicing for the best flavor. Chop some fresh parsley for garnish. It adds color and freshness to your plate. Season with salt and black pepper to enhance the flavors. Broth adds depth to the sauce. Choose chicken or vegetable broth based on your preference. You can add grated Parmesan cheese on top if you like. It melts beautifully and adds creaminess. This simple list of ingredients makes a delightful meal that is quick and easy. For the full recipe, check [Full Recipe]. Enjoy cooking! - Bring a large pot of salted water to a boil. - Cook linguine or spaghetti until al dente. - Drain and reserve some pasta water. Cooking the pasta is simple. First, add a good amount of salt to the water. This adds flavor. Then, drop in the pasta. Stir it occasionally so it doesn’t stick. The package will tell you how long to cook it. You want it to be firm, but not hard. This is called al dente. Once done, drain the pasta. Don’t forget to save some water for later! - Melt butter in a large skillet over medium heat. - Add shrimp, seasoning them with salt, pepper, and red pepper flakes. - Cook until shrimp turn pink and opaque. Now, let’s cook the shrimp. In a big skillet, melt some butter over medium heat. This adds a nice flavor. Add the shrimp and sprinkle salt, pepper, and red pepper flakes on top. These spices give it a kick! Cook for about 2 to 3 minutes. You will see the shrimp change color. They should look pink and opaque when they are ready. This means they are cooked just right! - Sauté garlic in the same skillet until fragrant. - Stir in chicken or vegetable broth, lemon juice, and zest. - Allow sauce to simmer for thickening. Next, we make the tasty sauce. In the same skillet, add more butter and toss in minced garlic. Sauté the garlic for 1 to 2 minutes. You want it to smell great but not burn. Then, pour in the broth, lemon juice, and lemon zest. Stir it well and let it simmer for about 3 to 4 minutes. This helps thicken the sauce and blend all the flavors. - Return shrimp to skillet along with cooked pasta and parsley. - Mix well, using reserved pasta water as needed for consistency. It’s time to combine everything! Add the cooked shrimp back into the skillet. Next, add the pasta and some chopped parsley. Mix it all together. If the sauce is too thick, add some of that reserved pasta water. This will help the sauce coat the pasta nicely. - Adjust seasoning as desired. - Serve hot with optional grated Parmesan cheese. Finally, taste your dish. You can add more salt, pepper, or red pepper flakes if needed. Serve it hot in a pasta bowl. If you like, sprinkle some grated Parmesan cheese on top. It makes the dish even better! For a nice touch, add extra parsley and a lemon wedge on the side. Enjoy your tasty shrimp scampi! For the full recipe, check out the detailed instructions provided earlier. To cook shrimp just right, keep an eye on the timing. Cook shrimp over medium heat for 2-3 minutes. You want them to turn pink and opaque. Too long, and they get rubbery. Avoid high heat, as it cooks them too fast. - Timing: 2-3 minutes is usually perfect. - Temperature: Use medium heat to keep them tender. To prevent rubbery shrimp, don't crowd the pan. If you add too many, they steam instead of sauté. Cook in batches if needed. You can switch up the sauce to match your taste. Want it creamier? Add a splash of cream or a dollop of mascarpone. If you like more zing, add extra lemon juice or zest. - Modifications: Try cream for richness or add extra lemon for brightness. - Spice Levels: Adjust red pepper flakes to make it milder or hotter based on your preference. Feel free to mix in herbs like basil or oregano for extra flavor. Garnishing makes your dish pop! Fresh parsley adds a nice green touch. A lemon wedge on the side looks great too. - Garnishing Tips: Use parsley and lemon for color. - Serving Dishes: A large pasta bowl makes it look fancy. Consider serving in individual bowls for a more personal touch. It makes every plate feel special. For the full recipe, check out the [Full Recipe]. {{image_2}} If you want to change things up, try using chicken or tofu instead of shrimp. Chicken cooks well in this dish and has a nice flavor. Tofu is great for a vegetarian option and soaks up the sauce well. You can also use different types of pasta, like penne or fettuccine, to give the dish a new twist. Choose the pasta you love most! To boost the taste, consider adding more herbs or spices. Fresh basil or thyme can add a nice touch. If you like some crunch, try adding bell peppers or spinach. These veggies not only add flavor but also pack in extra nutrition. A handful of cherry tomatoes can also brighten the dish and add a pop of color. Making a gluten-free version is easy. Just swap out regular pasta for gluten-free pasta. Many brands offer tasty options that work well. For a dairy-free alternative, you can skip the butter and use olive oil instead. This keeps the dish light while still being delicious. You can also leave out the Parmesan cheese for a completely dairy-free meal. To store leftover shrimp scampi, place it in an airtight container. Use a container that seals well to keep it fresh. You can keep it in the fridge for up to three days. After that, the shrimp may lose its taste and texture. Always make sure the dish cools down before sealing it. You can freeze shrimp scampi if you want to save it for later. First, let it cool completely. Then, place it in a freezer-safe container or bag. Remove as much air as possible to prevent freezer burn. It can last for up to three months in the freezer. When you’re ready to eat, thaw it in the fridge overnight before reheating. For safe reheating, use the microwave or a skillet. If you choose the microwave, heat it in short bursts to avoid overcooking the shrimp. Stir it often to warm it evenly. If you prefer a skillet, add a splash of broth or water to keep it moist. Heat over low to medium heat, stirring gently. This helps restore freshness and flavor. For the full recipe, check out the [Full Recipe]. The best shrimp for scampi are large shrimp, usually labeled as "U15" or "16-20." These sizes mean there are 15 or fewer shrimp per pound. They cook quickly and give a nice bite. Fresh shrimp have a sweet taste and bounce when you press them. If you can't find fresh shrimp, frozen shrimp work well too. Just make sure they are peeled and deveined. Yes, you can make shrimp scampi ahead of time. Cook the shrimp and sauce, then store them separately from the pasta. Let them cool first. Use airtight containers to keep them fresh. You can store them in the fridge for up to two days. When ready to eat, simply reheat the shrimp and sauce in a skillet. Cook the pasta fresh for the best taste. To turn up the heat, add more red pepper flakes. You can also include fresh chili peppers or hot sauce. Another option is to add a pinch of cayenne pepper while cooking. Start with a little, then taste as you go. This way, you can find the right level of spice for your taste. Shrimp scampi can be a healthy option. Shrimp are low in calories and high in protein. They also contain omega-3 fatty acids, which are good for your heart. The dish does have butter, which adds fat, but you can use less or substitute it with olive oil. Adding fresh herbs and lemon juice boosts flavor without many calories. Enjoying this dish in moderation can be part of a balanced diet. This blog post covered everything you need for perfect shrimp scampi. We discussed key ingredients, step-by-step instructions, and helpful tips for cooking the dish. You can customize it based on your taste and enjoy leftovers. Remember, whether you're using shrimp, chicken, or tofu, this dish is versatile. By following these guidelines, you can create a delightful meal that impresses everyone. Try experimenting with flavors and enjoy the delicious results. Happy cooking!](https://dailydishly.com/wp-content/uploads/2025/07/c22490f0-4aee-43d3-b983-e60dbbcdc7c4-768x768.webp)


