Looking for a fresh and easy meal prep idea? Orzo Greek Salad Jars are the answer! With vibrant flavors and bright colors, these jars make lunch a joy. I’ll guide you through the simple steps to create them, from choosing ingredients to storing them for later. Get ready to make your week easier and tastier with this fun and healthy salad in a jar! Let's dive in!
Why I Love This Recipe
- Fresh and Vibrant: This salad is packed with fresh vegetables and herbs, making it a colorful and nutritious option for any meal.
- Easy to Prepare: With straightforward instructions and quick prep time, this recipe is perfect for busy weeknights or meal prepping.
- Flavorful Dressing: The combination of olive oil, red wine vinegar, and oregano adds a delicious Mediterranean flair that elevates the dish.
- Versatile and Portable: These salad jars are great for picnics, lunches, or as a side dish, making them a convenient choice for on-the-go meals.
Ingredients
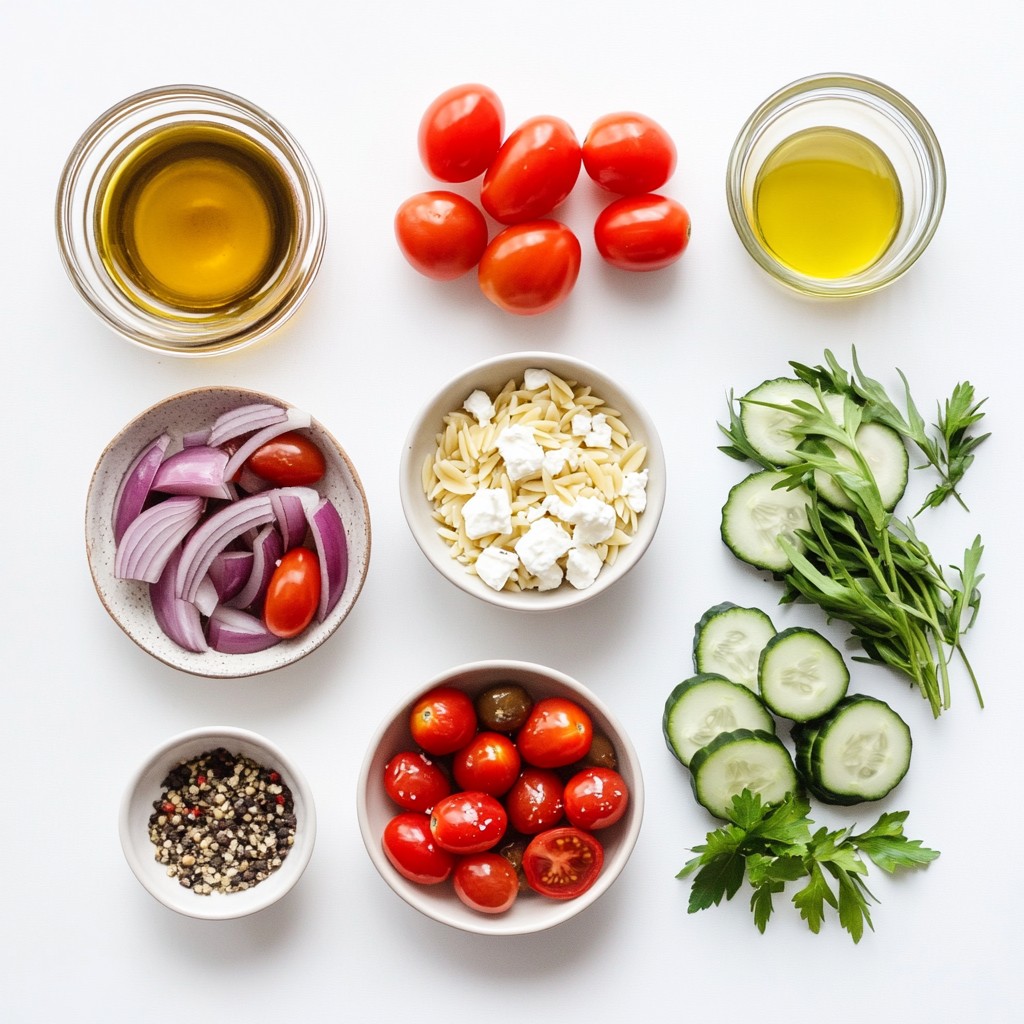
Complete List of Ingredients for Orzo Greek Salad Jars
- 1 cup orzo pasta
- 1 1/2 cups cherry tomatoes, halved
- 1 cucumber, diced
- 1/2 red onion, thinly sliced
- 1 cup Kalamata olives, pitted and halved
- 1 cup feta cheese, crumbled
- 1/4 cup olive oil
- 2 tablespoons red wine vinegar
- 1 tablespoon dried oregano
- Salt and pepper to taste
- Fresh parsley, for garnish
Quantity and Measurement Tips
When measuring orzo, use a dry measuring cup. Fill it to the top, then level it off. For cherry tomatoes, a cup means about 10-15 tomatoes, depending on size. Dice the cucumber evenly for a nice look. Use a scale if you want precise measurements, especially for the feta cheese. A kitchen scale is handy for this!
Ingredient Substitutions
If you don’t have orzo, you can use quinoa or couscous. For a gluten-free version, quinoa works great. Swap Kalamata olives for green olives if you prefer a milder taste. If you want a lighter cheese, try goat cheese instead of feta. You can also use lemon juice instead of red wine vinegar for a fresh twist. Fresh herbs like dill or mint can replace oregano for different flavors.
Step-by-Step Instructions
Cooking the Orzo Pasta
To start, cook the orzo pasta. Boil water in a pot and add a pinch of salt. Add one cup of orzo pasta and stir. Follow the package instructions for cooking time, usually around 8 to 10 minutes. Once done, drain the pasta in a colander. Rinse it under cold water to stop cooking. This keeps the orzo firm. Set it aside to cool while you prep the rest of the salad.
Preparing the Salad Mix
Next, grab a large mixing bowl. In this bowl, combine the salad ingredients. Add 1 1/2 cups of halved cherry tomatoes, one diced cucumber, and 1/2 of a thinly sliced red onion. Toss in one cup of pitted and halved Kalamata olives. Lastly, crumble one cup of feta cheese over the top. This mix creates a fresh, colorful base for our salad jars.
Making the Dressing
Now, let’s whip up a simple dressing. In a small bowl, whisk together 1/4 cup of olive oil and 2 tablespoons of red wine vinegar. Add one tablespoon of dried oregano for flavor. Season with salt and pepper to taste. Whisk until the dressing is well blended. This step adds a zesty kick to your salad.
Assembling the Jars
It’s time to build your salad jars. Start with the orzo at the bottom. This keeps it stable. Layer the salad mix next, followed by the dressing. Finish with the cherry tomatoes on top. This order prevents the tomatoes from getting squished. Seal the jars tightly and store them in the fridge. They taste even better if made a day ahead. When ready to eat, just grab a jar, and enjoy!
Tips & Tricks
How to Perfectly Cook Orzo
To cook orzo, start by boiling water in a pot. Add salt to the water for flavor. Then, add the orzo pasta. Boil it for about 8 to 10 minutes. Stir it occasionally to prevent sticking. Once it’s tender, drain the orzo in a colander. Rinse it under cold water to stop the cooking. This step keeps the orzo firm and bright.
Tips for Layering Ingredients in the Jars
Layering is key to a great jar salad. Start with the heaviest ingredients first. Place the orzo at the bottom. This weight keeps lighter items from getting squished. Next, add the cucumbers and red onions. They hold up well and add crunch. Follow with Kalamata olives and feta cheese. Finally, top with cherry tomatoes. This order keeps everything fresh and tasty.
Ideas for Garnishing and Presentation
Presentation makes your salad jars shine. Add a sprig of fresh parsley on top for color. You can also drizzle a little extra olive oil before serving. This adds shine and flavor. For fun, include a small fork or spoon with each jar. This makes it easy for friends to dig in. A simple label with the date or a fun note adds a personal touch.
Pro Tips
- Cook Orzo Al Dente: Be sure to cook the orzo just until al dente, as it will continue to absorb moisture from the dressing and vegetables while it sits.
- Use Fresh Ingredients: Fresh, high-quality ingredients will elevate the flavors of your salad. Opt for ripe tomatoes and crisp cucumbers for the best taste.
- Layering for Freshness: When assembling the jars, layer the ingredients in the order of their weight to prevent the lighter ingredients from getting crushed.
- Flavor Development: For optimal flavor, prepare the salad jars a day in advance to allow the flavors to meld together beautifully.
Variations
Additional Ingredients to Consider
You can add many tasty items to your Orzo Greek Salad Jars. Some great options include:
- Bell peppers, diced for crunch
- Avocado, creamy and rich
- Artichoke hearts, for extra flavor
- Chickpeas, for a protein boost
These additions make the salad more colorful and full of flavor. Feel free to mix and match based on what you like.
Dietary Modifications (vegan, gluten-free options)
To make this salad vegan, skip the feta cheese. You can replace it with:
- Vegan feta or
- Nutritional yeast for a cheesy taste
For a gluten-free version, swap the orzo for gluten-free pasta. Look for small pasta shapes to keep the texture similar.
Flavor Profile Adjustments
You can change the flavor of your salad with a few small tweaks. Try these ideas:
- Add lemon juice for a bright, zesty kick
- Use fresh herbs like dill or mint for more aroma
- Switch the red wine vinegar for balsamic vinegar for a sweeter taste
Each change brings a new twist to this classic dish. Experiment and find your favorite blend.
Storage Info
Best Practices for Storing Orzo Greek Salad Jars
To keep your Orzo Greek Salad Jars fresh, use clean, dry jars. Layer the ingredients carefully, starting with orzo and ending with tomatoes. This order helps maintain texture. Seal the jars tightly to lock in flavor. Store them in the fridge for best results.
Shelf Life and Freshness Tips
These jars last about four to five days in the fridge. The flavors improve as they sit, so making them a day ahead works well. Check for any changes in smell or color before eating. If you notice anything off, it’s best to toss it.
How to Reheat or Refresh Before Serving
If you want to enjoy the salad warm, you can reheat the orzo separately. Avoid reheating the whole jar, as it can make the veggies mushy. To refresh before serving, add a splash of olive oil and a squeeze of lemon juice. This adds freshness and brightens the flavors.
FAQs
What is Orzo Pasta?
Orzo is a small pasta shaped like rice. It cooks quickly and has a fun texture. You can use orzo in salads, soups, or as a side dish. It absorbs flavors well, making it a great choice for salads like Orzo Greek Salad Jars.
Can I make Orzo Greek Salad Jars ahead of time?
Yes, you can make Orzo Greek Salad Jars ahead of time. In fact, making them a day before can help the flavors blend better. Just layer the ingredients in jars and store them in the fridge. This makes meal prep easy and stress-free.
How long can I store Orzo Greek Salad Jars in the fridge?
You can store these jars in the fridge for up to five days. Just make sure the jars are sealed tightly. If you notice any changes in smell or color, it is best to toss them out. Freshness is key to enjoying this salad.
What other dressing options work with this salad?
You can try different dressings for your Orzo Greek Salad Jars. A lemon vinaigrette adds a bright taste. You could also use a creamy dressing for a richer flavor. Experimenting can help you find your favorite dressing that suits your taste.
Orzo Greek salad jars are fresh, tasty, and easy to make. We covered the full list of ingredients, plus tips for cooking orzo and making the perfect dressing. I shared ways to layer the salad and ideas for using different ingredients. You can also find storage tips to keep your jars fresh.
Try these jars for quick meals or gatherings. Explore different options to make them your own. With a bit of creativity, you can enjoy this dish anytime. Happy cooking!