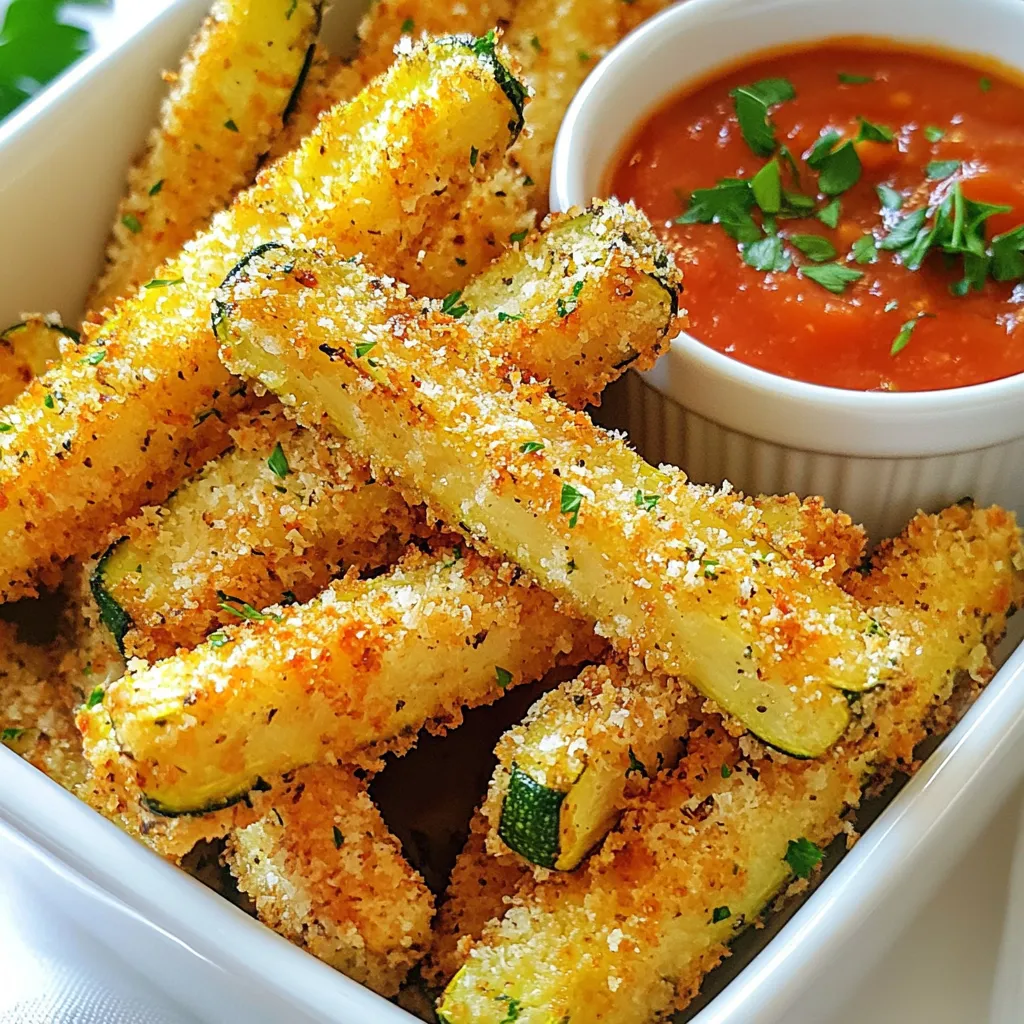
Looking for a fun way to enjoy more veggies? My Parmesan Crusted Zucchini Fries are the answer. They are crunchy, tasty, and super easy to make. With just a few basic ingredients, you can whip up a delicious snack or side dish in no time. Get ready to impress your family and friends with this flavorful twist on a classic! Let’s dive into the simple steps and tips for your new favorite treat.
Why I Love This Recipe
- Healthy Twist: These zucchini fries offer a healthier alternative to traditional fries, packed with nutrients while still being deliciously satisfying.
- Easy Preparation: With just a few simple steps, you can whip up these fries in no time, making them a perfect snack or side dish for busy days.
- Versatile Flavor: The combination of Parmesan and spices creates a savory flavor that pairs well with a variety of dips and main dishes.
- Family Favorite: Kids and adults alike love these crispy zucchini fries, making them a hit for family meals or gatherings.
Ingredients
Main Ingredients List
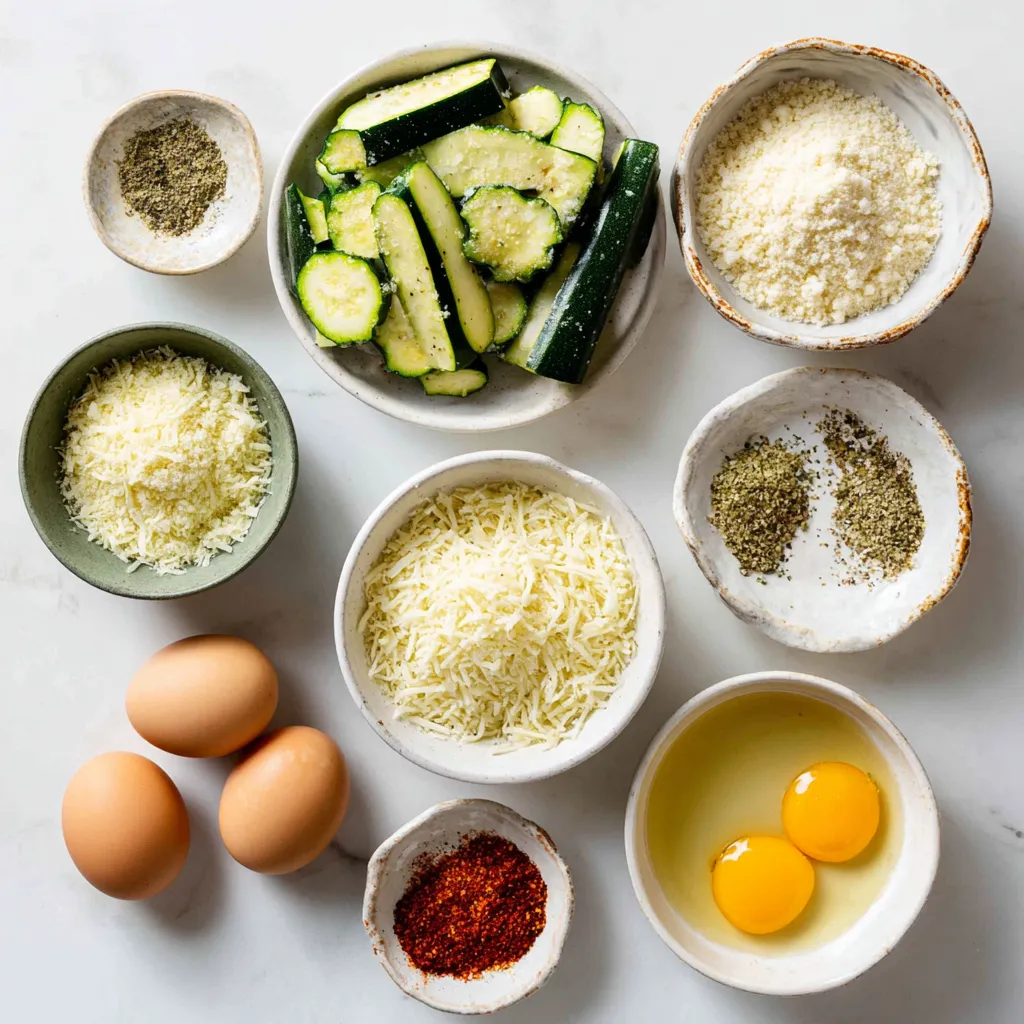
– 2 medium zucchinis, cut into strips
– 1 cup grated Parmesan cheese
– 1 cup breadcrumbs (panko for extra crunch)
– 2 large eggs, beaten
Seasoning Ingredients
– 1 teaspoon garlic powder
– 1 teaspoon dried oregano
– 1/2 teaspoon paprika
– Salt and pepper to taste
Cooking Ingredients
– Olive oil spray for cooking
To make Parmesan crusted zucchini fries, you need simple, fresh ingredients. First, grab your zucchinis. They should be firm, not soft. The Parmesan cheese gives the fries a rich flavor. I suggest using freshly grated cheese for the best taste. Next, you’ll need breadcrumbs. I recommend panko for extra crunch.
The eggs help the coating stick to the zucchini. Beat them well before you start dipping.
For seasoning, garlic powder adds a nice kick. Dried oregano brings a hint of earthiness, while paprika gives a touch of warmth. Do not forget salt and pepper to enhance the flavors.
Finally, olive oil spray helps the fries crisp up in the oven. With these ingredients, you’re ready to create a tasty snack that everyone will love!
Step-by-Step Instructions
Preparation and Preheating
– Preheat Oven: First, set your oven to 425°F (220°C). This hot temperature helps the fries get crispy.
– Prepare Baking Sheet: Line your baking sheet with parchment paper. This makes for easy clean-up.
Mixing the Coatings
– Combine Parmesan and Breadcrumbs: In a shallow bowl, mix 1 cup of grated Parmesan cheese with 1 cup of breadcrumbs. Add 1 teaspoon of garlic powder, 1 teaspoon of dried oregano, and 1/2 teaspoon of paprika. Season with salt and pepper. Stir until combined.
– Beat the Eggs: In another shallow bowl, crack 2 large eggs. Beat them well until they are mixed.
Dipping and Coating
– Dip Zucchini in Eggs: Take each zucchini strip and dip it into the beaten eggs. Let the extra egg drip off.
– Coat in Parmesan-Breadcrumb Mixture: Next, roll the zucchini strip in the Parmesan-breadcrumb mix. Press gently so the coating sticks well.
Baking
– Space Zucchini on Baking Sheet: Place the coated zucchini fries on your baking sheet. Make sure to leave space between each fry for even cooking.
– Spray with Olive Oil: Lightly spray the tops of the zucchini fries with olive oil. This helps them crisp up in the oven.
– Bake and Flip: Bake the fries for 20-25 minutes. Flip them halfway through to ensure they cook evenly. Look for a golden brown color to know they are ready.
These steps will help you enjoy crunchy, tasty Parmesan crusted zucchini fries in no time.
Tips & Tricks
Achieving Perfect Crispiness
– Use Panko Breadcrumbs: Panko breadcrumbs are lighter and crispier than regular ones. They create a great crunchy texture. This is key to making your zucchini fries stand out.
– Olive Oil Application: Spray olive oil on the fries before baking. This helps them crisp up nicely. A light coating of oil works wonders for that golden finish.
Serving Suggestions
– Presentation Ideas: Serve your zucchini fries in a small basket or on a colorful platter. This makes them look appealing and fun. You can also garnish with fresh parsley for a nice touch.
– Dipping Sauces: Pair your fries with marinara sauce or garlic aioli. These sauces add flavor and make the fries even more enjoyable. You can try making your own sauce for a twist.
Timing and Temperature
– Baking Duration: Bake the fries for about 20-25 minutes. Flipping them halfway through ensures they cook evenly. Look for a golden brown color to know they’re done.
– Oven Temperature Tips: Set your oven to 425°F (220°C) to get that perfect crunch. This high temperature helps to achieve a crispy exterior while keeping the inside tender.
Pro Tips
- Choose Fresh Zucchini: Fresh, firm zucchinis will yield the best texture and flavor for your fries. Look for ones that are not too large, as they can be more watery.
- Experiment with Seasoning: Feel free to mix in your favorite herbs and spices into the breadcrumb mixture for a personalized flavor. Try adding Italian seasoning or crushed red pepper for a kick!
- Use Parchment Paper: Lining your baking sheet with parchment paper not only prevents sticking but also ensures that the fries crisp up nicely without burning.
- Serve Immediately: For the best eating experience, serve the zucchini fries right out of the oven while they are still hot and crispy. They tend to lose their crunch if left out too long.
Variations
Flavor Additions
Spices and Herbs
You can spice up your fries with different herbs and spices. Try adding cayenne for heat or thyme for a fresh taste. You can also use Italian seasoning for a nice blend. Simply mix these into the Parmesan and breadcrumb mixture. This will give your fries a new twist.
Cheese Variations
Swap Parmesan for other cheeses if you want. Try using Asiago or Pecorino for a sharper flavor. You can also mix in some mozzarella for a cheesy pull. Just remember to adjust the amount based on how strong you want the flavor.
Techniques
Air Fryer Method
If you want a quicker method, use an air fryer. Preheat it to 400°F (200°C). Follow the same steps for coating the zucchini. Place the fries in the air fryer basket in a single layer. Cook for about 10-12 minutes, flipping halfway for even crispiness. This method reduces oil and keeps them light.
Grilling Option
For a smoky flavor, try grilling the zucchini fries. Coat them as you normally would. Place them on a hot grill over medium heat. Grill for about 5-7 minutes per side. Watch them closely to avoid burning. This method adds a nice char and great taste.
Ingredient Swaps
Gluten-Free Options
You can make this dish gluten-free easily. Just switch the breadcrumbs with gluten-free panko. This keeps the crunch while being safe for those who avoid gluten. Always check labels to ensure they meet your needs.
Vegan Alternatives
To make this recipe vegan, replace eggs with a mixture of ground flaxseed and water. Use 1 tablespoon of flaxseed with 3 tablespoons of water to replace one egg. For cheese, try nutritional yeast mixed with breadcrumbs. This gives you a cheesy flavor without dairy.
Storage Info
Storing Leftovers
– Container Recommendations: Store your leftover zucchini fries in an airtight container. This helps keep them fresh. Glass or plastic containers with tight lids work well. You can also use a resealable plastic bag if you remove as much air as possible.
– Best Practices for Freshness: Place a paper towel at the bottom of the container. This absorbs moisture and keeps the fries crisp. Store them in the fridge for up to three days. Make sure they cool down before sealing them up.
Reheating Instructions
– Oven vs Microwave: The oven is the best choice for reheating. Preheat it to 400°F (200°C) and bake the fries for about 10 minutes. This restores their crunch. If you use a microwave, the fries can turn soggy. If you must use the microwave, heat them for only 30 seconds.
– Tips for Maintaining Crispiness: When reheating in the oven, place the fries on a baking sheet. This allows air to circulate around them. Avoid covering them with foil, as this traps steam. A light spray of olive oil before reheating can help them crisp up again.
FAQs
How do I make zucchini fries crispy?
To make zucchini fries crispy, focus on two main techniques: coating and baking.
– Techniques for Crispiness: Use panko breadcrumbs for a crunchier texture. Also, ensure you space the fries on the baking sheet. This helps hot air flow around them, making them crisp.
– Importance of Coating: The coating is key. Mix grated Parmesan cheese with breadcrumbs. This combo adds flavor and texture. Make sure to press the mixture onto the zucchini strips. This ensures they stick well and get crispy when baked.
Can I make Parmesan Crusted Zucchini Fries ahead of time?
Yes, you can prepare zucchini fries ahead of time.
– Prep Tips for Future Cooking: Cut and coat the zucchini strips. Place them on a baking sheet in the fridge. This keeps them fresh until you’re ready to bake.
– Freezing Options: You can also freeze the coated fries. Lay them flat on a tray to freeze. Once frozen, transfer them to a bag. To cook, bake them straight from the freezer. Just add a few extra minutes to the baking time.
What dipping sauces pair well with zucchini fries?
Zucchini fries taste great with many dips.
– Best Dipping Sauce Suggestions: Marinara sauce is a classic choice. Garlic aioli also adds a nice touch. You can even try ranch dressing for a creamy option.
– Homemade Sauce Recipes: To make a simple garlic aioli, mix mayonnaise with minced garlic and lemon juice. For a quick marinara, heat canned tomatoes with garlic and Italian herbs. Both sauces enhance the flavor of your fries.
This blog post covers how to make delicious zucchini fries using simple ingredients. We looked at main ingredients, helpful tips, and tasty variations. You can easily achieve crispiness and explore different flavor options. Plus, I shared how to store and reheat your fries for later. Overall, these fries are a fun and tasty snack. Whether for a party or a quiet night in, they will impress everyone. Enjoy making these zucchini fries your wa


