Peach Streusel Muffins Delightful and Easy Treat Recipe
![- 1 ½ cups all-purpose flour - 1 tsp baking powder - ½ tsp baking soda - ¼ tsp salt - ½ cup granulated sugar - ¼ cup brown sugar, packed - 1/3 cup unsalted butter, melted - 1 large egg - 1 tsp vanilla extract - 1/2 cup buttermilk - 1 ½ cups fresh peaches, peeled and diced - 1/3 cup rolled oats - 1 tsp cinnamon Each ingredient plays a key role in making Peach Streusel Muffins perfect. The all-purpose flour gives the muffins their structure. Baking powder and baking soda help them rise and become fluffy. A touch of salt balances the sweetness. In the wet ingredients, the sugars add sweetness and flavor. The melted butter brings moisture and richness. The egg binds the mixture and helps with rise. Vanilla extract adds a lovely aroma, while buttermilk gives a soft texture and enhances flavor. The filling and topping are where the magic happens. Fresh peaches add juiciness and sweetness. Rolled oats in the topping create crunch. Cinnamon adds warmth and spice, making each bite delightful. Check out the full recipe for easy steps to create these tasty muffins! 1. Preheat your oven to 375°F (190°C). Line a muffin tin with liners or lightly grease it. 2. In a medium bowl, whisk together the all-purpose flour, baking powder, baking soda, and salt. Set this bowl aside for now. 1. In a large bowl, mix together the granulated sugar, brown sugar, and melted butter until well combined. 2. Beat in the egg and vanilla extract until the mixture is fluffy and smooth. 1. Add the buttermilk to the wet mixture and stir until combined. 2. Gradually add the dry ingredients to the wet mixture. Fold gently, just until combined; do not overmix. 3. Carefully fold in the diced peaches, spreading them evenly throughout the batter. 1. In a small bowl, mix the rolled oats, cinnamon, and a pinch of sugar for the streusel topping. 2. Scoop the muffin batter into the prepared muffin tin, filling each liner about two-thirds full. 3. Generously sprinkle the streusel topping over each muffin. 1. Bake the muffins for 18-20 minutes. Check for doneness by inserting a toothpick; it should come out clean. 2. Allow the muffins to cool in the pan for about 5 minutes. Then, transfer them to a wire rack to cool completely before serving. These Peach Streusel Muffins are a delight! For a full recipe, check the earlier section. Enjoy your time in the kitchen! - Ensure ingredients are at room temperature. This helps them mix well. - Do not overmix the batter. Gently fold until just combined for light muffins. - Serve warm with powdered sugar. It adds a sweet touch to each bite. - Garnish with a slice of fresh peach. This makes your muffins look even better. - Consider adding a dash of nutmeg. It gives a warm, spicy flavor to the muffins. - Use different fruits for variation. Blueberries or raspberries work great too! For the full recipe, check [Full Recipe]. These tips will help you create the best peach streusel muffins! {{image_2}} You can switch up the fruit in these muffins! Instead of peaches, use blueberries or raspberries. Both fruits add a burst of flavor. If you want more texture, try adding chopped nuts. Walnuts or pecans work great for extra crunch. If you're gluten-free, you can still enjoy these muffins. Use almond flour or oat flour instead of regular flour. For those avoiding dairy, simply swap in dairy-free butter and milk. This way, everyone can enjoy a tasty treat! Make mini muffins for a fun, bite-sized version. They are perfect for kids or snacks. You could also bake this batter in a round pan to create a cake. Just adjust the baking time, as it may need a bit longer. Keep your muffins at room temperature. Place them in an airtight container. This method keeps them soft for a few days. Enjoy them fresh for breakfast or a snack. You can freeze the muffins for up to three months. Wrap each muffin in plastic wrap. Then, place them in a freezer bag. When you want one, reheat it directly from the freezer. Pop it in the oven at 350°F (175°C) for about 10 minutes. They taste almost fresh-baked! Use parchment paper to line your container. This step helps maintain moisture in your muffins. Also, avoid stacking warm muffins. Stacking can make them soggy. Let them cool before storing. These simple tips keep your Peach Streusel Muffins delightful! For the full recipe, check the earlier section. To check if your muffins are done, insert a toothpick into the center. If it comes out clean, your muffins are ready. This simple test saves you from underbaking or overbaking. Trust me, it works every time! Yes, you can use canned peaches instead of fresh ones. Just make sure to drain them well. This keeps your muffins from getting too soggy. Canned peaches can still taste great in your muffins. To stop muffins from sticking to the liners, use high-quality liners. You can also grease the liners lightly with butter or oil. This little step makes a big difference for perfect muffins. If you have leftover streusel topping, store it in the fridge. You can use it for future baking or sprinkle it over yogurt. It adds a nice crunch and sweetness. Don't waste it! Making peach muffins is easy and fun. We covered all the key steps, from mixing the dry and wet ingredients to baking and storing the muffins. You can adjust flavors and fruits based on your taste. Remember the tips for better results, like using room temperature ingredients and avoiding overmixing. With this guide, you can create a delicious treat for any occasion. Enjoy your baking journey and share these for smiles!](https://dailydishly.com/wp-content/uploads/2025/07/b62cebd8-d26b-48c0-b1ab-fab18f37a599.webp)
Get ready to bake something delicious! These Peach Streusel Muffins are easy, fun, and packed with peach flavor. In just a few steps, you’ll whip up warm, fluffy muffins topped with a sweet, crunchy streusel. Perfect for breakfast or a snack, this treat will brighten your day. Follow my simple recipe and impress your family or guests. Let’s dive into the world of peachy goodness together!
Ingredients
Dry Ingredients
– 1 ½ cups all-purpose flour
– 1 tsp baking powder
– ½ tsp baking soda
– ¼ tsp salt
Wet Ingredients
– ½ cup granulated sugar
– ¼ cup brown sugar, packed
– 1/3 cup unsalted butter, melted
– 1 large egg
– 1 tsp vanilla extract
– 1/2 cup buttermilk
Filling and Topping
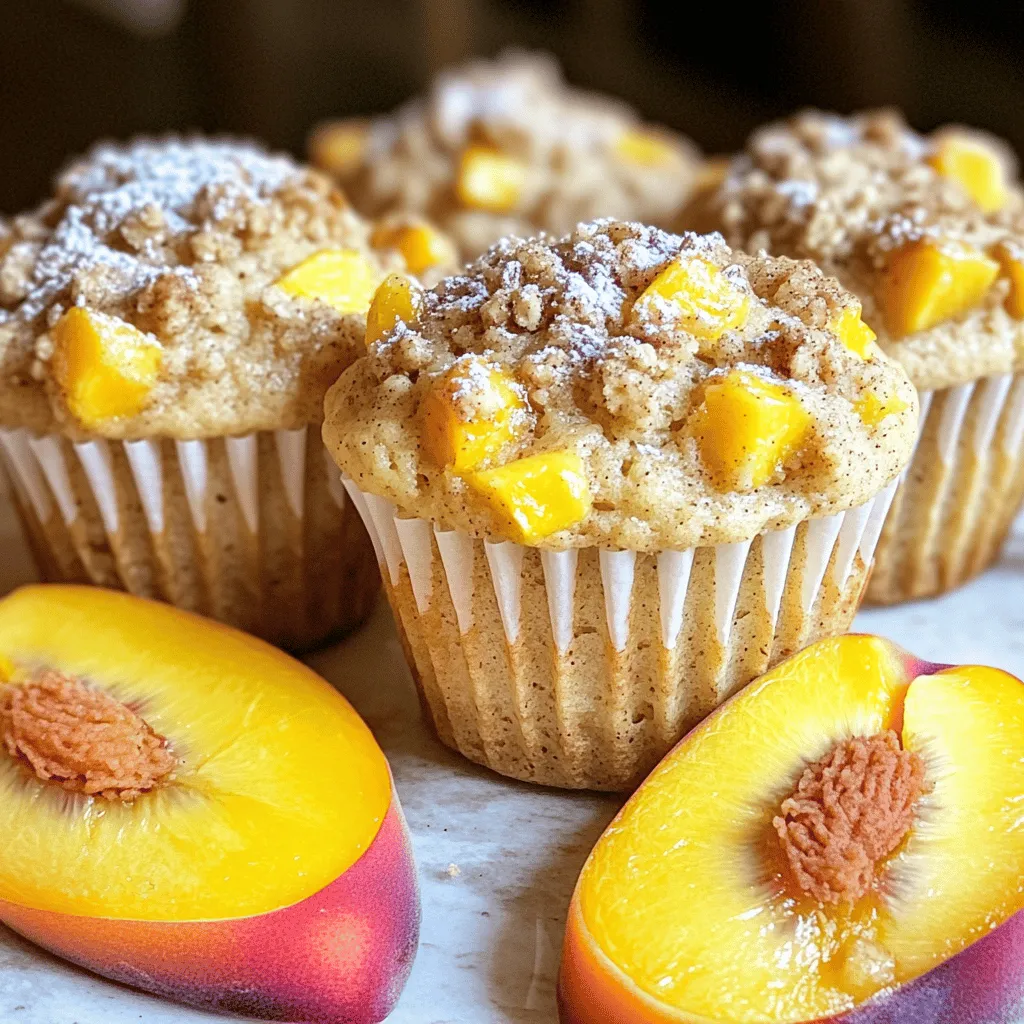
– 1 ½ cups fresh peaches, peeled and diced
– 1/3 cup rolled oats
– 1 tsp cinnamon
Each ingredient plays a key role in making Peach Streusel Muffins perfect. The all-purpose flour gives the muffins their structure. Baking powder and baking soda help them rise and become fluffy. A touch of salt balances the sweetness.
In the wet ingredients, the sugars add sweetness and flavor. The melted butter brings moisture and richness. The egg binds the mixture and helps with rise. Vanilla extract adds a lovely aroma, while buttermilk gives a soft texture and enhances flavor.
The filling and topping are where the magic happens. Fresh peaches add juiciness and sweetness. Rolled oats in the topping create crunch. Cinnamon adds warmth and spice, making each bite delightful.
Step-by-Step Instructions
Preparation Steps
1. Preheat your oven to 375°F (190°C). Line a muffin tin with liners or lightly grease it.
2. In a medium bowl, whisk together the all-purpose flour, baking powder, baking soda, and salt. Set this bowl aside for now.
Combine Wet Ingredients
1. In a large bowl, mix together the granulated sugar, brown sugar, and melted butter until well combined.
2. Beat in the egg and vanilla extract until the mixture is fluffy and smooth.
Assemble Muffin Batter
1. Add the buttermilk to the wet mixture and stir until combined.
2. Gradually add the dry ingredients to the wet mixture. Fold gently, just until combined; do not overmix.
3. Carefully fold in the diced peaches, spreading them evenly throughout the batter.
Prepare Streusel Topping
1. In a small bowl, mix the rolled oats, cinnamon, and a pinch of sugar for the streusel topping.
2. Scoop the muffin batter into the prepared muffin tin, filling each liner about two-thirds full.
3. Generously sprinkle the streusel topping over each muffin.
Baking Process
1. Bake the muffins for 18-20 minutes. Check for doneness by inserting a toothpick; it should come out clean.
2. Allow the muffins to cool in the pan for about 5 minutes. Then, transfer them to a wire rack to cool completely before serving.
These Peach Streusel Muffins are a delight!Enjoy your time in the kitchen!
Tips & Tricks
Baking Tips
– Ensure ingredients are at room temperature. This helps them mix well.
– Do not overmix the batter. Gently fold until just combined for light muffins.
Presentation Tips
– Serve warm with powdered sugar. It adds a sweet touch to each bite.
– Garnish with a slice of fresh peach. This makes your muffins look even better.
Flavor Enhancements
– Consider adding a dash of nutmeg. It gives a warm, spicy flavor to the muffins.
– Use different fruits for variation. Blueberries or raspberries work great too!These tips will help you create the best peach streusel muffins!

Variations
Fruit Options
You can switch up the fruit in these muffins! Instead of peaches, use blueberries or raspberries. Both fruits add a burst of flavor. If you want more texture, try adding chopped nuts. Walnuts or pecans work great for extra crunch.
Dietary Adjustments
If you’re gluten-free, you can still enjoy these muffins. Use almond flour or oat flour instead of regular flour. For those avoiding dairy, simply swap in dairy-free butter and milk. This way, everyone can enjoy a tasty treat!
Alternative Cooking Methods
Make mini muffins for a fun, bite-sized version. They are perfect for kids or snacks. You could also bake this batter in a round pan to create a cake. Just adjust the baking time, as it may need a bit longer.
Storage Info
Short-term Storage
Keep your muffins at room temperature. Place them in an airtight container. This method keeps them soft for a few days. Enjoy them fresh for breakfast or a snack.
Long-term Storage
You can freeze the muffins for up to three months. Wrap each muffin in plastic wrap. Then, place them in a freezer bag. When you want one, reheat it directly from the freezer. Pop it in the oven at 350°F (175°C) for about 10 minutes. They taste almost fresh-baked!
Freshness Tips
Use parchment paper to line your container. This step helps maintain moisture in your muffins. Also, avoid stacking warm muffins. Stacking can make them soggy. Let them cool before storing. These simple tips keep your Peach Streusel Muffins delightful!
FAQs
How do I know when my muffins are done?
To check if your muffins are done, insert a toothpick into the center. If it comes out clean, your muffins are ready. This simple test saves you from underbaking or overbaking. Trust me, it works every time!
Can I substitute fresh peaches with canned ones?
Yes, you can use canned peaches instead of fresh ones. Just make sure to drain them well. This keeps your muffins from getting too soggy. Canned peaches can still taste great in your muffins.
How do I prevent muffins from sticking to the liners?
To stop muffins from sticking to the liners, use high-quality liners. You can also grease the liners lightly with butter or oil. This little step makes a big difference for perfect muffins.
What can I do with leftover streusel topping?
If you have leftover streusel topping, store it in the fridge. You can use it for future baking or sprinkle it over yogurt. It adds a nice crunch and sweetness. Don’t waste it!
Making peach muffins is easy and fun. We covered all the key steps, from mixing the dry and wet ingredients to baking and storing the muffins. You can adjust flavors and fruits based on your taste. Remember the tips for better results, like using room temperature ingredients and avoiding overmixing. With this guide, you can create a delicious treat for any occasion. Enjoy your baking journey and share these for smiles!
![- 1 ½ cups all-purpose flour - 1 tsp baking powder - ½ tsp baking soda - ¼ tsp salt - ½ cup granulated sugar - ¼ cup brown sugar, packed - 1/3 cup unsalted butter, melted - 1 large egg - 1 tsp vanilla extract - 1/2 cup buttermilk - 1 ½ cups fresh peaches, peeled and diced - 1/3 cup rolled oats - 1 tsp cinnamon Each ingredient plays a key role in making Peach Streusel Muffins perfect. The all-purpose flour gives the muffins their structure. Baking powder and baking soda help them rise and become fluffy. A touch of salt balances the sweetness. In the wet ingredients, the sugars add sweetness and flavor. The melted butter brings moisture and richness. The egg binds the mixture and helps with rise. Vanilla extract adds a lovely aroma, while buttermilk gives a soft texture and enhances flavor. The filling and topping are where the magic happens. Fresh peaches add juiciness and sweetness. Rolled oats in the topping create crunch. Cinnamon adds warmth and spice, making each bite delightful. Check out the full recipe for easy steps to create these tasty muffins! 1. Preheat your oven to 375°F (190°C). Line a muffin tin with liners or lightly grease it. 2. In a medium bowl, whisk together the all-purpose flour, baking powder, baking soda, and salt. Set this bowl aside for now. 1. In a large bowl, mix together the granulated sugar, brown sugar, and melted butter until well combined. 2. Beat in the egg and vanilla extract until the mixture is fluffy and smooth. 1. Add the buttermilk to the wet mixture and stir until combined. 2. Gradually add the dry ingredients to the wet mixture. Fold gently, just until combined; do not overmix. 3. Carefully fold in the diced peaches, spreading them evenly throughout the batter. 1. In a small bowl, mix the rolled oats, cinnamon, and a pinch of sugar for the streusel topping. 2. Scoop the muffin batter into the prepared muffin tin, filling each liner about two-thirds full. 3. Generously sprinkle the streusel topping over each muffin. 1. Bake the muffins for 18-20 minutes. Check for doneness by inserting a toothpick; it should come out clean. 2. Allow the muffins to cool in the pan for about 5 minutes. Then, transfer them to a wire rack to cool completely before serving. These Peach Streusel Muffins are a delight! For a full recipe, check the earlier section. Enjoy your time in the kitchen! - Ensure ingredients are at room temperature. This helps them mix well. - Do not overmix the batter. Gently fold until just combined for light muffins. - Serve warm with powdered sugar. It adds a sweet touch to each bite. - Garnish with a slice of fresh peach. This makes your muffins look even better. - Consider adding a dash of nutmeg. It gives a warm, spicy flavor to the muffins. - Use different fruits for variation. Blueberries or raspberries work great too! For the full recipe, check [Full Recipe]. These tips will help you create the best peach streusel muffins! {{image_2}} You can switch up the fruit in these muffins! Instead of peaches, use blueberries or raspberries. Both fruits add a burst of flavor. If you want more texture, try adding chopped nuts. Walnuts or pecans work great for extra crunch. If you're gluten-free, you can still enjoy these muffins. Use almond flour or oat flour instead of regular flour. For those avoiding dairy, simply swap in dairy-free butter and milk. This way, everyone can enjoy a tasty treat! Make mini muffins for a fun, bite-sized version. They are perfect for kids or snacks. You could also bake this batter in a round pan to create a cake. Just adjust the baking time, as it may need a bit longer. Keep your muffins at room temperature. Place them in an airtight container. This method keeps them soft for a few days. Enjoy them fresh for breakfast or a snack. You can freeze the muffins for up to three months. Wrap each muffin in plastic wrap. Then, place them in a freezer bag. When you want one, reheat it directly from the freezer. Pop it in the oven at 350°F (175°C) for about 10 minutes. They taste almost fresh-baked! Use parchment paper to line your container. This step helps maintain moisture in your muffins. Also, avoid stacking warm muffins. Stacking can make them soggy. Let them cool before storing. These simple tips keep your Peach Streusel Muffins delightful! For the full recipe, check the earlier section. To check if your muffins are done, insert a toothpick into the center. If it comes out clean, your muffins are ready. This simple test saves you from underbaking or overbaking. Trust me, it works every time! Yes, you can use canned peaches instead of fresh ones. Just make sure to drain them well. This keeps your muffins from getting too soggy. Canned peaches can still taste great in your muffins. To stop muffins from sticking to the liners, use high-quality liners. You can also grease the liners lightly with butter or oil. This little step makes a big difference for perfect muffins. If you have leftover streusel topping, store it in the fridge. You can use it for future baking or sprinkle it over yogurt. It adds a nice crunch and sweetness. Don't waste it! Making peach muffins is easy and fun. We covered all the key steps, from mixing the dry and wet ingredients to baking and storing the muffins. You can adjust flavors and fruits based on your taste. Remember the tips for better results, like using room temperature ingredients and avoiding overmixing. With this guide, you can create a delicious treat for any occasion. Enjoy your baking journey and share these for smiles!](https://dailydishly.com/wp-content/uploads/2025/07/b62cebd8-d26b-48c0-b1ab-fab18f37a599-300x300.webp)


![To make a classic key lime pie, gather these simple ingredients: - 1 ½ cups graham cracker crumbs - ½ cup unsweetened coconut flakes - ⅓ cup granulated sugar - ½ cup unsalted butter, melted - 4 large egg yolks - 1 (14 oz) can sweetened condensed milk - ½ cup freshly squeezed key lime juice (about 12 key limes) - Zest of 2 key limes - 1 cup heavy whipping cream - 2 tablespoons powdered sugar - Lime slices and extra zest for garnish These ingredients create a sweet and tangy pie that sings with flavor. The graham cracker crust gives a crunchy base. The filling is creamy and zesty, thanks to the key lime juice. If you need to swap ingredients, here are a few ideas: - Use regular limes instead of key limes if they are hard to find. The taste will change slightly but still be good. - Swap coconut flakes for crushed nuts for a different texture in the crust. - Use light sweetened condensed milk to cut some calories. - If you want a dairy-free option, use coconut cream instead of heavy whipping cream. These substitutions can make the pie fit your needs while keeping it tasty. To pick the best key limes, look for these signs: - Choose limes that feel heavy for their size. This means they have more juice. - Look for limes that are smooth and firm. Avoid any that feel soft or have blemishes. - If you can, smell the limes. A sweet, fresh scent means they are ripe. Fresh key limes can elevate your pie to a whole new level. You’ll notice the bright flavor in every bite! For the full recipe, visit the [Full Recipe]. Making classic key lime pie is easy and fun. You will need to follow a few simple steps. First, you will prepare the crust. Next, you will mix the lime filling. Finally, you will bake and cool the pie. This recipe takes about 20 minutes to prep and 2 hours to chill. To start, gather your ingredients for the crust. You will need: - 1 ½ cups graham cracker crumbs - ½ cup unsweetened coconut flakes - ⅓ cup granulated sugar - ½ cup unsalted butter, melted 1. Preheat your oven to 350°F (175°C). 2. In a mixing bowl, mix the graham cracker crumbs, coconut flakes, and granulated sugar. 3. Pour in the melted butter and stir until it looks like wet sand. 4. Firmly press the mixture into the bottom and sides of a 9-inch pie pan. 5. Bake the crust for 8-10 minutes, until the edges are lightly golden. 6. Remove the crust from the oven and let it cool completely. Now, let’s make the lime filling. You will need: - 4 large egg yolks - 1 (14 oz) can sweetened condensed milk - ½ cup freshly squeezed key lime juice (about 12 key limes) - Zest of 2 key limes 1. In a large bowl, whisk the egg yolks until they turn pale. 2. Add the sweetened condensed milk to the bowl. 3. Pour in the key lime juice and lime zest. 4. Whisk the mixture until it is smooth and well combined. Next, it’s time to bake the filling. 1. Pour the lime mixture into your cooled crust. 2. Bake in the oven for 15 minutes, just until the filling is set. 3. After baking, remove the pie from the oven and let it cool at room temperature. 4. Refrigerate the pie for at least 2 hours to chill completely. Once chilled, you can top it with whipped cream and garnish it with lime slices and zest. Enjoy this zesty treat! For the complete details on how to make this pie, refer to the Full Recipe. To get the best texture for your Key Lime Pie, the filling needs to be smooth. Start by whisking the egg yolks until they look pale and creamy. This adds air and helps the pie rise slightly. Mix in the sweetened condensed milk slowly, then add the lime juice and zest. Make sure to whisk until everything blends well. This will give your pie that perfect creamy feel. Bake it just long enough to set, but not too long. Overbaking can make it rubbery. Making whipped cream at home is easy and fun! You will need heavy whipping cream and powdered sugar. Start with cold cream. Pour it into a bowl and use an electric mixer. Beat it on medium speed until soft peaks form. This usually takes about 2-3 minutes. Gradually add the powdered sugar and keep beating until stiff peaks form. This means the cream will hold its shape. Use it right away to top your chilled pie. You can even add a little vanilla for extra flavor! If your pie cracks, it may have baked too long. Make sure to check your filling after 15 minutes. A slight jiggle is okay! If your crust is too crumbly, try adding a bit more melted butter. When cooling, let it sit at room temperature before refrigerating. This helps avoid condensation. If your whipped cream doesn’t hold up, you might not have whipped it enough. Always use cold cream for the best results. For more details, check the Full Recipe. {{image_2}} Key lime pie is a classic dessert, but you can change it up in fun ways! If you love meringue, try adding it to your pie. Meringue is a light and fluffy topping made from egg whites. To make it, beat the egg whites until they form stiff peaks. Then, slowly add sugar until the mixture is glossy and thick. Spread it over the cooled pie and bake until golden. This adds a sweet and crunchy layer on top of the tart filling. For a gluten-free version of key lime pie, use almond flour or gluten-free graham crackers for the crust. You can also crush gluten-free cookies for a tasty base. The filling remains the same, so you still get that tangy flavor. This way, everyone can enjoy a slice! You can get creative with your crust. Instead of the classic graham cracker crust, think about using Oreo cookies or gingersnap cookies. Just crush them and mix with melted butter. You can also try a nut crust made from ground almonds or pecans. Each option gives a unique flavor that pairs well with the lime filling. For the full recipe, check out Zesty Classic Key Lime Pie. After enjoying your zesty classic key lime pie, you may have some leftovers. To keep it fresh, cover the pie with plastic wrap or foil. Store it in the fridge. This way, it stays cool and tasty. Make sure to eat it within three days for the best flavor. If you have slices, use an airtight container to keep them fresh. Freezing key lime pie is an excellent way to save it for later. First, let the pie cool completely after baking. Then, wrap it tightly in plastic wrap. After that, wrap it in foil for extra protection. You can also slice the pie before freezing for easy serving. When you’re ready to enjoy it, thaw the pie in the fridge overnight. This keeps the texture and flavor intact. Key lime pie can last in the refrigerator for about 3-4 days. If frozen, it stays good for about 2-3 months. You don’t need to reheat the pie; it’s best served cold. If you want to serve it warm, try putting it in the oven at a low temperature for a few minutes. Just be careful not to overheat it. The goal is to keep that creamy texture and tangy flavor. For the full recipe, check out the zesty classic key lime pie section! If you can't find key limes, use regular limes. They work well in this pie. The flavor will be slightly different but still tangy and tasty. You can also mix regular limes with a little lemon juice for extra zing. Yes, you can make Key Lime Pie ahead of time. It tastes even better after chilling. Just bake the pie, let it cool, and then refrigerate it. You can prepare it a day or two before serving. Just add the whipped cream before serving for the best texture. To check if the filling is set, gently shake the pie. If the center slightly jiggles but is firm, it’s ready. The filling will firm up more as it cools. Bake it for about 15 minutes to help it set properly. Key Lime Pie pairs well with fresh fruit. Berries or mango slices make great sides. You can also serve it with whipped cream on top. Some people enjoy a scoop of vanilla ice cream with it, too. For extra flair, add lime zest or slices as a garnish. For the full recipe, check out the Zesty Classic Key Lime Pie section above. Key lime pie is a simple and delicious treat. We explored the ingredients, substitutions, and tips for fresh key limes. I shared step-by-step instructions for the crust and filling, plus baking tips. You learned tricks for the perfect pie texture and homemade whipped cream. Variations include meringue and gluten-free options. We covered best storage methods and answered common questions about making this classic dessert. Now, you have everything you need to make a great key lime pie! Enjoy your baking adventure.](https://dailydishly.com/wp-content/uploads/2025/07/bf504450-0d09-4d53-b035-55d87c168019-768x768.webp)


![- 1/2 cup rolled oats - 1 tablespoon cocoa powder - 1 tablespoon peanut butter - 1 cup almond milk (or milk of choice) - 1 tablespoon maple syrup (or honey) - 1/2 teaspoon vanilla extract - A pinch of salt The main ingredients form the base of your chocolate peanut butter overnight oats. Rolled oats are key. They soak up the almond milk and get soft overnight. Cocoa powder adds rich chocolate flavor. Peanut butter brings creaminess and nutty taste. Maple syrup or honey sweetens the dish naturally. A splash of vanilla enhances all the flavors. Lastly, a pinch of salt balances the sweetness. - Sliced bananas - Chocolate chips - Crushed peanuts - Berries Toppings make your oats even more fun! Sliced bananas add sweetness and creaminess. Chocolate chips give an extra chocolatey bite. Crushed peanuts add crunch and extra flavor. Fresh berries bring a burst of color and freshness. You can mix and match to find your favorite combinations. These toppings not only taste great, but they also make your oats look pretty. For the full recipe, you can check out the Chocolate Peanut Butter Overnight Oats 🥜 recipe I created. It's a simple way to enjoy a delicious breakfast! 1. In a medium bowl, combine 1/2 cup rolled oats and 1 tablespoon cocoa powder. Mix well. 2. In another bowl or measuring cup, mix 1 cup almond milk, 1 tablespoon peanut butter, 1 tablespoon maple syrup, 1/2 teaspoon vanilla extract, and a pinch of salt until smooth. 3. Pour this liquid over the dry oat mixture. Stir until everything is well combined. 1. Transfer the mixture into a jar or an airtight container. Make sure it is sealed tight. 2. Refrigerate overnight or for at least 4 hours. This allows the oats to soak up the liquid and soften. 1. When ready to eat, stir the oats well. 2. Add your favorite toppings, like sliced bananas, chocolate chips, crushed peanuts, or berries. For the full recipe, you can refer to the [Full Recipe]. To get the right texture, you can add more milk. If you want your oats thicker, use less milk. Experiment to find what you love. You can also swap ingredients. Try using almond butter instead of peanut butter. You can even change up the sweetener. Honey or agave syrup works great too. Making several jars at once saves time. You can prepare them for the week ahead. Just follow the full recipe. Use small jars for easy transport. This way, you can grab one on busy mornings. Want to add a twist? Try adding spices like cinnamon or nutmeg. These spices bring warmth and depth to your oats. You can also experiment with sweeteners. If you like things sweeter, add a bit more maple syrup or honey. The options are endless! {{image_2}} You can switch up the nut butter if you want. Almond and cashew butters taste great too. They add a different twist and keep the oats creamy. For milk, try oat or coconut milk. These options work well for a dairy-free version. They also give a nice flavor boost. Adding fruits makes the oats even better. Strawberries and raspberries give a fresh taste. You can toss in some sliced bananas too. If you want crunch, add nuts or seeds. Chopped almonds or sunflower seeds work well. They make each bite exciting and fun. To keep it vegan, check that your ingredients are certified. Use maple syrup instead of honey. If you’re gluten-free, make sure your oats are labeled as such. This way, everyone can enjoy this tasty treat! Chocolate Peanut Butter Overnight Oats stay fresh in the fridge for up to five days. Store them in a sealed jar or container. Look for any changes in smell or texture. If the oats smell off or have a strange color, it’s best to toss them. Always check for signs of spoilage before eating. Yes, you can freeze overnight oats! They freeze well for about three months. Use an airtight container to prevent freezer burn. To thaw, move the jar to the fridge overnight. You can also warm them in the microwave. Just add a splash of milk to help with the texture. To warm up the oats, place them in a microwave-safe bowl. Heat for 30 seconds, then stir. If they seem too thick, add a little milk. You can also warm them on the stove over low heat. Stir often to avoid sticking. Enjoy your warm oats with your favorite toppings! To make vegan Chocolate Peanut Butter Overnight Oats, you need to swap a few ingredients. Use plant-based milk like almond or oat milk. For sweeteners, maple syrup works great. You can also try agave syrup. These substitutes keep the recipe creamy and sweet without dairy. Yes, you can use quick oats. They cook faster and absorb liquid quickly. However, they can become mushy. Rolled oats give a thicker texture. They hold their shape better and provide a chewier bite. Choose based on your texture preference. To boost protein, try adding a scoop of protein powder. Choose your favorite flavor, like chocolate or vanilla. You can also mix in Greek yogurt for creaminess. Nuts, seeds, or nut butter also add protein. These options make your oats more filling and nutritious. In this blog post, we explored how to make delicious Chocolate Peanut Butter Overnight Oats. You learned the main ingredients and the step-by-step process. We shared tips to perfect your oats and suggested easy meal prep ideas. You can also try various toppings and flavor combinations. Remember to store your oats properly for the best taste. Enjoy experimenting with this fun recipe. It makes healthy eating easy and tasty!](https://dailydishly.com/wp-content/uploads/2025/07/90d151b9-6d0c-4c1c-ba31-37512e57091e-768x768.webp)
