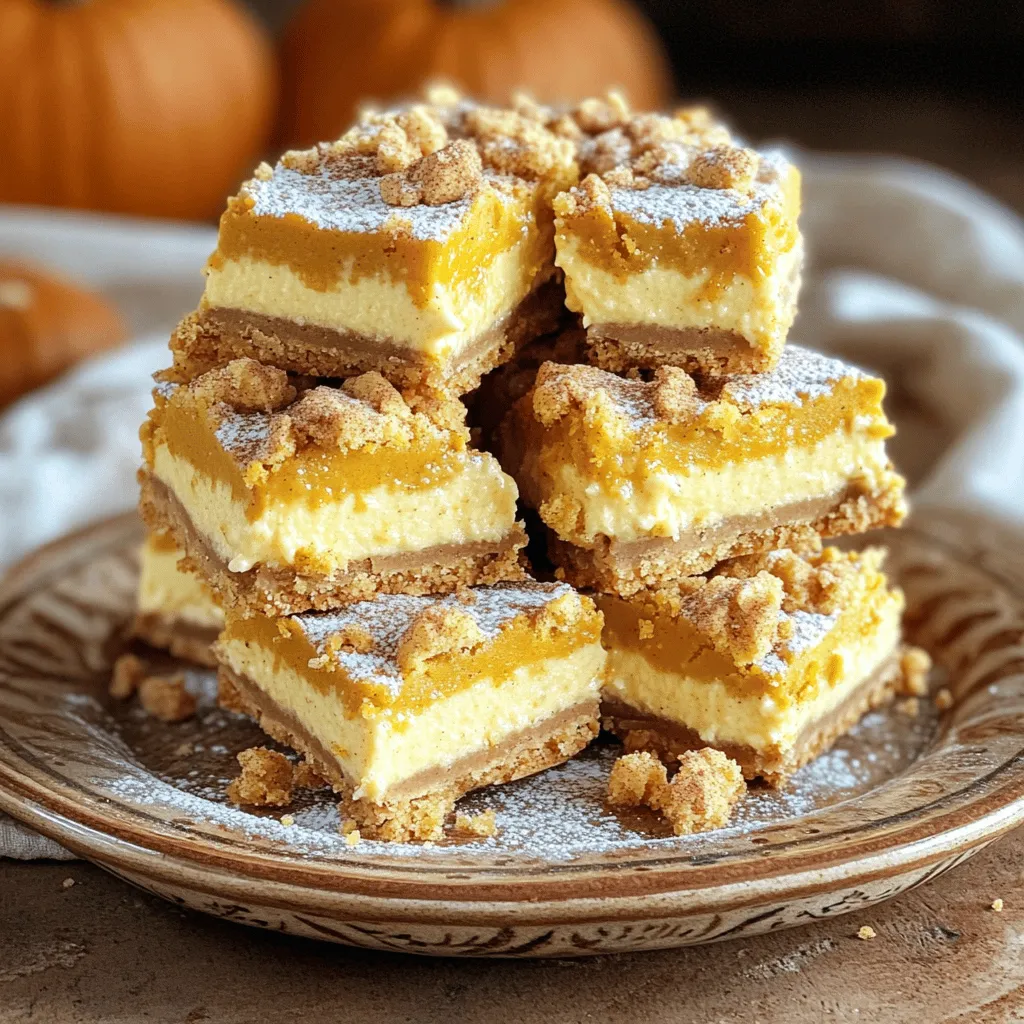
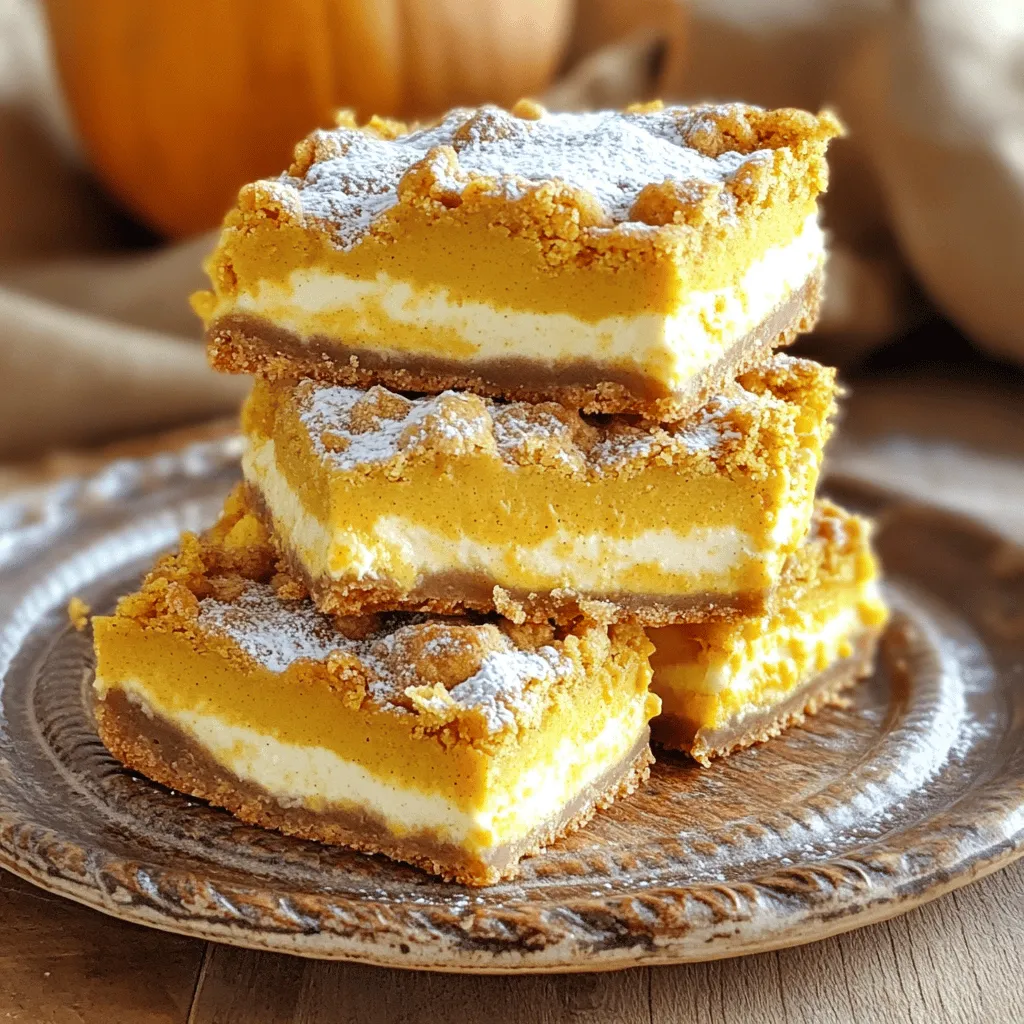
Get ready for a delicious treat that captures the essence of fall! Pumpkin Cheesecake Cookie Bars blend creamy cheesecake and soft cookie layers into one heavenly dessert. You’ll enjoy every bite filled with warm spices and pumpkin goodness. In this guide, I’ll walk you through the simple steps to create these bars, plus tips on variations and storage. Let’s dive into making this delightful fall treat!
Ingredients
Detailed List of Ingredients
For the pumpkin cheesecake cookie bars, you will need the following:
– 2 cups all-purpose flour
– 1 teaspoon baking soda
– 1/2 teaspoon baking powder
– 1 teaspoon ground cinnamon
– 1/2 teaspoon ground nutmeg
– 1/4 teaspoon ground ginger
– 1/4 teaspoon salt
– 1 cup unsalted butter, softened
– 1 cup brown sugar, packed
– 1/2 cup granulated sugar
– 1 large egg
– 2 teaspoons vanilla extract
– 1 cup pumpkin puree
– 8 oz cream cheese, softened
– 1/2 cup powdered sugar
– 1/2 teaspoon vanilla extract (for cream cheese layer)
Special Ingredient Notes
When choosing your ingredients, freshness matters. Use fresh spices for the best flavor. If your pumpkin puree is too watery, it can make the bars soggy. Choose a high-quality cream cheese for a rich, creamy texture. I recommend using unsalted butter. This gives you control over the salt in your recipe.
Suggested Substitutes
If you need alternatives, here are some great options:
– Flour: You can use whole wheat flour for a heartier texture.
– Butter: Coconut oil works well if you want a dairy-free option.
– Egg: A flax egg (1 tablespoon ground flaxseed mixed with 2.5 tablespoons water) is a good egg substitute.
– Pumpkin Puree: You may use sweet potato puree in a pinch.
– Cream Cheese: For a lighter option, use Greek yogurt.
These substitutes can maintain the taste and texture of your bars while accommodating dietary needs. Enjoy your baking adventure!
Step-by-Step Instructions
Prepping the Oven and Pan
First, you need to get your oven ready. Preheat it to 350°F (175°C). Next, take a 9×13 inch baking pan. You can grease it or line it with parchment paper. Lining helps with easy removal later.
Making the Cookie Dough
In a medium bowl, mix the dry ingredients. Combine 2 cups of all-purpose flour, 1 teaspoon of baking soda, and 1/2 teaspoon of baking powder. Add 1 teaspoon of ground cinnamon, 1/2 teaspoon of ground nutmeg, 1/4 teaspoon of ground ginger, and 1/4 teaspoon of salt. Set this mix aside.
In a large bowl, cream together 1 cup of softened unsalted butter, 1 cup of packed brown sugar, and 1/2 cup of granulated sugar. Beat this until it’s light and fluffy, about 2 to 3 minutes. Then, add 1 large egg and 2 teaspoons of vanilla extract. Mix until everything is well combined. Now, slowly add your dry mix to the wet mix. Stir until just combined. Remember to save 1 cup of this cookie dough for later!
Preparing the Cream Cheese Mixture
Now, you’ll make the cream cheese layer. In a separate bowl, beat together 8 oz of softened cream cheese, 1/2 cup of powdered sugar, and 1/2 teaspoon of vanilla extract. Add 1 cup of pumpkin puree to this mix. Beat until it’s smooth and creamy.
Combining Layers and Final Baking
Spread the remaining cookie dough evenly in the bottom of your prepared pan. This will be the crust. Pour the pumpkin cheesecake mixture over this crust. Spread it out evenly. Now, crumble the reserved cookie dough on top. Bake your bars for 30 to 35 minutes. They are done when the edges are golden and the center is slightly jiggly. Let the bars cool completely in the pan. After that, refrigerate them for at least 2 hours before cutting into squares.
Tips & Tricks
How to Achieve the Perfect Texture
To get the best texture in your pumpkin cheesecake cookie bars, follow these tips:
– Use softened ingredients: Make sure the butter and cream cheese are soft. This helps them mix well, creating a smooth texture.
– Don’t overmix: When you mix in the dry ingredients, stop as soon as you see no flour. Overmixing can make your bars tough.
– Cool properly: Let the bars cool in the pan. Refrigerating them for a few hours helps firm up the cheesecake layer.
Common Mistakes to Avoid
Here are some frequent mistakes to watch out for:
– Skipping the parchment paper: Lining your pan with parchment makes it easier to lift out the bars.
– Not measuring flour correctly: Use the spoon-and-level method. This keeps your bars from becoming dry.
– Ignoring the chilling time: Cutting into warm bars can make them fall apart. Chill them for the best results.
Serving Suggestions
I love to serve these bars in fun ways:
– Dust with powdered sugar: A light sprinkle on top adds a nice touch.
– Add whipped cream: A dollop of whipped cream makes each bite extra special.
– Garnish with spices: A sprinkle of cinnamon or nutmeg on top enhances the fall flavor.
These tips will help you create perfect pumpkin cheesecake cookie bars every time. Enjoy the delicious taste of fall!
Variations
Flavor Variations
You can change the taste of these cookie bars easily. Try adding chocolate chips for a sweet twist. You can also use white chocolate or butterscotch chips. If you love spices, add a little more cinnamon or a pinch of allspice. A splash of maple syrup can enhance the pumpkin flavor. Experimenting with these flavors makes each batch unique.
Healthier Versions
Want to make a healthier version? Substitute gluten-free flour for the all-purpose flour. This change keeps the taste while making it safe for gluten-free diets. You can also use less sugar. Try using coconut sugar or a sugar substitute. If you’re looking to lower calories, use low-fat cream cheese. These swaps keep the bars tasty while being kinder to your waistline.
Seasonal Variations
Get creative with seasonal themes! During the holidays, add cranberries or pecans for a festive touch. You can also swirl in some caramel sauce for a rich flavor. For Halloween, use orange and black sprinkles on top. In winter, try peppermint extract for a fresh twist. These seasonal changes make your pumpkin cheesecake cookie bars stand out at any gathering.
Storage Info
How to Properly Store Cookie Bars
To keep your pumpkin cheesecake cookie bars fresh, store them in the fridge. Place them in an airtight container. This method will help preserve their flavor and texture. Make sure they cool completely before storing. If they are still warm, condensation may form, making them soggy.
Freezing Instructions
You can freeze the cookie bars for later enjoyment. Cut them into squares and place them on a baking sheet. Make sure they are not touching. Freeze them for about two hours until solid. After that, transfer the squares into a freezer-safe bag or container. They can last up to three months in the freezer.
Best Containers for Storage
For storing cookie bars, choose airtight containers. Glass containers work well because they seal tightly and are easy to clean. You can also use plastic containers, but make sure they are BPA-free. If you plan to freeze them, use freezer bags for easy stacking and space-saving.
FAQs
Can I make these bars ahead of time?
Yes, you can make these bars ahead of time. They taste even better after chilling in the fridge. Just bake them, cool, and store in an airtight container. They last up to five days.
How do I tell when the bars are done baking?
To check if the bars are done, look for golden edges. The center should still be a bit jiggly. A toothpick inserted in the middle should come out mostly clean, with a few moist crumbs.
Can I use fresh pumpkin instead of canned?
Absolutely! You can use fresh pumpkin. Just cook and puree it until smooth. Make sure to drain any excess water. This will give your bars a fresh, vibrant flavor.
What can I use as a topping instead of cookie dough?
If you want a different topping, try crushed nuts or granola. You can also use chocolate chips for a sweet twist. Even a swirl of caramel sauce can add a fun flavor.
What are some ways to serve these bars?
Serve these bars on a pretty plate. Dust them with powdered sugar for a touch of elegance. You can add a dollop of whipped cream or a sprinkle of cinnamon. They are perfect for gatherings or cozy nights in!
This blog post covered how to create delicious cookie bars. We explored key ingredients and special notes, along with easy substitutes. I shared step-by-step instructions, making it simple to follow. You learned tips for perfecting texture and mistakes to avoid. I also provided fun flavor and healthier variations. Plus, you got storage tips for keeping your treats fresh.
In closing, these cookie bars are versatile and easy to make. Enjoy your baking journey!