Pumpkin Spice Cheesecake Dip Creamy and Delightful Treat

Are you ready to dive into fall flavors? This Pumpkin Spice Cheesecake Dip is a creamy delight that will satisfy your cravings. With a blend of pumpkin puree, cream cheese, and warm spices, it’s perfect for parties or cozy nights in. Plus, it’s easy to make! Join me as we whip up this tasty treat that pairs well with graham crackers, apple slices, or pretzels. Let’s get started!
Ingredients
Essential Ingredients
To make a delicious Pumpkin Spice Cheesecake Dip, you need these key ingredients:
– 8 oz cream cheese, softened
– 1 cup pumpkin puree
– 1/2 cup powdered sugar
– 1 tablespoon brown sugar
– 1 teaspoon vanilla extract
– 1 teaspoon pumpkin pie spice
– 1/2 teaspoon cinnamon
– 1/2 cup whipped topping
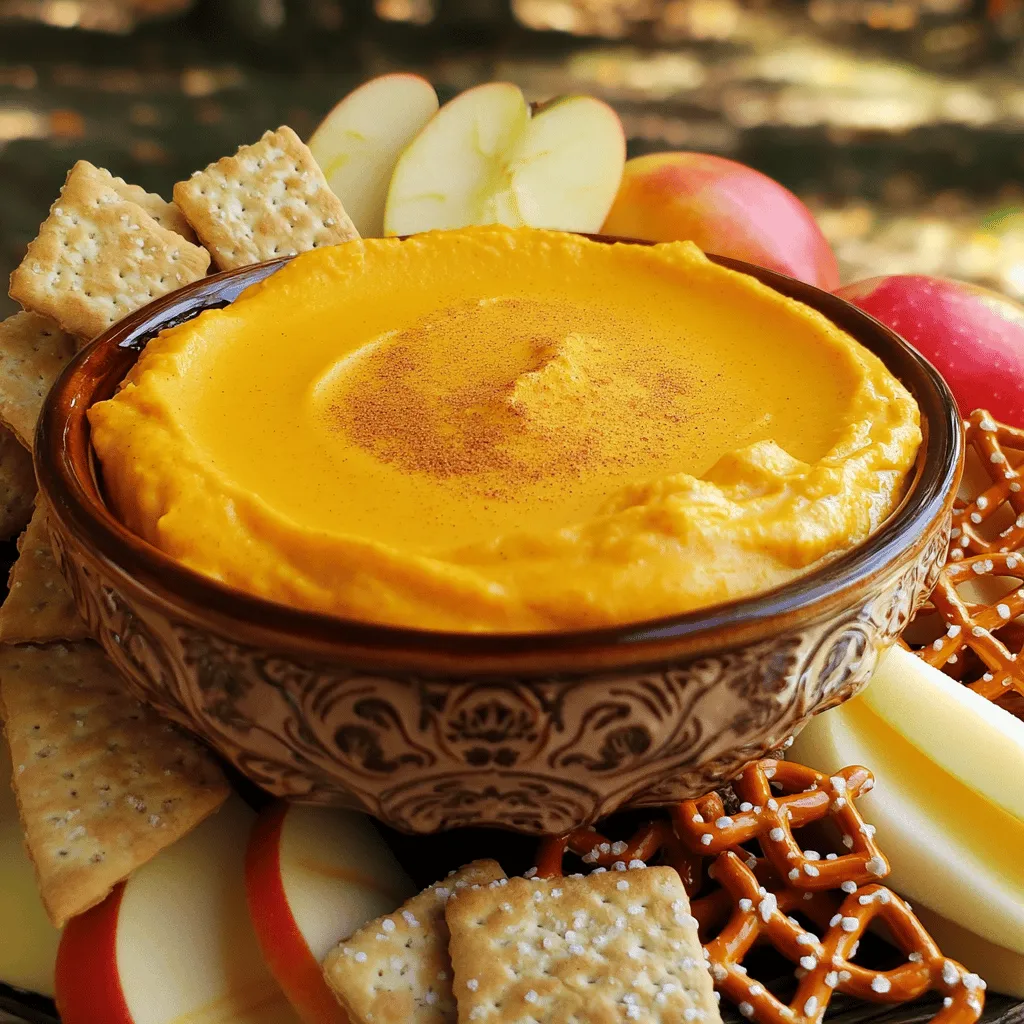
– Dippers: graham crackers, apple slices, or pretzels
Each ingredient plays a special role. The cream cheese gives the dip that rich and creamy base. Pumpkin puree adds a nice fall flavor while keeping the dip smooth. Sugar sweetens it just enough, and the spices bring warmth.
I love using whipped topping for a light texture. It makes the dip airy and fun to eat. For dippers, graham crackers add crunch, apple slices bring freshness, and pretzels give a salty kick. You can mix and match to find your favorite!Enjoy making this fun treat!
Step-by-Step Instructions
Prepping the Cream Cheese
Start by taking your cream cheese out of the fridge. You want it to be soft. This makes it easy to mix. Place the cream cheese in a large mixing bowl. Beat it with a mixer until it is smooth. This step is key to a creamy dip.
Mixing the Ingredients
Next, add the pumpkin puree to the bowl. Then, sprinkle in the powdered sugar and brown sugar. Pour in the vanilla extract, pumpkin pie spice, and cinnamon. Mix everything together until you have a smooth and even texture. This is where the flavors start to come alive.
Finishing Touches
Now, it’s time for the whipped topping. Gently fold it into the mixture. This helps keep the dip light and fluffy. After mixing, taste the dip. If you want it sweeter or spicier, adjust as needed. Finally, transfer your dip to a serving bowl. Chill it in the fridge for at least 30 minutes. This lets the flavors blend perfectly. When ready, serve it with graham crackers, apple slices, or pretzels for dipping. Enjoy your creamy and delightful treat!
Tips & Tricks
Achieving the Perfect Texture
To get the right texture, mix gently. Over-mixing can make the dip too runny. You want it smooth but thick. After mixing, chill the dip for at least 30 minutes. Chilling helps the flavors blend well and makes it creamy.
Adjusting Flavor
If you find the dip too sweet, you can change that. Add a little more pumpkin puree or a pinch of salt to balance the sweetness. For more flavor, add extra spices. A dash of nutmeg or more cinnamon can elevate the taste.
Presentation Ideas
How you serve the dip matters. Use a decorative bowl to make it look appealing. You can sprinkle a little pumpkin pie spice on top for style. Arrange graham crackers, apple slices, or pretzels around the bowl. This makes it easy for guests to dip in and adds a nice touch to your table.

Variations
Healthier Alternatives
You can make this dip lighter by swapping cream cheese with Greek yogurt. Greek yogurt adds protein and tang. This change keeps the dip creamy while cutting calories. You can also use natural sweeteners like honey or maple syrup instead of powdered sugar. These options offer a sweet taste without refined sugar.
Flavor Variations
To make your dip more exciting, try adding chocolate chips or nuts. Chocolate chips give a rich flavor that pairs well with pumpkin. Nuts add a nice crunch, making each bite interesting. You can also mix in other spices, such as nutmeg. Nutmeg adds warmth and depth, enhancing the pumpkin spice profile.
Seasonal Twists
For festive fun, add cranberries to your dip. The tartness of cranberries contrasts nicely with the sweet dip. It also gives a holiday vibe. You can also use flavored whipped topping, like cinnamon or vanilla. This twist can add an extra layer of flavor to the dip and surprise your guests.
Storage Info
How to Store Leftovers
Store your Pumpkin Spice Cheesecake Dip in an airtight container. This keeps it fresh and tasty. Place it in the refrigerator right after serving. Avoid leaving it out for too long. To preserve its creamy texture, use the container with the best seal.
Freezing Options
Yes, you can freeze the dip! Just put it in a freezer-safe container. Make sure to leave some space at the top for expansion. When you are ready to eat it, thaw it in the fridge overnight. This method keeps the dip smooth and delicious.
Shelf Life
In the fridge, the dip lasts about 3 to 5 days. Check for any changes in smell or color. If you see separation or an off smell, it’s best to throw it away. Always trust your senses; they guide you well!
FAQs
Can you make Pumpkin Spice Cheesecake Dip ahead of time?
Yes, you can make this dip ahead of time. I recommend preparing it a day before. Just chill it in the fridge. This allows the flavors to blend well.
What can I use as a dipper besides graham crackers?
You have many tasty options! Try apple slices for a fresh crunch. Pretzels add a nice salty bite. You can also use vanilla wafers or even banana slices for a sweet twist.
How long does Pumpkin Spice Cheesecake Dip last?
This dip can last up to five days in the fridge. Store it in an airtight container. If it looks or smells off, don’t eat it. Always check for freshness.
Is this dip gluten-free?
The dip itself is gluten-free if you use gluten-free dippers. Graham crackers often contain gluten, so opt for gluten-free options. Always read the labels to be sure.
The Pumpkin Spice Cheesecake Dip is an easy treat to enjoy. You learned the essential ingredients, from cream cheese to spices. I shared step-by-step instructions for smooth mixing and chilling. You discovered tips to change flavor and achieve the best texture. I also covered storage, variations, and common questions.
This dip is simple, tasty, and perfect for gatherings. Enjoy making this delightful treat whenever you crave something sweet!


![- 1 pound Brussels sprouts, trimmed and halved - 3 tablespoons olive oil - 1/4 cup pure maple syrup - 2 tablespoons balsamic vinegar - 1 teaspoon Dijon mustard - 1/2 teaspoon sea salt - 1/4 teaspoon freshly ground black pepper - 1/4 cup pecans, roughly chopped - 1/4 cup dried cranberries - Fresh thyme leaves for garnish (optional) When I make Maple Glazed Brussels Sprouts, I focus on fresh, high-quality ingredients. The main ingredients are simple yet powerful. I love using one pound of Brussels sprouts. Trim them carefully and cut them in half. This keeps them tender and allows for even cooking. The olive oil adds richness and helps the sprouts brown nicely. Maple syrup is the star of this dish. I always choose pure maple syrup. It adds sweetness and a unique flavor. The balsamic vinegar and Dijon mustard balance the sweetness. The sea salt enhances all the flavors without overpowering them. For garnishes, I often sprinkle freshly ground black pepper over the finished dish. Chopped pecans add crunch and nuttiness. Dried cranberries bring sweetness and a pop of color. If you want a fresh touch, add thyme leaves. These small details make the dish special. For the full recipe, check out the detailed cooking instructions. You will enjoy every bite! - Preheat your oven to 400°F (200°C). - In a large bowl, toss the Brussels sprouts with olive oil, salt, and pepper. This step coats them well and adds flavor. - Spread the Brussels sprouts in a single layer on a baking sheet. Make sure they are cut side down for even cooking. - Roast them for 20-25 minutes, until they are crispy and golden brown. You want them tender inside and crunchy outside. - In a small saucepan, whisk together maple syrup, balsamic vinegar, and Dijon mustard. - Heat this mixture over medium heat until well mixed. The glaze should be warm and smooth before you drizzle it on the sprouts. - After roasting, return the glazed Brussels sprouts to the oven for 5 more minutes. This helps the glaze caramelize. - When done, sprinkle with pecans and dried cranberries. If you like, garnish with fresh thyme leaves for a pop of color. For the complete recipe, check out [Full Recipe]. To make your maple glaze shine, use real maple syrup. It gives the best flavor. Store-bought syrups often lack depth. Keep an eye on the Brussels sprouts while roasting. They can burn quickly if you don't watch closely. You can change up the taste by adding nuts or dried fruits. Pecans add crunch, while cranberries add sweetness. Try adding a dash of cayenne or chili flakes if you like heat. This small change can make a big difference. If you have leftovers, store them in an airtight container. They will stay fresh for up to three days. When you want to eat them again, reheat in the oven. This helps keep their crispy texture. Enjoy your tasty dish again! For the full recipe, check out the Maple Glazed Brussels Sprouts recipe. {{image_2}} To make this dish vegan, you can replace butter with more olive oil. This keeps the flavor rich while sticking to plant-based options. Make sure all your ingredients are vegan-friendly. That way, everyone can enjoy this tasty treat. Maple glazed Brussels sprouts shine when you pair them with protein. Think grilled chicken or fish for a hearty meal. You can also serve these sprouts with quinoa or rice. This makes for a balanced and filling dinner. To add a fun twist, switch out dried cranberries for seasonal fruits. Roasted apples or pears make great substitutes. They bring extra sweetness and a lovely taste. This variation keeps your dish fresh and exciting with each season. To keep your maple glazed Brussels sprouts fresh, store them in an airtight container in the refrigerator. This helps retain their flavor and texture. They will stay good for up to three days. If you want to freeze them, start by laying the Brussels sprouts out on a baking sheet. Make sure they are not touching. Freeze them until solid, which usually takes about two hours. Once frozen, transfer them to a freezer-safe container. This method prevents them from sticking together. When you’re ready to enjoy your leftovers, reheat them to bring back that great crispiness. You can use the oven or a skillet. For the oven, set it to 375°F (190°C) and warm them for about 10-15 minutes. In a skillet, sauté them over medium heat until heated through. This keeps them tasty and crunchy. Enjoy your maple glazed Brussels sprouts again! For the full recipe, check out the details above. You can use honey or agave syrup. Both add sweetness. They work well in this recipe. Each gives a unique taste. Try them to find your favorite flavor. Yes, you can make this dish ahead. Just prepare the Brussels sprouts and glaze. Store them in the fridge. Reheat them before serving for the best taste. To reduce bitterness, blanch the Brussels sprouts first. Boil them in water for a few minutes. This softens their flavor. Pairing them with sweet ingredients, like maple syrup, also helps. These sprouts taste great with roasted meats. They also fit well in a vegetarian meal. Include them in a holiday feast or a cozy dinner. They bring a sweet and savory touch. This dish combines the tasty Brussels sprouts with a sweet maple glaze. You learned how to prepare and roast the sprouts perfectly. We also discussed fun variations and tips for enhancing flavor. In the end, Maple Glazed Brussels Sprouts can bring joy to any meal. Try them with your favorite proteins or grains. Enjoy the delicious mix of sweet and savory!](https://dailydishly.com/wp-content/uploads/2025/07/6c550e47-e99c-4554-a6d4-422f3e5f831a-768x768.webp)


![To make a great creamy feta pasta salad, you'll need a few simple ingredients. Here’s what you should gather: - 8 oz (225 g) fusilli pasta - 1 cup feta cheese, crumbled - 1/2 cup Greek yogurt - 1/4 cup olive oil - 1 tablespoon lemon juice - 1 teaspoon dried oregano - 1/2 teaspoon garlic powder - 1 cup cherry tomatoes, halved - 1 cucumber, diced - 1/4 red onion, finely chopped - Salt and pepper to taste - Fresh basil leaves for garnish Each ingredient brings its own flavor to the dish. The fusilli pasta adds a fun twist, while the feta cheese offers a rich, creamy taste. Greek yogurt makes the dressing smooth and adds a nice tang. Olive oil brings depth, and lemon juice gives a bright kick. Herbs like oregano and garlic powder enhance the taste. The cherry tomatoes and cucumber add freshness, and red onion brings a mild crunch. Finally, salt, pepper, and basil leaves round out this delightful salad. For the full recipe, you can check out the complete instructions. This creamy feta pasta salad is sure to be a hit! To make this creamy feta pasta salad, start by cooking the fusilli. Bring a large pot of salted water to a boil. Add the fusilli and cook it according to the package instructions. I recommend checking the pasta a minute or two early. You want it al dente, meaning it should have a slight bite to it. Once cooked, drain the pasta in a colander. Rinse it under cold water to stop the cooking process. This step cools the pasta quickly and keeps it from becoming mushy. Set it aside while you prepare the dressing. Now, let’s make the creamy dressing. In a medium bowl, combine the crumbled feta cheese and Greek yogurt. Add olive oil, lemon juice, dried oregano, and garlic powder. Use a fork to mash the feta and yogurt together. Mix until you get a creamy texture. Taste the dressing and adjust the seasoning. You may want to add more salt or pepper. This step is key for a flavor-packed salad. In a large mixing bowl, add the cooled fusilli, halved cherry tomatoes, diced cucumber, and chopped red onion. Pour the creamy feta dressing over the pasta and mix gently. Toss until everything is coated well. Chill the salad in the fridge for at least 30 minutes. This time allows the flavors to blend and deepen. Before serving, stir again and garnish with fresh basil leaves. Enjoy your fresh and delicious creamy feta pasta salad! To get the best creamy texture, mix your ingredients well. Start by mashing the feta with a fork. This helps it blend smoothly. Next, add Greek yogurt and olive oil. Use the fork to mix until you see no lumps. This step is key for a silky dressing. When you combine the dressing with the pasta, do it gently. Toss the pasta slowly to coat every piece. If you mix too hard, the pasta may break. You want it smooth, not mushy. To boost the flavor, think about adding fresh herbs. Basil and parsley work well with feta. You can also try adding a dash of chili flakes for some heat. If you're feeling adventurous, a sprinkle of smoked paprika can add depth. You can include optional ingredients too. Consider adding olives for a briny kick. Roasted red peppers can bring sweetness. These add-ins make your salad more exciting and unique. Creamy feta pasta salad pairs nicely with grilled chicken or fish. It also goes great with a side of crusty bread. For a complete meal, serve it alongside a fresh green salad. To make your dish look appealing, use a large, colorful bowl. Garnish with whole basil leaves on top. This not only adds beauty but also enhances the fresh aroma. Enjoy your delicious salad! For the full recipe, check out the [Full Recipe]. {{image_2}} You can switch up the pasta type for your creamy feta pasta salad. Try using penne, rotini, or even whole wheat pasta. Each type brings a new texture to the dish. If you prefer gluten-free options, choose rice or chickpea pasta. These options taste great and work well with the creamy feta dressing. Adding extra veggies and proteins boosts the nutrition of your salad. Consider mixing in spinach, bell peppers, or even artichokes. For protein, grilled chicken or chickpeas are fantastic choices. You can also experiment with cheese. Try adding mozzarella or goat cheese for a different flavor. Seasonal ingredients can change the taste of your pasta salad. In summer, use fresh corn, zucchini, or basil. These bright flavors make a refreshing dish. For winter, think about roasted vegetables like sweet potatoes or Brussels sprouts. The flavors will warm you up and keep the dish hearty. To keep your creamy feta pasta salad fresh, use an airtight container. Make sure it seals well. This will help keep the salad from drying out. You can store it in the fridge for up to three days. If you notice any changes in smell or texture, it is best to throw it away. When reheating the pasta salad, use the microwave. Heat it in short bursts to avoid overcooking. Stir it gently to ensure even warmth. If the salad feels dry, add a little olive oil or a splash of water. This will help bring back its creamy texture. Can you freeze creamy feta pasta salad? It’s not the best option. Freezing can change the texture of the feta and yogurt. If you still want to freeze it, use a freezer-safe container. Make sure to remove as much air as possible. You can keep it in the freezer for up to a month. When ready to eat, thaw it in the fridge overnight before serving. I recommend using classic feta cheese for this salad. Classic feta has a tangy and salty taste. It crumbles well and mixes nicely with the other ingredients. You can also try flavored feta. Flavored feta may include herbs or spices. These add different tastes to your pasta salad. However, classic feta keeps the dish light and fresh. Yes, you can make this pasta salad ahead of time. I suggest preparing it at least two hours before serving. This allows the flavors to mingle well. You can also store it in the fridge overnight. Just be sure to stir it before serving. This will help mix the dressings again. If you don't have Greek yogurt, you can try sour cream. Sour cream gives a similar creamy texture. Another option is cream cheese. Just mix it well to keep it smooth. For dairy-free options, consider using coconut yogurt. Almond or cashew yogurt also works well. These will change the flavor slightly but still taste great. For the complete list of ingredients and instructions, check out the [Full Recipe](#). In this blog post, we explored how to make a delicious creamy feta pasta salad. We covered the key ingredients, including fusilli, feta cheese, and fresh veggies. You learned the best cooking methods and how to create the perfect dressing. I shared tips to enhance flavor and storage advice for leftovers. Ready to impress your friends with this dish? A creamy feta pasta salad will please everyone. Enjoy making it and let the flavors shine!](https://dailydishly.com/wp-content/uploads/2025/07/1e04cd5b-2977-4013-97be-e6e1a5f7ba16-768x768.webp)
![- 12 mini bell peppers (assorted colors) - 1 cup cooked quinoa - 1 cup black beans, rinsed and drained - 1 cup corn (fresh, frozen, or canned) - 1/2 cup diced tomatoes (fresh or canned) - 1 cup shredded cheese (cheddar or pepper jack) The mini bell peppers are the stars here. Their sweet crunch makes a great bite. They come in many colors, adding fun to your dish. Quinoa adds protein and a nice texture. Black beans bring fiber and heartiness. Corn adds sweetness and color, while diced tomatoes add moisture and flavor. Finally, shredded cheese melts into a gooey topping that ties everything together. - 1 teaspoon cumin - 1 teaspoon smoked paprika - 1 teaspoon garlic powder - 1/2 teaspoon onion powder - Salt and pepper to taste Seasonings bring life to your dish. Cumin adds warmth and earthiness. Smoked paprika gives a touch of smokiness. Garlic powder adds depth, while onion powder enhances flavor. Salt and pepper balance everything out. This blend will make your stuffed mini bell peppers burst with flavor. - Fresh cilantro, chopped (for garnish) - 1 tablespoon olive oil Garnishes make your dish pretty and fresh. Fresh cilantro adds a pop of color and brightness. Olive oil adds richness and ties the flavors together. Together, they make your stuffed mini bell peppers look and taste amazing. You can find the full recipe [here]. 1. Preheat the oven to 375°F (190°C). This step gets your oven ready for baking. 2. Cut the tops off the mini bell peppers. Use a sharp knife for a clean cut. 3. Remove the seeds and any white parts inside the peppers. This helps reduce bitterness. 1. In a large mixing bowl, combine the cooked quinoa, black beans, corn, and diced tomatoes. 2. Add half a cup of shredded cheese to the mix. This adds creaminess and flavor. 3. Stir in the cumin, smoked paprika, garlic powder, onion powder, salt, and pepper. Mix well until everything is combined. 4. Drizzle one tablespoon of olive oil over the filling and stir again. This keeps it moist. 1. Carefully fill each mini bell pepper with the quinoa mixture. Press down gently to pack it in. 2. Arrange the stuffed peppers upright in a baking dish. If they tip over, use crumpled aluminum foil to help them stand. 3. Sprinkle the rest of the cheese on top of the stuffed peppers. This will melt into a tasty layer. 4. Cover the dish with aluminum foil. Bake for 20 minutes, then remove the foil. 5. Bake for an additional 10-15 minutes, until the peppers are tender and the cheese is bubbly and golden. 6. After baking, let them cool for a few minutes before garnishing with fresh cilantro. For the Full Recipe, refer to the ingredients and precise steps above. Enjoy! You can easily change this recipe. Try using ground turkey instead of black beans. It adds a nice flavor. For some heat, add chili powder or cayenne pepper. This can spice things up! If you want vegan options, skip the cheese and use tofu. For gluten-free, ensure you select gluten-free grains and beans. You have options for cooking. Baking is simple and gives a soft texture. You can also use an air fryer. Air frying makes them crispy and quick. If you want a smoky taste, grilling is great. Just watch the peppers so they don’t burn. Dips enhance the meal. Salsa and guacamole pair well with the stuffed peppers. You can serve them as appetizers or as a fun main dish. They are colorful and bright, making your table look good. For a complete meal, add a fresh salad on the side. You can find the full recipe above, so you have all the details you need. {{image_2}} You can make stuffed mini bell peppers in many tasty ways. For a Mexican twist, add taco seasoning to the filling. This adds spice and flavor. You can use ground meat or keep it vegetarian. For a Mediterranean style, mix in feta cheese and olives. This creates a salty and creamy taste. The tangy flavors work great with the sweet peppers. Both options are fun and easy to try. Feel free to play with the main ingredients. You can swap quinoa for rice if you prefer it. Rice adds a nice texture and flavor. If you want a change, use lentils instead of beans. Lentils cook fast and have a great taste. They also boost the protein in your dish. These swaps let you customize the recipe to your liking. Seasonal changes can inspire new stuffed pepper ideas. In summer, use fresh garden veggies like zucchini or corn. These add brightness and flavor. In winter, try heartier vegetables like mushrooms or kale. They give warmth and comfort to your meal. These seasonal changes keep things interesting and delicious. For the full recipe, check out the details above. After you enjoy your stuffed mini bell peppers, store the leftovers in the fridge. Place them in an airtight container. This keeps them fresh and tasty. If you have a lot, you can stack them, but make sure they are not too crowded. The best containers are glass or BPA-free plastic. They seal well and help keep the flavor. To freeze stuffed peppers, let them cool first. Then, wrap each pepper tightly in plastic wrap. After that, put them in a freezer-safe bag or container. This helps prevent freezer burn. When you want to eat them, take them out. Thaw them in the fridge overnight. You can reheat them in the oven or microwave. If using the oven, bake at 350°F (175°C) until warmed through. Stuffed mini bell peppers last about 3 to 5 days in the fridge. If frozen, they can last up to 3 months. For the best taste, eat them sooner rather than later. Always check for any signs of spoilage before eating. Keeping track of freshness helps you enjoy your meal at its best. Stuffed mini bell peppers are small, colorful peppers filled with a tasty mix. They are often stuffed with ingredients like quinoa, beans, corn, and cheese. After baking, they become soft and flavorful. The peppers add a nice crunch and sweetness. This dish is perfect as an appetizer or a main course. You can enjoy them warm or at room temperature. Yes, you can make stuffed mini bell peppers in advance. Prepare the filling and stuff the peppers. Then, cover and refrigerate them for up to a day. When ready to bake, take them out and let them sit for 15 minutes. This helps them cook evenly. You can also freeze them before baking. To do this, wrap them tightly and store them for up to three months. Thaw in the fridge overnight before baking. Stuffed mini bell peppers pair well with many sides. Here are a few tasty options: - A fresh green salad with vinaigrette - Guacamole and tortilla chips - Rice or quinoa pilaf - A light soup, like tomato or corn chowder - Sparkling water or a light white wine These sides complement the flavors of the stuffed peppers and make the meal more complete. You can tell stuffed mini bell peppers are done by checking a few signs. First, look for the peppers to be tender and slightly wrinkled. The cheese on top should be golden and bubbly. If you poke a pepper with a fork, it should feel soft but not mushy. Cooking time is usually 30 to 35 minutes at 375°F (190°C). If unsure, a food thermometer should read 165°F (74°C) inside the filling. Stuffed mini bell peppers are fun, tasty, and easy to make. We explored their main ingredients, seasonings, and garnishes. You learned how to prep, mix, and bake them perfectly. Plus, I shared great tips for customizing and serving your dish. Don’t forget about storing leftovers for later! Experiment with flavors and try different options. There’s so much you can do with this dish. Enjoy making stuffed peppers that please everyone at your table!](https://dailydishly.com/wp-content/uploads/2025/07/7be91d44-d02b-4978-8cdb-a2e2cd47e9c1-768x768.webp)
