Rainbow Veggie Spring Rolls Vibrant and Fresh Delight

Looking for a fun, healthy, and colorful snack? You’re in the right place! Rainbow Veggie Spring Rolls are packed with fresh ingredients like crispy veggies and vibrant herbs. They are easy to make and perfect for any meal or party. In this guide, I’ll share tasty ingredient ideas, step-by-step instructions, and helpful tips to make your rolls pop with flavor and color. Let’s roll into this delicious journey together!
Why I Love This Recipe
- Vibrant Colors: The combination of colorful veggies makes these spring rolls not only visually appealing but also enjoyable to eat.
- Fresh Ingredients: Using fresh herbs and veggies ensures these spring rolls are packed with flavor and nutrition.
- Customizable: You can easily swap out ingredients based on your preferences or what you have on hand, making this recipe versatile.
- Fun to Make: Rolling your own spring rolls can be a fun activity for friends and family, turning meal prep into a creative experience.
Ingredients
List of Fresh Ingredients
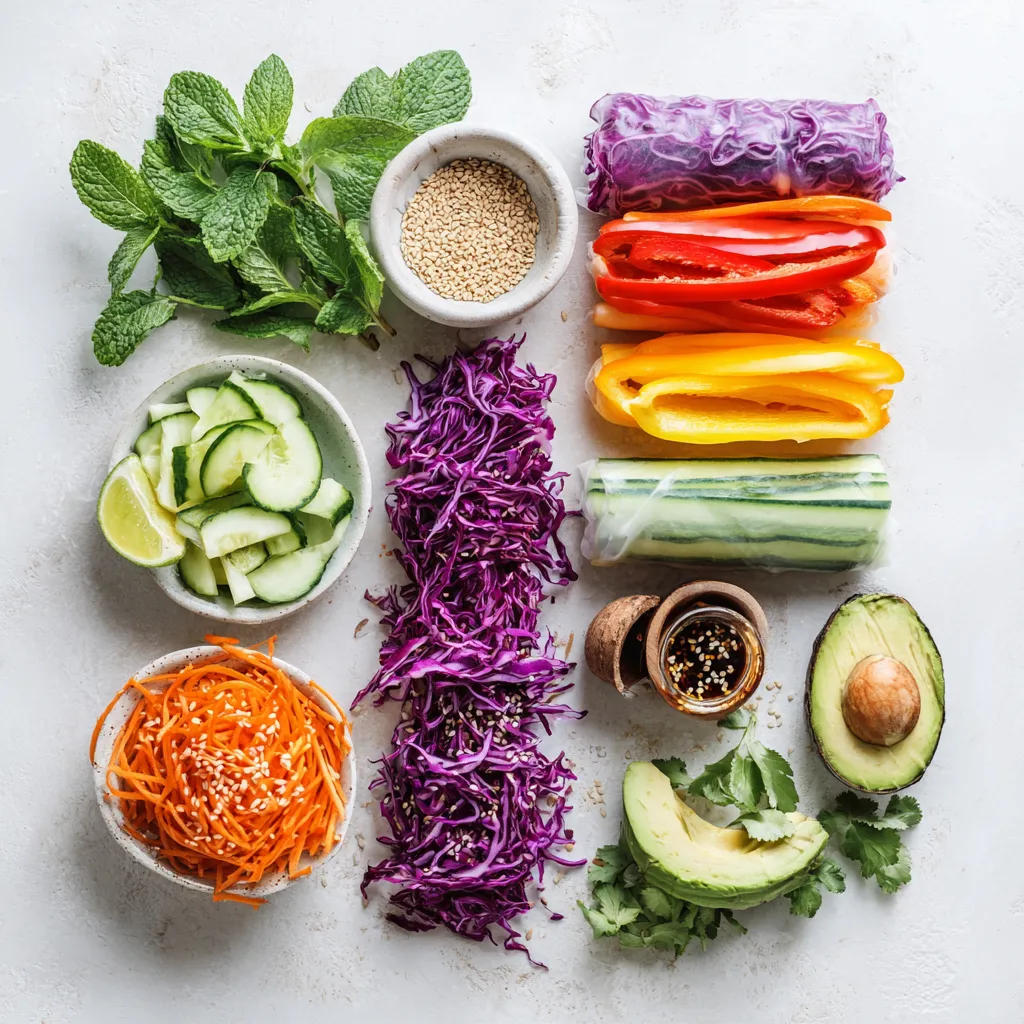
– 8 rice paper wrappers
– 1 cup red cabbage, shredded
– 1 cup carrots, julienned
– 1 cup cucumber, julienned
– 1 cup bell peppers (various colors), thinly sliced
– 1 cup avocado, sliced
– 1 cup fresh mint leaves
– 1 cup fresh cilantro leaves
To make rainbow veggie spring rolls, you will need fresh ingredients. Start with rice paper wrappers. They are the base for your rolls. Next, you will want to gather colorful veggies. Red cabbage adds a nice crunch. Carrots bring sweetness, while cucumber gives a refreshing taste. Use bell peppers for a pop of color. Avocado adds creaminess and flavor.
Fresh herbs are key. Mint leaves add a bright touch, and cilantro gives a fresh taste. These herbs make your rolls vibrant and tasty.
Optional Ingredients
– 1/4 cup sesame seeds for garnish
– Dipping sauce ingredients:
– 1/4 cup hoisin sauce
– 2 tablespoons peanut butter
– 1 tablespoon lime juice
– 1 tablespoon water
You can use sesame seeds for a garnish. They add a nutty flavor and nice crunch. For the dipping sauce, mix hoisin sauce and peanut butter. Add lime juice for tang and water to thin it out. This sauce will enhance your rolls’ flavor. It’s fun to dip!

Step-by-Step Instructions
Preparation of Vegetables
To start, wash all your vegetables. Use cold water to rinse them well. If you have carrots, peel them before cutting. For the other veggies, just rinse them to keep their fresh taste.
Next, it’s time to julienne and slice. Take the carrots and cut them into thin strips. For cucumbers and bell peppers, slice them thinly. You want all the pieces to be about the same size. This way, they will roll nicely in the spring roll. Shredding the red cabbage adds a nice crunch and color to your dish.
Soaking Rice Paper
Now, we soak the rice paper. Fill a shallow dish with warm water. Take one rice paper wrapper and dip it in the water. Keep it there for about 15-20 seconds. You want it to feel soft but not mushy.
Carefully lift the wrapper out of the water. Place it on a clean, flat surface. Be gentle to avoid any tears. If it sticks, just wet your fingers a bit to help.
Assembling Spring Rolls
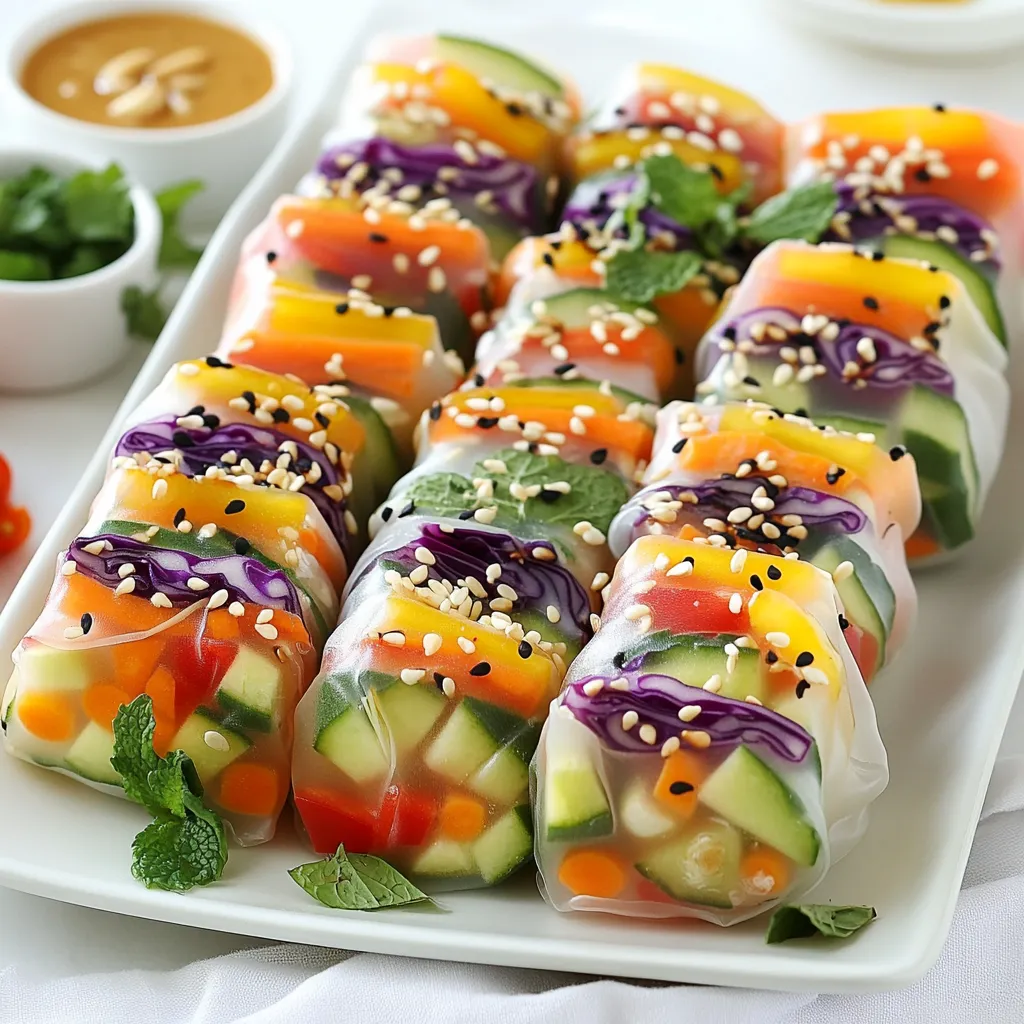
Let’s layer our colorful veggies! Start with fresh mint and cilantro leaves. Place them at the bottom third of the wrapper. Next, stack your red cabbage, carrots, cucumber, bell peppers, and avocado. Keep everything neat and colorful.
For extra flavor, sprinkle some sesame seeds over the veggies. Now, fold in the sides of the wrapper. Start rolling tightly from the bottom up. Make sure not to tear the wrapper. If you feel resistance, stop and adjust. Repeat this for the rest of the wrappers.
Enjoy your beautiful rainbow veggie spring rolls!
Tips & Tricks
Rolling Techniques
To keep the rice paper intact, start with warm water. Dip the rice paper wrapper for 15-20 seconds. It should feel soft but firm. Place it on a clean surface.
If you tear the wrapper, don’t worry! Just use a bit of extra rice paper to patch it up. When rolling, make sure to tuck in the sides tightly. This helps keep all the veggies inside.
Ingredient Substitutions
You can swap veggies for what you have. Try zucchini, radishes, or even sprouts. They add crunch and color too. For dips, use tahini or a simple soy sauce. Both are great for vegan and gluten-free diets.
Presentation Tips
Arrange your spring rolls on a bright plate. It makes them pop! You can add extra herbs around the rolls for color. Drizzle the dipping sauce on the plate for a fun touch. This makes your dish look fancy and inviting.
Pro Tips
- Freshness is Key: Use fresh vegetables for the best flavor and crunch. Always wash and dry your ingredients thoroughly before preparation.
- Perfecting the Roll: Ensure the rice paper is soft but not overly soggy. A quick dip in warm water is enough; it will continue to soften as you work.
- Flavor Boost: Experiment with herbs and spices! Adding a pinch of chili flakes or a drizzle of sesame oil can elevate the taste of your spring rolls.
- Serving Style: Arrange spring rolls on a platter with colorful garnishes like sliced lime or extra herbs for a visually appealing presentation.

Variations
Different Flavor Profiles
You can change the taste of your rainbow veggie spring rolls in many ways.
– Adding protein options: Adding shrimp, chicken, or tofu boosts flavor and makes them filling. Simply cook the protein first, then slice it into thin strips. Place it on top of your veggies while you roll.
– Spicing it up: If you like heat, add jalapeños or other spicy ingredients. Thinly slice the jalapeños and layer them in with your veggies. This gives a nice zing to each bite.
Color Combinations
Let’s play with colors and flavors by mixing different veggies and fruits.
– Seasonal vegetables: Use fresh, seasonal veggies for variety. Think about adding radishes, snap peas, or even asparagus. Each season brings new colors and tastes that make your rolls exciting.
– Colorful fruit additions: Want a sweeter roll? You can add fruits like mango or pineapple. These fruits add a burst of sweetness and a lovely color contrast. Just slice them thin and layer them in with your veggies.
These variations will keep your spring rolls fresh and fun!
Storage Info
Best Practices for Storage
To keep your uncooked spring rolls fresh, follow these steps:
– Place a damp paper towel between the rolls. This keeps them from drying out.
– Store them in an airtight container. A container with a lid works best.
– Keep the rolls in the fridge. They stay fresh for up to two days.
For the dipping sauce:
– Store it in a sealed jar or container.
– Keep it in the fridge for a week. Stir well before using.
Reheating and Serving Suggestions
If you have leftover spring rolls, here’s how to reheat them:
– Preheat your oven to 350°F (175°C).
– Place the rolls on a baking sheet. Cover them with foil to keep moisture.
– Heat for about 10 minutes. This keeps them from drying out.
Packing spring rolls for lunch is easy:
– Wrap them in parchment paper or foil. This helps keep them fresh.
– Include a small container for the dipping sauce. It prevents sogginess.
– Add a side of fresh veggies for a balanced meal.
FAQs
How do you keep rice paper from sticking together?
To keep rice paper from sticking, layer them with care. Use a clean parchment paper between each rice paper wrapper. This helps them not to touch and stick. When storing them, place a damp cloth over the wrappers. It keeps them moist and fresh. You can also lightly coat them with oil if needed.
Can you make spring rolls ahead of time?
Yes, you can make spring rolls ahead of time. I suggest you store them in the fridge for up to one day. Cover them with a damp cloth or plastic wrap. This keeps them from drying out. It’s best to eat them fresh, but making them a few hours ahead is okay.
What is a good substitute for hoisin sauce in the dipping sauce?
If you need a substitute for hoisin sauce, try soy sauce mixed with a touch of sugar. You can also use peanut sauce or teriyaki sauce. Each option gives a different flavor but still tastes great. Feel free to mix and match to find your favorite dip!
Making spring rolls at home is simple and fun. You learned about fresh ingredients like rice paper, veggies, and herbs. I shared tips on how to prep, soak, and roll your spring rolls. We also discussed storage and creative flavor combinations.
Remember, the key is to be creative and have fun with it. Try different veggies and dips. Whether you’re new or experienced, making these rolls can bring joy to your kitchen. Enjoy crafting your perfect spring roll

Rainbow Veggie Spring Rolls
Ingredients
- 8 pieces rice paper wrappers
- 1 cup red cabbage, shredded
- 1 cup carrots, julienned
- 1 cup cucumber, julienned
- 1 cup bell peppers (various colors), thinly sliced
- 1 cup avocado, sliced
- 1 cup fresh mint leaves
- 1 cup fresh cilantro leaves
- 0.25 cup sesame seeds (optional)
- 0.25 cup hoisin sauce
- 2 tablespoons peanut butter
- 1 tablespoon lime juice
- 1 tablespoon water
Instructions
- Prepare all your vegetables by washing, peeling (if necessary), and cutting them into thin strips or slices.
- Fill a shallow dish with warm water. Take a rice paper wrapper and carefully dip it into the water for about 15-20 seconds, or until it becomes soft and pliable.
- Place the softened rice paper on a clean flat surface. Start layering your veggies; begin with a few mint and cilantro leaves, then add a combination of red cabbage, carrots, cucumber, bell peppers, and avocado neatly on the bottom third of the wrapper.
- Sprinkle a few sesame seeds over the veggies for extra flavor and texture.
- Fold the sides of the wrapper over the filling, then roll it tightly from the bottom up to enclose the filling, creating a spring roll. Repeat this process for the remaining wrappers and filling.
- For the dipping sauce, in a small bowl, whisk together hoisin sauce, peanut butter, lime juice, and water until smooth. Adjust the consistency with additional water if needed.
- Serve the rainbow veggie spring rolls on a platter, alongside the dipping sauce.


![For a vibrant and tasty treat, use a mix of colorful fruits. Here’s what you need: - 1 cup strawberries, hulled - 1 cup orange segments - 1 cup pineapple chunks - 1 cup green grapes - 1 cup blueberries - 1 cup purple grapes or blackberries These fruits not only look great, but they also pack in vitamins. Each fruit adds its own flavor and texture. You can choose fresh, ripe fruits for the best taste. If you want to add a bit of sweetness, consider these options: - 2 tablespoons honey (optional) Honey brings a natural sweetness to the skewers. Drizzle it on before serving. It works well with all the fruits. Garnishing makes your skewers look even better. Use fresh mint leaves for a pop of color. Arrange the skewers on a platter for a fun display. You can also place them in a glass jar for a playful touch. This way, everyone can grab their own skewer! For the full recipe, check the detailed steps to make these beautiful treats. Start by washing all the fruits well. Rinse strawberries, grapes, blueberries, and oranges under cool water. Hull the strawberries, removing the green tops. Cut large strawberries in half for easier skewering. Peel the oranges and break them into segments. For the pineapple, slice it into bite-sized pieces. Finally, rinse the green and purple grapes. Grab wooden skewers and now it’s time to thread the fruits. Begin with a strawberry, then add an orange segment. Next, add a pineapple chunk and follow with a green grape. Then, add a blueberry and finish with a purple grape or blackberry. Aim for a vibrant pattern with all the colors of the rainbow. Each skewer should look fun and inviting! If you want to add a bit of sweetness, drizzle honey over the skewers. This step is optional, but it can enhance the flavors. For a refreshing treat, chill the skewers in the fridge for about 30 minutes before serving. Arrange them on a lovely platter and add fresh mint leaves for a pop of color. These simple steps make your rainbow fruit skewers look and taste amazing. For more detailed instructions, check the Full Recipe. Choosing ripe fruits is key for tasty skewers. Look for bright colors and firm texture. For strawberries, pick those that are deep red. Oranges should feel heavy and have smooth skin. Pineapples should have a sweet smell and give slightly when pressed. Grapes are ripe when they are plump and not wrinkled. Blueberries should be deep blue, while purple grapes should show no signs of green. When skewering, use sturdy wooden sticks or metal skewers. Start with a strawberry at the bottom. Follow with an orange segment and then a pineapple chunk. Next, add a green grape and a blueberry. Finish with a purple grape or blackberry on top. This order keeps the colors bright and fun. Space the fruits a bit apart to allow for easy eating. For parties, arrange your skewers on a big platter. Display them upright in a tall glass or jar. This makes them easy to grab. You can add a small bowl of honey for dipping. Fresh mint leaves add a nice touch and flavor. Guests will love the colors and the taste! For more ideas, check out the Full Recipe. {{image_2}} You can switch up the fruits in your skewers. Try using kiwi instead of orange for a tangy taste. Swap in mango for a sweeter flavor, or use raspberries for a tart kick. Here are some great options: - Kiwi - Mango - Raspberries - Peaches - Apples These fruits add different colors, flavors, and textures. You can mix and match based on what you like. Get creative with your combinations! Dips can make your fruit skewers even more fun. You can serve them with yogurt or chocolate sauce. Here are some tasty ideas: - Vanilla yogurt - Honey yogurt - Chocolate sauce - Nut butter Dipping adds a new layer of flavor. You can make a small bowl for each dip. This way, everyone can enjoy their favorite! Make your skewers special for holidays or parties. For a birthday, use colorful sprinkles on your yogurt dip. For summer picnics, create a “beach” theme with coconut flakes. You can also arrange the fruits in shapes, like stars or hearts. This adds a fun touch to your dish. For more details on making these colorful treats, check the Full Recipe. To keep your rainbow fruit skewers fresh, store them in the fridge. Place them in an airtight container. This helps prevent the fruits from drying out or absorbing odors. If you plan to serve them later, keep the honey separate until just before serving. This way, the skewers stay crisp and colorful. When prepping your skewers, wash and cut your fruits ahead of time. Keep them in separate containers for easy access. This makes it simple to assemble the skewers when you’re ready. If you want to make them in advance, prepare them a few hours before serving. Just remember to refrigerate them to keep them fresh. Most fruits have a good shelf life when stored correctly. Here’s a quick guide: - Strawberries: 3–5 days - Oranges: 1–2 weeks - Pineapple: 3–5 days - Grapes: 1 week - Blueberries: 1 week - Blackberries: 3–5 days Always check for freshness before using any fruit. By following these tips, your rainbow fruit skewers will stay vibrant, tasty, and ready to enjoy! For the full recipe, check back on the main article. Yes, you can use frozen fruits for skewers. However, they may not hold their shape well. Frozen fruits often lose some water when thawed. This can make them mushy. If you want to use them, let them thaw first. Pat them dry with a towel to reduce excess moisture. This way, they won’t drip and make a mess. To boost the nutrition of your rainbow fruit skewers, consider these tips: - Add a source of protein. Use yogurt, cheese cubes, or nuts. - Include seeds. Sprinkle chia or flaxseed on the fruit. - Use whole fruits instead of fruit juice. Whole fruits have more fiber. - Mix in some veggies. Cherry tomatoes or cucumber slices can add crunch. These small changes can make your skewers even healthier without losing flavor. For a summer picnic, the best fruits are those that are sweet and refreshing. Here are some great choices: - Strawberries: Juicy and easy to eat. - Watermelon: Hydrating and fun to slice. - Pineapple: Sweet and tangy. - Grapes: Bite-sized and portable. - Blueberries: Packed with antioxidants. - Raspberries: Tart and flavorful. These fruits not only taste great but also look beautiful on your skewers. You can find the full recipe for rainbow fruit skewers [here]. Enjoy! Rainbow fruit skewers are fun and easy to make. We covered the best fruits, optional sweeteners, and cool presentation ideas. You learned how to prep the fruit and assemble the skewers step by step. I shared tips on choosing ripe fruit and serving them at gatherings. We also explored variations, like adding dips and themed designs. Finally, I discussed how to store your skewers for freshness. Now, grab your favorites and get creative with your skewers! Enjoy these tasty treats while having fun with friends and family.](https://dailydishly.com/wp-content/uploads/2025/06/1f4123b9-dd53-4d15-af26-e58167d567ef-768x768.webp)


