Roast Garlic Parmesan Cauliflower Tasty Side Dish

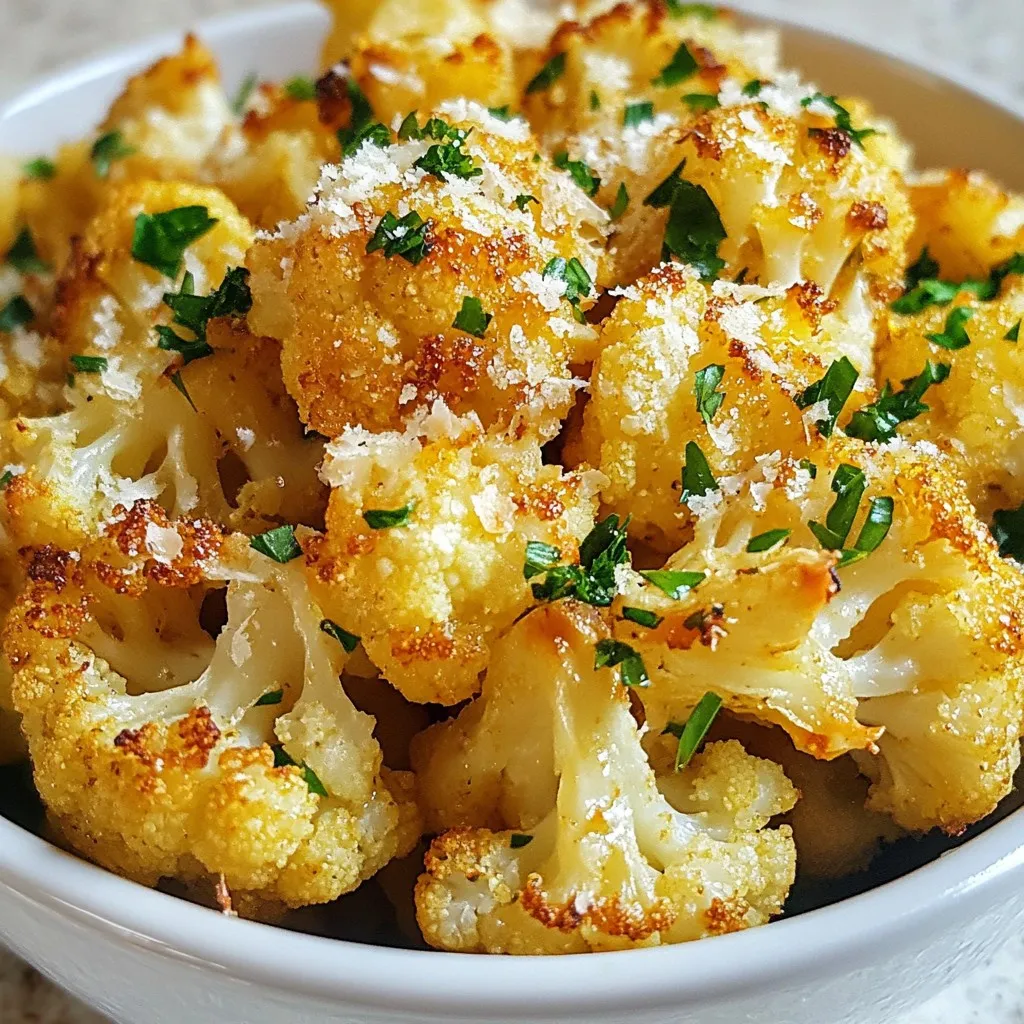
Looking for a tasty side dish that’s easy and fun to make? Let me introduce you to Roast Garlic Parmesan Cauliflower! This dish is packed with flavor. It’s creamy, cheesy, and just the right amount of crispy. Plus, it pairs perfectly with any main course. In this post, I’ll share all the steps, tips, and variations you need to master this delightful recipe. Get ready to impress your family and friends!
Why I Love This Recipe
- Delicious Flavor Combination: The blend of roasted garlic and Parmesan cheese creates a savory, mouthwatering dish that elevates cauliflower to a whole new level.
- Simple to Prepare: With minimal ingredients and straightforward steps, this recipe is perfect for busy weeknights or as a side for special occasions.
- Healthier Alternative: Roasting cauliflower is a great way to enjoy a low-carb and nutrient-rich vegetable without sacrificing flavor or satisfaction.
- Customizable: You can easily add your favorite spices or herbs to make this dish your own, ensuring it fits any meal or taste preference.
Ingredients
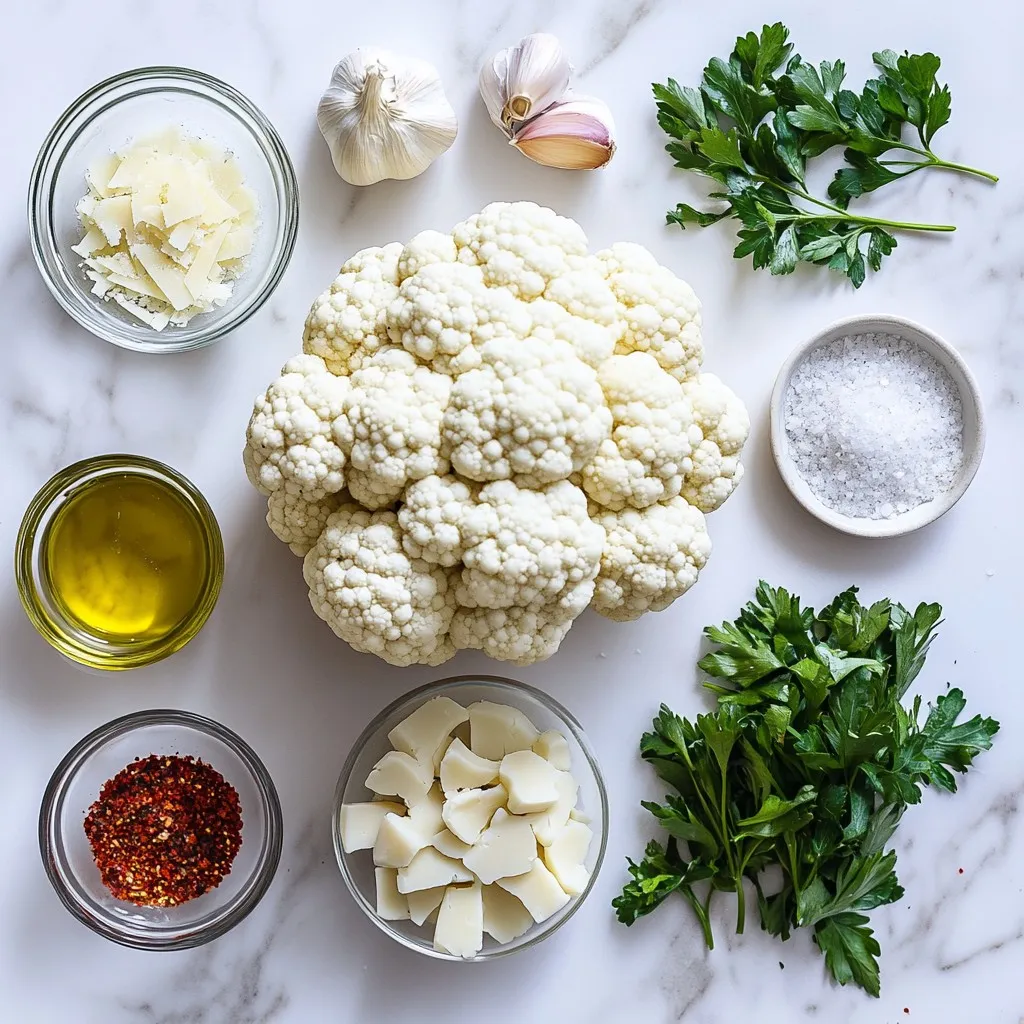
To make Roast Garlic Parmesan Cauliflower, you need a few simple ingredients. This dish is easy and delicious. Here’s what you need:
– 1 large head of cauliflower, cut into florets
– 4 tablespoons olive oil
– 6 cloves garlic, minced
– 1 teaspoon garlic powder
– ½ teaspoon smoked paprika
– Salt and pepper, to taste
– ½ cup grated Parmesan cheese
– 2 tablespoons fresh parsley, chopped
– Zest of 1 lemon (optional for brightness)
Each ingredient plays a key role. The cauliflower is the star. It brings a nice texture. The olive oil helps the cauliflower roast well. Garlic adds a strong, savory flavor.
Garlic powder and smoked paprika give depth and warmth. Salt and pepper enhance all these flavors. Parmesan cheese creates a crispy, cheesy top. Fresh parsley and lemon zest brighten the dish.
You can easily adjust these ingredients. Want it spicy? Add some red pepper flakes. Want a vegan dish? Try nutritional yeast instead of Parmesan. The options are endless!

Step-by-Step Instructions
Preparation Steps
1. Preheating the oven: Start by preheating your oven to 425°F (220°C). This step is key to achieving that perfect roast.
2. Mixing the ingredients: In a large mixing bowl, combine the cauliflower florets with 4 tablespoons of olive oil. Add 6 cloves of minced garlic, 1 teaspoon of garlic powder, and ½ teaspoon of smoked paprika. Toss everything well, ensuring each floret gets coated. Season with salt and pepper to taste. Finally, mix in half of the ½ cup of grated Parmesan cheese.
Roasting Instructions
1. Spreading and timing for roasting: Spread the cauliflower mixture evenly on a baking sheet lined with parchment paper. Roast it in the oven for 25-30 minutes. Stir halfway through to help it cook evenly. You want the cauliflower to become tender and golden brown.
2. Finishing touches with cheese: In the last 5 minutes of roasting, sprinkle the remaining Parmesan cheese over the cauliflower. This creates a cheesy, crispy topping. Once the timer goes off, take it out and sprinkle chopped parsley and lemon zest for a fresh touch. Enjoy your flavorful side dish!
Tips & Tricks
Perfecting the Dish
To ensure even seasoning, coat each cauliflower floret well. Mix olive oil, minced garlic, garlic powder, and smoked paprika in a large bowl. Toss the florets until they are fully covered. This step is key for flavor.
For optimal tenderness and crispiness, roast your cauliflower at 425°F. This high heat creates a nice golden brown. Stir the cauliflower halfway through cooking. This helps it cook evenly. Check for tenderness by piercing it with a fork. It should be soft but not mushy.
Serving Suggestions
For a beautiful presentation, serve roasted cauliflower in a rustic bowl. A platter works great too. Garnish with extra parsley and lemon slices. This adds a splash of color and brightness.
Pair this dish with grilled chicken or fish. It also complements pasta dishes nicely. The garlic and Parmesan flavors enhance many main meals. Feel free to get creative with your serving ideas!
Pro Tips
- Choose the Right Cauliflower: Opt for a fresh head of cauliflower with firm, tightly packed florets for the best texture and flavor.
- Don’t Rush the Roasting: Allow the cauliflower to roast until golden and tender, as this caramelization brings out the natural sweetness of the vegetable.
- Garlic Variations: For a deeper garlic flavor, consider roasting whole cloves alongside the cauliflower and adding them in at the end.
- Experiment with Cheese: Try mixing in different cheeses like cheddar or gouda for a unique twist on the classic Parmesan flavor.

Variations
Flavor Enhancements
You can make this dish even more exciting. Try adding spices like cumin or curry powder for warmth. Fresh herbs like thyme or rosemary can bring a nice twist. These options add depth and can change the flavor profile of the dish.
If you want to swap out the Parmesan cheese, try nutritional yeast. It gives a cheesy flavor without dairy. You can also use vegan cheese shreds, which melt nicely. This way, you keep the tasty aspect while catering to different diets.
Dietary Adjustments
To make this dish vegan, simply skip the Parmesan cheese. Use a sprinkle of nutritional yeast instead. This keeps the savory taste while being plant-based.
For gluten-free options, this dish is already gluten-free. Just ensure your other ingredients, like spices, are also gluten-free. This makes it easy for everyone to enjoy this tasty side dish.
Storage Info
How to Store Leftovers
To keep your roast garlic Parmesan cauliflower fresh, store it in the fridge. Place it in an airtight container. Make sure it cools to room temperature before sealing. This way, it will stay tasty for up to three days.
If you want to store it longer, try freezing it. Spread the cooled cauliflower on a baking sheet in a single layer. Freeze for about an hour, then transfer it to a freezer-safe bag. This method helps prevent clumping. You can keep it frozen for up to three months.
Reheating Instructions
When you’re ready to enjoy leftovers, reheating is key. The oven is the best way to keep the texture and flavor. Preheat it to 350°F (175°C). Spread the cauliflower on a baking sheet and cover it loosely with foil. Heat for about 15-20 minutes, removing the foil for the last few minutes. This will help it regain some crispiness.
You can also use the microwave if you’re in a hurry. Place the cauliflower in a microwave-safe dish and cover it with a damp paper towel. Heat in short bursts of 1-2 minutes, checking often. This method is faster, but it may not keep the crispness as well as the oven.
FAQs
Common Questions
How do I know when the cauliflower is done?
You can tell the cauliflower is done when it turns golden brown. It should be tender but not mushy. The best way to check is to pierce it with a fork. If it slides in easily, it’s ready to serve.
Can I use frozen cauliflower instead of fresh?
Yes, you can use frozen cauliflower. Just make sure to thaw it first. Pat it dry with a towel to remove excess moisture. This helps keep it crispy while roasting.
Ingredient Substitutions
What can I substitute for Parmesan cheese?
If you need a substitute for Parmesan cheese, try nutritional yeast. It gives a cheesy flavor without dairy. You can also use Pecorino Romano or Grana Padano for a similar taste.
Is there a garlic powder alternative?
You can use garlic salt in place of garlic powder. Just be sure to adjust the salt in your recipe. Fresh minced garlic is another great option, adding a strong garlic flavor to your dish.
This article covered how to make a delicious roasted cauliflower dish. We explored key ingredients, like garlic and Parmesan. I provided step-by-step instructions for preparation and roasting. You found tips to enhance flavor and serve it well. You learned about variations to fit dietary needs. Plus, I shared storage tips for leftovers.
Roasted cauliflower is a versatile and healthy option. I hope you enjoy making it as much as I d

Roast Garlic Parmesan Cauliflower
Ingredients
- 1 large head cauliflower, cut into florets
- 4 tablespoons olive oil
- 6 cloves garlic, minced
- 1 teaspoon garlic powder
- 0.5 teaspoon smoked paprika
- to taste salt and pepper
- 0.5 cup grated Parmesan cheese
- 2 tablespoons fresh parsley, chopped
- 1 zest of lemon (optional for brightness)
Instructions
- Preheat your oven to 425°F (220°C).
- In a large mixing bowl, combine the cauliflower florets with olive oil, minced garlic, garlic powder, and smoked paprika. Toss well so that the cauliflower is evenly coated.
- Season with salt and pepper to taste, then mix in half of the grated Parmesan cheese.
- Spread the cauliflower mixture evenly on a baking sheet lined with parchment paper.
- Roast in the preheated oven for 25-30 minutes or until the cauliflower is tender and golden brown, stirring halfway through to ensure even cooking.
- In the last 5 minutes of roasting, sprinkle the remaining Parmesan cheese over the cauliflower to create a cheesy, crispy topping.
- Once done, remove from the oven and sprinkle chopped parsley and lemon zest over the top for a refreshing contrast.


![- 6 large eggs - 1 cup fresh spinach, chopped - 1/2 cup cherry tomatoes, halved - 1/2 cup bell pepper, diced (any color) - 1/4 cup onion, finely chopped - 1/4 cup feta cheese, crumbled (optional) - 1 tablespoon olive oil - Salt and pepper to taste - 1/2 teaspoon garlic powder - 1/2 teaspoon dried oregano Each ingredient in these muffins brings a lot of good stuff. Eggs are full of protein and help build strong muscles. Spinach is packed with vitamins A and C, plus iron, which is great for energy. Cherry tomatoes add antioxidants, protecting your cells. Bell peppers provide vitamin C, which helps your body heal. Onions add flavor and may boost heart health. Feta cheese gives a nice taste and some calcium. Olive oil adds healthy fats and helps you absorb nutrients. Garlic powder and oregano bring extra flavor and may support your immune system. You can swap ingredients to fit your taste. Use egg whites instead of whole eggs for fewer calories. For a dairy-free option, try nutritional yeast or a plant-based cheese. If you don’t have fresh spinach, frozen spinach works too. Just make sure to thaw and drain it first. Other veggies like zucchini or mushrooms can replace bell peppers. You can even add spices like cumin or paprika for a twist. The full recipe lets you explore these fun options! Start by preheating your oven to 350°F (175°C). This temperature helps your muffins bake evenly. Next, grease a muffin tin with cooking spray or olive oil. This step prevents the muffins from sticking. In a large bowl, crack the six eggs. Whisk them well until they blend. Add salt, pepper, garlic powder, and dried oregano. Mix these ingredients until combined. Now, heat a tablespoon of olive oil in a skillet over medium heat. Add the chopped onion and diced bell pepper. Sauté them for about 3-4 minutes. You want them soft but not brown. Next, stir in one cup of chopped spinach. Let the spinach wilt for about 1-2 minutes. Remove the skillet from the heat. Add the sautéed veggies and half a cup of halved cherry tomatoes to the egg mixture. If you like, fold in a quarter cup of crumbled feta cheese. This adds a nice flavor. Evenly pour the egg and veggie mix into the muffin tin. Fill each cup about 3/4 full to allow room for rising. Bake the muffins in your preheated oven for 18-20 minutes. Keep an eye on them as they bake. The eggs should set and turn a light golden color. To check for doneness, insert a toothpick into the center of a muffin. If it comes out clean, your muffins are ready. If not, give them a few more minutes. Once cooked, remove the muffin tin from the oven. Let it cool for a few minutes. This step makes it easier to remove the muffins. Gently lift them out and place on a plate. Now, you have delicious and healthy spinach egg muffins! Enjoy them warm, or store them for later. For the full recipe, refer to the [Full Recipe]. You can make your muffins unique with different veggies. Try adding mushrooms or zucchini for more flavor. You can also switch the cheese. Swap feta for cheddar or goat cheese. If you're a spice lover, add a pinch of red pepper flakes for heat. You can even use herbs like basil or thyme to change the taste. These tweaks let you enjoy different flavors each time you make them. Sautéing your veggies before adding them to the eggs brings out their taste. This step softens the onions and bell peppers, making them sweet. You can also roast your tomatoes for a smoky flavor. Adding garlic while you sauté gives a nice aroma and taste. If you want a richer flavor, try using butter instead of olive oil. These small changes make a big difference in how your muffins taste. These muffins taste great with many sides. Serve them with a fresh salad for a light meal. You can also pair them with avocado slices for creaminess. A dollop of salsa on top adds a nice kick. For breakfast, a side of fruit complements the savory muffins well. Try them with a cup of yogurt or a smoothie for a balanced start to your day. You can find the full recipe [here](#). {{image_2}} You can easily make these muffins vegetarian or add meat. For a meat option, try diced ham or cooked bacon. You can mix in turkey sausage for extra protein. If you stick to veggies, load up on more colorful peppers. Zucchini or mushrooms add a nice touch too. Both options taste great and keep your muffins full of flavor. To make these muffins gluten-free, focus on the ingredients. The recipe already uses no flour. Make sure to check that all your add-ins, like cheese or meat, are gluten-free. You can even swap feta for a dairy-free cheese if needed. These simple changes let everyone enjoy your tasty muffins. Get creative with flavors! Fresh herbs like basil, parsley, or thyme can brighten your muffins. If you want cheese, try cheddar or goat cheese for a twist. Spice lovers can add red pepper flakes or smoked paprika. Each combination offers a new taste adventure. Explore different flavors to find your favorite mix. For the full recipe, check the details provided earlier. To keep your healthy spinach egg muffins fresh, let them cool first. Once cool, place them in an airtight container. You can store them in the fridge for up to five days. If you want them to last longer, freezing is a great option. To reheat your muffins, use the microwave or oven. If using a microwave, place one muffin on a plate. Heat it for about 30 seconds. If you prefer the oven, preheat to 350°F (175°C). Place the muffins on a baking sheet and heat for about 10 minutes. This helps keep them moist and tasty. Freezing is simple. Wrap each muffin in plastic wrap. Then, place them in a freezer-safe bag. Label the bag with the date. They will stay good for up to three months. When ready to eat, thaw them in the fridge overnight before reheating. You can enjoy these muffins anytime! For the full recipe, check out the Healthy Spinach Egg Muffins. To make your Healthy Spinach Egg Muffins fluffier, whisk the eggs well. You can also add a splash of milk or cream. This helps to create air bubbles in the eggs. Baking powder is another option. Just a teaspoon can lift the muffins up. Make sure not to overmix your batter. This keeps the muffins light. Yes, you can use frozen spinach. Just thaw it and squeeze out excess water. This prevents your muffins from becoming soggy. Frozen spinach is a great time-saver. It’s also nutrient-rich, just like fresh spinach. However, fresh spinach gives a brighter color and texture. Both options work well, so choose what you prefer. Spinach is full of vitamins and minerals. It contains vitamin K, which helps with bone health. Spinach is also rich in antioxidants. These help fight free radicals in your body. Eggs are a great source of protein. They help build and repair tissues. They also contain choline, which supports brain health. Together, spinach and eggs make a nutritious meal. Enjoy them in your Healthy Spinach Egg Muffins! For the full recipe, check out the section above. These healthy spinach egg muffins are easy to make and full of flavor. We covered the ingredients, their benefits, and tasty substitutions. You learned step-by-step tips for perfect baking and how to check for doneness. We discussed ways to customize your muffins and shared storage tips for freshness. Remember, variations allow you to cater to different diets and preferences. These muffins are not just delicious; they are also nutritious. Enjoy making and sharing them with friends and family!](https://dailydishly.com/wp-content/uploads/2025/07/77bd2bbd-3206-4841-bb2c-177ed70e9b7b-768x768.webp)

![To make a refreshing Lemon Basil Chickpea Salad, you need the following: - 1 can (15 oz) chickpeas, drained and rinsed - 1 cup cherry tomatoes, halved - 1 cucumber, diced - 1 bell pepper (any color), diced - 1/4 red onion, finely chopped - 1/4 cup fresh basil leaves, chopped - Juice of 1 lemon - 3 tablespoons extra-virgin olive oil - Salt and pepper to taste - 1/4 teaspoon garlic powder - 1/4 teaspoon red pepper flakes (optional) When picking your produce, choose firm tomatoes and bright, crisp cucumbers. Look for bell peppers that feel heavy for their size. Fresh basil should smell sweet and look vibrant. These tips help ensure your salad shines with flavor. You can add extra flavor and texture to your salad with these options: - Avocado, diced for creaminess - Feta cheese, crumbled for a salty kick - Olives, sliced for a briny touch - Grilled corn for sweetness Feel free to swap ingredients based on what’s in season. For example, use zucchini in summer or roasted butternut squash in fall. This flexibility makes the salad fun and fresh all year long. For the complete recipe, check out the [Full Recipe]. To make the Lemon Basil Chickpea Salad, start with a large bowl. Combine the following ingredients: - 1 can (15 oz) chickpeas, drained and rinsed - 1 cup cherry tomatoes, halved - 1 cucumber, diced - 1 bell pepper (any color), diced - 1/4 red onion, finely chopped - 1/4 cup fresh basil leaves, chopped Mix these well. The chickpeas add protein and texture. The tomatoes and cucumber bring freshness and crunch. The bell pepper adds color, while the onion gives a mild zing. Once mixed, let’s prepare the dressing. You can serve the salad right away, but I suggest letting it sit for at least 10 minutes. This time helps the flavors blend nicely. For the dressing, grab a small bowl. Whisk together these ingredients: - Juice of 1 lemon - 3 tablespoons extra-virgin olive oil - Salt and pepper to taste - 1/4 teaspoon garlic powder - 1/4 teaspoon red pepper flakes (optional) The lemon juice gives a bright, tangy taste. Olive oil adds richness. Adjust the salt and pepper to your liking. If you want a kick, add the red pepper flakes. Aim for a smooth blend in your dressing. Drizzle it over your salad and toss gently. Taste the salad and adjust seasoning if needed. Enjoy this vibrant dish fresh, or chill it for a refreshing bite. For the full recipe, check out the detailed instructions. You can pair Lemon Basil Chickpea Salad with many dishes. It goes well with grilled chicken or fish. You can also serve it with warm pita bread for a filling meal. For a light lunch, try it with a scoop of quinoa. When presenting the salad, use a large, bright bowl. This makes the colors pop and draws attention. Garnish with extra basil leaves or lemon slices for a fresh look. Adjusting the seasonings can make this salad perfect for your taste. If you like more zest, add extra lemon juice. For added heat, sprinkle in more red pepper flakes. You can also mix in more garlic powder for a stronger flavor. If you have leftovers, store them in an airtight container. To enhance the flavors, let the salad rest for a bit before eating. Reheating is not usually needed, but you can warm it slightly if you prefer. Just be careful not to heat it too much, as the fresh veggies taste best cold. {{image_2}} You can easily switch up the vegetables in your Lemon Basil Chickpea Salad. Here are some ideas: - Zucchini: Grate or dice it for a fresh crunch. - Carrots: Shred them for a sweet touch. - Corn: Add sweet corn for extra flavor and texture. You can also swap out chickpeas for other legumes: - Black beans: They add a rich, earthy taste. - Lentils: These will make your salad even heartier. For herbs, feel free to get creative: - Mint: It gives a refreshing twist. - Cilantro: Perfect if you love its bold flavor. When it comes to dressings, you can personalize it: - Balsamic vinaigrette: Adds a tangy sweetness. - Greek yogurt dressing: For a creamy element. This salad is versatile for different diets. To make it vegan, simply ensure the dressing is plant-based. You can replace any non-vegan ingredients with plant-friendly options: - Use nutritional yeast instead of cheese for a cheesy flavor without dairy. For gluten-free needs, this salad is already safe! Just make sure any added ingredients are gluten-free. To lower calories, skip the oil or use less. You can also add more veggies to bulk it up without extra calories. If you want to boost protein, consider these options: - Feta cheese: Crumble it on top for creamy richness. - Grilled chicken: Adds heartiness and flavor. With these variations, your Lemon Basil Chickpea Salad can fit any taste or diet. Check out the Full Recipe for all the details! To keep your Lemon Basil Chickpea Salad fresh, store it in an airtight container. Glass containers work well, but plastic ones are fine too. Make sure the lid closes tightly. Place the salad in the fridge right away. This helps lock in flavors and keeps everything crisp. If you have extra dressing, store it separately. This way, your salad won’t get soggy. When you’re ready to eat, simply drizzle the dressing over the salad and toss it again. Your salad will stay fresh in the fridge for about three days. After that, the veggies may lose their crunch. Look for signs of spoilage. If the salad smells off or looks slimy, it’s time to toss it. Make sure to check the basil too. If the leaves turn brown or wilt, it’s best to discard them. Enjoy your salad while it’s fresh for the best taste. For the full recipe, check [Full Recipe]. What can I add to make this salad heartier? You can add cooked quinoa or farro for more fiber. Chopped avocado adds creaminess. Grilled chicken or shrimp boosts protein. Can I make this salad ahead of time? Yes, you can make this salad ahead. It tastes even better after sitting for a while. Just store it in the fridge. Is there a substitute for chickpeas in this recipe? If you don't have chickpeas, try black beans or cannellini beans. Both offer protein and a nice texture. This salad is not just tasty; it’s healthy too. One serving has about 250 calories. It has 10 grams of fat and 12 grams of protein. - Chickpeas provide protein and fiber. - Tomatoes add vitamins and antioxidants. - Cucumbers keep the salad light and refreshing. - Basil offers flavor and has anti-inflammatory properties. How to make the salad more flavorful? To enhance the taste, add more lemon juice or fresh herbs. A pinch of cumin can also add depth. Recommendation for preparing for meal prepping When meal prepping, keep the dressing separate. This keeps the salad fresh and crisp. Store it in airtight containers for best results. This blog post walked you through making a fresh and tasty Lemon Basil Chickpea Salad. We covered the main ingredients and tips for choosing the best produce. You learned how to make a flavorful dressing and plenty of serving ideas. In conclusion, this salad is easy to customize for any diet and season. With proper storage, it stays fresh and tasty for days. Enjoy making this salad and share it with friends and family for a healthy treat!](https://dailydishly.com/wp-content/uploads/2025/07/d3747d36-0043-45e0-9a82-fe789303a34f-768x768.webp)


