
Looking to elevate your snacking game? Let me introduce you to Roasted Beet Hummus! This delightful recipe is not only simple but also bursts with flavor and vibrant color. Packed with nutritious beets, creamy tahini, and zesty lemon, it’s a healthful twist on a classic dip. You’re going to love how easy it is to make and how it adds a gorgeous pop to any table. Ready to dive in?
Why I Love This Recipe
- Vibrant Color: This beet hummus boasts a stunning deep pink hue that instantly brightens up any table.
- Nutrient-Packed: Beets are rich in vitamins and minerals, making this dish a healthy choice for snacking or spreading.
- Easy to Make: With simple ingredients and straightforward steps, you’ll have delicious hummus ready in no time!
- Versatile Flavor: The earthy sweetness of beets combined with tahini and garlic creates a unique flavor profile that pairs well with various dippers.
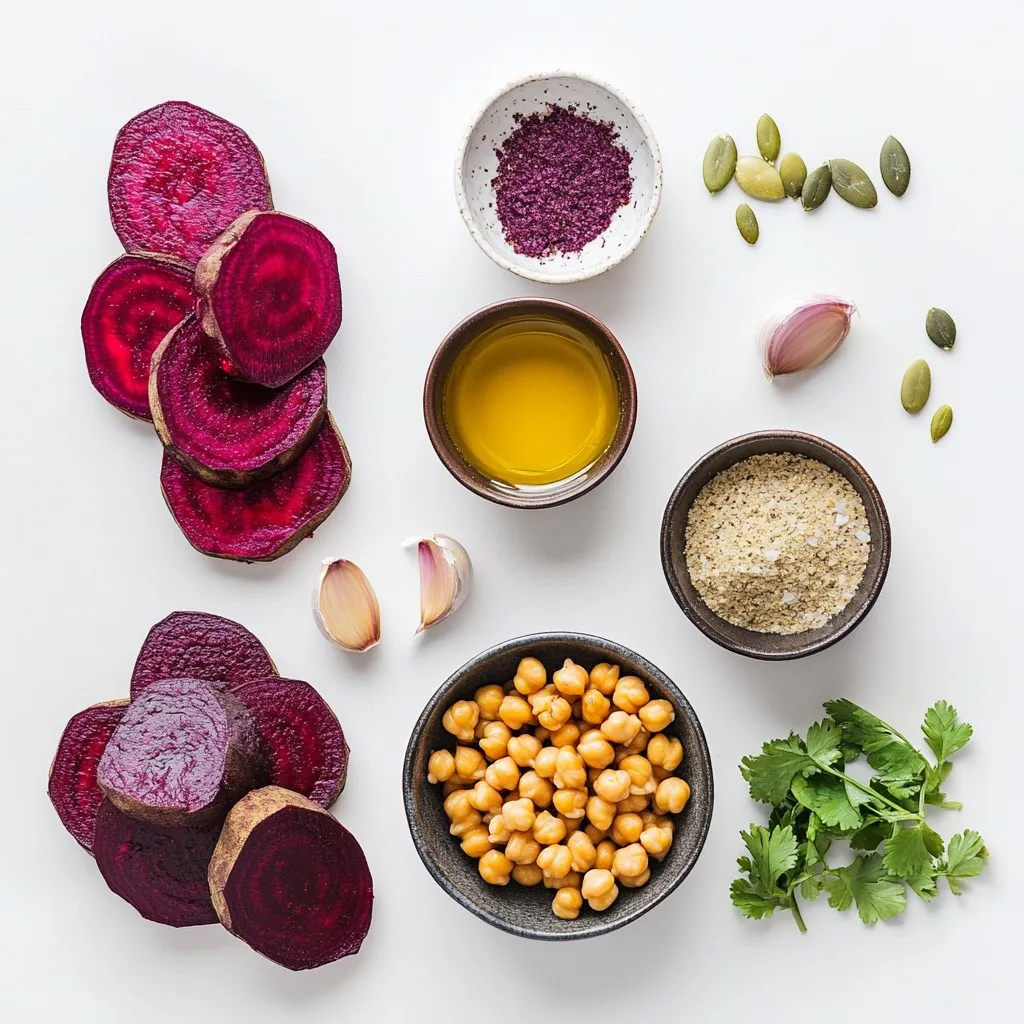
Ingredients
List of Essential Ingredients
To make roasted beet hummus, gather these key ingredients:
– 2 medium-sized beets, roasted and peeled
– 1 can (15 oz) chickpeas, drained and rinsed
– 1/4 cup tahini
– 2 tablespoons lemon juice
– 2 tablespoons olive oil
– 2 cloves garlic, minced
– 1/2 teaspoon ground cumin
– Salt and pepper to taste
– Water, as needed for consistency
These ingredients blend to create a vibrant and tasty dip. Each one plays a role in flavor and texture.
Optional Ingredients for Garnishing
For a touch of flair, consider these optional garnishes:
– Pumpkin seeds
– Fresh herbs like parsley or dill
These add crunch and a burst of color. They also enhance the flavor, making your hummus even more inviting.
Notes on Ingredient Quality
Choosing the right ingredients matters. Here are some tips:
– Fresh Beets: Look for firm, smooth beets. Avoid any that are soft or wrinkled. Fresh beets give a better taste and vibrant color to your hummus.
– Types of Tahini: Tahini can vary in flavor. Some are nutty and rich, while others might taste bitter. Choose a high-quality tahini for the best hummus.
Using good-quality ingredients ensures your roasted beet hummus is delicious. Enjoy the process of selecting and prepping your ingredients!
Step-by-Step Instructions
Preparing the Beets
To start, we need to roast the beets. Preheat your oven to 400°F (200°C). Wrap two medium-sized beets in aluminum foil. Place them on a baking sheet. Roast for 45 to 60 minutes. You want them tender enough to pierce with a fork. After roasting, let them cool for a bit. Once cool, peel off the skins using your fingers or a paper towel. The skins should come off easily. Now, chop the beets into smaller pieces. This helps when you blend them later.
Blending the Ingredients
Next, we will blend everything together. In your food processor, combine the roasted beets, one can of drained chickpeas, 1/4 cup tahini, 2 tablespoons lemon juice, 2 tablespoons olive oil, 2 minced garlic cloves, and 1/2 teaspoon ground cumin. Pulse the mixture until it’s smooth. If it seems thick, don’t worry! You can adjust it.
Achieving the Perfect Consistency
To get the right thickness, add water slowly. Start with one tablespoon at a time. Blend after each addition. Keep blending until the hummus is creamy and smooth. Season with salt and pepper to taste. Blend again to mix well. You want it just right for dipping or spreading.
Tips & Tricks
Successful Roasting Techniques
Roasting beets is key for great hummus. Set your oven to 400°F (200°C). Wrap your beets in aluminum foil. This keeps them moist and tender. Roast them for 45-60 minutes. Check for doneness with a fork. If it goes in easily, they are ready. Let the beets cool before peeling. Use gloves to avoid staining your hands!
Flavor Enhancements
You can make your hummus unique. Try adding spices like smoked paprika or cayenne pepper. A pinch of cinnamon can add warmth. If you like a bit of sweetness, add a dash of maple syrup. For a fresh twist, mix in fresh herbs like dill or basil. This gives your hummus depth and flavor.
Serving Suggestions
Serve your beet hummus in a bright bowl. Drizzle olive oil on top for shine. Garnish with pumpkin seeds and fresh herbs. This adds color and texture. Pair it with colorful veggies like carrots and cucumbers. Pita chips also work great for dipping. You can even spread it on toast for a tasty snack.
Pro Tips
- Roasting Time: Ensure the beets are fully tender by testing with a fork after 45 minutes. Depending on their size, they may need up to 60 minutes.
- Consistency Control: When blending, start with less water and gradually add until you achieve your preferred smoothness for the hummus.
- Flavor Boost: For added depth, consider roasting the garlic cloves alongside the beets for a sweeter, more mellow flavor.
- Garnish Ideas: Elevate presentation by serving with colorful veggies and a sprinkle of nuts or seeds; this adds texture and visual appeal.
Variations
Flavor Profiles
You can change the taste of beet hummus by adding spices. Here are some ideas:
– Smoked Paprika: This gives a nice smoky flavor.
– Cayenne Pepper: If you like heat, add a pinch for spice.
– Fresh Herbs: Chopped mint or cilantro adds freshness.
– Lemon Zest: This brightens the flavor and adds a zing.
Mix and match these spices to find your favorite flavor. Each one brings a new twist to the hummus.
Dietary Options
Beet hummus is great for many diets. It’s vegan and gluten-free, making it easy for everyone to enjoy. Here are some adaptations:
– Nut-Free: Skip tahini and use sunflower seed butter.
– Low-Carb: Use fewer chickpeas or replace them with cauliflower.
– Oil-Free: Replace olive oil with vegetable broth for a lighter version.
These options help you make hummus fit your needs or preferences.
Creative Uses
Beet hummus is not just a dip. It has many creative uses that can impress your guests:
– Spread: Slather it on toast or sandwiches instead of butter.
– Dip: Pair it with fresh veggies, chips, or crackers.
– Salad Dressing: Thin it with water and drizzle over salads.
– Pasta Sauce: Mix it into pasta for a colorful twist.
Try these ideas to enjoy beet hummus in fun ways. Each use highlights its vibrant color and taste.
Storage Info
How to Store Roasted Beet Hummus
Store your roasted beet hummus in an airtight container. Glass containers work best for keeping the flavor fresh. It will stay good in the fridge for about 4 to 5 days. Make sure to seal it tightly to prevent any odors from mixing in. If you notice any changes in smell or color, it’s best to throw it out.
Freezing Instructions
To freeze beet hummus, use a freezer-safe container. Leave some space at the top for expansion. You can also use ice cube trays for smaller portions. When you want to use it, thaw the hummus in the fridge overnight. For quick thawing, place the container in cold water for 30 minutes.
Reheating Tips
Reheat your beet hummus gently. Use a microwave or a stove over low heat. If it seems dry, stir in a little water or olive oil. This helps keep the texture smooth and creamy. Taste and adjust the seasoning if needed. Enjoy your hummus warm or at room temperature!
FAQs
What are the health benefits of beets?
Beets are packed with nutrients. They are low in calories but high in vitamins. One cup of cooked beets has:
– Calories: 58
– Fiber: 4 grams
– Vitamin C: 6% of the Daily Value (DV)
– Folate: 37% of the DV
– Potassium: 9% of the DV
Eating beets may help lower blood pressure. They also support heart health. The natural sugars in beets provide energy, while fiber aids digestion. Plus, their bright color comes from antioxidants, which fight free radicals in the body.
How long does roasted beet hummus last in the fridge?
Roasted beet hummus lasts about 5 to 7 days in the fridge. Store it in an airtight container for best results. Make sure the hummus is cool before sealing it. If you see any signs of spoilage, like a bad smell or mold, throw it away.
Can I use fresh beets instead of roasted?
Yes, you can use fresh beets, but the taste will differ. Fresh beets are earthy and crisp, while roasted beets become sweet and tender. If you use fresh beets, consider cooking them first. Boil or steam them until they are soft. This step makes blending easier and enhances flavor.
You learned about making delicious roasted beet hummus. We covered key ingredients and their quality, along with easy steps for preparation. Tips for roasting and flavoring added depth to your dish, and I shared fun variations for all diets. Lastly, you have storage tips to keep your hummus fresh. Enjoy crafting your hummus and exploring its many use


