Salted Caramel Apple Nachos Irresistible Delight

Looking for a sweet treat that’s easy to make and hard to resist? Welcome to “Salted Caramel Apple Nachos Irresistible Delight.” This fun dessert blends fresh apples with rich caramel, making every bite a tasty adventure. Whether you’re hosting a party or just treating yourself, these nachos are sure to impress. Let’s dive into the simple steps and fresh flavors that will make you the star of any gathering!
Why I Love This Recipe
- Delicious Flavor Combination: The sweet and tart flavors of the apples perfectly balance the rich salted caramel, making each bite a delightful experience.
- Easy to Prepare: This recipe takes only 10 minutes from start to finish, making it a quick and convenient dessert or snack option.
- Customizable Ingredients: You can easily swap out the nuts, granola, or chocolate chips based on your preferences, allowing for endless variations.
- Perfect for Sharing: These nachos are great for gatherings or family nights, encouraging everyone to dig in and enjoy together.
Ingredients
Detailed Ingredient List
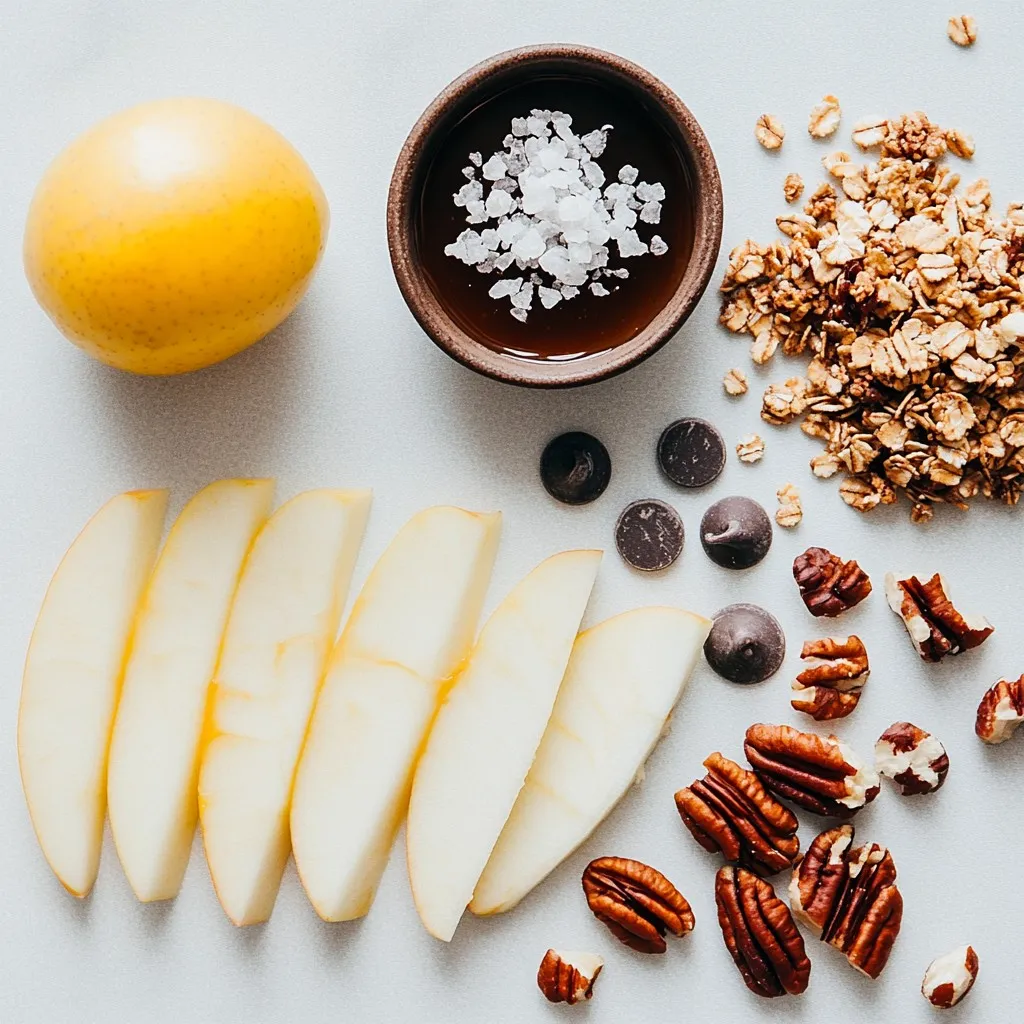
– 3 medium-sized apples (Honeycrisp, Fuji, or Granny Smith), thinly sliced
– 1 cup granola (your choice of flavor)
– 1/2 cup salted caramel sauce (store-bought or homemade)
– 1/4 cup mini chocolate chips
– 1/4 cup chopped nuts (walnuts, pecans, or almonds)
– Sea salt flakes, for sprinkling
– 1 tablespoon lemon juice (to prevent apple browning)
These ingredients create a blend of flavors and textures. The apples bring crispness. The granola adds crunch. The salted caramel enhances sweetness.
Recommended Apple Varieties
I love using Honeycrisp apples for their sweet and tart balance. Fuji apples are also great. They are sweet and juicy. Granny Smith apples add a nice tang. They contrast well with the caramel.
Substitutions for Allergies or Preferences
If you’re allergic to nuts, simply skip them. You can also use seeds, like pumpkin or sunflower. For gluten-free options, choose gluten-free granola. If you want to avoid caramel, try a berry sauce instead. This way, you can still enjoy delicious nachos!

Step-by-Step Instructions
Preparing the Apples
Start by washing the apples well. Choose medium-sized apples like Honeycrisp, Fuji, or Granny Smith for the best taste. Core each apple and slice them thinly. This makes them easy to stack and eat. To keep them fresh and bright, toss the slices in lemon juice. This step is key to prevent browning.
Assembling the Nachos
Grab a large platter or a baking sheet lined with parchment paper. Lay the apple slices down in an overlapping pattern. This creates a nice base for your nachos. Drizzle half of the salted caramel sauce over the apples. Make sure it covers them well. Next, sprinkle the granola evenly over the apples for a nice crunch. Add mini chocolate chips and chopped nuts on top. These add great flavor and texture. Finally, drizzle the rest of the salted caramel sauce over everything.
Final Touches and Serving Suggestions
Lightly sprinkle sea salt flakes over the nachos. This helps balance the sweetness of the caramel and apples. Serve immediately so everyone can enjoy the fresh taste. For a fun twist, offer extra salted caramel sauce on the side for dipping. You can also add fresh apple slices or mint leaves for a pop of color. Enjoy this sweet treat with friends and family!
Tips & Tricks
Preventing Apple Browning
To keep your apples fresh, use lemon juice. Toss the apple slices in a bowl with one tablespoon of lemon juice. This simple step stops browning. It keeps your nachos looking great. Fresh-looking apples make the dish more inviting.
Enhancing Flavor with Presentation Tips
Presentation is key for any dish. Arrange the apple slices in a fun design on your platter. Overlap them slightly to create a beautiful base. Drizzle half the salted caramel sauce in a zigzag. This adds flair, making it eye-catching. For extra color, add fresh mint leaves around the edges. You can also serve a small bowl of caramel on the side for dipping.
Best Practices for Perfect Caramel Drizzle
For a perfect caramel drizzle, heat the sauce slightly. This makes it easier to pour. Use a squeeze bottle or a spoon for more control. Drizzle the caramel evenly over the apples. Remember to save some for the final touch. A light sprinkle of sea salt balances the sweetness perfectly.
Pro Tips
- Choose the Right Apples: Use a mix of sweet and tart apples like Honeycrisp and Granny Smith for a balanced flavor.
- Make It Nut-Free: If allergies are a concern, simply omit the nuts or replace them with sunflower seeds for crunch without the allergens.
- Presentation Matters: Arrange the apple slices in a colorful pattern to make the dish visually appealing and inviting.
- Customize Your Toppings: Feel free to experiment with different toppings like coconut flakes or dried fruit to create your unique version.

Variations
Nut-Free Options
If you want a nut-free version of salted caramel apple nachos, skip the nuts. You can replace them with seeds like sunflower or pumpkin. These seeds add crunch without the allergens. You can also try coconut flakes for a sweet twist. They lend a tropical flavor that works well with apples.
Flavorful Toppings Ideas
Get creative with toppings! You can use dried fruits like cranberries, raisins, or apricots. They add chewiness and a burst of flavor. For a fun twist, consider using crushed cookies like graham crackers or Oreos. They add a delightful crunch and sweetness. Drizzle some melted peanut butter or white chocolate for a rich finish.
Seasonal Twist Suggestions
Change it up for the seasons! In the fall, add spices like cinnamon or nutmeg to the caramel. You can also toss in some pomegranate seeds for a festive touch. In winter, use peppermint candies for a fresh flavor. For spring, try fresh berries like strawberries or blueberries. Each season offers unique flavors that can enhance your nachos.
Storage Info
How to Store Leftovers
To store leftovers, place your salted caramel apple nachos in an airtight container. Make sure to cover them to keep them fresh. If you have extra caramel sauce, store it in a separate container to prevent sogginess. This way, you can enjoy the nachos for up to two days.
Reheating Tips
Reheating salted caramel apple nachos is tricky. The apples can get mushy if heated too much. Instead, I suggest enjoying them cold. If you prefer warm nachos, briefly microwave them for about 10 seconds. Check them often to avoid overcooking. Drizzle with fresh caramel after reheating for a yummy boost.
Best Practices for Fresh Ingredients
To keep your nachos fresh, always use crisp apples. Honeycrisp, Fuji, or Granny Smith work best. When buying apples, look for ones that feel firm and have smooth skin. Store them in the fridge to maintain their crunch. Granola and nuts should also be stored in a cool, dry place to keep them fresh and crunchy.
FAQs
Can I make this recipe in advance?
Yes, you can prepare some parts ahead of time. Slice the apples and toss them with lemon juice. Store them in an airtight container in the fridge. You can also make the salted caramel sauce in advance. Just reheat it gently before serving. However, I recommend assembling the nachos right before serving. This keeps the apples crisp and the toppings fresh.
What serving suggestions pair well with Salted Caramel Apple Nachos?
These nachos are great on their own but pair well with some sides. You can serve them with extra caramel sauce for dipping. A scoop of vanilla ice cream adds a creamy touch. If you want something warm, serve them with warm apple cider. These additions make your dessert even more fun and delicious.
Is there a way to make this dessert healthier?
Absolutely! You can swap out the salted caramel sauce for a lighter version. Try using homemade applesauce or yogurt instead. For the granola, choose a low-sugar option or skip it entirely. Instead of chocolate chips, use fresh berries for a fruity twist. These changes make your nachos still tasty but a bit healthier too.
This blog post explored the fun and tasty world of Salted Caramel Apple Nachos. We covered key ingredients, step-by-step instructions, and helpful tips to make your nachos shine. Remember, you can switch the apples or toppings to fit any taste. Store any leftovers well to enjoy later. Crafting this dessert can be a delightful experience. Now, gather your friends and enjoy this sweet treat togethe

Salted Caramel Apple Nachos
Ingredients
- 3 medium-sized apples (Honeycrisp, Fuji, or Granny Smith), thinly sliced
- 1 cup granola (your choice of flavor)
- 1/2 cup salted caramel sauce (store-bought or homemade)
- 1/4 cup mini chocolate chips
- 1/4 cup chopped nuts (walnuts, pecans, or almonds)
- to taste sea salt flakes, for sprinkling
- 1 tablespoon lemon juice (to prevent apple browning)
Instructions
- Begin by preparing the apples: rinse them thoroughly, core, and slice them thinly. To keep the apple slices fresh and vibrant, toss them in a bowl with the lemon juice.
- On a large serving platter or a baking sheet lined with parchment paper, arrange the apple slices in an overlapping pattern, creating a base layer.
- Drizzle half of the salted caramel sauce over the arranged apple slices, ensuring an even distribution.
- Sprinkle the granola evenly over the apples, allowing for added crunch and texture.
- Add mini chocolate chips and chopped nuts on top for delightful bites of flavor and added richness.
- Drizzle the remaining salted caramel sauce over the entire dish to give it an enticing finish.
- Lightly sprinkle sea salt flakes over the nachos to elevate the caramel sweetness and enhance the overall flavor profile.
- Serve immediately, allowing guests to dig in and enjoy the sweetness of the caramel combined with the tartness of the apples.


![- 1 cup all-purpose flour - 1 cup whole wheat flour - 2 tablespoons brown sugar - 2 teaspoons baking powder - 1 teaspoon baking soda - 1 teaspoon ground cinnamon - 1 teaspoon ground nutmeg - 1/2 teaspoon ground ginger - 1/4 teaspoon ground cloves - 1/4 teaspoon salt - 1 cup pumpkin puree - 1 1/2 cups milk (dairy or non-dairy) - 2 large eggs - 1/4 cup melted butter or coconut oil - 1 teaspoon vanilla extract - Maple syrup - Whipped cream - Powdered sugar - Extra cinnamon To make perfect Pumpkin Spice Waffles, you need to gather all the right ingredients. Start with your flours. I use both all-purpose and whole wheat flour for a nice texture. Brown sugar adds a touch of sweetness that balances the spices well. Next, you have your leavening agents. Baking powder and baking soda work together to create fluffy waffles. The spices make this dish special. Ground cinnamon, nutmeg, ginger, and cloves give that warm, cozy taste we love in fall. Don’t forget the salt; it helps enhance all the flavors. Pumpkin puree is the star here. It adds moisture and that lovely pumpkin flavor. I prefer using fresh puree, but canned works just fine too. For the liquid, milk brings everything together; you can use dairy or a non-dairy option. Eggs bind the batter and add richness. Butter or coconut oil adds fat, making the waffles tender. Lastly, vanilla extract gives a lovely aroma. Don't skip the toppings! Maple syrup is a must, and whipped cream makes it feel special. A dusting of powdered sugar or cinnamon can take it to the next level. With these ingredients ready, you can follow the Full Recipe for a delightful breakfast treat. Preheat your waffle iron according to the manufacturer’s instructions. This step helps your waffles cook evenly and become crispy. In a large bowl, whisk together the following dry ingredients: - 1 cup all-purpose flour - 1 cup whole wheat flour - 2 tablespoons brown sugar - 2 teaspoons baking powder - 1 teaspoon baking soda - 1 teaspoon ground cinnamon - 1 teaspoon ground nutmeg - 1/2 teaspoon ground ginger - 1/4 teaspoon ground cloves - 1/4 teaspoon salt This mix gives your waffles their warm, spice flavor. In another bowl, mix the wet ingredients until smooth: - 1 cup pumpkin puree - 1 1/2 cups milk (dairy or non-dairy) - 2 large eggs - 1/4 cup melted butter or coconut oil - 1 teaspoon vanilla extract The pumpkin puree adds moisture and a rich taste. Pour the wet ingredients into the dry mix. Stir gently until just combined. A few lumps are okay; overmixing makes the waffles tough. Lightly grease the waffle iron if needed. Pour an appropriate amount of batter into the preheated iron. Cook until golden brown. This usually takes a few minutes. Serve your waffles hot. Drizzle with maple syrup, add whipped cream, and sprinkle cinnamon for extra flavor. Don't forget to check out the Full Recipe for more details! To make your waffles light and fluffy, follow these tips: - Use fresh baking powder and baking soda. This gives your waffles the lift they need. - Mix the batter until just combined. A few lumps are okay; overmixing can make them tough. - Let the batter rest for a few minutes before cooking. This helps the waffles rise better. - Preheat your waffle iron well. A hot iron ensures a crispy outside and soft inside. You can add fun twists to your pumpkin spice waffles. Here are some ideas: - Fold in chocolate chips for a sweet surprise. They melt and create a lovely gooey texture. - Add chopped nuts like walnuts or pecans for crunch. They bring a nice contrast to the soft waffles. - Mix in dried fruit, such as cranberries or raisins, for extra sweetness and chewiness. - Try a splash of maple extract for a deeper flavor. It pairs perfectly with pumpkin. Taking care of your waffle iron is key for great results. Here are some best practices: - Always preheat your waffle iron according to the manufacturer’s instructions. A hot iron cooks evenly. - Lightly grease the iron with butter or oil if needed. This prevents sticking and ensures a clean release. - Don't open the waffle iron too soon. Wait until the steam stops before checking for doneness. - Clean your waffle iron after each use. This keeps it in good shape and ready for your next batch. For the full recipe, check out the [Full Recipe]. {{image_2}} To make gluten-free pumpkin spice waffles, you can swap out the all-purpose flour. Use a gluten-free all-purpose flour blend instead. Make sure it has xanthan gum for the right texture. You can also add a bit of almond flour for extra flavor. This will give the waffles a nice nutty taste. Check the baking powder to ensure it is gluten-free as well. This simple change makes your breakfast safe for everyone. Want to make these waffles vegan? It's easy! Replace the eggs with flax eggs. Mix one tablespoon of ground flaxseed with three tablespoons of water for each egg. Let it sit for five minutes to thicken. Use almond milk or any other non-dairy milk instead of regular milk. Swap the butter for coconut oil or a vegan butter alternative. These changes keep the flavor while making it plant-based. You can add more fun to your pumpkin spice waffles. Try mixing in chocolate chips for a sweet twist. Nuts like walnuts or pecans add a crunchy texture. You can also use different spices. Try cardamom for a unique taste or allspice for a warm flavor. Adding a splash of maple extract can make it even more delicious. Feel free to experiment and find your favorite flavors! To keep your leftover waffles fresh, place them in an airtight container. You can also wrap them in plastic wrap or aluminum foil. Store them in the fridge for up to three days. When you want to eat them, just warm them up in the toaster or microwave. If you want to save waffles for later, freezing is a great option. First, let the waffles cool completely. Then, place a piece of parchment paper between each waffle. This prevents them from sticking together. Store them in a freezer bag or container. They can last up to three months in the freezer. To reheat, pop them in a toaster or bake them in the oven. This keeps them crispy. Waffles stored in the fridge last about three days. If frozen, they remain good for three months. After that, they may lose flavor and texture. Always check for any signs of spoilage before enjoying your waffles. Enjoy them fresh for the best taste! You can use several options if you don't have pumpkin puree. Here are some ideas: - Sweet potato puree: It has a similar texture and flavor. - Butternut squash puree: This option is also sweet and creamy. - Homemade pumpkin puree: Just roast fresh pumpkin until soft, then blend. Using these alternatives may change the flavor slightly, but they still taste great. To get your waffles nice and crispy, follow these tips: - Preheat your waffle iron: Make sure it’s hot before adding batter. - Use a little extra oil: Adding a bit more oil to the batter can help. - Don't overmix the batter: A few lumps are fine; this helps keep them light. - Cook longer: If they are not crispy enough, cook them a little longer. These tricks will help you achieve that perfect crunch. Yes, you can prepare the batter ahead of time. Here’s how: - Store in the fridge: Keep the batter in an airtight container for up to 24 hours. - Stir before use: Give it a gentle stir if it separates. Keep in mind that letting the batter sit too long may affect the rise. You can find pre-made pumpkin spice waffles in many stores. Check these places: - Supermarkets: Look in the frozen breakfast section. - Health food stores: They often carry organic or gluten-free options. - Online retailers: Websites like Amazon may have several brands available. Brands like Eggo and Nature's Path often sell great options. Toppings can enhance your pumpkin spice waffles. Here are some ideas: - Maple syrup: A classic choice that complements the spices well. - Whipped cream: Adds creaminess and sweetness. - Powdered sugar: A light dusting makes them look fancy. - Extra cinnamon: Sprinkle some on top for added flavor. These toppings will take your waffles to the next level! In this article, we explored how to craft perfect pumpkin spice waffles from scratch. We covered ingredient lists, step-by-step instructions, and tips for the best flavor and texture. I also shared ways to vary the recipe for gluten-free or vegan options, plus storage advice. Enjoying homemade waffles can be simple and fun. You can impress your family with these warm, delicious treats at breakfast or brunch. Give them a try, and savor every bite!](https://dailydishly.com/wp-content/uploads/2025/06/28ffe532-610a-4fe8-ab83-510bf8d3c6f3-768x768.webp)