Salted Caramel Chocolate Tart Delightful and Easy Recipe
![- 1 ½ cups all-purpose flour - 1/2 cup unsweetened cocoa powder - 1/4 cup powdered sugar - 1/2 cup cold unsalted butter, cubed - 1 large egg yolk - 2 tablespoons ice water - 1 cup granulated sugar - 1/2 cup heavy cream - 1/4 cup unsalted butter, diced - 1 teaspoon sea salt (divided) - 8 ounces dark chocolate (60-70% cacao), chopped - 1 teaspoon vanilla extract The key to a great salted caramel chocolate tart is using high-quality ingredients. Start with flour and cocoa powder for a rich crust. The powdered sugar adds sweetness to balance the cocoa. For the tart's texture, use cold, cubed unsalted butter. This keeps the crust tender. You’ll also need an egg yolk to help bind the dough. Ice water makes it easier to form the dough without warming it too much. For the caramel, granulated sugar melts into a sweet syrup. Heavy cream and butter add richness, while sea salt enhances the flavor. For the chocolate layer, choose dark chocolate with 60-70% cacao. This gives a deep, rich taste. Finally, vanilla extract adds warmth and depth to the chocolate. For the full recipe, refer to the previous section. - Combine 1 ½ cups of flour, 1/2 cup cocoa powder, and 1/4 cup powdered sugar in a food processor. - Add 1/2 cup cold unsalted butter and pulse until it looks like crumbs. - Next, add 1 large egg yolk and 2 tablespoons of ice water. Pulse until the dough forms. - Shape the dough into a disc, cover it in plastic, and chill for 30 minutes. - Preheat your oven to 350°F (175°C). - Roll out the chilled dough to about 1/4-inch thick on a floured surface. - Place the dough in a 9-inch tart pan and trim any excess. - Prick the bottom of the crust with a fork to prevent bubbling. - Bake for 15-18 minutes, or until the crust is set. - Let the crust cool completely before adding the filling. - In a medium pan, melt 1 cup of granulated sugar over medium heat. - Watch closely as it turns a deep amber color. Swirl the pan gently. - Carefully add 1/2 cup of heavy cream; it will bubble up. - Stir in 1/4 cup diced unsalted butter and 1/2 teaspoon sea salt until smooth. - Set the salted caramel mixture aside to cool. - In a heatproof bowl, combine 8 ounces of chopped dark chocolate and 1 teaspoon of vanilla extract. - Pour the warm salted caramel over the chocolate. Let it sit for one minute. - Stir until the mixture is fully combined and smooth. - Pour the chocolate-caramel mixture into the cooled tart crust. - Sprinkle the top with the remaining 1/2 teaspoon of sea salt. - Refrigerate the tart for at least 2 hours to set before serving. For the full recipe, including all details, check out the [Full Recipe]. - Use cold ingredients and chill the dough. This keeps the crust flaky. - Roll out the dough to about 1/4 inch thick. This gives the right texture. - Avoid overworking the dough. This helps keep it tender and light. - Control the heat when melting sugar. Medium heat gives the best color. - Add cream slowly to avoid splatter. This keeps you safe and clean. - Use sea salt for flavor. It enhances the caramel's rich taste. - Drizzle extra caramel sauce on top. This adds a beautiful touch. - Add chocolate shavings for elegance. They make the tart look fancy. - Serve the tart chilled. This provides the best taste experience. For the complete recipe, check out the Full Recipe. {{image_2}} You can switch up the chocolate to suit your taste. - Use milk chocolate for a sweeter tart. - Try bittersweet chocolate for a deep flavor. - For dairy-free needs, go for dark chocolate with no milk. - Add a few drops of flavor extracts like almond or orange for extra fun. Toppings can make your tart more exciting and tasty. - Add seasonal fruits like berries or slices of pear. They add a fresh touch. - Consider using nuts like chopped pecans or walnuts for crunch. - A sprinkle of sea salt enhances the sweet flavors well. - Top with flavored whipped cream for a creamy finish. The crust can change the whole tart experience. - For a gluten-free option, use almond flour or a gluten-free blend. - Want a richer taste? Use more butter or add cocoa powder for deeper flavor. - You can make a cookie crust using crushed cookies mixed with butter. It adds a fun twist. For the full recipe, check out the details above. Enjoy creating your own tasty variations! Store your salted caramel chocolate tart in the fridge. Use an airtight container or wrap it tightly in plastic wrap. This keeps it fresh and moist. The tart stays good for about 4 to 5 days. Always check for dryness if you store it longer. A cover is a must to prevent the tart from drying out. Yes, you can freeze the salted caramel chocolate tart! To freeze, wrap it well in plastic wrap and then in foil. This protects it from freezer burn. When you want to eat it, let it thaw in the fridge overnight. Freezing may change the texture a bit, but it will still taste great. Look for a change in smell or color to spot spoilage. If it smells off or looks odd, don't eat it. Also, check for any mold. To avoid spoilage, store it properly and eat it within the recommended time. Yes, you can make this tart ahead of time. I recommend preparing it a day before serving. This allows the flavors to blend well. Store it in the refrigerator. Wrap it tightly in plastic wrap. The tart can last for about three days in the fridge. This way, you can enjoy it without stress on the day of your event. If your salted caramel is too thick, don’t worry. You can easily adjust the thickness. Before using, gently reheat the caramel on low heat. Stir in a bit of heavy cream or water. This will help thin it out. Make sure to do this slowly. You want the caramel to remain smooth and creamy. Yes, you can replace dark chocolate with other kinds. Milk chocolate or semi-sweet chocolate works well. Each type will change the taste and sweetness. Milk chocolate will make it sweeter and creamier. Semi-sweet chocolate offers a balanced flavor. If you're looking for dairy-free options, use vegan chocolate. Just remember, the overall flavor will shift with each choice. Making a salted caramel chocolate tart is a fun and rewarding process. We covered the main ingredients, step-by-step instructions, and helpful tips to perfect your tart. Remember to control the heat for your caramel and chill your dough well. Explore variations for unique flavors and toppings. With proper storage, your tart will stay fresh and delicious. I hope you enjoy making this delightful dessert as much as I do. Happy baking!](https://dailydishly.com/wp-content/uploads/2025/06/6f09bf16-2729-4506-9c92-819aec74037f.webp)
Are you ready to impress your friends and family with a mouthwatering dessert? This Salted Caramel Chocolate Tart is a delightful treat that’s easier to make than you think! With a rich chocolate crust, creamy salted caramel, and a silky chocolate layer, this tart is sure to satisfy any sweet tooth. I’ll guide you step-by-step through this simple recipe, ensuring you create a stunning dessert that everyone will love!
Ingredients
Main Ingredients for Salted Caramel Chocolate Tart
– 1 ½ cups all-purpose flour
– 1/2 cup unsweetened cocoa powder
– 1/4 cup powdered sugar
– 1/2 cup cold unsalted butter, cubed
– 1 large egg yolk
– 2 tablespoons ice water
– 1 cup granulated sugar
– 1/2 cup heavy cream
– 1/4 cup unsalted butter, diced
– 1 teaspoon sea salt (divided)
– 8 ounces dark chocolate (60-70% cacao), chopped
– 1 teaspoon vanilla extract
The key to a great salted caramel chocolate tart is using high-quality ingredients. Start with flour and cocoa powder for a rich crust. The powdered sugar adds sweetness to balance the cocoa. For the tart’s texture, use cold, cubed unsalted butter. This keeps the crust tender.
You’ll also need an egg yolk to help bind the dough. Ice water makes it easier to form the dough without warming it too much. For the caramel, granulated sugar melts into a sweet syrup. Heavy cream and butter add richness, while sea salt enhances the flavor.
For the chocolate layer, choose dark chocolate with 60-70% cacao. This gives a deep, rich taste. Finally, vanilla extract adds warmth and depth to the chocolate.
Step-by-Step Instructions
Making the Tart Crust
– Combine 1 ½ cups of flour, 1/2 cup cocoa powder, and 1/4 cup powdered sugar in a food processor.
– Add 1/2 cup cold unsalted butter and pulse until it looks like crumbs.
– Next, add 1 large egg yolk and 2 tablespoons of ice water. Pulse until the dough forms.
– Shape the dough into a disc, cover it in plastic, and chill for 30 minutes.
Baking the Crust
– Preheat your oven to 350°F (175°C).
– Roll out the chilled dough to about 1/4-inch thick on a floured surface.
– Place the dough in a 9-inch tart pan and trim any excess.
– Prick the bottom of the crust with a fork to prevent bubbling.
– Bake for 15-18 minutes, or until the crust is set.
– Let the crust cool completely before adding the filling.
Preparing the Salted Caramel
– In a medium pan, melt 1 cup of granulated sugar over medium heat.
– Watch closely as it turns a deep amber color. Swirl the pan gently.
– Carefully add 1/2 cup of heavy cream; it will bubble up.
– Stir in 1/4 cup diced unsalted butter and 1/2 teaspoon sea salt until smooth.
– Set the salted caramel mixture aside to cool.
Making the Chocolate Layer
– In a heatproof bowl, combine 8 ounces of chopped dark chocolate and 1 teaspoon of vanilla extract.
– Pour the warm salted caramel over the chocolate. Let it sit for one minute.
– Stir until the mixture is fully combined and smooth.
Assembling the Tart
– Pour the chocolate-caramel mixture into the cooled tart crust.
– Sprinkle the top with the remaining 1/2 teaspoon of sea salt.
– Refrigerate the tart for at least 2 hours to set before serving.
Tips & Tricks
Achieving the Perfect Tart Crust
– Use cold ingredients and chill the dough. This keeps the crust flaky.
– Roll out the dough to about 1/4 inch thick. This gives the right texture.
– Avoid overworking the dough. This helps keep it tender and light.
Perfecting the Salted Caramel
– Control the heat when melting sugar. Medium heat gives the best color.
– Add cream slowly to avoid splatter. This keeps you safe and clean.
– Use sea salt for flavor. It enhances the caramel’s rich taste.
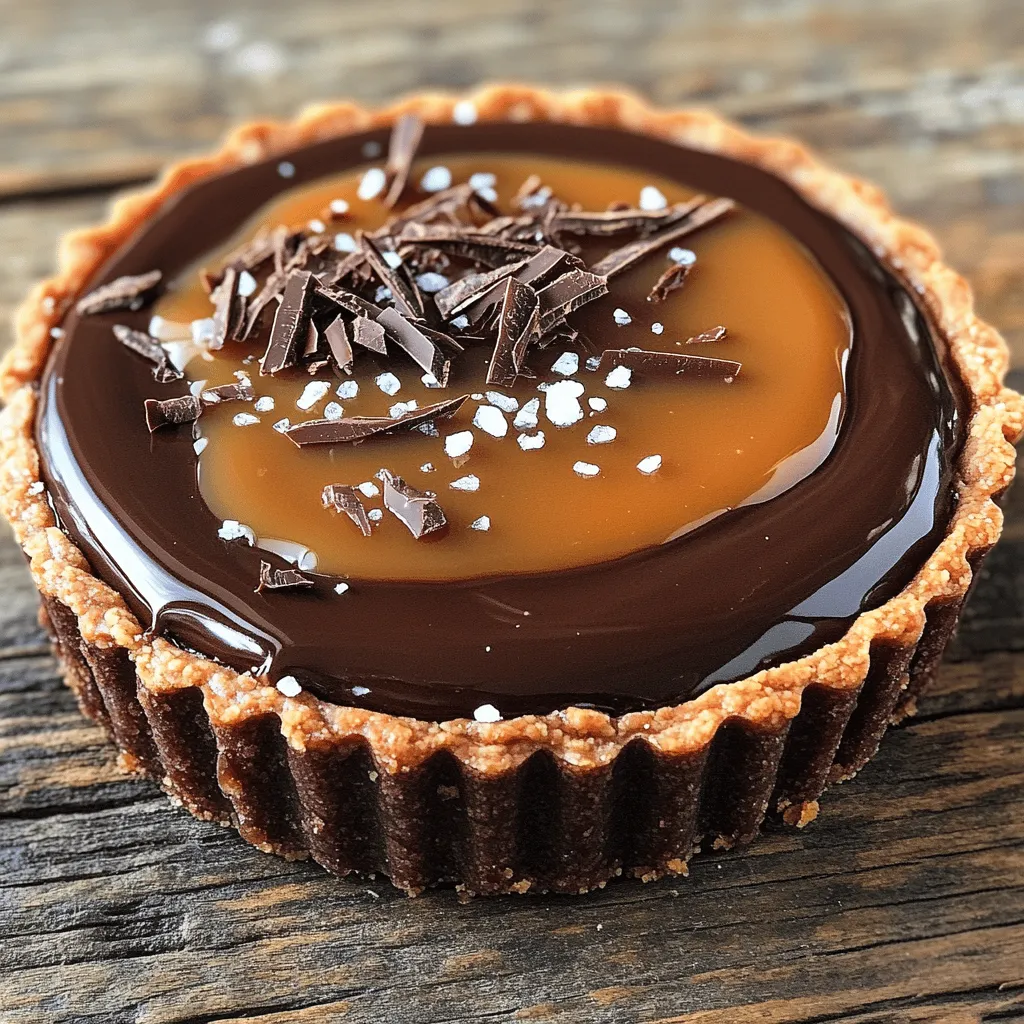
Presentation Suggestions
– Drizzle extra caramel sauce on top. This adds a beautiful touch.
– Add chocolate shavings for elegance. They make the tart look fancy.
– Serve the tart chilled. This provides the best taste experience.

Variations
Alternative Chocolate Choices
You can switch up the chocolate to suit your taste.
– Use milk chocolate for a sweeter tart.
– Try bittersweet chocolate for a deep flavor.
– For dairy-free needs, go for dark chocolate with no milk.
– Add a few drops of flavor extracts like almond or orange for extra fun.
Creative Toppings
Toppings can make your tart more exciting and tasty.
– Add seasonal fruits like berries or slices of pear. They add a fresh touch.
– Consider using nuts like chopped pecans or walnuts for crunch.
– A sprinkle of sea salt enhances the sweet flavors well.
– Top with flavored whipped cream for a creamy finish.
Different Crust Options
The crust can change the whole tart experience.
– For a gluten-free option, use almond flour or a gluten-free blend.
– Want a richer taste? Use more butter or add cocoa powder for deeper flavor.
– You can make a cookie crust using crushed cookies mixed with butter. It adds a fun twist.Enjoy creating your own tasty variations!
Storage Info
Refrigeration Guidelines
Store your salted caramel chocolate tart in the fridge. Use an airtight container or wrap it tightly in plastic wrap. This keeps it fresh and moist. The tart stays good for about 4 to 5 days. Always check for dryness if you store it longer. A cover is a must to prevent the tart from drying out.
Freezing Options
Yes, you can freeze the salted caramel chocolate tart! To freeze, wrap it well in plastic wrap and then in foil. This protects it from freezer burn. When you want to eat it, let it thaw in the fridge overnight. Freezing may change the texture a bit, but it will still taste great.
Signs of Spoilage
Look for a change in smell or color to spot spoilage. If it smells off or looks odd, don’t eat it. Also, check for any mold. To avoid spoilage, store it properly and eat it within the recommended time.
FAQs
Can I make this tart ahead of time?
Yes, you can make this tart ahead of time. I recommend preparing it a day before serving. This allows the flavors to blend well. Store it in the refrigerator. Wrap it tightly in plastic wrap. The tart can last for about three days in the fridge. This way, you can enjoy it without stress on the day of your event.
What if my salted caramel is too thick?
If your salted caramel is too thick, don’t worry. You can easily adjust the thickness. Before using, gently reheat the caramel on low heat. Stir in a bit of heavy cream or water. This will help thin it out. Make sure to do this slowly. You want the caramel to remain smooth and creamy.
Can I replace dark chocolate with other types?
Yes, you can replace dark chocolate with other kinds. Milk chocolate or semi-sweet chocolate works well. Each type will change the taste and sweetness. Milk chocolate will make it sweeter and creamier. Semi-sweet chocolate offers a balanced flavor. If you’re looking for dairy-free options, use vegan chocolate. Just remember, the overall flavor will shift with each choice.
Making a salted caramel chocolate tart is a fun and rewarding process. We covered the main ingredients, step-by-step instructions, and helpful tips to perfect your tart. Remember to control the heat for your caramel and chill your dough well. Explore variations for unique flavors and toppings. With proper storage, your tart will stay fresh and delicious. I hope you enjoy making this delightful dessert as much as I do. Happy baking!
![- 1 ½ cups all-purpose flour - 1/2 cup unsweetened cocoa powder - 1/4 cup powdered sugar - 1/2 cup cold unsalted butter, cubed - 1 large egg yolk - 2 tablespoons ice water - 1 cup granulated sugar - 1/2 cup heavy cream - 1/4 cup unsalted butter, diced - 1 teaspoon sea salt (divided) - 8 ounces dark chocolate (60-70% cacao), chopped - 1 teaspoon vanilla extract The key to a great salted caramel chocolate tart is using high-quality ingredients. Start with flour and cocoa powder for a rich crust. The powdered sugar adds sweetness to balance the cocoa. For the tart's texture, use cold, cubed unsalted butter. This keeps the crust tender. You’ll also need an egg yolk to help bind the dough. Ice water makes it easier to form the dough without warming it too much. For the caramel, granulated sugar melts into a sweet syrup. Heavy cream and butter add richness, while sea salt enhances the flavor. For the chocolate layer, choose dark chocolate with 60-70% cacao. This gives a deep, rich taste. Finally, vanilla extract adds warmth and depth to the chocolate. For the full recipe, refer to the previous section. - Combine 1 ½ cups of flour, 1/2 cup cocoa powder, and 1/4 cup powdered sugar in a food processor. - Add 1/2 cup cold unsalted butter and pulse until it looks like crumbs. - Next, add 1 large egg yolk and 2 tablespoons of ice water. Pulse until the dough forms. - Shape the dough into a disc, cover it in plastic, and chill for 30 minutes. - Preheat your oven to 350°F (175°C). - Roll out the chilled dough to about 1/4-inch thick on a floured surface. - Place the dough in a 9-inch tart pan and trim any excess. - Prick the bottom of the crust with a fork to prevent bubbling. - Bake for 15-18 minutes, or until the crust is set. - Let the crust cool completely before adding the filling. - In a medium pan, melt 1 cup of granulated sugar over medium heat. - Watch closely as it turns a deep amber color. Swirl the pan gently. - Carefully add 1/2 cup of heavy cream; it will bubble up. - Stir in 1/4 cup diced unsalted butter and 1/2 teaspoon sea salt until smooth. - Set the salted caramel mixture aside to cool. - In a heatproof bowl, combine 8 ounces of chopped dark chocolate and 1 teaspoon of vanilla extract. - Pour the warm salted caramel over the chocolate. Let it sit for one minute. - Stir until the mixture is fully combined and smooth. - Pour the chocolate-caramel mixture into the cooled tart crust. - Sprinkle the top with the remaining 1/2 teaspoon of sea salt. - Refrigerate the tart for at least 2 hours to set before serving. For the full recipe, including all details, check out the [Full Recipe]. - Use cold ingredients and chill the dough. This keeps the crust flaky. - Roll out the dough to about 1/4 inch thick. This gives the right texture. - Avoid overworking the dough. This helps keep it tender and light. - Control the heat when melting sugar. Medium heat gives the best color. - Add cream slowly to avoid splatter. This keeps you safe and clean. - Use sea salt for flavor. It enhances the caramel's rich taste. - Drizzle extra caramel sauce on top. This adds a beautiful touch. - Add chocolate shavings for elegance. They make the tart look fancy. - Serve the tart chilled. This provides the best taste experience. For the complete recipe, check out the Full Recipe. {{image_2}} You can switch up the chocolate to suit your taste. - Use milk chocolate for a sweeter tart. - Try bittersweet chocolate for a deep flavor. - For dairy-free needs, go for dark chocolate with no milk. - Add a few drops of flavor extracts like almond or orange for extra fun. Toppings can make your tart more exciting and tasty. - Add seasonal fruits like berries or slices of pear. They add a fresh touch. - Consider using nuts like chopped pecans or walnuts for crunch. - A sprinkle of sea salt enhances the sweet flavors well. - Top with flavored whipped cream for a creamy finish. The crust can change the whole tart experience. - For a gluten-free option, use almond flour or a gluten-free blend. - Want a richer taste? Use more butter or add cocoa powder for deeper flavor. - You can make a cookie crust using crushed cookies mixed with butter. It adds a fun twist. For the full recipe, check out the details above. Enjoy creating your own tasty variations! Store your salted caramel chocolate tart in the fridge. Use an airtight container or wrap it tightly in plastic wrap. This keeps it fresh and moist. The tart stays good for about 4 to 5 days. Always check for dryness if you store it longer. A cover is a must to prevent the tart from drying out. Yes, you can freeze the salted caramel chocolate tart! To freeze, wrap it well in plastic wrap and then in foil. This protects it from freezer burn. When you want to eat it, let it thaw in the fridge overnight. Freezing may change the texture a bit, but it will still taste great. Look for a change in smell or color to spot spoilage. If it smells off or looks odd, don't eat it. Also, check for any mold. To avoid spoilage, store it properly and eat it within the recommended time. Yes, you can make this tart ahead of time. I recommend preparing it a day before serving. This allows the flavors to blend well. Store it in the refrigerator. Wrap it tightly in plastic wrap. The tart can last for about three days in the fridge. This way, you can enjoy it without stress on the day of your event. If your salted caramel is too thick, don’t worry. You can easily adjust the thickness. Before using, gently reheat the caramel on low heat. Stir in a bit of heavy cream or water. This will help thin it out. Make sure to do this slowly. You want the caramel to remain smooth and creamy. Yes, you can replace dark chocolate with other kinds. Milk chocolate or semi-sweet chocolate works well. Each type will change the taste and sweetness. Milk chocolate will make it sweeter and creamier. Semi-sweet chocolate offers a balanced flavor. If you're looking for dairy-free options, use vegan chocolate. Just remember, the overall flavor will shift with each choice. Making a salted caramel chocolate tart is a fun and rewarding process. We covered the main ingredients, step-by-step instructions, and helpful tips to perfect your tart. Remember to control the heat for your caramel and chill your dough well. Explore variations for unique flavors and toppings. With proper storage, your tart will stay fresh and delicious. I hope you enjoy making this delightful dessert as much as I do. Happy baking!](https://dailydishly.com/wp-content/uploads/2025/06/6f09bf16-2729-4506-9c92-819aec74037f-300x300.webp)


![To make delicious lemon blueberry muffins, you will need: - 1 ½ cups all-purpose flour - 1 cup fresh blueberries (or frozen, thawed) - ½ cup granulated sugar - 2 teaspoons baking powder - ½ teaspoon baking soda - ½ teaspoon salt - Zest of 1 lemon - ½ cup plain yogurt (Greek or regular) - 1/3 cup vegetable oil - 2 large eggs - 2 tablespoons fresh lemon juice - 1 teaspoon vanilla extract - Optional: Turbinado sugar for topping When baking, accurate measurements matter. Use a kitchen scale for the best results. If you don’t have all-purpose flour, you can try whole wheat flour. It adds a nutty taste. For sugar, you may use brown sugar for a deeper flavor. If you need to swap yogurt, sour cream works well too. Fresh blueberries give a burst of flavor and color. They are juicy and plump. Frozen blueberries are convenient and save time. They work well too, just make sure to thaw them first. Always toss blueberries in flour before adding to the batter. This helps them stay suspended and not sink to the bottom. For the best flavor, use what you have on hand. Enjoy every bite of these muffins! For the Full Recipe, follow the detailed instructions to create these tasty treats. First, I start by getting my muffin tin ready. Preheat your oven to 375°F (190°C). Line the muffin tin with paper liners or spray it lightly with cooking spray. This helps the muffins come out easily. Next, I grab a medium bowl. Here, I whisk together 1 ½ cups of all-purpose flour, 2 teaspoons of baking powder, ½ teaspoon of baking soda, ½ teaspoon of salt, and the zest of 1 lemon. Mixing these ingredients well ensures an even rise in the muffins. In a large bowl, I mix ½ cup of granulated sugar with 2 large eggs. I whisk this until it looks smooth. Then, I add ½ cup of plain yogurt, ⅓ cup of vegetable oil, 2 tablespoons of fresh lemon juice, and 1 teaspoon of vanilla extract. I keep whisking until everything blends nicely. Now comes the fun part! I take the dry mix and add it to the wet mix. I stir gently until just combined. It’s important not to overmix, or the muffins can become tough. Next, I fold in 1 cup of fresh blueberries carefully. This way, I keep them whole and evenly spread in the batter. I divide the batter evenly into the muffin cups, filling each about two-thirds full. If I want a crunchy topping, I sprinkle a pinch of turbinado sugar on top of each muffin. I bake them for 18-20 minutes. I know they’re done when a toothpick comes out clean. After baking, I let the muffins cool in the pan for about 5 minutes before moving them to a wire rack. For the complete recipe, check out the Full Recipe. To get that perfect muffin texture, you want a light and fluffy bite. Start with the right flour. All-purpose flour works well. Be careful not to overmix the batter. Stir until just combined. This keeps the muffins airy. Using yogurt is a great trick for moist muffins. It adds creaminess without extra fat. I prefer plain yogurt. Greek yogurt works, too, if you want a thicker texture. The acidity in yogurt also enhances the flavor. Mixing batter can be tricky. First, always mix dry and wet ingredients in separate bowls. This helps in even mixing. When you combine them, use a gentle folding motion. This keeps air in the batter. Avoid using a whisk at this stage. A spatula works best to maintain fluffiness. Toppings can elevate your muffins. A sprinkle of turbinado sugar gives a nice crunch. You can also try lemon zest on top for extra zing. If you like, add a drizzle of glaze made from lemon juice and powdered sugar. It adds sweetness and makes them look fancy. For the full recipe, check out the Lemon Blueberry Bliss Muffins 🫐. {{image_2}} Lemon blueberry muffins are delicious as they are, but you can try fun twists. Here are some great ideas to mix things up. Add a nutty flavor by mixing in sliced almonds. They give a nice crunch. Just fold in 1/2 cup of sliced almonds when you add the blueberries. This adds texture and a hint of almond taste. The almonds pair well with the lemon and blueberries. You can make these muffins gluten-free easily. Swap the all-purpose flour for a gluten-free flour blend. Look for a blend with xanthan gum for the best results. Follow the same recipe, and you’ll get tasty muffins without gluten. These muffins taste just as good as the original. For a vegan option, replace eggs and yogurt. Use flax eggs instead. Mix 1 tablespoon of ground flaxseed with 2.5 tablespoons of water to replace one egg. For yogurt, use plant-based yogurt, either soy or almond. The muffins will still be fluffy and moist, bursting with flavor. Feel free to explore these variations to suit your taste! You can find the full recipe for the original version to get started. To keep your lemon blueberry muffins fresh, place them in an airtight container. This helps keep them soft and moist. Store them at room temperature for up to three days. If you want to keep them longer, consider freezing. Freezing is a great way to save muffins for later. After the muffins cool completely, wrap each one in plastic wrap. Then, place them in a freezer-safe bag or container. They can last up to three months in the freezer. To enjoy, just take out the muffins and let them thaw at room temperature. When you are ready to eat your muffins, reheating them is easy. You can use the microwave for quick warming. Heat them for about 15-20 seconds. For a crispier muffin, use the oven. Preheat the oven to 350°F (175°C), and heat for about 5-10 minutes. This method brings back their fresh-baked taste. Enjoy your muffins from the [Full Recipe] with your favorite drink! Yes, you can swap blueberries for other fruits. Raspberries, strawberries, or blackberries work well. Just make sure to adjust the amount if the fruit is larger or smaller. Mixing in lemon zest adds a nice zing to any fruit you choose. Check your muffins at 18 minutes. Insert a toothpick into the center of a muffin. If it comes out clean or with a few crumbs, your muffins are ready. Overbaking can dry them out, so keep an eye on them. Dense muffins may come from overmixing the batter. Mix just until combined. Another reason could be too much flour. Use a kitchen scale to measure flour for accuracy. Adding an extra egg or more yogurt can also help lighten the texture. Absolutely! Use a mini muffin tin instead of a regular one. Fill each cup about halfway and bake for 10-12 minutes. They make great snacks or party treats! You can find the full recipe in the previous sections. This blog post detailed how to make lemon blueberry muffins, from ingredients to storage. We explored the key ingredients, the best techniques, and even tasty variations. Remember, fresh blueberries add the best flavor, but frozen ones work too. Don't forget the tips to achieve a perfect texture and how to store your muffins for later. Baking can be fun, so get creative with flavors and enjoy making these delicious treats! Happy baking!](https://dailydishly.com/wp-content/uploads/2025/06/1bf09e67-92cf-4ebe-bc60-9e869fac49a4-768x768.webp)


