Savory Avocado Egg Salad Lettuce Wraps Recipe

Looking for a fresh, tasty meal that’s quick and easy to make? This Savory Avocado Egg Salad Lettuce Wraps recipe is the perfect answer. Packed with flavor and nutrition, these wraps will keep you satisfied without weighing you down. I’ll guide you through simple steps, helpful tips, and fun variations to make this dish your own. Ready to dive into a world of deliciousness? Let’s get started!
Why I Love This Recipe
- Healthy and Nutritious: This avocado egg salad is packed with protein and healthy fats, making it a wholesome choice for any meal.
- Quick and Easy: With just 10 minutes of prep time, this recipe is perfect for busy days or a last-minute lunch.
- Versatile Serving: These lettuce wraps can be enjoyed as a light meal, snack, or even as a party appetizer.
- Flavorful and Colorful: The combination of avocado, lemon, and herbs creates a delightful flavor profile that is visually appealing.
Ingredients
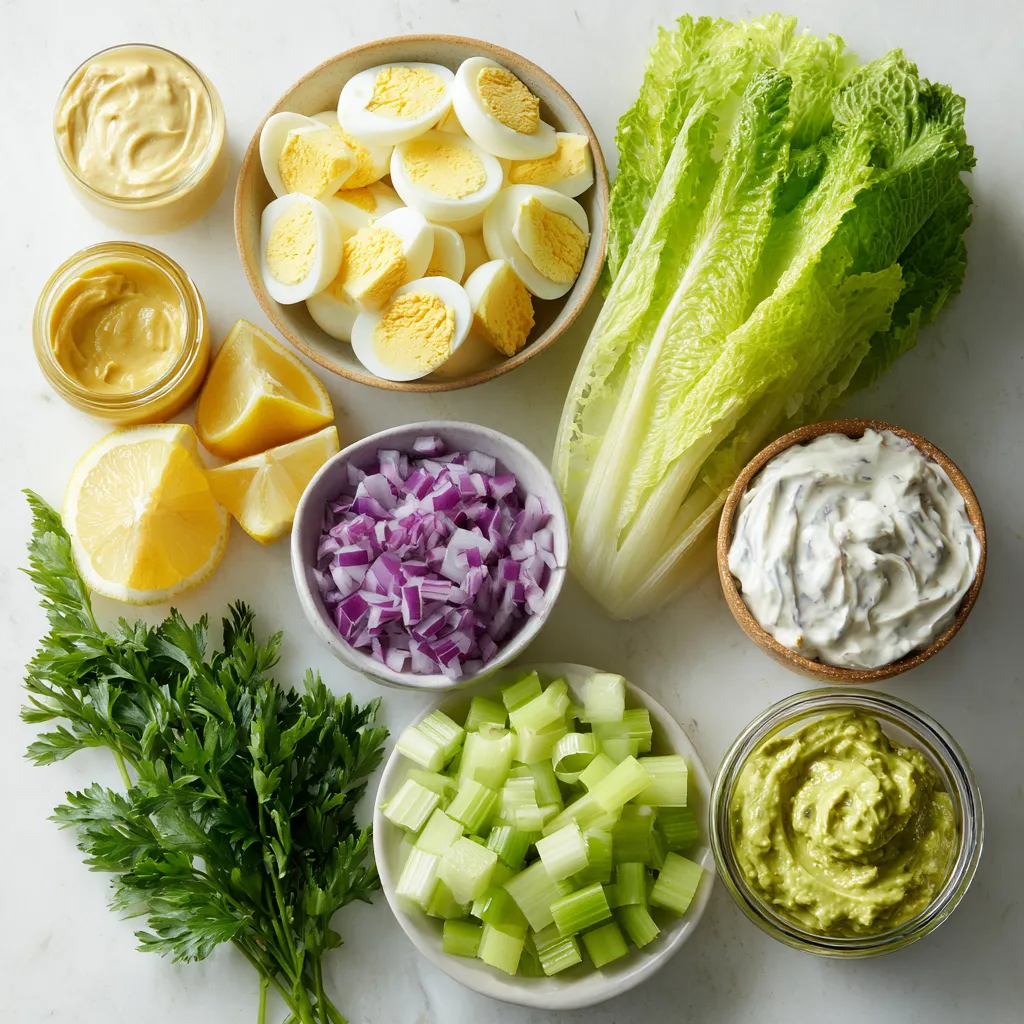
Avocado Egg Salad Ingredients
– 4 hard-boiled eggs, peeled and chopped
– 1 ripe avocado, pitted and mashed
– 2 tablespoons Greek yogurt
– 1 tablespoon Dijon mustard
– 1 tablespoon lemon juice
– 1 small red onion, finely chopped
– 1 celery stalk, finely diced
– Salt and pepper to taste
Lettuce Wrap Ingredients
– 1 head of romaine lettuce (for wraps)
Optional Garnishes
– Fresh parsley, chopped
The avocado egg salad is creamy and full of flavor. The hard-boiled eggs give it protein. The avocado adds healthy fats and a nice texture. Mixing in Greek yogurt makes it rich and tangy. Dijon mustard brings a sharp taste that lifts the dish. Lemon juice adds brightness and keeps the avocado fresh. The red onion and celery give crunch and color.
For the wraps, romaine lettuce is perfect. It is sturdy and crisp. You can use other leafy greens too, but romaine holds up well.
Garnishes like fresh parsley add a nice touch. They make the dish look vibrant and inviting. You can sprinkle them on top for added flavor.

Step-by-Step Instructions
Prep Work
Start by hard-boiling four eggs. Place them in a pot, cover with water, and bring to a boil. Once boiling, reduce heat and simmer for 10-12 minutes. When done, cool them in ice water. Peel and chop the eggs when they are cool. Next, grab a ripe avocado. Cut it in half, remove the pit, and scoop the flesh into a bowl. Mash it well with a fork until smooth.
Mixing Ingredients
In a mixing bowl, combine the chopped eggs and mashed avocado. Add two tablespoons of Greek yogurt, one tablespoon of Dijon mustard, and one tablespoon of lemon juice. Mix these ingredients together until they are creamy and well blended. Then, finely chop one small red onion and dice one celery stalk. Stir these into the egg salad mixture. Season with salt and pepper to your taste. Adjust as needed for flavor.
Assembling the Lettuce Wraps
Now, take a head of romaine lettuce. Carefully separate the leaves, wash them under cold water, and pat them dry. This will be your wrap. Spoon a generous amount of the avocado egg salad into each lettuce leaf. Aim for a nice, full wrap. Finally, garnish with freshly chopped parsley for color and flavor. For a nice touch, arrange the wraps on a platter with the open side facing up. Serve with lemon wedges for a fresh squeeze while eating.
Tips & Tricks
Best Ways to Mash Avocado
To get the best mashed avocado, use a fork. Press down firmly but gently. You want it smooth, not pureed. A ripe avocado makes this easier. Look for one that gives slightly when you press it. If you prefer a chunky texture, stop mashing sooner.
How to Achieve Creaminess
For a creamy avocado egg salad, add Greek yogurt. This gives it a nice tang and moisture. You can also mix in some Dijon mustard for extra flavor. The lemon juice helps keep the color bright and fresh. Adjust the amount based on your taste.
Customizing Flavor Profiles
You can change the flavor of your egg salad easily. Add herbs like dill or chives for a fresh taste. If you like spice, stir in some diced jalapeños. For a sweet note, try adding diced apples or grapes. Always taste as you mix to get it just right.
Pro Tips
- Use Fresh Ingredients: Always select ripe avocados and fresh vegetables to enhance the flavors of your egg salad.
- Customize Your Seasoning: Feel free to add spices like paprika or cayenne pepper for an extra kick in flavor.
- Make It Ahead: You can prepare the egg salad a few hours in advance; just store it in the refrigerator until ready to serve.
- Experiment with Greens: Try using other leafy greens like butter lettuce or kale for different textures and flavors.

Variations
Alternative Green Options
You can change the lettuce to mix things up. Try using butter lettuce for a soft bite. It wraps well and adds a silky texture. You can also use collard greens for a sturdier wrap. They hold up great and have a nice, earthy flavor. If you want a crunch, use cabbage leaves. They add a fun texture to your meal.
Vegan Substitutes
Want to make this dish vegan? Swap out the eggs and yogurt. Use chickpeas instead of eggs. Mash them up for a similar texture. For creaminess, try using silken tofu or mashed avocado. These give a rich taste without dairy. You can add nutritional yeast for a cheesy flavor.
Additional Mix-Ins
Feel free to get creative with mix-ins. Diced bell peppers add sweetness and color. Chopped pickles or relish bring a nice tang. You can also add spices like paprika or curry powder for extra flavor. Fresh herbs like dill or cilantro brighten the dish. Just remember to mix well for even flavor distribution.
Storage Info
Storing Leftover Egg Salad
You can keep leftover egg salad in the fridge. Use an airtight container. It stays fresh for up to three days. When you want to eat it, check for any odd smells. If it smells fine, mix it well before serving.
Freezing Guidelines
Freezing egg salad is not the best idea. The texture changes when it thaws. If you have to freeze it, use a freezer-safe bag. Squeeze out all the air before sealing. Use it within a month for best taste.
Best Practices for Lettuce Wraps
Store lettuce wraps in the fridge for up to a day. Keep the filling and lettuce separate. This keeps the wraps crisp and fresh. If you have leftover filling, use it in a salad or on toast.
FAQs
How long do Avocado Egg Salad Lettuce Wraps last?
Avocado Egg Salad Lettuce Wraps are best when fresh. If stored, they can last for about 1 to 2 days in the fridge. The key is to keep the salad and lettuce separate until you serve them. This helps keep the lettuce crisp and the salad fresh. If you mix them, the lettuce wilts quickly.
Can I use different types of lettuce?
Yes, you can use different types of lettuce! While romaine is great, you can try butter lettuce or iceberg for a crunchy bite. Each type adds its own flavor and texture. Just make sure the leaves are large enough to hold the filling.
What can I serve with Avocado Egg Salad Lettuce Wraps?
Many options go well with these wraps. You can serve them with fresh fruit for a light meal. Chips or crackers add a nice crunch. You might also enjoy a simple soup on the side. These pairings make the meal more filling and fun!
This blog post covered how to make delicious avocado egg salad lettuce wraps. We discussed key ingredients, step-by-step instructions, and tips for the best flavor. You learned about variations and how to store leftovers. My final thought is that this dish is easy to make and very tasty. Feel free to customize it to your liking. Enjoy your healthy meal

Avocado Egg Salad Lettuce Wraps
Ingredients
- 4 pieces hard-boiled eggs, peeled and chopped
- 1 piece ripe avocado, pitted and mashed
- 2 tablespoons Greek yogurt
- 1 tablespoon Dijon mustard
- 1 tablespoon lemon juice
- 1 small red onion, finely chopped
- 1 stalk celery, finely diced
- to taste salt and pepper
- 1 head romaine lettuce (for wraps)
- to taste fresh parsley, chopped (for garnish)
Instructions
- In a mixing bowl, combine the chopped hard-boiled eggs and mashed avocado.
- Add the Greek yogurt, Dijon mustard, and lemon juice to the bowl, mixing until well incorporated and creamy.
- Stir in the finely chopped red onion and diced celery, ensuring they are evenly distributed throughout the mixture.
- Season the egg salad with salt and pepper to taste, adjusting the seasoning as necessary.
- Carefully separate the romaine lettuce leaves and wash them gently under cold water. Pat dry with a paper towel.
- Spoon an ample amount of the avocado egg salad mixture into each lettuce leaf, creating a generous wrap.
- Garnish with freshly chopped parsley for a pop of color and flavor.


![- 2 cups diced apples - 1 cup celery, chopped - 1 cup grapes, halved - 1 cup walnuts, toasted - 1/2 cup raisins - 1/2 cup plain Greek yogurt - 2 tablespoons mayonnaise - 1 tablespoon lemon juice - Salt and pepper to taste - Fresh mint leaves for garnish The main ingredients create a great mix of flavors and textures. I love using tart apples, like Granny Smith. Their crunch adds freshness to the salad. Celery adds a nice crunch, while grapes bring sweetness. Toasted walnuts give a rich, nutty flavor. Raisins add little bursts of sweetness throughout. - Yogurt alternatives (like sour cream or vegan yogurt) - Different nut options (like pecans or almonds) - Additional fruits (like oranges or pears) Feel free to switch things up! You can use sour cream or vegan yogurt if you prefer. Pecans and almonds also work great if you want different nuts. Adding fruits like oranges or pears can give the salad a unique twist. For the full recipe, check [Full Recipe]. Start by dicing the apples into small, even pieces. I like using Granny Smith for a nice tart flavor. Next, chop the celery into thin slices. This adds a great crunch to the salad. Then, halve the grapes. You can use red or green grapes, depending on your preference. This will add sweetness and color. Finally, toast the walnuts in a dry pan on medium heat. Stir them often until they smell nutty. This step brings out their flavor. In a small bowl, mix the Greek yogurt and mayonnaise. Add the lemon juice, salt, and pepper. Whisk until smooth and creamy. This dressing adds a tangy taste that pairs well with the fruit. In a large mixing bowl, combine the fruit and nut mixture with the dressing. Gently mix everything until the apples and grapes are evenly coated. This ensures every bite is flavorful. Next, chill the salad in the refrigerator for at least 30 minutes. This helps the flavors meld together. Just before serving, toss the salad lightly and garnish with fresh mint leaves. Enjoy your Classic Waldorf Salad! For the full recipe, check out the details above. Choosing the right apple is key. I love using Granny Smith apples. They give the salad a tart flavor that contrasts well with the sweet grapes. Other options include Honeycrisp or Fuji for a sweeter taste. Always pick crisp apples for the best crunch. Toasting walnuts can boost their flavor. Start by placing them in a dry pan over medium heat. Stir them often for about 5-7 minutes. Watch for a golden color and a nutty smell. This step adds depth to your salad. You can add simple spices or herbs to elevate the taste. A pinch of cinnamon or nutmeg can add warmth. Fresh herbs like parsley or dill can brighten your dish. Experiment with a bit of fresh lemon zest for a zesty kick. For sweetness, consider using honey or maple syrup. A teaspoon of honey can balance the tartness of the apples. Maple syrup offers a unique flavor and a touch of earthiness. Adjust the sweetness to your taste, but don't overdo it. You want a nice balance. For the full recipe, check out the Classic Waldorf Salad recipe. {{image_2}} You can make the Waldorf salad your own. Adding protein is a great option. Cooked chicken or shrimp works well. This change adds heartiness and makes it more filling. You can also make a vegan version. Use chickpeas or tofu instead of yogurt and mayo. This keeps the salad creamy and tasty without dairy. Switching up the fruits can change the whole flavor. In fall, use crisp pears or sweet figs. In summer, try fresh berries for a juicy twist. You can also change the dressing. A light vinaigrette can give it a new taste. Or, try adding a hint of honey for extra sweetness. These variations keep your Waldorf salad fresh and exciting. For the classic recipe, check out the Full Recipe. To keep your Waldorf salad fresh, store it in the fridge. Use an airtight container. This helps to keep the salad cool and crisp. Avoid using metal containers, as they can react with the ingredients. Glass or plastic works best. You can keep the salad in the fridge for up to three days. After that, the fruits may lose their crunch. It is not a good idea to freeze Waldorf salad. The texture of the apples and grapes changes when frozen. Enjoy it fresh for the best taste! For the full recipe, check out the earlier section. Waldorf Salad started in the late 1800s. A chef at the Waldorf Astoria Hotel in New York created it. It was first served at a charity ball in 1896. The salad features apples, celery, and walnuts. Over time, it has become a classic dish. It mixes sweet and crunchy flavors, making it popular. Yes, you can prepare Waldorf Salad ahead. This dish tastes even better after sitting in the fridge. To do this, chop the fruits and mix them with the dressing. Store it in an airtight container for up to 24 hours. Just remember to add the nuts just before serving. This keeps them crunchy and fresh. Waldorf Salad pairs well with many dishes. It makes a great side for roasted chicken or turkey. You can also serve it alongside sandwiches for lunch. The salad’s fresh taste balances rich flavors nicely. Try it with grilled fish for a light dinner option. To make Waldorf Salad healthier, you can swap some ingredients. Use low-fat yogurt instead of regular mayo. You can also add more fruits, like berries or oranges. For a nut-free version, try sunflower seeds. These changes help cut calories while keeping the flavor. You can find the full recipe for Classic Waldorf Salad right here. It includes all the details you need to create this tasty dish. Enjoy making it at home! Waldorf salad is a tasty mix of fruits, nuts, and creamy dressing. You now know the key ingredients, how to prepare them, and some handy tips for extra flavor. Think about adding your favorite fruits or proteins to make it unique. Remember, it’s easy to store and great for meal prep. Enjoy sharing this delicious dish with family and friends or serving it at your next gathering. Your tasty, fresh Waldorf salad will impress!](https://dailydishly.com/wp-content/uploads/2025/06/915437da-33d1-4ffb-bb72-5bb8c719e96d-768x768.webp)


![For this dish, you need 1 pound of fresh asparagus. Look for bright green color and firm stems. Trim the tough ends before cooking. This helps ensure that each bite is tender and tasty. Garlic and lemon are the stars here. You’ll need 4 cloves of garlic, minced finely. This adds a nice punch of flavor. You also need the zest and juice of 1 lemon. The zest gives a bright taste, while the juice adds a fresh tang. You can enhance the dish with extra ingredients. I suggest adding 1 teaspoon of red pepper flakes for a little heat. Fresh parsley, chopped, makes a nice garnish. It adds color and a fresh taste. A pinch of salt and pepper rounds out the flavors, making the dish pop. For the full recipe, check the details above. Start by gathering all your ingredients. You will need: - 1 pound fresh asparagus, trimmed - 4 cloves garlic, minced - 2 tablespoons olive oil - Zest of 1 lemon - Juice of 1 lemon - 1 teaspoon red pepper flakes (optional) - Salt and pepper to taste - Fresh parsley, chopped (for garnish) Wash the asparagus well and trim the ends. This helps remove any tough parts. Next, mince the garlic finely. Zest the lemon carefully to avoid the bitter white pith. Finally, squeeze the juice from the lemon, making sure to catch any seeds. Preheat your oven to 400°F (200°C). This ensures even cooking. In a large bowl, combine the asparagus, minced garlic, olive oil, lemon zest, and red pepper flakes, if you want some heat. Add the lemon juice and season with salt and pepper. Toss everything together well. You want the asparagus to be nicely coated. Now, spread the asparagus on a baking sheet in a single layer. This helps them cook evenly. Roast them in the oven for 15-20 minutes. Toss halfway through to promote even browning. You’ll know they’re done when they are tender and slightly crispy. Once cooked, remove the asparagus from the oven. Transfer it to a serving platter. For a pop of color and freshness, garnish with chopped parsley. This dish pairs well with many meals, making it a versatile side. If you want, you can check out the Full Recipe for more tips and variations! To get your asparagus just right, start with fresh spears. Look for bright green color and firm texture. Trim the tough ends, about one inch from the bottom. This helps avoid bitterness. Spread the asparagus in a single layer on the baking sheet. This ensures even roasting. Toss halfway through cooking for a nice crisp. Roast until tender, about 15-20 minutes. You can add more flavor to your dish. Try a sprinkle of Parmesan cheese before roasting for a savory kick. Fresh herbs like thyme or dill work well too. Add a splash of balsamic vinegar for a tangy twist. Red pepper flakes add heat, but use them sparingly. Lemon zest gives a bright taste that contrasts nicely with garlic. Need to feed more guests? Simply double the ingredients. You can also cut the recipe in half for smaller meals. Adjust the cooking time if you change the amount. Use a larger baking sheet for more asparagus. This keeps them from steaming and ensures a crispy finish. Always check for doneness by tasting a piece. {{image_2}} You can cook garlic lemon asparagus in many ways. Grilling gives it a smoky flavor. Just toss the asparagus with the garlic lemon mix and grill for 5-7 minutes. Sautéing is quick and easy too. Heat a pan, add olive oil, and toss the asparagus for about 5 minutes. Both methods keep the asparagus crisp and full of taste. Want to change up the flavor? Adding cheese is a great option. Feta or Parmesan adds creaminess. Fresh herbs like thyme or basil also work well. Just mix them in before you roast. If you like heat, try adding more red pepper flakes. Each twist brings a new taste to this dish. Seasonal ingredients can brighten this recipe. In spring, add some fresh peas or radishes. In summer, toss in cherry tomatoes for sweetness. Fall calls for butternut squash cubes. Winter may inspire you to add roasted nuts for crunch. Using what's fresh makes this dish more fun and tasty. After you enjoy your garlic lemon asparagus, store leftovers in an airtight container. This helps keep the flavors fresh. Place the container in the fridge. Leftovers last about three to four days. If you notice any off smells or changes in color, it's best to toss them. To reheat your asparagus, use the oven or a skillet. Preheat the oven to 350°F (175°C). Spread the asparagus on a baking sheet and warm for about 10 minutes. This keeps them crispy. If using a skillet, add a splash of olive oil and heat on medium for five minutes. Stir gently to avoid burning. Yes, you can freeze garlic lemon asparagus, but it may change texture. Blanch the asparagus first. Boil for two minutes, then place in ice water. Drain and dry before placing in freezer bags. They can last up to three months in the freezer. When ready to eat, cook straight from frozen. Enjoy the fresh taste by using the [Full Recipe]. Garlic lemon asparagus lasts about 3 to 5 days in the fridge. To store it, put it in an airtight container. This keeps it fresh and tasty. I recommend eating it within this time for the best flavor and texture. If you notice any changes, like a mushy texture, it’s best to throw it out. You can use frozen asparagus, but it will change the dish’s texture. Frozen asparagus tends to be softer when cooked. To use it, thaw the asparagus first. After that, pat it dry to remove excess moisture. This helps achieve a better roast. You might also need to adjust the cooking time. Garlic lemon asparagus pairs well with many dishes. Here are some great options: - Grilled chicken or fish - Pasta with olive oil and herbs - Quinoa or rice dishes - Steak or pork chops - A fresh green salad These ideas help you create a balanced meal. The bright lemon flavor complements rich proteins nicely. For even more inspiration, check out the Full Recipe for Garlic Lemon Asparagus. This article covered how to make delicious Garlic Lemon Asparagus. We talked about key ingredients like fresh asparagus and garlic. I shared clear steps to prepare, cook, and serve it. You learned tips for roasting it perfectly and some fun variations. Also, I gave storage tips to keep it fresh. When you try this dish, enjoy its bright flavors. Feel free to get creative with your own twists. Happy cooking!](https://dailydishly.com/wp-content/uploads/2025/06/b7aeafc4-6d88-42f1-94a5-d1a2b58bd123-768x768.webp)

![To make easy roasted chickpeas, you need just a few key items. Here’s what you will need: - 1 can (15 oz) chickpeas, drained and rinsed - 2 tablespoons olive oil - 1 teaspoon smoked paprika - 1 teaspoon garlic powder - 1/2 teaspoon cumin - 1/2 teaspoon ground coriander - 1/4 teaspoon cayenne pepper (adjust to taste) - Salt to taste These ingredients form the base of the recipe. The chickpeas give you protein and fiber, while the olive oil helps them crisp up. The spices add flavor that makes them truly enjoyable. You can easily change up the taste with some optional spices. Try adding: - 1 teaspoon onion powder - 1 teaspoon Italian seasoning - A squeeze of lemon juice - A dash of hot sauce Feel free to mix and match these spices. The more you play around, the more fun flavors you can create! Garnishes can make your roasted chickpeas stand out. I suggest: - Fresh parsley, chopped - A sprinkle of nutritional yeast for a cheesy flavor - Sliced green onions These garnishes not only add color but also provide a fresh touch. Whether you want to keep it simple or fancy, these options enhance your dish. For the full recipe, refer back to the beginning. Start by preheating your oven to 400°F (200°C). Next, take one can of chickpeas and drain them well. Rinse the chickpeas under cold water to remove any canning liquid. This keeps the flavor fresh. Once rinsed, pat the chickpeas dry with paper towels. Removing moisture is key for that perfect crunch. If they are wet, they won't get crispy. In a large mixing bowl, add the dry chickpeas. Pour in two tablespoons of olive oil. This helps the spices stick and adds flavor. Next, sprinkle in one teaspoon each of smoked paprika and garlic powder. Add half a teaspoon of cumin and ground coriander for warmth. For a bit of heat, include a quarter teaspoon of cayenne pepper. You can adjust this to make it spicier or milder. Finish with salt to taste. Toss everything well until all the chickpeas are coated. Spread the seasoned chickpeas on a baking sheet lined with parchment paper. This makes cleanup easy. Roast the chickpeas in your preheated oven for about 20 to 30 minutes. Make sure to stir them every 10 minutes. This ensures even cooking. The chickpeas are done when they look golden brown and feel crispy. After roasting, let them cool for a few minutes. They will crisp up even more as they cool. Garnish with fresh chopped parsley for a pop of color. For the full recipe, refer to the previous section. To get the best crunch, start by drying your chickpeas well. After you rinse them, use paper towels to soak up extra moisture. This step is key! If they are wet, they won’t crisp up. Once dry, coat them evenly with olive oil and spices. Spread them in a single layer on your baking sheet. This helps them roast evenly. Stir them every ten minutes while they cook. This ensures all sides get golden and crunchy! One common mistake is skipping the drying step. Wet chickpeas won’t turn crunchy. Another mistake is overcrowding the pan. If they are too close, they will steam instead of roast. Lastly, don’t skip the stirring! If you leave them alone, some may burn while others stay soft. Follow these tips, and you will have perfect roasted chickpeas! Serve your crispy chickpeas in a bright bowl. They make a great snack or a topping for salads. You can also pair them with a dip, like tahini sauce or vegan yogurt. For a fun twist, sprinkle some extra spices on top right before serving. Enjoy these tasty bites with friends or as a healthy snack during movie night! For the full recipe, check out the detailed instructions above. {{image_2}} You can change the flavor of roasted chickpeas easily. Try a mix of spices. For a savory blend, use onion powder, chili powder, and a touch of thyme. For a Mediterranean twist, combine oregano, lemon zest, and a pinch of salt. If you love herbs, add rosemary or dill for freshness. The options are endless! You can make chickpeas spicy or sweet. For a spicy kick, increase the cayenne pepper. Add some chili flakes for more heat. If you prefer sweet, try cinnamon with a little sugar or maple syrup. This gives a warm, sweet touch. Sweet chickpeas make a great snack or dessert! Boost the flavor by adding extra ingredients. Toss in some nuts or seeds for crunch. You can even mix in dried fruit like raisins or cranberries for a sweet surprise. Another idea is to add garlic cloves while roasting. They will soften and add a rich garlic flavor. These additions make the snack even more exciting and tasty! For the full recipe, check out the [Full Recipe]. After enjoying your roasted chickpeas, let them cool completely. Place them in an airtight container. This keeps them fresh and crunchy. If you do not have an airtight container, use a zip-top bag. Make sure to squeeze out as much air as possible before sealing. Roasted chickpeas are best when fresh, but you can reheat them. Preheat your oven to 350°F (175°C). Spread the chickpeas on a baking sheet in a single layer. Bake for about 10 minutes, or until they are warm and crispy again. Avoid microwaving them; this can make them soft. Properly stored roasted chickpeas last about 3 to 4 days. Keep them away from heat and moisture. For longer storage, consider freezing them. Just make sure to use a freezer-safe container. When ready to eat, let them thaw in the fridge overnight, then reheat as mentioned above. Enjoy keeping your snacks tasty and fresh! Yes, you can use dried chickpeas. First, soak them in water overnight. This helps them soften. After soaking, cook them until they are tender. This usually takes about an hour. Then, drain and rinse them well. Follow the same steps in the Full Recipe for seasoning and roasting. Using dried chickpeas might take longer but can add a fresher taste. Roasted chickpeas are very versatile. You can serve them as a snack on their own. They also make a great salad topper. Try adding them to grain bowls for crunch. For a fun twist, serve them with vegan yogurt or tahini sauce for dipping. You can even mix them into trail mix for a healthy snack. You will know they are done when they are golden brown and crunchy. Check them around the 20-minute mark. Stir them every 10 minutes to ensure even cooking. If they look dry and crispy, they are ready. Let them cool slightly after roasting. They will get crunchier as they cool down. Easy roasted chickpeas are a healthy and tasty snack. We covered ingredients, from essentials to fun seasonings. You learned how to prepare, coat, and roast your chickpeas to crispy perfection. I shared tips to avoid common mistakes and ways to serve them. You can also explore flavor variations and proper storage. Keep this guide on hand for your next snacking adventure! Enjoy your delicious roasted chickpeas, and make them your own.](https://dailydishly.com/wp-content/uploads/2025/06/2a694b00-c6e3-4f48-98d3-e4cb03920d39-768x768.webp)