Savory Chicken Caesar Wraps Easy and Tasty Meal

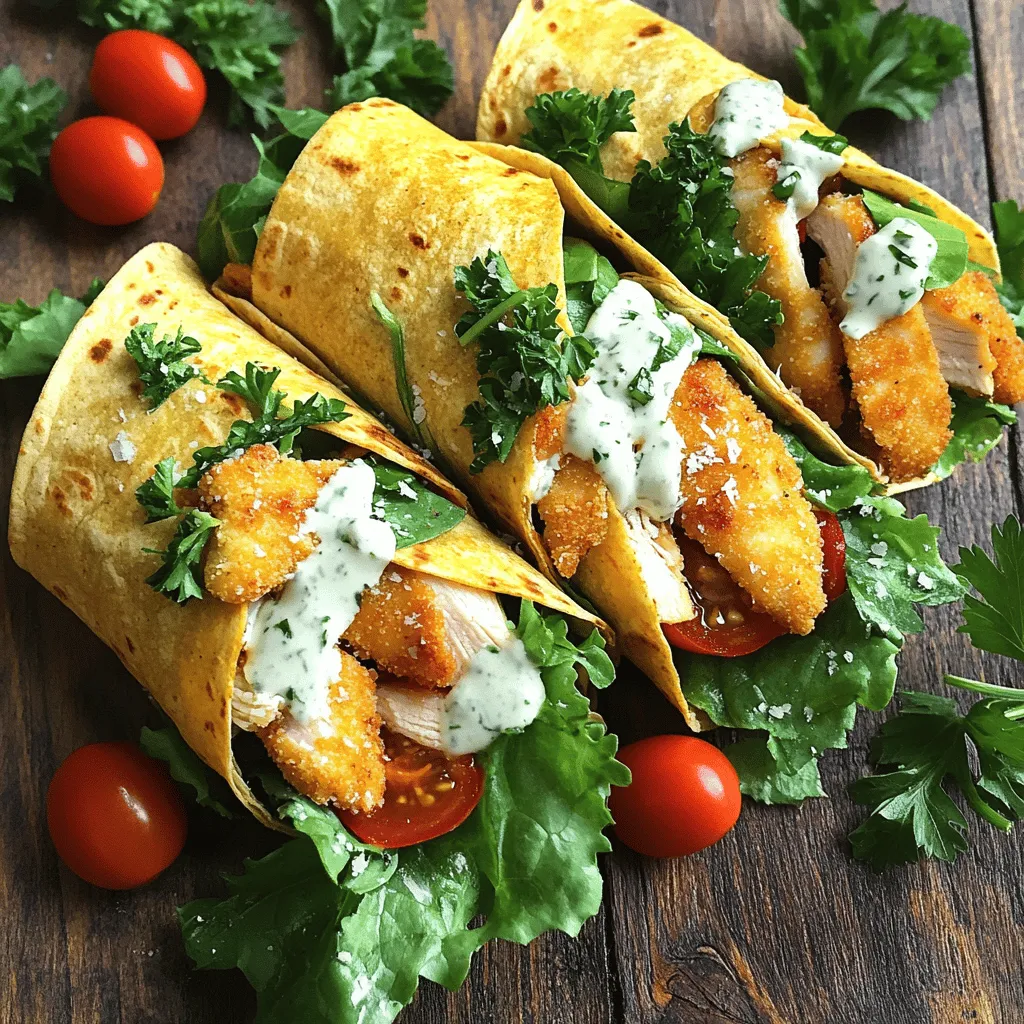
Are you looking for a quick and delicious meal? My Savory Chicken Caesar Wraps are the perfect solution! With just a few simple ingredients and easy steps, you can whip up a tasty wrap that suits any busy day. They’re great for lunch or dinner and are sure to impress. Join me as I share how to make these wraps, along with helpful tips, variations, and storing advice. Let’s get cooking!
Ingredients
Essential Ingredients for Chicken Caesar Wraps
To make tasty Chicken Caesar Wraps, you need some key items. Here’s what to gather:
– 2 boneless, skinless chicken breasts
– 1 cup Romaine lettuce, chopped
– ½ cup cherry tomatoes, halved
– ½ cup Caesar dressing
– ¼ cup grated Parmesan cheese
– 4 large flour tortillas
– Olive oil for cooking
These ingredients create a fresh and flavorful wrap. The chicken adds protein, while the lettuce and tomatoes give a nice crunch. The Caesar dressing ties everything together with its rich taste.
Suggested Seasonings
Seasoning makes a big difference in flavor. For these wraps, I use:
– 1 teaspoon garlic powder
– 1 teaspoon paprika
– Salt and pepper to taste
Garlic powder gives a warm taste, and paprika adds a little color and smokiness. Salt and pepper enhance the flavors of all the ingredients.
Optional Garnishes
Garnishes can make your dish look even better. Here are some options:
– Fresh parsley
Adding fresh parsley is a great touch. It brightens up the dish and adds a pop of color. You can sprinkle it on top before serving for extra flair.
Step-by-Step Instructions
Detailed Cooking Process
To start, season the chicken breasts with garlic powder, paprika, salt, and pepper. This adds great flavor. Heat a tablespoon of olive oil in a skillet over medium heat. Once the oil is hot, add the chicken breasts. Cook them for about 6-7 minutes on each side. You want them to be golden brown and fully cooked.
After cooking, remove the chicken from the skillet. Let it rest for a few minutes. This helps keep it juicy. Now, slice the chicken into thin strips.
In a large bowl, mix the chopped Romaine lettuce, halved cherry tomatoes, sliced chicken, Caesar dressing, and grated Parmesan cheese. Toss gently until everything is well-coated.
Tips for Perfectly Cooked Chicken
To cook chicken well, make sure your skillet is hot before adding the chicken. This helps create a nice sear. Use a meat thermometer if you want to be precise. The chicken should reach 165°F. Avoid overcrowding the pan; this can steam the chicken instead of searing it.
Letting the chicken rest is key. This allows the juices to settle, making it tender.
Assembling Your Wrap
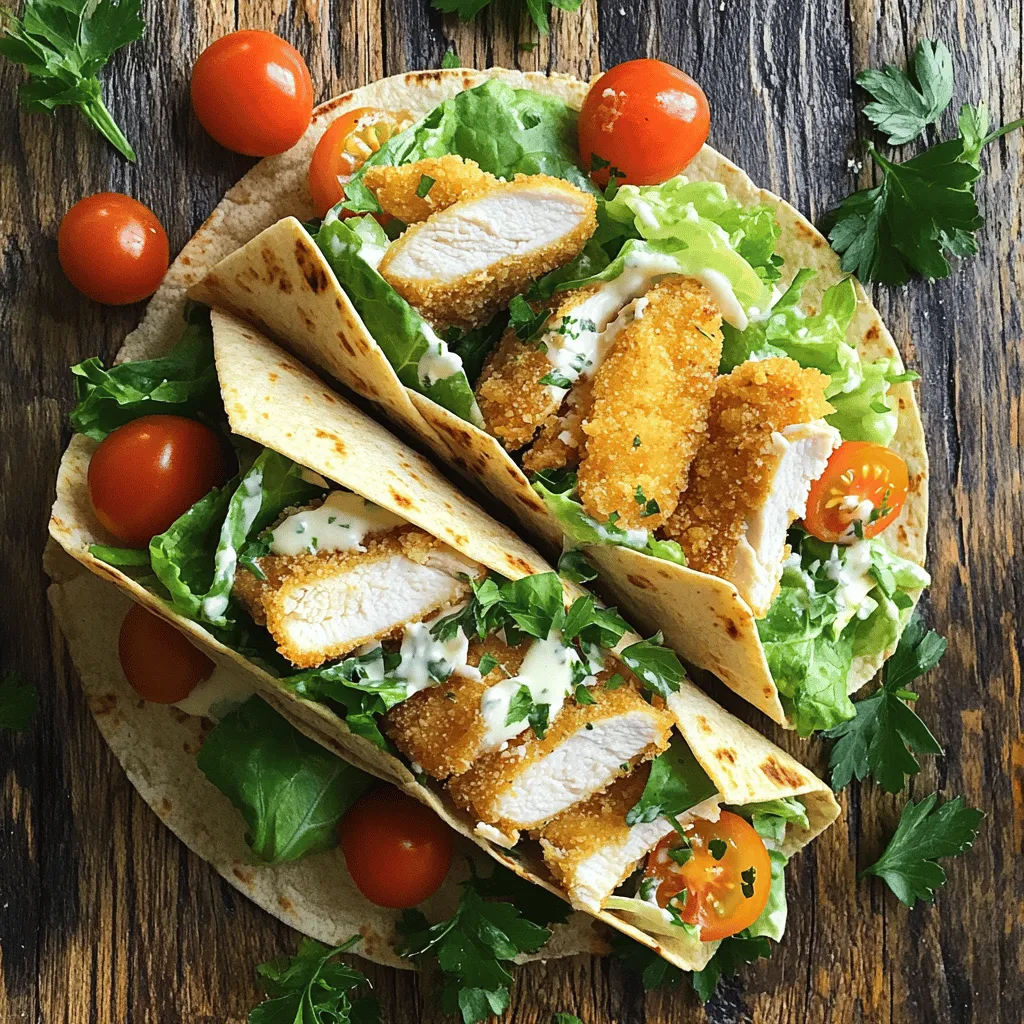
Now it’s time to assemble your wraps! Lay a tortilla flat on a clean surface. Spoon a generous amount of the chicken Caesar mixture onto the center.
Fold the sides of the tortilla inward. Then, roll it up tightly from the bottom. Make sure to encase the filling well. Repeat this process with the rest of the tortillas and filling.
For extra crispiness, place the wraps seam-side down in the skillet for 2-3 minutes. This gives them a nice golden look. Finally, slice each wrap in half diagonally and serve warm. Enjoy your tasty Chicken Caesar Wraps!
Tips & Tricks
How to Keep Your Wraps Fresh
To keep your wraps fresh, store them in an airtight container. Wrap each one in plastic wrap, too. This helps hold in moisture and flavor. You can also place a damp paper towel inside. It keeps the wraps from drying out. If you plan to eat them later, add the dressing just before serving. This prevents sogginess.
Enhancing Flavor with Additions
You can easily boost the flavor of your Chicken Caesar Wraps. Try adding slices of avocado for creaminess. You can also toss in some crisp bacon bits for a smoky taste. Fresh herbs like basil or cilantro add a nice touch, too. Want some heat? Add sliced jalapeños or a dash of hot sauce. These simple additions make each bite even better.
Common Mistakes to Avoid
One common mistake is overcooking the chicken. This can make it dry and tough. Always check the chicken’s internal temperature. It should be 165°F for safety. Another mistake is using too much dressing. This can make your wrap soggy. Start with a small amount and add more if you need it. Finally, don’t forget to slice your wraps. This makes them easy to eat and fun to share.

Variations
Vegetarian Chicken Caesar Wraps
You can easily switch to a vegetarian version. Use grilled tofu or tempeh instead of chicken. Both options absorb flavor well and offer great texture. Add your favorite veggies, like bell peppers, cucumbers, or even roasted carrots. These wraps stay tasty and filling, while keeping the classic Caesar flavor.
Alternative Dressings
If you want to change the taste, try different dressings. A ranch or Greek yogurt dressing can work well. You can also mix in a bit of lemon juice for freshness. Experiment with flavors until you find your favorite. Each dressing brings a new twist to your wrap.
Healthier Options: Low-Calorie Alternatives
You can make your wraps lighter by using whole wheat tortillas. Swap regular Caesar dressing for a light version. You can also reduce cheese or use nutritional yeast for a cheesy flavor without the calories. Add more greens, like spinach or kale, to boost nutrients. These small changes keep your meal healthy and delicious.
Storage Info
Storing Leftover Wraps
If you have extra Chicken Caesar wraps, store them in the fridge. Place each wrap in a sealed container or wrap them in plastic. They will stay fresh for about 2 days. Make sure to keep them away from strong smells in your fridge. This helps maintain their taste.
Best Practices for Freezing
To freeze your Chicken Caesar wraps, wrap each one tightly in foil or plastic wrap. Then, place them in a freezer bag. They can last up to 3 months in the freezer. When you want to eat them, it’s best to thaw them overnight in the fridge. This keeps the wraps from getting soggy.
Reheating Tips
When you are ready to enjoy your wraps, you can reheat them in a skillet. Heat the skillet over medium heat and place the wraps seam-side down. Cook for about 2-3 minutes on each side until they are warm and crispy. You can also microwave them for about 30 seconds, but they won’t be as crispy. Enjoy these tasty wraps fresh and hot!
FAQs
How can I make Chicken Caesar Wraps gluten-free?
To make Chicken Caesar Wraps gluten-free, use gluten-free tortillas. These are easy to find at most grocery stores. You can also make your own using gluten-free flour. Ensure your Caesar dressing is gluten-free too. Check the label for any hidden gluten. Using these swaps keeps your wraps tasty and safe.
Can I use leftover chicken for this recipe?
Yes, you can use leftover chicken for this recipe. Shredded or diced chicken works great. It saves time and adds flavor. Just make sure it’s cooked well and seasoned. This way, you can enjoy a quick meal without starting from scratch.Follow the steps to create a delicious meal that your family will love. Don’t forget to enjoy the process!
Chicken Caesar wraps are simple and fun to make. We covered must-have ingredients, cooking steps, and tips to keep your wraps fresh. Variations let you enjoy different flavors while storage info helps reduce waste. Remember, you can adapt this wrap to fit your needs, whether gluten-free or using leftovers. Enjoy exploring these options and making your own delicious wraps!


. You can store your Maple Roasted Brussels Sprouts in an airtight container. They stay fresh for up to 4 days. This helps keep the flavors intact and prevents spoilage. If you have leftovers, this is a simple way to enjoy them later. To enjoy your Brussels sprouts again, warm them in the oven or microwave. For best results, the oven method is ideal. Preheat your oven to 350°F (175°C) and place the sprouts on a baking sheet. Heat for about 10 minutes. This way, they regain their crispiness. You can freeze Maple Roasted Brussels Sprouts, but some texture may change. When you thaw them, they might be softer. To freeze, let them cool first, then place them in a freezer bag. This allows you to keep them for up to 3 months. When ready to eat, thaw in the fridge overnight, then reheat as mentioned above. To prep Brussels sprouts, first, wash them well. Trim off the tough ends and remove any yellow leaves. Then, cut each sprout in half. This helps them cook evenly and allows for better flavor absorption. Yes, you can prepare these Brussels sprouts in advance. Just roast them and let them cool. Store them in the fridge. When you are ready to eat, reheat them in the oven or microwave. This makes meal prep easy and saves time. These sprouts are great with many dishes. They pair well with meats like chicken, pork, or turkey. You can also serve them as part of a vegetarian meal, adding grains or other greens for a full plate. For the full recipe, check out the Maple Roasted Brussels Sprouts 🥬. In this article, I shared how to make Maple Roasted Brussels Sprouts. You learned about key ingredients like Brussels sprouts, olive oil, and maple syrup. The step-by-step guide makes cooking easy, from prepping to roasting. Remember, you can add nuts and cranberries for extra crunch. In the end, these sprouts are tasty and healthy. They fit well with many meals. Give this recipe a try and explore the variations to make it your own. Enjoy your cooking!](https://dailydishly.com/wp-content/uploads/2025/07/44b5f92b-02cd-478b-85d5-cb90a80bf444-768x768.webp)
![- 1 lb boneless, skinless chicken thighs - 1/2 cup cornstarch - 1/4 teaspoon black pepper - 1 cup panko breadcrumbs - 1/4 cup sesame seeds - 1/4 cup soy sauce - 1/4 cup honey - 1 tablespoon apple cider vinegar - 1 teaspoon ginger paste - 1 garlic clove, minced - Green onions, finely sliced - Toasted sesame seeds To make crispy sesame chicken, gather all your ingredients first. This helps you stay organized and enjoy the cooking process. The chicken thighs offer a tender bite while the cornstarch provides that essential crunch. Panko breadcrumbs and sesame seeds create a delightful texture and nutty flavor. For the sauce, soy sauce and honey blend perfectly. Apple cider vinegar adds a hint of tang, while ginger and garlic bring warmth and depth. These simple ingredients make a sauce that truly elevates your dish. Don’t forget your garnishes! Finely sliced green onions and toasted sesame seeds add a pop of color and flavor. When you plate your dish, it not only looks great but also tastes amazing. This is the key to making crispy sesame chicken irresistible. For the detailed steps on how to combine these ingredients, check out the Full Recipe. To start, mix the dry ingredients. In a bowl, combine 1/2 cup cornstarch, 1/2 teaspoon salt, and 1/4 teaspoon black pepper. This mix will help the chicken get crispy. Next, bread the chicken. Take 1 lb of cut chicken thighs. Dip each piece into the cornstarch mix, then into a beaten large egg. Finally, coat each piece with a mix of 1 cup panko breadcrumbs and 1/4 cup sesame seeds. Make sure the coating is even. This step is key for that crunchy texture. Now, heat oil for frying. In a deep skillet, add enough vegetable oil to cover the chicken pieces. Heat it over medium-high heat. Once the oil is hot, fry the chicken in batches. Cook for about 5-7 minutes until each piece is golden brown and crispy. Drain the fried chicken on paper towels. This keeps it from getting soggy. For the sauce, grab a separate saucepan. Combine 1/4 cup soy sauce, 1/4 cup honey, 1 tablespoon apple cider vinegar, 1 teaspoon ginger paste, and a minced garlic clove. Heat the mixture over medium heat. Stir and bring it to a simmer for 3-4 minutes. This thickens your sauce and blends the flavors nicely. Once the chicken is fried, drizzle or toss the sauce over it. Make sure each piece is well-coated. Enjoy your crispy sesame chicken! For more details, check out the Full Recipe. To make your chicken crispy, use cornstarch and panko breadcrumbs. Cornstarch helps absorb moisture, while panko adds crunch. - Use 1/2 cup of cornstarch. - Mix it with 1/2 teaspoon salt and 1/4 teaspoon black pepper. - Coat each chicken piece well before frying. Frying temperature matters too. Heat your vegetable oil to medium-high. The right heat cooks the chicken fast and keeps it crispy. - Fry in small batches. - Cook each batch for about 5-7 minutes. - Drain on paper towels to remove excess oil. To boost flavor, adjust the sauce. This sauce is a mix of sweet and savory, but you can change it to your taste. - Add more honey for sweetness or soy sauce for saltiness. - Try using fresh garlic and ginger. Fresh ingredients add a lively taste and aroma. Use 1 teaspoon of ginger paste and 1 minced garlic clove in your sauce. This makes it more vibrant and tasty. How you serve your chicken makes a big difference. For an attractive plate, use a large platter. - Drizzle extra sauce over the chicken. - Garnish with sliced green onions and toasted sesame seeds for color and texture. This makes your Crispy Sesame Chicken look as good as it tastes! For more tips and the full recipe, check the [Full Recipe]. {{image_2}} You can make Crispy Sesame Chicken lighter. Instead of frying, try baking. Bake the chicken at 400°F for 20-25 minutes. This method keeps the crunch without extra oil. If you want low-sodium soy sauce, use tamari or coconut aminos. Both give a similar flavor but with less salt. You can add spices to the coating for extra flavor. Try paprika or cayenne for a little heat. A pinch of garlic powder adds a nice touch too. To mix things up, use different sauces. Sweet chili sauce or teriyaki sauce can give a fun twist. You can also try a spicy mustard sauce for a zing. Pair your Crispy Sesame Chicken with tasty sides. Steamed broccoli or stir-fried vegetables work well. They add color and nutrition. You can also serve it with rice. Jasmine or brown rice both complement the dish. For a fresh touch, add a side salad with sesame dressing. Enjoy your meal with a mix of flavors and textures! To keep your Crispy Sesame Chicken fresh, refrigerate it right away. Place the chicken in a shallow container. This helps it cool down faster. Cover the container tightly with a lid or plastic wrap. This keeps the chicken from drying out. Use it within three days for the best taste. Use airtight containers for storing leftovers. Glass containers work great since they do not stain. You can also use BPA-free plastic containers. Make sure they are safe for food use. Label your containers with the date. This helps you track how long they have been stored. To enjoy your Crispy Sesame Chicken again, you need to reheat it carefully. The oven is the best choice. Preheat your oven to 350°F (175°C). Place the chicken on a baking sheet. Heat for about 10-15 minutes. This keeps the chicken crispy. The microwave is faster but can make the chicken soggy. If you must use it, heat in short bursts. Check after every 30 seconds to avoid overcooking. Yes, you can freeze Crispy Sesame Chicken! First, let it cool completely. Then, wrap each piece tightly in plastic wrap. Place the wrapped pieces in a freezer bag. Squeeze out the air and seal it. This prevents freezer burn. To thaw, move the chicken to the fridge overnight. This keeps it safe. You can also use the microwave for a quick thaw. Use the defrost setting, checking often. Once thawed, reheat in the oven for the best results. Enjoy your delicious meal again! For the complete recipe, check out the Full Recipe section. You can use chicken breasts as a substitute for chicken thighs. They are leaner but still work well. You may also try chicken tenders, which are tender and cook quickly. For vegetarian options, consider using tofu or tempeh. They absorb flavors well and provide a nice texture when cooked. Look for a golden brown color on the chicken. The coating should be crispy and firm. You can use a meat thermometer to check the temperature. Chicken should reach 165°F (75°C) to be safe to eat. If you do not have a thermometer, cut into a piece. The meat should be white with no pink inside. Yes, you can make the sauce in advance. Just mix all the sauce ingredients in a saucepan. Cook it over medium heat until it thickens slightly. Allow it to cool, then store it in an airtight container. When ready to use, reheat it gently on the stove. You can also microwave it for a quick option. This blog post recaps the steps to make Crispy Sesame Chicken. We covered the ingredients, cooking methods, and tips for perfect results. Whether you fry or bake, the key is achieving crispiness. I shared flavorful sauce ideas and garnishing tips to enhance your dish. Remember to store and reheat leftovers properly for best taste. With simple variations, you can easily adapt this recipe. Enjoy your cooking adventure with these helpful insights, and impress everyone with your delicious meal!](https://dailydishly.com/wp-content/uploads/2025/07/12f93f23-c091-4c02-8196-bfe71a37e11f-768x768.webp)