Craving a dish that’s both hearty and delightful? You’re in for a treat with my savory Sweet Potato Gnocchi with Sage Butter recipe! This easy dish brings comfort to your table, combining tender gnocchi with a rich sage butter sauce. Whether you’re a seasoned cook or a kitchen newbie, I’ll guide you step-by-step. Let’s dive into the ingredients and make something special together!
Why I Love This Recipe
- Deliciously Sweet: The natural sweetness of the sweet potatoes adds a delightful flavor that pairs perfectly with the savory sage butter.
- Comfort Food Classic: This gnocchi dish is the ultimate comfort food, ideal for cozy evenings or gatherings with family and friends.
- Easy to Make: With simple ingredients and straightforward steps, this recipe is accessible for both novice and experienced cooks.
- Versatile Sauce Options: While sage butter is a classic pairing, you can easily swap it out for your favorite sauces to customize the dish.
Ingredients
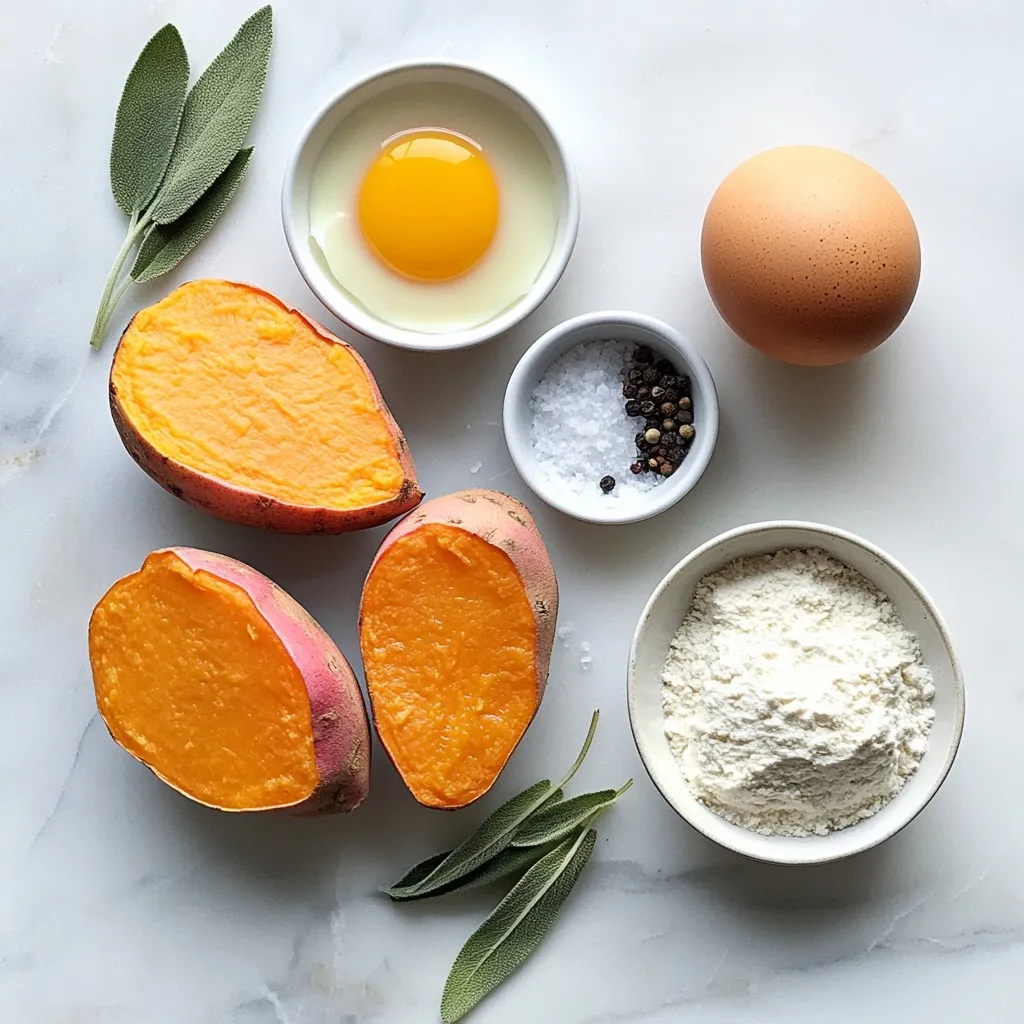
List of Ingredients for Sweet Potato Gnocchi
– 2 medium sweet potatoes (about 1 pound), baked and peeled
– 1 cup all-purpose flour (plus extra for dusting)
– 1 large egg
– 1/2 teaspoon salt
List of Ingredients for Sage Butter Sauce
– 4 tablespoons unsalted butter
– 10-12 fresh sage leaves
– Pinch of nutmeg (optional)
– Freshly grated Parmesan cheese (for serving)
– Black pepper (for seasoning)
Optional Ingredients and Substitutions
You can use different flours like whole wheat or gluten-free blends. If you don’t have sage, try thyme or rosemary for a new taste. To make it richer, add more butter. For a sweet touch, mix in a bit of brown sugar with the sweet potatoes.
Step-by-Step Instructions
Preparing the Sweet Potato Gnocchi
To start, you need to bake two medium sweet potatoes. Bake them until soft, which usually takes about 45 minutes. Once they cool, peel and mash them in a large bowl until smooth. This step is key for the gnocchi’s texture.
Next, add one large egg and half a teaspoon of salt to the mashed sweet potatoes. Mix until well combined. Now, gradually fold in one cup of all-purpose flour. Start with three-quarters of a cup and add more as needed. You want a soft dough that is not too sticky.
On a floured surface, divide the dough into four pieces. Roll each piece into a rope that is about half an inch thick. Cut the ropes into one-inch pieces. To create ridges, gently press each piece with a fork. This helps the sauce stick later. Dust with a bit of flour to keep them from sticking together.
Cooking the Gnocchi
Bring a large pot of salted water to a boil. This is where the magic happens! Carefully drop the gnocchi into the pot. Cook them in batches to avoid crowding. They are done when they float to the top, which takes about 2 to 4 minutes.
Using a slotted spoon, remove the gnocchi and place them on a plate. Make sure to let them rest while you prepare the sauce.
Making the Sage Butter Sauce
In a skillet over medium heat, melt four tablespoons of unsalted butter. Watch closely as it starts to foam. Add 10 to 12 fresh sage leaves to the melted butter. Cook until the butter turns a light golden brown, and the sage leaves become crispy, which takes about 2 to 3 minutes.
Once the butter is ready, add the cooked gnocchi to the skillet. Toss gently to coat them in the sage butter. If you like, you can add a pinch of nutmeg for an extra kick of flavor.
Remove the skillet from the heat. Season with black pepper, and serve right away. Don’t forget to top your gnocchi with freshly grated Parmesan cheese for the final touch!
Tips & Tricks
How to Perfect Your Gnocchi Texture
To make gnocchi that feels just right, use the right amount of flour. Start with 3/4 cup and add more as needed. The dough should be soft but not sticky. If it is too sticky, add a little more flour. Knead it gently. Overworking the dough can make your gnocchi tough.
Common Mistakes to Avoid
One common mistake is using wet sweet potatoes. Make sure to bake them well and let them cool. This helps remove excess moisture. Avoid adding too much flour too quickly. It can make your gnocchi dense. Also, do not skip the fork pressing step. This gives the gnocchi ridges, helping sauce stick better.
Serving Suggestions and Pairing Ideas
Sweet potato gnocchi pairs well with various toppings. Try adding sautéed spinach or mushrooms for extra flavor. Crushed walnuts add a nice crunch. You can also drizzle a bit of balsamic glaze for a sweet touch. For drinks, a light white wine or herbal tea complements the dish nicely. Enjoy your meal with freshly grated Parmesan on top.
Pro Tips
- Choose the Right Sweet Potatoes: Opt for firm, smooth-skinned sweet potatoes for the best flavor and texture in your gnocchi.
- Don’t Overwork the Dough: Mix the dough just until combined to keep the gnocchi light and fluffy. Over-kneading can make them dense.
- Test Cooking Time: Always cook a small batch first to ensure you have the right boiling time. Gnocchi is ready when it floats!
- Customize Your Sauce: Feel free to add garlic or a splash of lemon juice to the sage butter for an extra layer of flavor.
Variations
Alternative Sauces for Gnocchi
You can switch up the sauce for your sweet potato gnocchi. Here are some tasty options:
– Brown Butter Sage Sauce: This uses the same sage but adds a deeper flavor.
– Creamy Alfredo Sauce: A rich and cheesy sauce that pairs well with gnocchi.
– Marinara Sauce: A classic tomato sauce that brings a fresh taste.
– Pesto Sauce: Use basil or arugula pesto for a bright, herbal flavor.
Each sauce gives a new twist. Try them all to find your favorite.
Gluten-Free Gnocchi Options
If you need gluten-free gnocchi, you have choices. Use these ingredients instead:
– Gluten-Free Flour: Substitute all-purpose flour with a gluten-free blend.
– Almond Flour: This adds a nutty flavor and works well in gnocchi.
Mix and match until you find the right texture. Gluten-free gnocchi can still be delicious.
Flavor Enhancements and Add-Ins
Want to take your gnocchi further? Here are some ideas:
– Cheese: Add ricotta or mozzarella to the dough for creaminess.
– Herbs: Mix in fresh herbs like thyme or rosemary for extra flavor.
– Spices: Add garlic powder or paprika for a kick.
– Vegetables: Incorporate spinach or kale to boost nutrition.
These add-ins can transform your dish. Get creative and customize your sweet potato gnocchi!
Storage Info
How to Store Leftover Gnocchi
To keep leftover gnocchi fresh, place them in an airtight container. Make sure they cool to room temperature first. Store them in the fridge. They will stay good for 2-3 days. You can also sprinkle a little flour on them to prevent sticking.
Freezing Instructions for Fresh Gnocchi
To freeze fresh gnocchi, lay them out on a baking sheet. Make sure they do not touch each other. Place the sheet in the freezer for about an hour. Once frozen, transfer the gnocchi to a freezer bag. They will last for up to 3 months. When ready to use, you can cook them straight from frozen. No need to thaw!
Reheating Tips for Best Texture
To reheat gnocchi, boiling is the best method. Bring a pot of water to a boil. Add the gnocchi and cook until they float again. This usually takes 2-3 minutes. You can also sauté them in a pan with a little butter for extra flavor. This gives them a nice crisp outside while keeping the inside soft.
FAQs
What is the best way to cook gnocchi?
The best way to cook gnocchi is by boiling it. Start with a large pot of salted water. Bring the water to a rolling boil. Once boiling, gently drop the gnocchi in the water. Cook them in batches for 2-4 minutes. Gnocchi is done when they float to the top. This shows they are light and fluffy.
Can I make gnocchi ahead of time?
Yes, you can make gnocchi ahead of time. Prepare the dough and shape the gnocchi. Then, place them on a floured baking sheet. Make sure they do not touch each other. Cover them with plastic wrap and refrigerate for up to 24 hours. For longer storage, freeze them in a single layer. Once frozen, transfer them to a freezer bag. They can stay fresh for up to 2 months.
What can I serve with sweet potato gnocchi?
Sweet potato gnocchi pairs well with many dishes. You can serve it with a sage butter sauce for rich flavor. Other great options include a light garlic sauce or a creamy Alfredo sauce. For sides, consider sautéed greens or a fresh salad. Grated Parmesan cheese adds a lovely touch. Feel free to get creative and mix in your favorite flavors!
This article covered your guide to making sweet potato gnocchi. We listed ingredients, step-by-step instructions, and tips for perfect texture. Variations let you explore sauces and gluten-free options. I shared how to store and reheat gnocchi properly.
In summary, making this dish is simple and fun. With practice, you’ll impress friends and family with your skills. Enjoy your cookin