Sheet-Pan BBQ Chicken Nachos Simple Family Feast

Get ready for a simple yet delicious family feast with my Sheet-Pan BBQ Chicken Nachos! This dish is perfect for crowd-pleasing dinners or fun game nights. You’ll learn how to layer crispy chips, savory BBQ chicken, and gooey cheese—all on one handy pan. Plus, I’ll share tips for customizing the dish and storing leftovers. Let’s dive into a recipe that will have everyone asking for more!
Ingredients
Main Ingredients for Sheet-Pan BBQ Chicken Nachos
For these tasty nachos, you will need:
– 2 cups shredded cooked chicken
– 1 cup BBQ sauce
– 1 large bag tortilla chips
– 2 cups shredded cheddar cheese
– 1 cup black beans, rinsed and drained
– 1 cup sweet corn (canned or frozen)
– 1 jalapeño, sliced
– 1/4 cup chopped fresh cilantro
– 1/2 cup sour cream
– 1/4 cup sliced green onions
– Optional: avocado slices for topping
These ingredients work together to create a tasty mix of flavors. The chicken gets juicy with the BBQ sauce. The chips give a nice crunch.
Optional Toppings and Garnishes
You can make these nachos even better with extra toppings. Here are some ideas:
– Avocado slices add creaminess.
– Fresh tomatoes bring a burst of color.
– Lime wedges add a tangy twist.
– Pickled jalapeños can give more heat.
– Olives add a briny flavor.
Feel free to mix and match your favorites.
Ingredient Substitutions
No worries if you don’t have everything! Here are some easy swaps:
– Use rotisserie chicken if you want a quick option.
– Swap BBQ sauce for a spicy salsa or hot sauce.
– Try pepper jack cheese for a kick instead of cheddar.
– Use pinto beans instead of black beans for a different taste.
– For a vegan version, use plant-based chicken and dairy-free cheese.
These substitutions keep the spirit of nachos alive while fitting your pantry.
Step-by-Step Instructions
Preparing the BBQ Chicken Mixture
Start by preheating your oven to 400°F (200°C). In a large bowl, mix 2 cups of shredded cooked chicken with 1 cup of BBQ sauce. Use a spoon to stir. Make sure the chicken gets fully coated in the sauce. This step adds a lot of flavor to your nachos.
Assembling the Nachos on the Sheet Pan
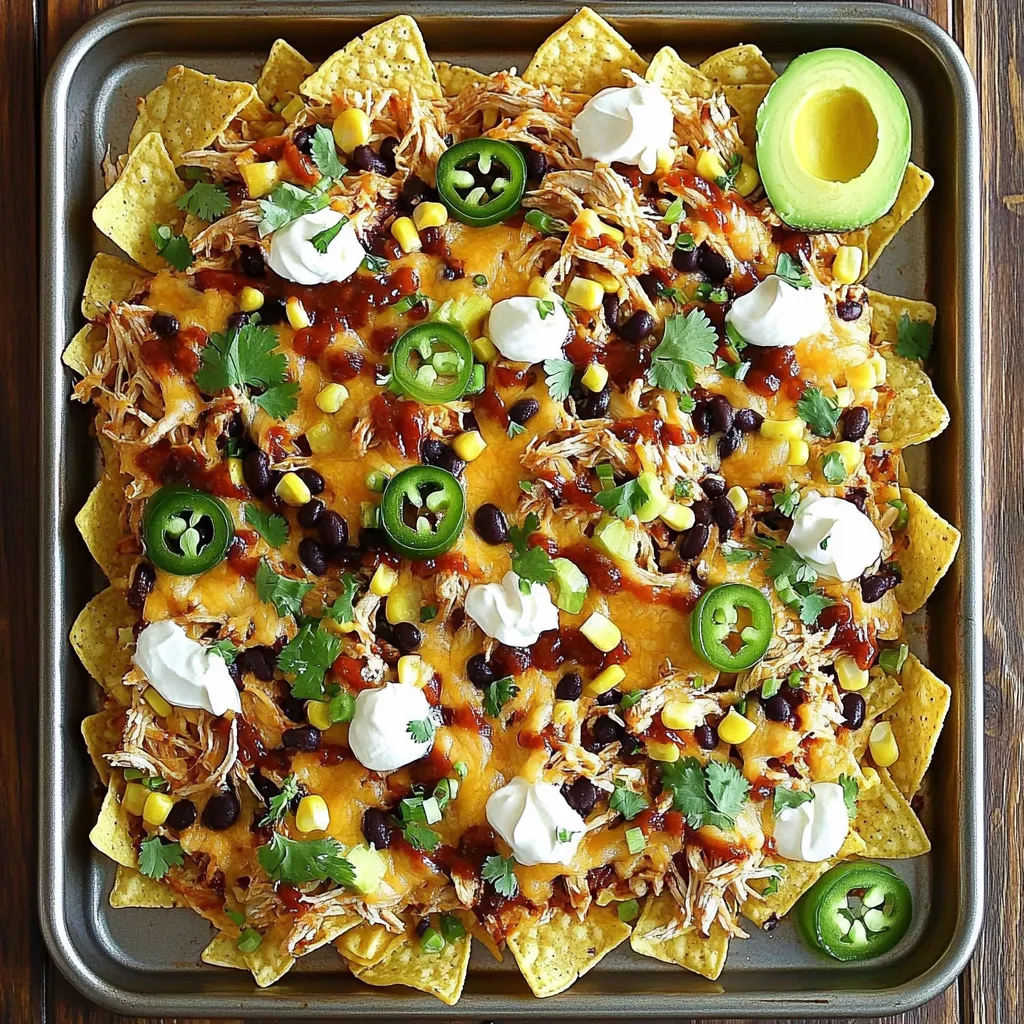
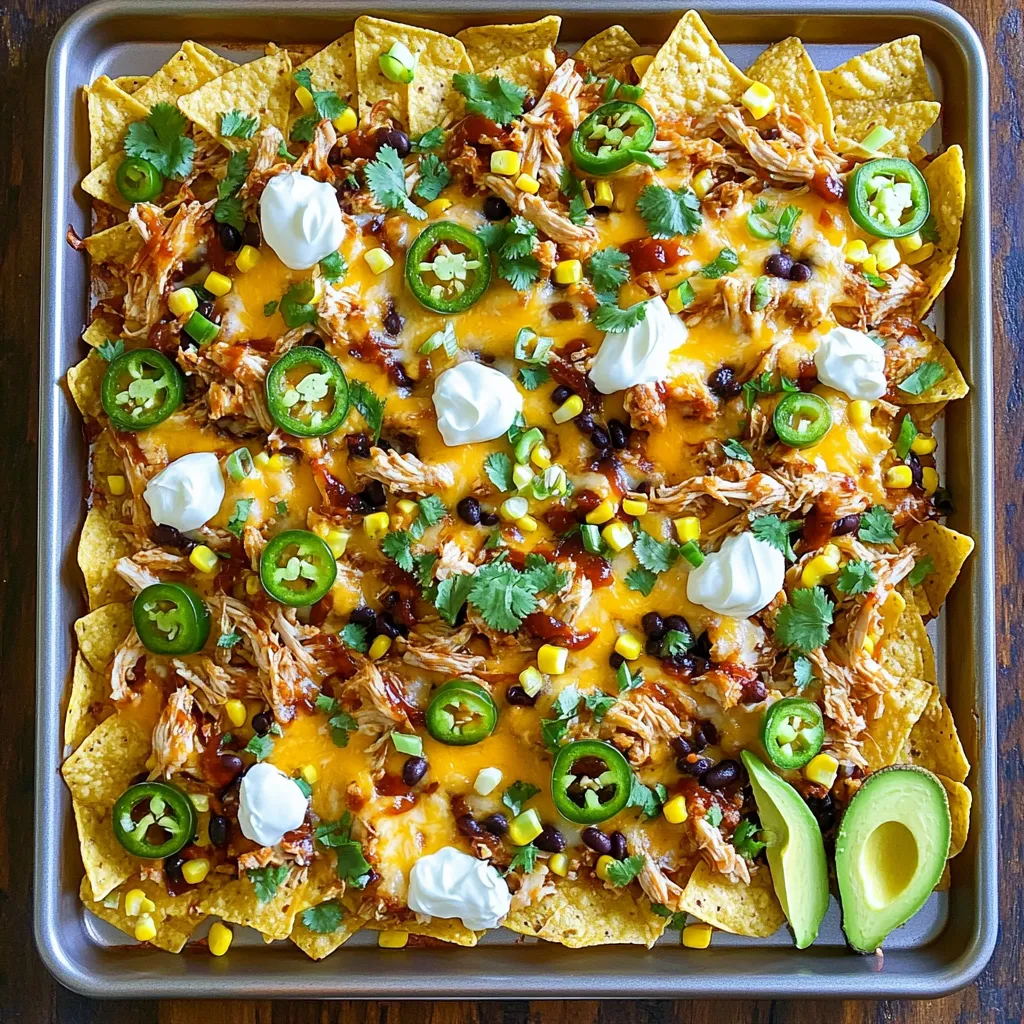
Grab a large sheet pan and spread out the tortilla chips. Use a big bag, and let the chips overlap slightly. Next, take the BBQ chicken mixture and spread it evenly over the chips. Then, add 1 cup of rinsed black beans and 1 cup of sweet corn. Sprinkle 2 cups of shredded cheddar cheese over the top. For some heat, layer jalapeño slices on top.
Baking Instructions and Key Tips
Now, place the sheet pan in the oven. Bake for about 15 minutes. Keep an eye on it until the cheese melts and starts to bubble. Once it’s done, take it out and add fresh cilantro and sliced green onions for a nice touch. Serve your nachos hot with sour cream and optional avocado slices on the side. Enjoy the feast!
Tips & Tricks
How to Achieve the Perfect Cheese Melt
To get that gooey cheese you crave, use fresh shredded cheese. Pre-shredded cheese often has anti-caking agents that stop it from melting well. Spread the cheese evenly over the nachos. This way, every chip gets its fair share. Bake until the cheese bubbles and turns golden. It takes about 15 minutes at 400°F. Keep an eye on it to avoid burning.
Best Practices for Layering Ingredients
Layering is key for great nachos. Start with tortilla chips. Make sure they cover the pan evenly. Then add half of the BBQ chicken. Next, sprinkle the black beans and corn. Follow with the rest of the chicken. Finish with cheese on top. This way, you keep chips from getting soggy. Each chip will stay crunchy and flavorful.
Adjusting Spice Levels with Jalapeños
Jalapeños can add a fun kick to your nachos. If you love spice, slice them thin and spread them on top. For milder heat, remove the seeds before slicing. You can also use pickled jalapeños for a tangy twist. Start with a little, then taste. You can always add more if you like.

Variations
Different BBQ Sauce Flavors to Try
You can switch up the flavor of your nachos by using different BBQ sauces. For a sweet touch, try honey BBQ sauce. If you want heat, go for chipotle BBQ sauce. A tangy option, like mustard-based BBQ sauce, adds a unique twist. You can even mix sauces for a fun flavor blend. Each sauce choice changes the taste and makes your nachos feel new.
Vegetarian or Vegan Options
If you want a vegetarian version, simply swap the chicken for black beans or grilled veggies. You can add more beans for protein. For a vegan option, use plant-based cheese instead of cheddar. Make sure your BBQ sauce is vegan, too. This way, everyone can enjoy the nachos, no matter their diet.
Adding Additional Vegetables or Proteins
You can boost the nutrition by adding more veggies. Bell peppers, diced tomatoes, or zucchini work well. For extra protein, add shredded pork or beef. If you like a crunch, toss in some radishes or fresh corn. These additions not only enhance flavor but also make the dish more colorful and fun.
Storage Info
How to Store Leftover Nachos
Leftover nachos need proper storage for freshness. First, let them cool down. Then, place them in an airtight container. Cover the nachos with a lid or plastic wrap. Store them in the fridge for up to three days. Avoid stacking them to keep the chips from getting soggy.
Reheating Instructions for Best Results
To reheat your nachos, use an oven for the best texture. Preheat your oven to 350°F (175°C). Spread the leftover nachos on a baking sheet. Heat them for about 10 minutes, or until they are warm. This will help the chips stay crisp. You can also microwave them, but they may get soft.
Freezing Options for Pre-Made Nachos
Freezing nachos is an option for longer storage. However, not all ingredients freeze well. If you want to freeze them, skip the cheese and toppings. Assemble the nachos with chips and chicken only. Wrap the tray tightly with plastic wrap. Store them in a freezer-safe bag. They can last for up to two months. When ready to enjoy, thaw in the fridge overnight. Then, add cheese and toppings before baking.
FAQs
Can I use raw chicken for this recipe?
No, you should not use raw chicken. The dish needs cooked chicken for safety. Raw chicken takes too long to cook in the oven with the nachos. It can lead to undercooked meat and food safety issues. Always use shredded cooked chicken for the best results. This makes the dish easy and quick to prepare.
What other toppings can I add to my nachos?
You can add many tasty toppings to your nachos. Here are some great options:
– Diced tomatoes
– Sliced olives
– Guacamole
– Fresh lime juice
– Sliced red onion
– Chopped bell peppers
– Crumbled queso fresco
Feel free to mix and match to create your perfect flavor. Nachos are all about fun and creativity!
How can I make this dish gluten-free?
Making this dish gluten-free is simple. Just choose gluten-free tortilla chips. Many brands offer tasty options. Always check the label to ensure they meet your needs. You can also add gluten-free sauces and toppings. This way, everyone can enjoy your delicious nachos without worry!
We explored how to make tasty sheet-pan BBQ chicken nachos. You learned about essential ingredients, cooking steps, and handy tips. I shared fun variations and ways to store leftovers. You can adjust flavors to suit your taste. These nachos are easy to prepare and perfect for any gathering. Enjoy this dish with friends and family, and don’t forget to get creative with toppings!


![For these grilled veggie skewers, you will need: - 1 large zucchini, sliced into thick rounds - 1 red bell pepper, cut into squares - 1 yellow bell pepper, cut into squares - 1 red onion, cut into chunks - 8 cherry tomatoes - 1 cup mushrooms, halved These vegetables bring color and flavor to your skewers. You can mix and match based on your taste. Try using eggplant or asparagus for a twist. The marinade adds zest and depth to the veggies. You will need: - 3 tablespoons olive oil - 2 teaspoons dried oregano - 1 teaspoon garlic powder - Salt and pepper to taste This simple mix enhances the natural flavors of the vegetables. Adjust the salt and pepper to fit your liking. Garnishes can make your skewers pop! Consider using: - Fresh parsley, chopped Adding parsley gives a fresh touch. It also adds a nice green color to the dish. You can also sprinkle feta cheese for a creamy bite. For the full recipe, check the Grilled Mediterranean Veggie Skewers. Start by gathering your veggies. Use a large bowl to combine: - 1 large zucchini, sliced into thick rounds - 1 red bell pepper, cut into squares - 1 yellow bell pepper, cut into squares - 1 red onion, cut into chunks - 8 cherry tomatoes - 1 cup mushrooms, halved Make sure to wash all your vegetables well. This keeps them fresh and clean. Cut them into even pieces. This helps them cook evenly on the grill. Next, we make the marinade. In a small bowl, whisk together: - 3 tablespoons olive oil - 2 teaspoons dried oregano - 1 teaspoon garlic powder - Salt and pepper to taste Mix until well combined. Pour this mixture over your veggies in the large bowl. Toss gently. Make sure every piece is coated. This will add great flavor to your skewers. Now it’s time to grill! First, preheat your grill to medium-high heat. While it heats, thread the marinated vegetables onto the skewers. Alternate between different types for a colorful look. Once the grill is hot, place the skewers on it. Grill for about 10-12 minutes. Turn the skewers occasionally. You want nice grill marks and tender veggies. When they are done, remove them from the grill. Let them cool slightly before serving. You can garnish with fresh parsley for an extra burst of flavor. For the full recipe, check out [Full Recipe]. Enjoy your grilled Mediterranean veggie skewers! To grill veggie skewers well, start with a clean grill. This helps prevent sticking. Preheat your grill to medium-high heat. This temperature cooks veggies evenly and keeps them crisp. Soak wooden skewers in water for at least 30 minutes. This step helps them not burn on the grill. When placing skewers on the grill, leave space between them. This promotes even heat flow. Keep a close eye on them. Turn the skewers every few minutes. This way, every side gets that nice grill mark. To get that perfect char, use high heat for a short time. Grill your skewers for about 10-12 minutes. Turn them often to avoid burning. The goal is tender veggies with those lovely grill lines. You want a bit of caramelization for extra flavor. Don’t forget to watch for the color change, too. When the veggies are brightly colored and tender, they are done. If you want a deeper char, leave them on a bit longer. Just be careful not to overcook them. Serve your grilled Mediterranean veggie skewers warm. They shine on their own, but pair nicely with dips. Try hummus or a yogurt sauce for added flavor. You can also serve them on a bed of fresh greens. This adds a nice crunch and vibrancy. For a fun twist, chop up leftovers and add them to salads. You can also use them in wraps or sandwiches. They keep well, making them a great meal prep option. For the full recipe, check out the details above. Enjoy your grilling! {{image_2}} You can swap in many other veggies for your skewers. Try using eggplant, asparagus, or even cauliflower. Each brings a unique taste and texture. For a sweeter note, add butternut squash or carrots. These flavors will shine when grilled. Don't be afraid to mix and match. The more colorful, the better! For a heartier meal, add protein to your skewers. Chicken or shrimp work well here. Cut them into bite-sized pieces for even cooking. You can marinate them just like the veggies. For a vegan option, try tofu or tempeh. They soak up flavors beautifully. Adding protein makes your skewers more filling and nutritious. While the olive oil and oregano mix is great, you can get creative. Try adding lemon juice or balsamic vinegar for extra zing. A bit of honey can bring a sweet touch. Experiment with spices like smoked paprika or cumin for warmth. Each marinade will change the flavor profile. Feel free to explore and find your favorite! Check out the Full Recipe for more details on creating the perfect skewers. After enjoying your Grilled Mediterranean Veggie Skewers, store leftovers in an airtight container. This keeps the flavors fresh. You can keep them in the fridge for three to four days. Make sure they cool down before sealing. Layer them with paper towels to absorb extra moisture. To reheat your skewers, use a skillet or grill. This helps maintain the charred flavor. Heat them on medium for about five minutes. Turn them gently to warm all sides. You can also use a microwave, but it may make them soft. If you choose the microwave, heat in short bursts to avoid overcooking. Freezing grilled skewers is a great option for meal prep. Let them cool completely first. Then, wrap each skewer in plastic wrap. Place the wrapped skewers in a freezer bag, removing as much air as possible. They can stay fresh for up to three months. To enjoy, thaw in the fridge overnight before reheating. Yes, you can use many types of vegetables. Try eggplant, asparagus, or even corn. Mixing colors and shapes makes your dish fun and tasty. Each vegetable adds its unique flavor. Experiment to find your favorites! Soak wooden skewers for at least 30 minutes. This helps prevent them from burning on the grill. If you forget to soak them, use metal skewers instead. They work great and need no soaking at all. Many sauces taste great with these skewers. Tzatziki sauce adds a cool, creamy bite. A balsamic glaze gives a sweet twist. You can also try a spicy harissa sauce for heat. Each sauce adds its own special touch to the dish. For the full recipe, check it out! Grilled Mediterranean Veggie Skewers are fun and easy to make. We looked at the best veggies, how to prepare them, and tasty marinades. I shared tips for grilling and great serving ideas. You can try different veggies and proteins to mix things up. Remember to store leftovers well so you can enjoy them later. With these guidelines, your grilling efforts will be a hit. Enjoy every bite and happy grilling!](https://dailydishly.com/wp-content/uploads/2025/07/4b70700e-9f85-4317-b9e4-a855a04e592b-768x768.webp)

![To make a refreshing Lemon Basil Chickpea Salad, you need the following: - 1 can (15 oz) chickpeas, drained and rinsed - 1 cup cherry tomatoes, halved - 1 cucumber, diced - 1 bell pepper (any color), diced - 1/4 red onion, finely chopped - 1/4 cup fresh basil leaves, chopped - Juice of 1 lemon - 3 tablespoons extra-virgin olive oil - Salt and pepper to taste - 1/4 teaspoon garlic powder - 1/4 teaspoon red pepper flakes (optional) When picking your produce, choose firm tomatoes and bright, crisp cucumbers. Look for bell peppers that feel heavy for their size. Fresh basil should smell sweet and look vibrant. These tips help ensure your salad shines with flavor. You can add extra flavor and texture to your salad with these options: - Avocado, diced for creaminess - Feta cheese, crumbled for a salty kick - Olives, sliced for a briny touch - Grilled corn for sweetness Feel free to swap ingredients based on what’s in season. For example, use zucchini in summer or roasted butternut squash in fall. This flexibility makes the salad fun and fresh all year long. For the complete recipe, check out the [Full Recipe]. To make the Lemon Basil Chickpea Salad, start with a large bowl. Combine the following ingredients: - 1 can (15 oz) chickpeas, drained and rinsed - 1 cup cherry tomatoes, halved - 1 cucumber, diced - 1 bell pepper (any color), diced - 1/4 red onion, finely chopped - 1/4 cup fresh basil leaves, chopped Mix these well. The chickpeas add protein and texture. The tomatoes and cucumber bring freshness and crunch. The bell pepper adds color, while the onion gives a mild zing. Once mixed, let’s prepare the dressing. You can serve the salad right away, but I suggest letting it sit for at least 10 minutes. This time helps the flavors blend nicely. For the dressing, grab a small bowl. Whisk together these ingredients: - Juice of 1 lemon - 3 tablespoons extra-virgin olive oil - Salt and pepper to taste - 1/4 teaspoon garlic powder - 1/4 teaspoon red pepper flakes (optional) The lemon juice gives a bright, tangy taste. Olive oil adds richness. Adjust the salt and pepper to your liking. If you want a kick, add the red pepper flakes. Aim for a smooth blend in your dressing. Drizzle it over your salad and toss gently. Taste the salad and adjust seasoning if needed. Enjoy this vibrant dish fresh, or chill it for a refreshing bite. For the full recipe, check out the detailed instructions. You can pair Lemon Basil Chickpea Salad with many dishes. It goes well with grilled chicken or fish. You can also serve it with warm pita bread for a filling meal. For a light lunch, try it with a scoop of quinoa. When presenting the salad, use a large, bright bowl. This makes the colors pop and draws attention. Garnish with extra basil leaves or lemon slices for a fresh look. Adjusting the seasonings can make this salad perfect for your taste. If you like more zest, add extra lemon juice. For added heat, sprinkle in more red pepper flakes. You can also mix in more garlic powder for a stronger flavor. If you have leftovers, store them in an airtight container. To enhance the flavors, let the salad rest for a bit before eating. Reheating is not usually needed, but you can warm it slightly if you prefer. Just be careful not to heat it too much, as the fresh veggies taste best cold. {{image_2}} You can easily switch up the vegetables in your Lemon Basil Chickpea Salad. Here are some ideas: - Zucchini: Grate or dice it for a fresh crunch. - Carrots: Shred them for a sweet touch. - Corn: Add sweet corn for extra flavor and texture. You can also swap out chickpeas for other legumes: - Black beans: They add a rich, earthy taste. - Lentils: These will make your salad even heartier. For herbs, feel free to get creative: - Mint: It gives a refreshing twist. - Cilantro: Perfect if you love its bold flavor. When it comes to dressings, you can personalize it: - Balsamic vinaigrette: Adds a tangy sweetness. - Greek yogurt dressing: For a creamy element. This salad is versatile for different diets. To make it vegan, simply ensure the dressing is plant-based. You can replace any non-vegan ingredients with plant-friendly options: - Use nutritional yeast instead of cheese for a cheesy flavor without dairy. For gluten-free needs, this salad is already safe! Just make sure any added ingredients are gluten-free. To lower calories, skip the oil or use less. You can also add more veggies to bulk it up without extra calories. If you want to boost protein, consider these options: - Feta cheese: Crumble it on top for creamy richness. - Grilled chicken: Adds heartiness and flavor. With these variations, your Lemon Basil Chickpea Salad can fit any taste or diet. Check out the Full Recipe for all the details! To keep your Lemon Basil Chickpea Salad fresh, store it in an airtight container. Glass containers work well, but plastic ones are fine too. Make sure the lid closes tightly. Place the salad in the fridge right away. This helps lock in flavors and keeps everything crisp. If you have extra dressing, store it separately. This way, your salad won’t get soggy. When you’re ready to eat, simply drizzle the dressing over the salad and toss it again. Your salad will stay fresh in the fridge for about three days. After that, the veggies may lose their crunch. Look for signs of spoilage. If the salad smells off or looks slimy, it’s time to toss it. Make sure to check the basil too. If the leaves turn brown or wilt, it’s best to discard them. Enjoy your salad while it’s fresh for the best taste. For the full recipe, check [Full Recipe]. What can I add to make this salad heartier? You can add cooked quinoa or farro for more fiber. Chopped avocado adds creaminess. Grilled chicken or shrimp boosts protein. Can I make this salad ahead of time? Yes, you can make this salad ahead. It tastes even better after sitting for a while. Just store it in the fridge. Is there a substitute for chickpeas in this recipe? If you don't have chickpeas, try black beans or cannellini beans. Both offer protein and a nice texture. This salad is not just tasty; it’s healthy too. One serving has about 250 calories. It has 10 grams of fat and 12 grams of protein. - Chickpeas provide protein and fiber. - Tomatoes add vitamins and antioxidants. - Cucumbers keep the salad light and refreshing. - Basil offers flavor and has anti-inflammatory properties. How to make the salad more flavorful? To enhance the taste, add more lemon juice or fresh herbs. A pinch of cumin can also add depth. Recommendation for preparing for meal prepping When meal prepping, keep the dressing separate. This keeps the salad fresh and crisp. Store it in airtight containers for best results. This blog post walked you through making a fresh and tasty Lemon Basil Chickpea Salad. We covered the main ingredients and tips for choosing the best produce. You learned how to make a flavorful dressing and plenty of serving ideas. In conclusion, this salad is easy to customize for any diet and season. With proper storage, it stays fresh and tasty for days. Enjoy making this salad and share it with friends and family for a healthy treat!](https://dailydishly.com/wp-content/uploads/2025/07/d3747d36-0043-45e0-9a82-fe789303a34f-768x768.webp)

