Sheet Pan Garlic Parmesan Gnocchi & Veggies Recipe

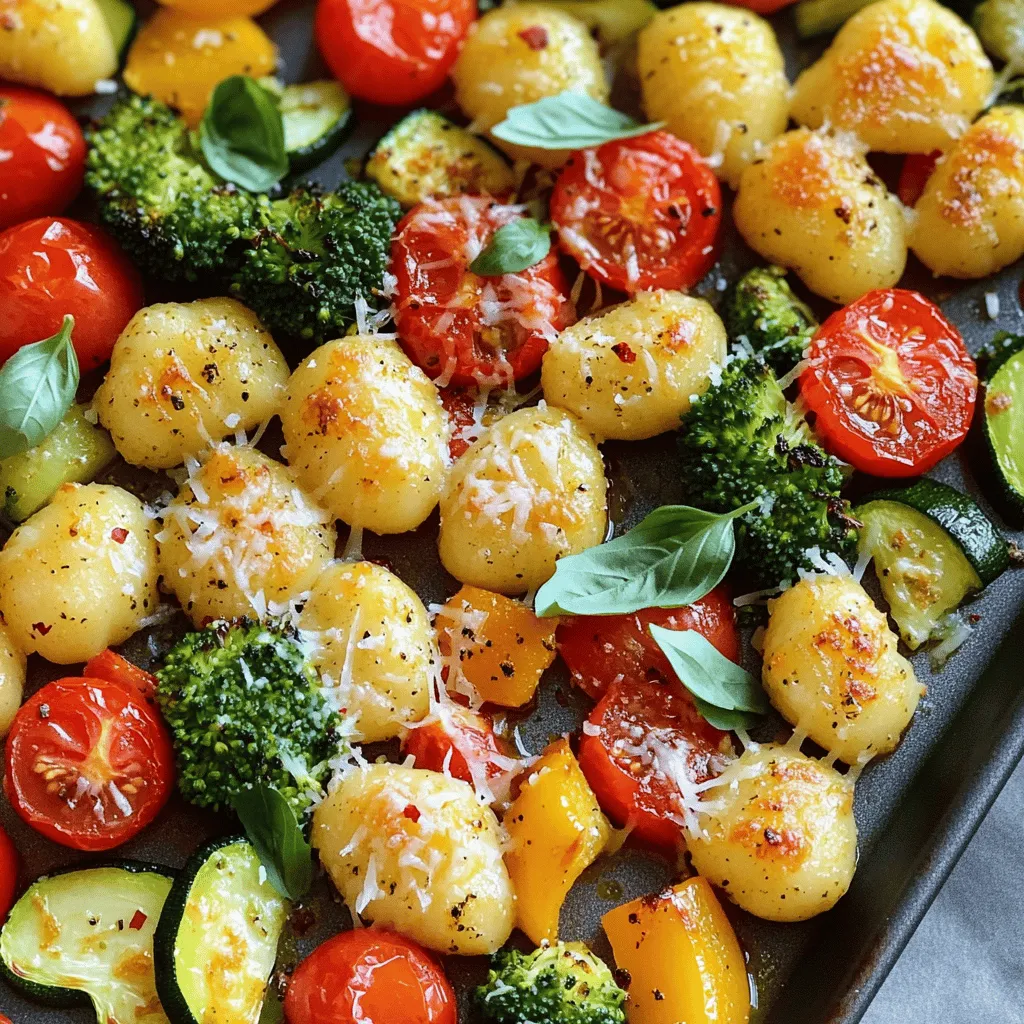
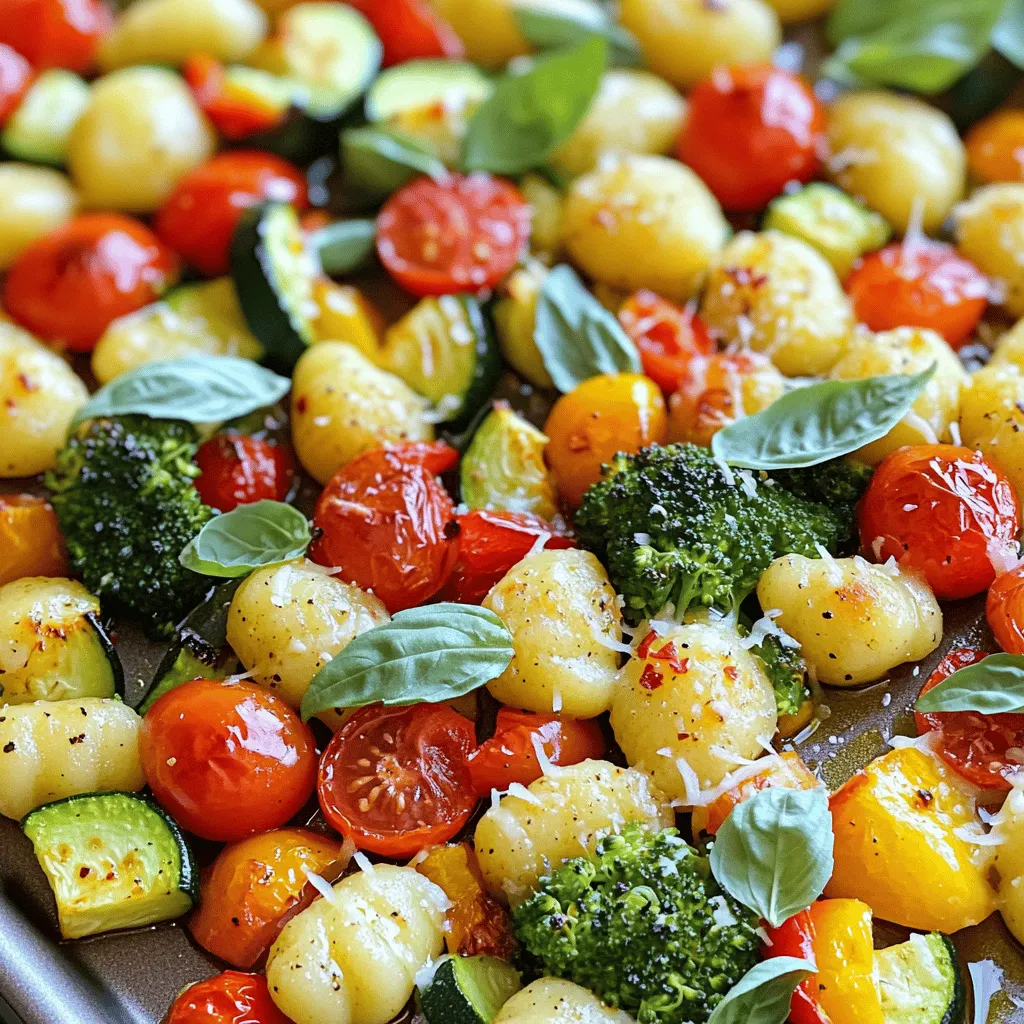
Looking for a quick, tasty meal? My Sheet Pan Garlic Parmesan Gnocchi & Veggies recipe has you covered! With just simple ingredients like store-bought gnocchi and fresh vegetables, you can whip up a dish in no time. It’s perfect for busy nights when you crave flavor without the fuss. Join me as I guide you through each easy step, making dinner a breeze and cleanup even easier!
Ingredients
Main Ingredients List
– 1 pound store-bought gnocchi
– 2 cups cherry tomatoes, halved
– 1 bell pepper, chopped (any color)
– 1 zucchini, sliced
– 1 cup broccoli florets
– 4 cloves garlic, minced
– 4 tablespoons olive oil
– 1 teaspoon Italian seasoning
– ½ teaspoon red pepper flakes
– ½ cup freshly grated Parmesan cheese
– Salt and pepper to taste
For this dish, I love using store-bought gnocchi. It saves time and tastes great. Fresh veggies add color and nutrition. Cherry tomatoes burst with flavor, while bell pepper and zucchini bring sweetness. Broccoli adds a nice crunch and is good for you. Garlic gives a strong, savory taste. Olive oil helps everything crisp up nicely.
Optional Garnishes
– Fresh basil leaves
Fresh basil leaves are a lovely touch. They add a pop of color and a fresh taste. If you have some, consider using them.
Nutritional Information
Each serving has about:
– Calories: 350
– Fats: 15g
– Proteins: 10g
– Carbs: 50g
This meal is balanced. It has enough carbs for energy and protein to keep you full. The fats come from olive oil and cheese, which add flavor and richness. Enjoy this dish knowing it’s tasty and nutritious!
Step-by-Step Instructions
Preparing the Oven and Sheet Pan
1. First, preheat your oven to 425°F (220°C). This step is key to getting the right texture.
2. Line a large sheet pan with parchment paper. This helps with easy cleanup later.
Mixing the Ingredients
1. In a big bowl, combine the gnocchi, halved cherry tomatoes, chopped bell pepper, sliced zucchini, and broccoli florets. Make sure they mix well.
2. In a small bowl, whisk together the minced garlic, olive oil, Italian seasoning, red pepper flakes, salt, and pepper. This mixture will add great flavor.
Baking Process
1. Drizzle the garlic mix over the gnocchi and veggies. Toss everything until well coated.
2. Spread the mixture evenly on the prepared sheet pan in a single layer. This helps everything cook evenly.
3. Bake in the preheated oven for 20-25 minutes. The gnocchi should be slightly crispy, and the veggies tender.
4. Once done, take the sheet pan out of the oven. Sprinkle the grated Parmesan cheese over the hot mixture.
5. Place the sheet pan back into the oven for an extra 2-3 minutes. This will melt the cheese perfectly.
6. Remove from the oven and let it cool for a couple of minutes before serving. Enjoy your meal!
Tips & Tricks
Perfecting the Dish
To get crispy gnocchi, spread them out on the pan. This helps the hot air cook them evenly. You can also give them a light toss in olive oil before adding other veggies. For flavor, use fresh herbs like thyme or oregano. These herbs add a nice touch. You may also try adding lemon zest for a fresh burst.
Time-saving Hacks
Using pre-cut vegetables saves a lot of time. Many stores sell bags of mixed veggies. Just grab and toss them in. For batch cooking, make extra gnocchi. Cook a big batch and store it. You can freeze what you don’t use. Next time, you can make this meal in a flash.
Serving Suggestions
This dish pairs well with a crisp salad. A light vinaigrette complements the flavors. You can also serve it with crusty bread to soak up any sauce. For a heartier meal, add grilled chicken or shrimp on top. This makes it filling and satisfying.

Variations
Vegetable Substitutions
You can swap veggies based on what you have. Some great options include:
– Asparagus
– Spinach
– Cauliflower
– Carrots
These choices let you enjoy seasonal flavors. Feel free to mix and match for fun. Adjust cooking times if needed. For example, thin veggies like spinach cook faster.
Dietary Modifications
Want to make this dish vegan? Use plant-based gnocchi and skip the cheese. You can add nutritional yeast for a cheesy taste. For gluten-free options, look for gluten-free gnocchi. Many brands offer tasty versions. Check the label to ensure they fit your needs.
Flavor Additions
You can amp up the flavor in many ways. Try different cheeses like mozzarella or feta. Each cheese adds a unique taste. If you want a kick, add hot sauce or a splash of balsamic vinegar. These small tweaks change the dish without much effort.
Storage Info
Refrigeration Guidelines
Store leftovers in an airtight container. Keep them in the fridge for up to three days. When you want to eat, just reheat in the oven or microwave.
Freezing Instructions
To freeze, place the cooled dish in a freezer-safe container. Make sure to label it with the date. You can freeze it for up to three months. When ready to eat, thaw it overnight in the fridge. Reheat in the oven for the best texture.
Shelf Life
Cooked gnocchi and veggies last in the fridge for about three days. In the freezer, they can last up to three months. Always check for any off smells or changes in color before eating.
FAQs
Can I use homemade gnocchi?
Yes, you can use homemade gnocchi! Making it from scratch is fun and adds a personal touch. To make gnocchi, you need potatoes, flour, and egg. Boil the potatoes until soft, then mash them. Mix in the flour and egg to form a dough. Roll into small pieces and shape them into little dumplings. Cook them in boiling water until they float. Use them in this recipe just like store-bought gnocchi. They will taste fresh and delicious.
What other vegetables can I include?
You can add many different veggies to this dish! Here are some great options:
– Carrots, sliced
– Asparagus, chopped
– Cauliflower florets
– Green beans, cut
– Eggplant, diced
These vegetables add different colors and flavors. Feel free to mix and match based on what you have. Just remember to cut them into similar sizes for even cooking.
How do I make this dish spicier?
To add some heat, try these ideas:
– Add more red pepper flakes. Use one teaspoon instead of half.
– Include jalapeños or serrano peppers, chopped.
– Drizzle some hot sauce over the finished dish.
– Toss in some crushed black pepper for extra spice.
These options will give your dish a nice kick without overpowering the garlic and Parmesan flavors.
This blog post detailed a tasty and easy way to make baked gnocchi with vegetables. You learned about the main ingredients, optional garnishes, and important nutrition facts. The step-by-step guide helped you prepare and bake your dish perfectly. We shared handy tips for making the meal faster and adding extra flavors. You discovered tasty ways to modify the recipe for different diets. Finally, proper storage advice ensures your leftovers stay fresh. With these easy steps, enjoy a healthy and delicious meal that you can share!


 link. In this blog post, I shared the secrets behind a delicious Honey Garlic Shrimp Stir-Fry. You'll find main ingredients like honey, shrimp, and fresh veggies. I provided clear steps for preparing the sauce, cooking shrimp, and stir-frying vegetables. I also included handy tips, variations, and storage advice. I hope you feel confident to try this simple dish. Enjoy experimenting with flavors and make it your own! Cooking should be fun and satisfying.](https://dailydishly.com/wp-content/uploads/2025/05/962d655e-f29a-4340-8cbb-ef8b8eb83789-768x768.webp)
![One Pan Honey Garlic Chicken is a simple dish that packs a big flavor punch. It combines juicy chicken thighs with sweet honey and rich garlic. The colorful veggies add crunch and nutrition. This dish is quick to make and perfect for busy nights. You can find the Full Recipe at the end. - 4 boneless, skinless chicken thighs - 3 tablespoons honey - 3 tablespoons soy sauce - 4 cloves garlic, minced - 1 tablespoon fresh ginger, grated - 2 tablespoons olive oil - 1 teaspoon sesame oil - 1 red bell pepper, sliced - 1 green bell pepper, sliced - 1 cup snap peas - Salt and pepper to taste - Sesame seeds for garnish - Chopped green onions for garnish To make this recipe, you need a few basic tools: - A large skillet for cooking - A mixing bowl for marinating - A cutting board and knife for chopping - A measuring spoon for accuracy - A meat thermometer to check chicken doneness With these ingredients and tools, you can create a meal that delights your taste buds and impresses your friends and family! To start, you need to marinate the chicken. In a bowl, mix honey, soy sauce, minced garlic, and grated ginger. This mix gives the chicken a sweet and savory taste. Take your chicken thighs and add them to the bowl. Make sure they are well coated. Let the chicken marinate for at least 20 minutes. This step helps the flavors soak in. Next, it’s time to prepare the pan. Heat olive oil and sesame oil in a large skillet. Set the heat to medium-high. The oils will help the chicken cook nicely and add flavor. Once the pan is hot, take the chicken out of the marinade. Reserve the marinade for later. Add the chicken thighs to the pan. Sear each side for about 5-6 minutes. You want them to be golden brown. After that, add the sliced red and green bell peppers and snap peas. Sauté the vegetables for 3-4 minutes. They should be tender but still crisp. Pour the reserved marinade over the chicken and vegetables in the skillet. Lower the heat to medium. Let it simmer for about 5 minutes. This will thicken the sauce a bit. Check the chicken’s internal temperature. It should reach 165°F (74°C). Don’t forget to season with salt and pepper to taste. Once done, remove from heat and let it rest for a couple of minutes. Finally, sprinkle sesame seeds and chopped green onions on top before serving. Enjoy your One Pan Honey Garlic Chicken! To make the best marinade, use fresh ingredients. Combine honey, soy sauce, garlic, and ginger. This mix gives a sweet and savory taste. Let the chicken soak in the marinade for at least 20 minutes. If you have more time, an hour is even better. This helps the chicken absorb all the flavors. For juicy chicken, avoid overcooking. Use a meat thermometer to check the temperature. Aim for 165°F (74°C) for safe eating. Searing the chicken first locks in the juices. Cook each side for about 5-6 minutes until golden brown. Let the chicken rest after cooking to keep it moist. Cook vegetables until they are tender-crisp. You want them to stay bright and colorful. Add them to the pan after the chicken has browned. This keeps them from getting too soft. Sauté the sliced bell peppers and snap peas for 3-4 minutes. This way, they retain their crunch and freshness. Remember, for the full recipe, check out the [Full Recipe]. Enjoy creating this quick and yummy meal! {{image_2}} You can switch up the protein in this recipe for quick meals. Chicken thighs are great, but you can use chicken breasts, shrimp, or tofu. Each choice adds a unique taste. If you use shrimp, cook them just until they turn pink. For tofu, press it to remove extra water and cube it. Marinate as you would the chicken for the same sweet and savory flavor. Feel free to swap vegetables based on your taste or what you have. Broccoli, carrots, and zucchini work well. Use any crunchy vegetable you like. Just cut them into similar sizes so they cook evenly. Remember to sauté until they are tender yet crisp. This keeps them vibrant and full of flavor! For those who enjoy heat, add crushed red pepper flakes or sliced jalapeños. This gives your dish a nice kick. You can also mix in lime juice or rice vinegar for a tangy twist. Both will enhance the honey garlic sauce. Experiment with these ideas to find your favorite taste! Check out the Full Recipe for more details! After enjoying your One Pan Honey Garlic Chicken, let the leftovers cool. Place the chicken and vegetables in an airtight container. This keeps them fresh and tasty. Store in the fridge for up to three days. Always label your container with the date. To reheat, use a microwave or a skillet. If using the microwave, warm on medium for about 2-3 minutes. Stir halfway through for even heating. If you prefer a skillet, heat a small amount of oil over medium heat. Add the chicken and vegetables, stirring for about 5 minutes until warm. If you want to save some for later, freezing works great. First, let the dish cool completely. Then, transfer it to a freezer-safe container. Make sure to remove as much air as possible. You can freeze it for up to three months. When ready to eat, thaw it overnight in the fridge before reheating. For the best taste, marinate the chicken for at least 20 minutes. This allows the flavors to soak in. If you have more time, marinating for up to 2 hours gives even better results. Just remember, don’t marinate too long, as it can make the chicken mushy. Yes, you can use chicken breasts. They will work fine in this recipe. However, chicken thighs have more fat, which keeps them juicy and tasty. If you use breasts, be sure to watch the cooking time. They cook faster than thighs. You can serve this dish with rice or quinoa. Both soak up the sweet sauce well. Steamed veggies or a fresh salad also make great sides. They add color and balance to your meal. You can even serve it with noodles for a fun twist. Yes, this dish is perfect for meal prep. It stores well in the fridge for up to four days. Just keep the chicken and veggies in an airtight container. You can heat it up easily for quick lunches or dinners. Enjoy your yummy meal without the fuss! For the full recipe, check out the details above. We covered the key steps for making One Pan Honey Garlic Chicken. You learned about the ingredients, kitchen tools, and the cooking process. I shared tips to perfect your dish, including marination and vegetable cooking. You also saw fun variations to try and how to store your leftovers. This dish is simple and tasty for any meal. Enjoy making it your own!](https://dailydishly.com/wp-content/uploads/2025/06/cad806aa-ae3a-4121-b5f5-07eae0f4869e-768x768.webp)
![Fresh spinach is the star of this soup. You will need 2 cups of roughly chopped spinach. This leafy green adds color and nutrients. Spinach is rich in vitamins A and C, making your soup healthy and vibrant. When you cook it, the spinach wilts and blends well with the other flavors. Tortellini brings heartiness to the soup. You can use fresh or frozen cheese tortellini, about 2 cups. Fresh tortellini cooks quickly, usually in 3-5 minutes. Frozen tortellini takes a bit longer. Whichever you choose, the soft pasta adds texture and a delightful bite to the creamy broth. Aromatics build the flavor base. You will need a medium onion, diced, and 3 minced garlic cloves. These add savory depth to the soup. A grated carrot, about one medium-sized, gives a touch of sweetness. Together, they create a warm, inviting aroma that fills your kitchen. Don't forget the olive oil! You will need 2 tablespoons to sauté the aromatics to perfection. For the full recipe, see the details above. To start, grab a large pot. Heat 2 tablespoons of olive oil over medium heat. Add 1 diced onion and sauté it until it softens, about 4-5 minutes. Next, stir in 3 minced garlic cloves and 1 grated carrot. Cook this mix for another 2-3 minutes. The garlic should smell great at this point. This base gives the soup a rich flavor. Now, pour in 4 cups of vegetable broth. Bring it to a gentle boil. Once boiling, add 2 cups of cheese tortellini. Follow the package instructions to cook them. Fresh tortellini usually takes about 3-5 minutes. You know they are ready when they float to the top. Reduce the heat to low. Stir in 2 cups of roughly chopped spinach, 1 cup of heavy cream, 1 teaspoon of dried basil, 1 teaspoon of salt, and 1/2 teaspoon of black pepper. Let the soup simmer for 5-7 minutes. This allows the spinach to wilt and the flavors to meld. Taste the soup and adjust the seasoning if needed. Serve it hot, topped with grated Parmesan cheese and fresh basil leaves if you wish. For the complete recipe, see the [Full Recipe]. To boost flavor, don't skip the onions and garlic. Sauté them well; it adds depth. A touch of dried basil brings warmth, while salt and pepper brighten all the tastes. If you want more zing, consider red pepper flakes. They give a lovely kick without overpowering the soup. Fresh herbs are also a great choice. Toss in some fresh basil or parsley right before serving for a fresh burst. If you like a thicker soup, add less broth or more cream. You can also use less tortellini. If the soup feels too thick, just stir in a bit more broth or water. This lets you control how creamy or brothy you want your soup. Using a hand blender can also help. Blend just a little bit to create a smoother base while keeping some chunks for texture. Cook the tortellini according to the package instructions. Fresh tortellini usually takes about 3-5 minutes. If you use frozen, check for the right cooking time. Adding them to boiling broth helps them cook quickly and evenly. They are done when they float to the top. Don’t forget to add them at the right time. If they overcook, they'll become mushy and lose their shape. Follow these tips to enjoy the perfect tortellini in your creamy soup. For more details, check the Full Recipe. {{image_2}} You can easily add protein to your creamy spinach tortellini soup. Chicken, turkey, or sausage work well. If you like shrimp, toss some in during the last few minutes of cooking. For a meatless option, try cooked lentils or chickpeas. These additions make your soup heartier and more filling. To make this soup vegan, swap out the heavy cream for coconut milk or cashew cream. Use vegetable broth instead of chicken broth for a rich base. Look for vegan tortellini in stores, or make your own with flour and water. Nutritional yeast can give a cheesy flavor without dairy. Feel free to mix in other veggies. Carrots and peas add sweetness and color. Zucchini or bell peppers can bring in fresh flavors. You can use frozen vegetables for convenience. Just add them during the cooking process so they heat through and blend well with the soup. For the full recipe, see the section above. After making the creamy spinach tortellini soup, let it cool to room temperature. Then, transfer it to an airtight container. Store it in the fridge for up to three days. If you want to enjoy it later, make sure you seal it well. This keeps the flavors fresh and tasty. You can freeze this soup for longer storage. First, let the soup cool completely. Then, pour it into freezer-safe containers. Leave some space at the top for expansion. The soup can freeze for up to three months. When you’re ready to eat it, just thaw it in the fridge overnight. To reheat, pour the soup into a pot over medium heat. Stir often to avoid sticking. Heat until it’s warm all the way through. If the soup is too thick, add a little broth or water. This will help restore its creamy texture. Enjoy this comforting meal again, just like the first time. For the full recipe, check out the earlier sections. Yes, you can use frozen spinach. Just thaw it first and drain excess water. Frozen spinach is often picked at peak freshness, so it can taste great. However, fresh spinach offers a brighter taste and texture. If you like a more vibrant green, go for fresh. You can thicken the soup in a few ways. One method is to add a cornstarch slurry. Mix one tablespoon of cornstarch with two tablespoons of cold water. Stir this into the soup and heat until it thickens. Another option is to blend part of the soup using an immersion blender. This keeps it creamy and rich. Parmesan cheese is a fantastic choice for adding flavor. It melts well and gives a nice salty kick. You can also try adding cream cheese for extra creaminess. If you want a stronger flavor, consider using sharp cheddar. Just sprinkle it in while the soup simmers for a delicious twist. For the complete recipe, check out the Full Recipe section. In this post, I covered the essentials for a delicious tortellini soup. We discussed key ingredients like fresh spinach, various tortellini, and aromatics. I provided step-by-step instructions for preparing and cooking your dish. I shared tips for enhancing flavors and adjusting texture. You also learned about tasty variations and proper storage methods. Remember, small swaps can greatly change your soup. Enjoy trying new flavors and make it your own! Your perfect tortellini soup awaits.](https://dailydishly.com/wp-content/uploads/2025/06/4c17d0e8-c88c-41b6-a4f3-bfc90cf6bf08-768x768.webp)

