Slow Cooker Cinnamon Roll French Toast Delight

Ready to impress your family with a fun breakfast? This Slow Cooker Cinnamon Roll French Toast Delight is the perfect mix of sweet and creamy. Imagine warm cinnamon rolls soaking in a rich egg mixture, all cooked to perfection. You’ll only need a few ingredients, and the slow cooker does the work for you. Let’s dive into this easy recipe that transforms breakfast into a delicious treat!
Ingredients
Main Ingredients
– 1 can (16 oz) refrigerated cinnamon rolls
– 6 large eggs
– 1 cup milk
– 1 teaspoon vanilla extract
– 1 teaspoon ground cinnamon
– 1/2 teaspoon nutmeg
To make this delightful dish, you need some simple items. The main star is a can of cinnamon rolls. I love using the refrigerated kind because they save time and taste amazing! You also need six large eggs to bind everything together. Milk adds creaminess, while vanilla extract gives a lovely flavor. Ground cinnamon and nutmeg bring warmth and spice, making your dish even better.
Optional Ingredients
– 1/2 cup maple syrup
– 1/2 cup chopped pecans
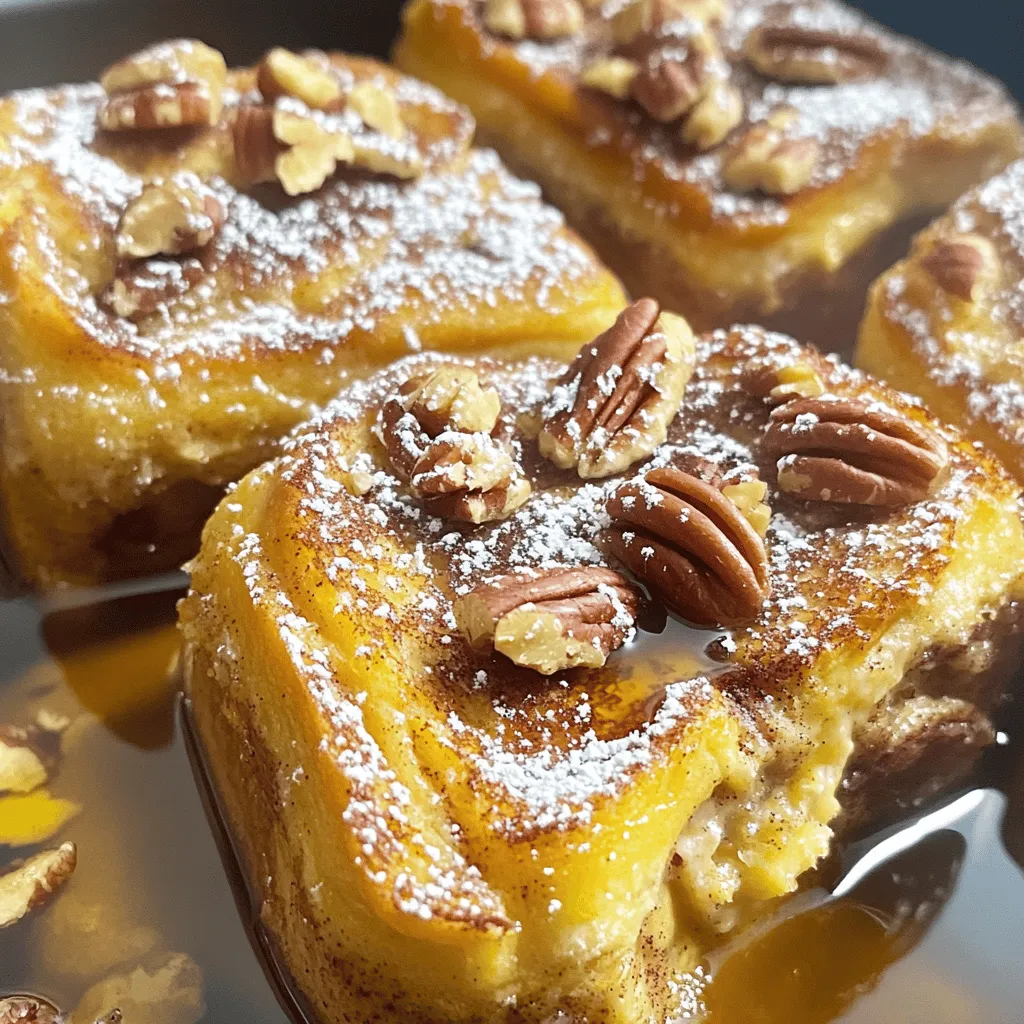
– 1/2 cup powdered sugar (for drizzling)
I often add a drizzle of maple syrup for sweetness. If you like crunch, sprinkle in some chopped pecans. The powdered sugar is great for a sweet finish on top. These extras can elevate your meal, but they are not required. Feel free to mix and match to create your own twist!
Step-by-Step Instructions
Preparing the Slow Cooker
Lightly grease the inside of the slow cooker. You can use cooking spray or butter. This step helps prevent the cinnamon rolls from sticking. A well-greased pot makes serving easier.
Preparing the Cinnamon Rolls
Open the can of cinnamon rolls. Cut each roll into quarters with a sharp knife. Place the pieces in an even layer in the slow cooker. Make sure they fit snugly but do not crowd them.
Mixing the Egg Mixture
In a large mixing bowl, whisk together the eggs and milk. Add the vanilla extract, ground cinnamon, and nutmeg. Mix well until everything is combined. This mixture adds flavor and helps the rolls soak up the goodness.
Combining Ingredients
Pour the egg mixture over the cinnamon roll pieces. Make sure every piece gets coated well. Gently press down on the rolls with a spatula. This ensures they soak up the egg mixture nicely.
Adding Maple Syrup and Nuts
Drizzle the maple syrup over the top of the rolls. If you like, sprinkle the chopped pecans on top for some crunch. The syrup adds sweetness, and the nuts give added texture.
Cooking Process
Cover the slow cooker and set it to low. Cook for about 4 hours. Check the cinnamon rolls once in a while. They should be fully cooked and set in the center when done.
Serving Suggestions
Once cooked, turn off the slow cooker and let it cool slightly. Drizzle powdered sugar over the cooked dish before serving. This adds a lovely touch and makes it look even more delicious. Enjoy warm for the best flavor!
Tips & Tricks
Ensuring Proper Cooking
To make sure your Slow Cooker Cinnamon Roll French Toast is just right, check for doneness. After about four hours, poke the center with a toothpick. If it comes out clean, it’s done. If not, cook for another 30 minutes. Cooking times can vary by slow cooker, so keep an eye on it.
Best Practices for Ingredient Substitutions
If you need a dairy-free version, try almond or oat milk instead of regular milk. For egg replacements, use flaxseed meal or applesauce. This keeps the dish tasty while meeting dietary needs. If you want a nut-free dish, skip the pecans or use sunflower seeds.
Enhancing Flavor
Want to spice things up? Add extra cinnamon or a pinch of cardamom for warmth. You can also mix in some chocolate chips for a sweet twist. Top with fresh berries or whipped cream for a fun finish. Each bite can be a new delight!

Variations
Different Flavor Profiles
You can change the taste by using different cinnamon rolls. Look for flavored rolls like caramel or apple. You can also add fresh fruit. Sliced bananas or berries mix well with the rolls. They add a fresh taste and more color. Experimenting with flavors makes this dish unique each time.
Breakfast Casserole Option
If you want a baked version, you can turn this into a breakfast casserole. Just follow the same steps but use a baking dish instead of a slow cooker. Preheat your oven to 350°F. Bake the mixture for about 30-40 minutes. Check for doneness by inserting a toothpick. It should come out clean when done. This gives you a crispy top with a soft inside.
Gluten-Free Alternatives
To make this dish gluten-free, look for gluten-free cinnamon rolls. Many brands offer great options. You can also make your own using almond flour or coconut flour. Just ensure the other ingredients are gluten-free, too. This way, everyone can enjoy this tasty treat without worry.
Storage Info
Proper Storage Methods
To store leftovers, first cool the dish. Once it is at room temperature, cut it into portions. Place the pieces in an airtight container. You can keep it in the fridge for easy access. If you want to store it longer, freeze the portions. Use freezer-safe bags or containers to prevent freezer burn.
Reheating Instructions
When reheating, the best way is to use the microwave. Heat one portion at a time. Start with 30 seconds and check if it is warm. If not, add more time in 10-second bursts. You can also reheat in the oven. Preheat to 350°F (175°C) and cover with foil. Bake for about 10-15 minutes until warmed through.
Shelf Life
In the fridge, the dish lasts about 3-4 days. If you freeze it, it can last up to 2-3 months. When you’re ready to eat, just thaw it overnight in the fridge before reheating. Always check for any off smells or changes in texture before eating leftovers.
FAQs
Can I use homemade cinnamon rolls?
Yes, you can use homemade cinnamon rolls. Just cut them into quarters, just like the store-bought ones. This will let the egg soak in well. The taste will be even better with your fresh rolls!
How do I make this recipe ahead of time?
To prep ahead, you can cut the rolls and mix the egg mixture the night before. Store the rolls in the fridge. Combine everything in the slow cooker in the morning. This makes breakfast super easy.
What can I substitute for eggs?
You can use unsweetened applesauce or mashed bananas as an egg substitute. Use about 1/4 cup for each egg. This keeps the dish moist and adds sweetness without eggs.
Is it possible to make it without dairy?
Yes, you can make this recipe dairy-free. Use almond milk or oat milk instead of regular milk. This keeps the flavors rich while making it suitable for lactose-free diets.
Can I cook this on high instead of low?
You can cook it on high. If you do, check it after about 2 hours. Cooking on high may lead to a firmer texture, but it will still taste great!
In this post, we explored a tasty slow cooker cinnamon roll dish. We covered key ingredients like cinnamon rolls and eggs. I provided step-by-step instructions to make the cooking easy. Tips for customization and storage were shared too.
You can make this dish your own with different flavors and add-ins. I hope you feel excited to try this recipe. Enjoy this warm, sweet treat with friends and family!


![To make a No-Bake Oreo Cheesecake, you need a few key items. Here’s what you’ll need: - 24 Oreo cookies (plus extra for garnish) - 4 tablespoons unsalted butter, melted - 16 oz cream cheese, softened - 1 cup powdered sugar - 1 teaspoon vanilla extract - 1 cup heavy whipping cream - 1/2 cup mini chocolate chips (optional) These ingredients create a rich and creamy dessert that everyone loves. You can amp up the taste with a few fun additions. Consider these options: - Crushed peppermint candies for a minty twist - A splash of coffee or espresso for depth - Different flavored cookies, like peanut butter Oreos These extras can give your cheesecake a unique flair. If you’re missing an item, don’t worry! Here are some swaps you can use: - Use gluten-free cookies if you need a gluten-free option. - For a lighter version, try low-fat cream cheese. - Sour cream can replace some cream cheese for tanginess. These substitutions help you customize the recipe to suit your taste or dietary needs. Always remember to check for allergies when serving to others. For the full recipe, you can refer to the details shared above. Enjoy creating this delightful dessert! To start, gather your ingredients. You need 24 Oreo cookies and 4 tablespoons of melted butter. Place the cookies in a food processor. Crush them into fine crumbs. Once you have crumbs, add the melted butter. Pulse the mixture until it's well combined. This should look like wet sand. Next, take a 9-inch springform pan. Press the Oreo mixture firmly into the bottom. Make sure it is even and compact. This crust will hold everything together. Now, put the pan in the refrigerator. Let it chill while you make the filling. Now, let’s focus on the cheesecake filling. You’ll need 16 oz of softened cream cheese, 1 cup of powdered sugar, and 1 teaspoon of vanilla extract. In a large bowl, beat the cream cheese until smooth with an electric mixer. Gradually add the powdered sugar and vanilla. Mix until fully combined. In another bowl, pour in 1 cup of heavy whipping cream. Whip it until stiff peaks form. This will make your cheesecake light and fluffy. Gently fold the whipped cream into the cream cheese mixture. If you like, fold in 1/2 cup of mini chocolate chips for extra flavor. Now, let’s bring it all together. Take the chilled Oreo crust from the refrigerator. Spoon the cheesecake filling over the crust. Smooth the top with a spatula for a nice finish. Cover the pan with plastic wrap. Place it back in the refrigerator and let it chill for at least 4 hours. For the best results, let it chill overnight. This helps the cheesecake set firmly. Once set, remove the cheesecake from the springform pan. Garnish with crushed Oreo cookies on top. Now, slice it into wedges and serve. Enjoy your creamy, delicious no-bake Oreo cheesecake! For the complete recipe, check out the [Full Recipe]. When making a no-bake Oreo cheesecake, avoid overmixing your cream cheese. This can make it too runny. Also, don’t forget to chill the crust before adding the filling. A warm crust can melt the filling. Lastly, use softened cream cheese. Cold cream cheese does not mix well and can cause lumps. To get a smooth texture, beat the cream cheese until creamy before adding sugar. Mix slowly when adding the whipped cream. This keeps the air in the mixture, making it light. If you want a firmer cheesecake, chill it longer. I recommend overnight for the best results. You can make your cheesecake even better. Try adding mini chocolate chips for a fun crunch. You might also mix in crushed Oreos for extra flavor. If you like a hint of coffee, add a teaspoon of espresso powder. This adds depth without overpowering the Oreo flavor. For a fruity twist, use a layer of fruit puree on top. It looks great and tastes amazing! For more details, check out the Full Recipe. {{image_2}} You can have fun with flavors! Instead of Oreos, try using other cookies. For a classic taste, use graham crackers. If you love chocolate, use chocolate sandwich cookies. You can even mix in fruit flavors. Adding lemon or strawberry can brighten your cheesecake. Just swap the cookie crust and adjust the filling to match your new flavor. Want a lighter version? You can use low-fat cream cheese. It still tastes great! Substitute Greek yogurt for some of the cream cheese. This adds protein and cuts fat. You can also use a sugar substitute if you want fewer calories. For the crust, replace regular cookies with whole grain options. These swaps help make a lighter cheesecake without losing the taste. Toppings can change the whole dessert! Besides crushed Oreos, think about fresh fruit. Strawberries and raspberries add color and flavor. You can drizzle chocolate or caramel sauce on top. Whipped cream is always a hit too. For a fun crunch, sprinkle nuts or toffee bits on each slice. Get creative and mix different toppings for a unique look and taste! For the full recipe, check out the details above. Enjoy making your own variations! To keep your No-Bake Oreo Cheesecake fresh, cover it tightly with plastic wrap. You can also use an airtight container. Store it in the refrigerator. It will stay good for up to five days. Make sure it is fully set before covering it. This will help keep the texture perfect. If you want to keep your cheesecake longer, freezing is a great option. First, let the cheesecake chill completely in the fridge. Then, wrap it in plastic wrap, and follow with aluminum foil. This double layer helps prevent freezer burn. It can last up to three months in the freezer. To enjoy it, move the cheesecake to the fridge to thaw overnight. When serving leftovers, use a sharp knife to cut clean slices. Wipe the knife after each cut for neat edges. If you have extra toppings, like whipped cream or chocolate sauce, add them right before serving. This keeps them fresh and tasty. Enjoy your leftovers within three days for the best flavor! It takes about 4 hours for the cheesecake to set. For the best results, chill it overnight. This gives the filling time to firm up. You want it to hold its shape when you slice it. If you rush this step, the cheesecake may be too soft. You need both cream cheese and whipped cream for this recipe. Cream cheese adds the rich flavor. The whipped cream makes the cheesecake light and fluffy. If you only use cream cheese, it will be too dense. Stick to the recipe for the best taste. To cut a no-bake cheesecake, use a sharp knife. Dip the knife in hot water and wipe it dry before cutting. This method helps create clean slices. You can also use a thin spatula to lift out each piece. Enjoy serving this beautiful dessert! This blog covered how to make a no-bake Oreo cheesecake step by step. We explored essential and optional ingredients, plus tips for perfect texture. I also shared variations to make this dessert fit your taste and healthier choices. Finally, I included storage methods and answers to common questions. You now have the tools to create a delicious cheesecake and impress everyone. Enjoy making this tasty treat!](https://dailydishly.com/wp-content/uploads/2025/07/9651beeb-141b-494d-95f3-40869f463a5c-768x768.webp)
