S’mores No-Bake Cookies Simple and Tasty Treat

- 1 cup graham cracker crumbs - 1 cup rolled oats - 1/2 cup unsweetened cocoa powder - 1/2 cup peanut butter (or almond butter) - 1/4 cup honey or maple syrup - 1/2 teaspoon vanilla extract - 1/2 cup mini marshmallows - 1/2 cup chocolate chips You can swap the nut butter with sun butter or tahini if you need to avoid nuts. For sweeteners, try agave syrup or coconut sugar. If you want a different flavor, use white chocolate chips or dark chocolate chunks instead of regular chocolate chips. This gives a fun twist to the S'mores taste. {{ingredient_image_1}} First, gather your graham cracker crumbs, rolled oats, and cocoa powder. In a large mixing bowl, combine these three ingredients. Mix them well so every bite has great flavor. You want to break up any lumps in the cocoa powder. Use a whisk or a fork for a good blend. This step makes sure the dry mix is ready for the next part. Next, take a microwave-safe bowl and add the peanut butter and honey or maple syrup. Heat this mixture for about 20 to 30 seconds. This warming makes it easier to stir. Once warm, remove it from the microwave and mix in the vanilla extract. Stir until smooth. Proper mixing here is key to a tasty cookie. Now it’s time to bring the dry and wet ingredients together. Pour the peanut butter mixture into the bowl with the dry mix. Stir until everything is coated and sticky. If it seems too dry, add a little more honey or peanut butter. After that, gently fold in the mini marshmallows and chocolate chips. These will add sweetness and fun. Next, line an 8x8-inch baking dish with parchment paper. Spread the cookie mixture into the dish. Press down firmly to create a solid layer. Chill the cookies in the fridge for at least 30 minutes. This helps them set up nicely. Once they are firm, lift the cookies out using the parchment paper. Cut them into squares or bars. For serving, arrange the squares on a nice plate. You can drizzle melted chocolate on top for a sweet touch. Adding some extra graham cracker crumbs and mini marshmallows makes it look even better! To know if your mixture is too dry, look for a crumbly texture. It should hold together when pressed. If it feels wet, it may be too sticky. The key is to find a balance. If it's too dry, add a bit more honey or peanut butter. A little goes a long way. If it’s too wet, sprinkle in more graham cracker crumbs or oats. This way, you can adjust it to match your taste. You can add different flavors to your cookies. Try mixing in some cinnamon or a pinch of salt. These small changes can make a big difference. For a gooey texture, ensure your peanut butter and honey mixture is warm. Heat them in the microwave for 20-30 seconds. This will help the mixture blend better and keep it soft. Make your cookies look special by arranging them on a pretty plate. Drizzle melted chocolate over the top for a fun touch. You can also sprinkle extra graham cracker crumbs and mini marshmallows on top. This adds a nice visual and makes them more fun to eat. Pro Tips Storage Tip: Keep these cookies in an airtight container in the fridge to maintain their freshness for up to a week. Nut Butter Variation: Experiment with different nut butters like cashew or sunflower seed butter for a unique flavor twist. Chocolate Options: Use dark chocolate chips or even white chocolate for a different taste profile. Graham Cracker Substitution: If you're gluten-free, substitute the graham cracker crumbs with gluten-free graham crackers or almond flour. {{image_2}} You can change the flavors of these cookies easily. Try using flavored nut butters, like cashew or almond butter. These add a twist to the usual taste. You can also switch between chocolate and white chocolate chips. Each choice brings a different flavor and look. If you need gluten-free options, use gluten-free graham cracker crumbs and oats. These swaps keep the treat safe for those with gluten issues. For vegan alternatives, replace honey with maple syrup and use a plant-based nut butter. This way, everyone can enjoy these cookies. Adding seasonal ingredients can make these cookies special. For fall, mix in some pumpkin spice for a cozy touch. During holidays, consider using festive sprinkles or shapes. This gives your cookies a fun holiday vibe and makes them more exciting to share. To keep your S’mores No-Bake Cookies fresh, use an airtight container. A glass or plastic container works well. You can stack the cookies in layers, placing parchment paper between them. This helps to prevent sticking. Store your cookies in a cool, dry place. Avoid direct sunlight, as it can make them soft. For best taste, eat them within a week. If you notice any changes in smell or texture, it’s time to let them go. You can freeze S’mores No-Bake Cookies for later. First, cut them into squares or bars. Wrap each piece in plastic wrap. Then, place them in a freezer-safe bag or container. This keeps them from getting freezer burn. They can last up to three months in the freezer. To thaw, take out the cookies and let them sit at room temperature for about 30 minutes. You can also thaw them in the fridge overnight. Enjoy your cookies once they are soft again! No, you cannot use regular flour. Graham cracker crumbs give a sweet, crunchy taste. Flour lacks this flavor and texture. If you use flour, the cookies will be dry and less tasty. Stick with graham cracker crumbs for the best results. These cookies last about one week in the fridge. Look for signs like a change in smell or texture. If they feel hard or smell off, it’s time to toss them. For best taste, eat them fresh! Yes, you can. Use almond butter, sunflower seed butter, or even coconut oil. Each option binds the ingredients well. Make sure to check for allergies if you use alternatives. Use a sharp knife for clean cuts. You can warm the knife slightly to help slice through. If the cookies crumble, let them chill longer. A gentle touch helps keep the squares intact. You’ve now learned how to make delicious S’mores No-Bake Cookies. We covered the key ingredients, helpful tips, and tasty variations. You can easily adapt the recipe to fit your needs and preferences. Enjoy the chewy texture and sweet flavors that these cookies bring. Store them well to keep them fresh, or freeze for later. I hope you get creative and make this treat your own!

WANT TO SAVE THIS RECIPE?

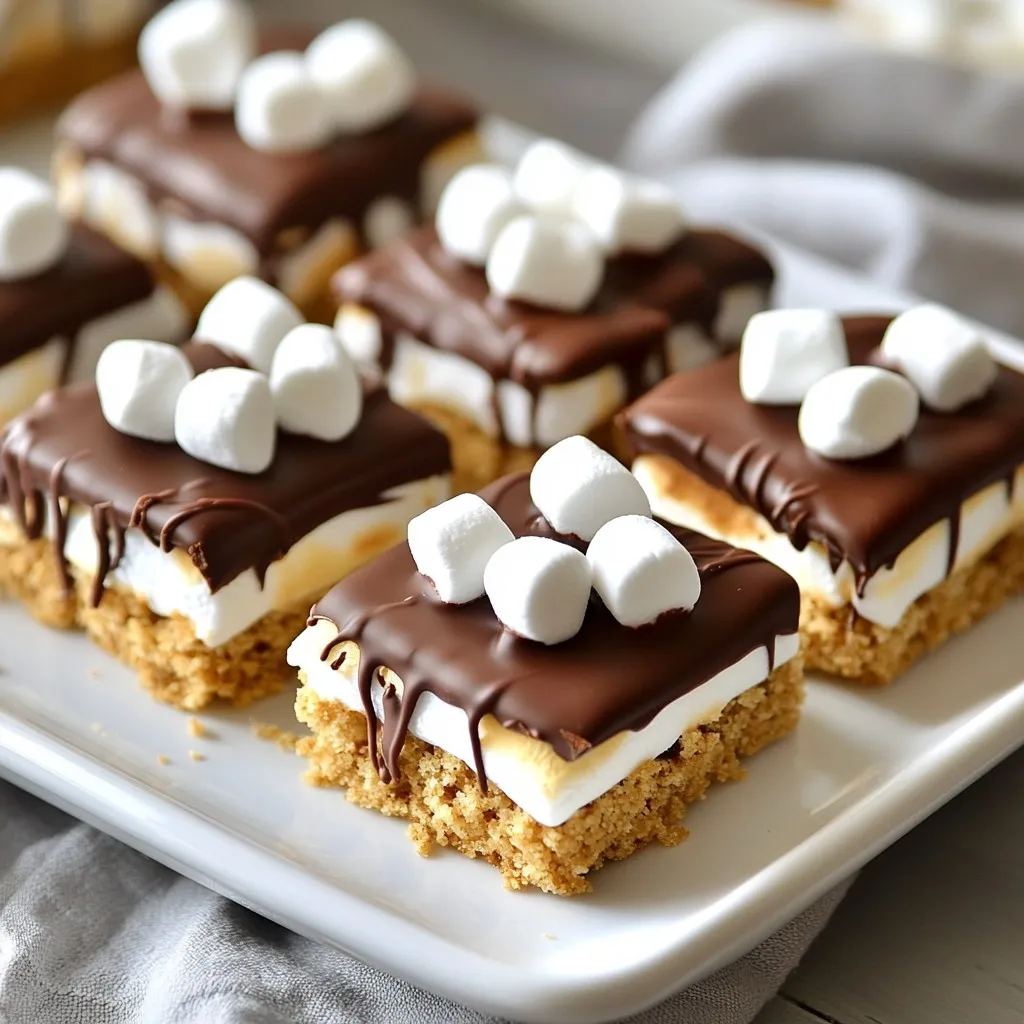
Are you ready to whip up a tasty treat that requires no baking? S’mores No-Bake Cookies are simple, fun, and perfect for any occasion! With just a few ingredients like graham cracker crumbs, peanut butter, and chocolate, you can create a dessert that will delight your taste buds. In this guide, I’ll share easy steps and tips to make these cookies your new favorite indulgence. Let’s dive in!

Why I Love This Recipe

  1. Easy Preparation: This no-bake recipe is quick and simple, making it perfect for a last-minute treat!
  2. Delicious Flavor Combination: The blend of chocolate, peanut butter, and marshmallows delivers that classic S’mores taste!
  3. Customizable Ingredients: Feel free to swap ingredients like using almond butter or different sweeteners based on your preference.
  4. Fun for Everyone: These cookies are a hit with kids and adults alike, making them a great treat for gatherings!

Ingredients

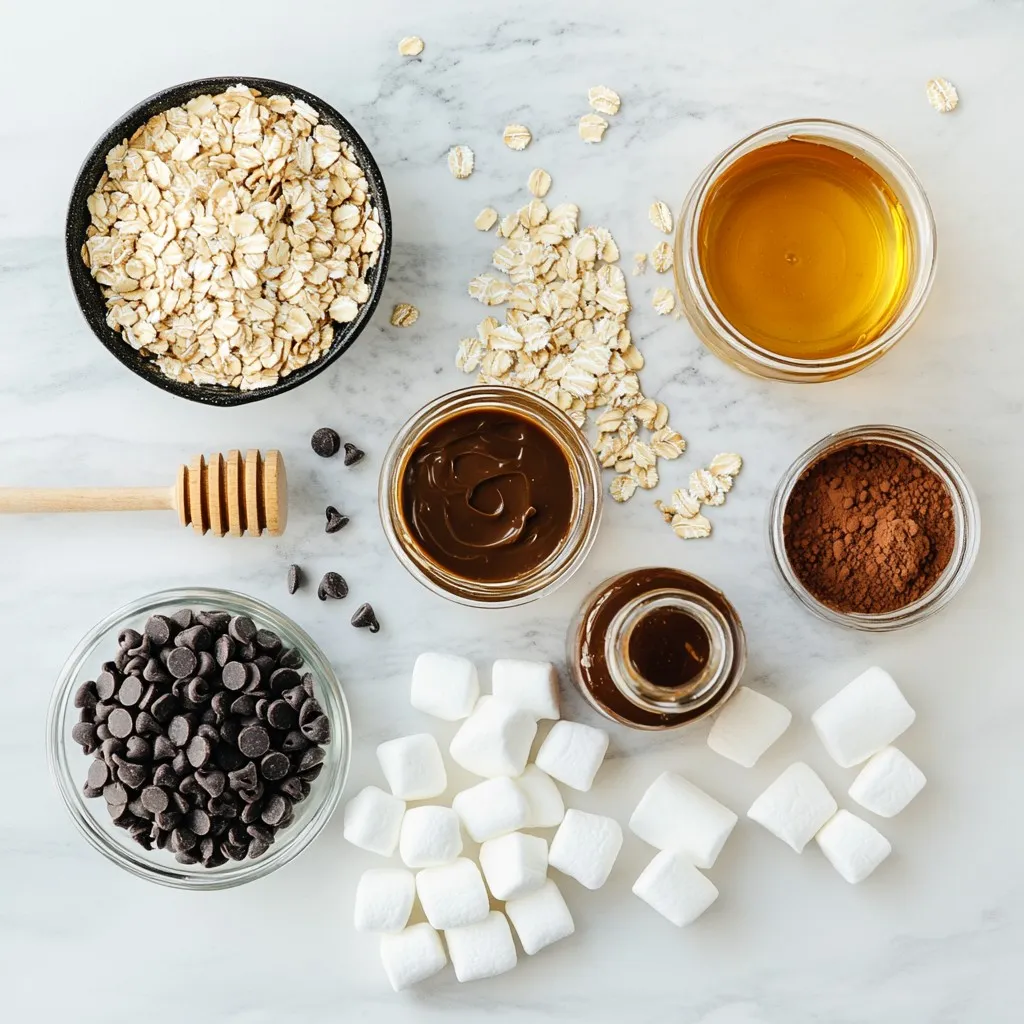
List of Required Ingredients

– 1 cup graham cracker crumbs

– 1 cup rolled oats

– 1/2 cup unsweetened cocoa powder

– 1/2 cup peanut butter (or almond butter)

– 1/4 cup honey or maple syrup

– 1/2 teaspoon vanilla extract

– 1/2 cup mini marshmallows

– 1/2 cup chocolate chips

Ingredient Substitutions

You can swap the nut butter with sun butter or tahini if you need to avoid nuts. For sweeteners, try agave syrup or coconut sugar. If you want a different flavor, use white chocolate chips or dark chocolate chunks instead of regular chocolate chips. This gives a fun twist to the S’mores taste.

Step-by-Step Instructions

Preparation of Dry Ingredients

First, gather your graham cracker crumbs, rolled oats, and cocoa powder. In a large mixing bowl, combine these three ingredients. Mix them well so every bite has great flavor. You want to break up any lumps in the cocoa powder. Use a whisk or a fork for a good blend. This step makes sure the dry mix is ready for the next part.

Making the Wet Mixture

Next, take a microwave-safe bowl and add the peanut butter and honey or maple syrup. Heat this mixture for about 20 to 30 seconds. This warming makes it easier to stir. Once warm, remove it from the microwave and mix in the vanilla extract. Stir until smooth. Proper mixing here is key to a tasty cookie.

Combining and Molding

Now it’s time to bring the dry and wet ingredients together. Pour the peanut butter mixture into the bowl with the dry mix. Stir until everything is coated and sticky. If it seems too dry, add a little more honey or peanut butter. After that, gently fold in the mini marshmallows and chocolate chips. These will add sweetness and fun. Next, line an 8×8-inch baking dish with parchment paper. Spread the cookie mixture into the dish. Press down firmly to create a solid layer.

Chilling and Serving

Chill the cookies in the fridge for at least 30 minutes. This helps them set up nicely. Once they are firm, lift the cookies out using the parchment paper. Cut them into squares or bars. For serving, arrange the squares on a nice plate. You can drizzle melted chocolate on top for a sweet touch. Adding some extra graham cracker crumbs and mini marshmallows makes it look even better!

Tips & Tricks

Achieving the Perfect Texture

To know if your mixture is too dry, look for a crumbly texture. It should hold together when pressed. If it feels wet, it may be too sticky. The key is to find a balance.

If it’s too dry, add a bit more honey or peanut butter. A little goes a long way. If it’s too wet, sprinkle in more graham cracker crumbs or oats. This way, you can adjust it to match your taste.

Enhancing Flavor

You can add different flavors to your cookies. Try mixing in some cinnamon or a pinch of salt. These small changes can make a big difference.

For a gooey texture, ensure your peanut butter and honey mixture is warm. Heat them in the microwave for 20-30 seconds. This will help the mixture blend better and keep it soft.

Presentation Tips

Make your cookies look special by arranging them on a pretty plate. Drizzle melted chocolate over the top for a fun touch.

You can also sprinkle extra graham cracker crumbs and mini marshmallows on top. This adds a nice visual and makes them more fun to eat.

Pro Tips

  1. Storage Tip: Keep these cookies in an airtight container in the fridge to maintain their freshness for up to a week.
  2. Nut Butter Variation: Experiment with different nut butters like cashew or sunflower seed butter for a unique flavor twist.
  3. Chocolate Options: Use dark chocolate chips or even white chocolate for a different taste profile.
  4. Graham Cracker Substitution: If you’re gluten-free, substitute the graham cracker crumbs with gluten-free graham crackers or almond flour.

Variations

Different Flavor Combinations

You can change the flavors of these cookies easily. Try using flavored nut butters, like cashew or almond butter. These add a twist to the usual taste. You can also switch between chocolate and white chocolate chips. Each choice brings a different flavor and look.

Dietary Adaptations

If you need gluten-free options, use gluten-free graham cracker crumbs and oats. These swaps keep the treat safe for those with gluten issues. For vegan alternatives, replace honey with maple syrup and use a plant-based nut butter. This way, everyone can enjoy these cookies.

Seasonal Variations

Adding seasonal ingredients can make these cookies special. For fall, mix in some pumpkin spice for a cozy touch. During holidays, consider using festive sprinkles or shapes. This gives your cookies a fun holiday vibe and makes them more exciting to share.

Storage Info

Best Practices for Storing Cookies

To keep your S’mores No-Bake Cookies fresh, use an airtight container. A glass or plastic container works well. You can stack the cookies in layers, placing parchment paper between them. This helps to prevent sticking. Store your cookies in a cool, dry place. Avoid direct sunlight, as it can make them soft.

For best taste, eat them within a week. If you notice any changes in smell or texture, it’s time to let them go.

Freezing Instructions

You can freeze S’mores No-Bake Cookies for later. First, cut them into squares or bars. Wrap each piece in plastic wrap. Then, place them in a freezer-safe bag or container. This keeps them from getting freezer burn. They can last up to three months in the freezer.

To thaw, take out the cookies and let them sit at room temperature for about 30 minutes. You can also thaw them in the fridge overnight. Enjoy your cookies once they are soft again!

FAQs

Can I use regular flour instead of graham cracker crumbs?

No, you cannot use regular flour. Graham cracker crumbs give a sweet, crunchy taste. Flour lacks this flavor and texture. If you use flour, the cookies will be dry and less tasty. Stick with graham cracker crumbs for the best results.

How long do S’mores No-Bake Cookies last?

These cookies last about one week in the fridge. Look for signs like a change in smell or texture. If they feel hard or smell off, it’s time to toss them. For best taste, eat them fresh!

Can I make these cookies without peanut butter?

Yes, you can. Use almond butter, sunflower seed butter, or even coconut oil. Each option binds the ingredients well. Make sure to check for allergies if you use alternatives.

What is the best way to cut the chilled cookies?

Use a sharp knife for clean cuts. You can warm the knife slightly to help slice through. If the cookies crumble, let them chill longer. A gentle touch helps keep the squares intact.

You’ve now learned how to make delicious S’mores No-Bake Cookies. We covered the key ingredients, helpful tips, and tasty variations. You can easily adapt the recipe to fit your needs and preferences. Enjoy the chewy texture and sweet flavors that these cookies bring. Store them well to keep them fresh, or freeze for later. I hope you get creative and make this treat your ow

- 1 cup graham cracker crumbs - 1 cup rolled oats - 1/2 cup unsweetened cocoa powder - 1/2 cup peanut butter (or almond butter) - 1/4 cup honey or maple syrup - 1/2 teaspoon vanilla extract - 1/2 cup mini marshmallows - 1/2 cup chocolate chips You can swap the nut butter with sun butter or tahini if you need to avoid nuts. For sweeteners, try agave syrup or coconut sugar. If you want a different flavor, use white chocolate chips or dark chocolate chunks instead of regular chocolate chips. This gives a fun twist to the S'mores taste. {{ingredient_image_1}} First, gather your graham cracker crumbs, rolled oats, and cocoa powder. In a large mixing bowl, combine these three ingredients. Mix them well so every bite has great flavor. You want to break up any lumps in the cocoa powder. Use a whisk or a fork for a good blend. This step makes sure the dry mix is ready for the next part. Next, take a microwave-safe bowl and add the peanut butter and honey or maple syrup. Heat this mixture for about 20 to 30 seconds. This warming makes it easier to stir. Once warm, remove it from the microwave and mix in the vanilla extract. Stir until smooth. Proper mixing here is key to a tasty cookie. Now it’s time to bring the dry and wet ingredients together. Pour the peanut butter mixture into the bowl with the dry mix. Stir until everything is coated and sticky. If it seems too dry, add a little more honey or peanut butter. After that, gently fold in the mini marshmallows and chocolate chips. These will add sweetness and fun. Next, line an 8x8-inch baking dish with parchment paper. Spread the cookie mixture into the dish. Press down firmly to create a solid layer. Chill the cookies in the fridge for at least 30 minutes. This helps them set up nicely. Once they are firm, lift the cookies out using the parchment paper. Cut them into squares or bars. For serving, arrange the squares on a nice plate. You can drizzle melted chocolate on top for a sweet touch. Adding some extra graham cracker crumbs and mini marshmallows makes it look even better! To know if your mixture is too dry, look for a crumbly texture. It should hold together when pressed. If it feels wet, it may be too sticky. The key is to find a balance. If it's too dry, add a bit more honey or peanut butter. A little goes a long way. If it’s too wet, sprinkle in more graham cracker crumbs or oats. This way, you can adjust it to match your taste. You can add different flavors to your cookies. Try mixing in some cinnamon or a pinch of salt. These small changes can make a big difference. For a gooey texture, ensure your peanut butter and honey mixture is warm. Heat them in the microwave for 20-30 seconds. This will help the mixture blend better and keep it soft. Make your cookies look special by arranging them on a pretty plate. Drizzle melted chocolate over the top for a fun touch. You can also sprinkle extra graham cracker crumbs and mini marshmallows on top. This adds a nice visual and makes them more fun to eat. Pro Tips Storage Tip: Keep these cookies in an airtight container in the fridge to maintain their freshness for up to a week. Nut Butter Variation: Experiment with different nut butters like cashew or sunflower seed butter for a unique flavor twist. Chocolate Options: Use dark chocolate chips or even white chocolate for a different taste profile. Graham Cracker Substitution: If you're gluten-free, substitute the graham cracker crumbs with gluten-free graham crackers or almond flour. {{image_2}} You can change the flavors of these cookies easily. Try using flavored nut butters, like cashew or almond butter. These add a twist to the usual taste. You can also switch between chocolate and white chocolate chips. Each choice brings a different flavor and look. If you need gluten-free options, use gluten-free graham cracker crumbs and oats. These swaps keep the treat safe for those with gluten issues. For vegan alternatives, replace honey with maple syrup and use a plant-based nut butter. This way, everyone can enjoy these cookies. Adding seasonal ingredients can make these cookies special. For fall, mix in some pumpkin spice for a cozy touch. During holidays, consider using festive sprinkles or shapes. This gives your cookies a fun holiday vibe and makes them more exciting to share. To keep your S’mores No-Bake Cookies fresh, use an airtight container. A glass or plastic container works well. You can stack the cookies in layers, placing parchment paper between them. This helps to prevent sticking. Store your cookies in a cool, dry place. Avoid direct sunlight, as it can make them soft. For best taste, eat them within a week. If you notice any changes in smell or texture, it’s time to let them go. You can freeze S’mores No-Bake Cookies for later. First, cut them into squares or bars. Wrap each piece in plastic wrap. Then, place them in a freezer-safe bag or container. This keeps them from getting freezer burn. They can last up to three months in the freezer. To thaw, take out the cookies and let them sit at room temperature for about 30 minutes. You can also thaw them in the fridge overnight. Enjoy your cookies once they are soft again! No, you cannot use regular flour. Graham cracker crumbs give a sweet, crunchy taste. Flour lacks this flavor and texture. If you use flour, the cookies will be dry and less tasty. Stick with graham cracker crumbs for the best results. These cookies last about one week in the fridge. Look for signs like a change in smell or texture. If they feel hard or smell off, it’s time to toss them. For best taste, eat them fresh! Yes, you can. Use almond butter, sunflower seed butter, or even coconut oil. Each option binds the ingredients well. Make sure to check for allergies if you use alternatives. Use a sharp knife for clean cuts. You can warm the knife slightly to help slice through. If the cookies crumble, let them chill longer. A gentle touch helps keep the squares intact. You’ve now learned how to make delicious S’mores No-Bake Cookies. We covered the key ingredients, helpful tips, and tasty variations. You can easily adapt the recipe to fit your needs and preferences. Enjoy the chewy texture and sweet flavors that these cookies bring. Store them well to keep them fresh, or freeze for later. I hope you get creative and make this treat your own!

S'mores No-Bake Cookies

Delicious no-bake cookies that combine the flavors of s'mores with a chewy texture.
Prep Time 15 minutes
Total Time 45 minutes
Course Dessert
Cuisine American
Servings 16
Calories 150 kcal

Ingredients
  

  • 1 cup graham cracker crumbs
  • 1 cup rolled oats
  • 0.5 cup unsweetened cocoa powder
  • 0.5 cup peanut butter (or almond butter)
  • 0.25 cup honey or maple syrup
  • 0.5 teaspoon vanilla extract
  • 0.5 cup mini marshmallows
  • 0.5 cup chocolate chips

Instructions
 

  • In a large mixing bowl, combine the graham cracker crumbs, rolled oats, and cocoa powder. Mix well to combine all the dry ingredients.
  • In a microwave-safe bowl, heat the peanut butter and honey (or maple syrup) together for about 20-30 seconds until warm and more easily mixable. Remove from the microwave and stir in the vanilla extract.
  • Pour the peanut butter mixture into the dry ingredients and mix until everything is well-coated. The mixture should be sticky but not too wet. If it's too dry, add a bit more honey or peanut butter.
  • Gently fold in the mini marshmallows and chocolate chips until evenly distributed throughout the dough.
  • Line a baking dish (around 8x8 inches works well) with parchment paper for easy removal. Spread the cookie mixture into the dish evenly, pressing down firmly to create a solid layer.
  • Chill the cookies in the refrigerator for at least 30 minutes until set.
  • Once set, lift the cookies out of the dish using the parchment paper and cut into squares or bars.

Notes

Arrange the squares on a decorative plate and drizzle with melted chocolate for an extra treat. Sprinkle some extra graham cracker crumbs and mini marshmallows on top for a fun S'mores touch!
Keyword cookies, no-bake, s'mores

WANT TO SAVE THIS RECIPE?

Related Posts