Spicy Honey Garlic Shrimp Tasty and Simple Dish

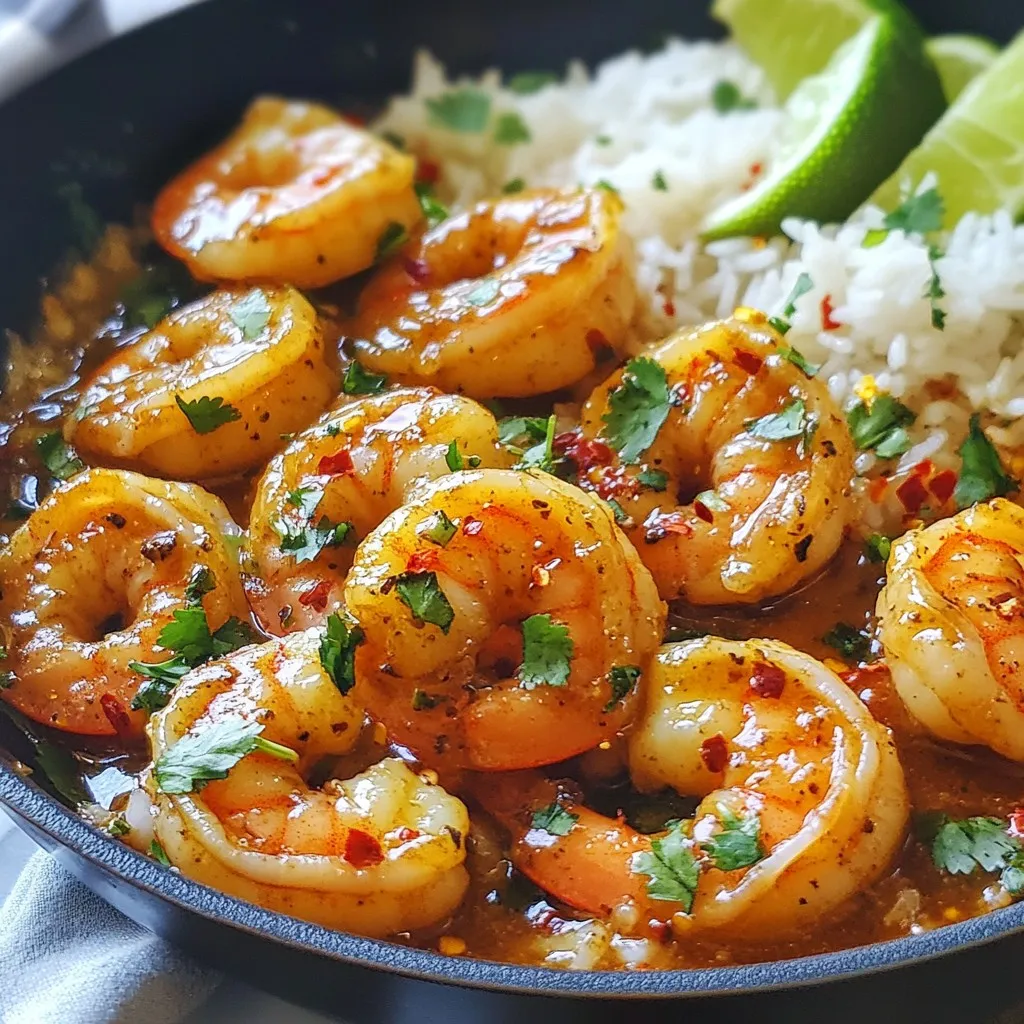
If you’re craving a dish that packs a punch in flavor but is still simple to make, look no further than my Spicy Honey Garlic Shrimp. With just a handful of fresh ingredients, you can whip up a meal that impresses. Imagine succulent shrimp coated in a sweet and spicy sauce, served with vibrant herbs. Perfect for any occasion, this dish will soon be a favorite in your kitchen. Let’s get cooking!
Why I Love This Recipe
- Quick and Easy: This recipe comes together in just 15 minutes, making it perfect for busy weeknights.
- Flavor Explosion: The combination of honey, garlic, and ginger creates a sweet and spicy sauce that is irresistible.
- Healthy Choice: Shrimp is a lean protein that cooks quickly and pairs well with nutritious sides like rice or quinoa.
- Customizable Heat: You can easily adjust the level of spice by altering the amount of red pepper flakes to suit your taste.
Ingredients
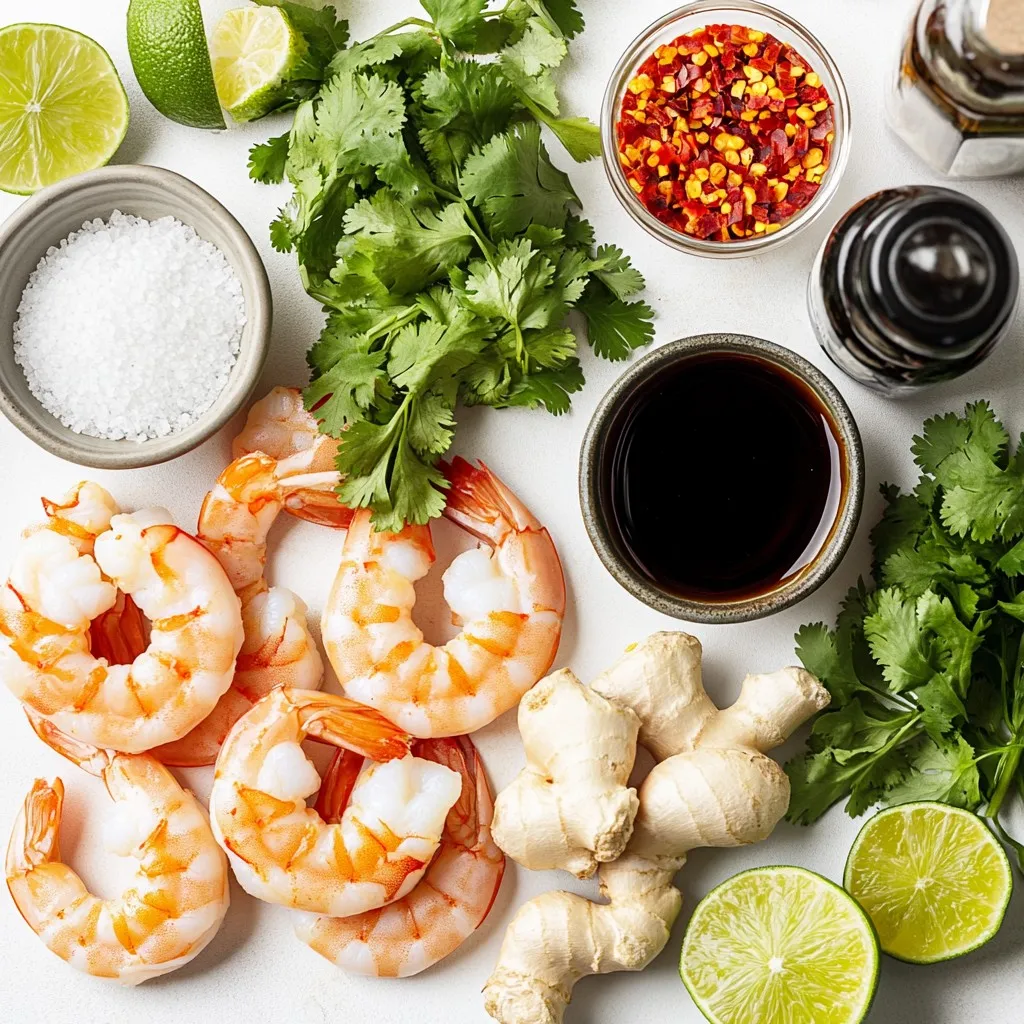
Main Ingredients for Spicy Honey Garlic Shrimp
– Large shrimp: 1 pound, peeled and deveined
– Honey: 3 tablespoons
– Soy sauce: 2 tablespoons
– Garlic: 3 cloves, minced
– Ginger: 1 tablespoon, minced
– Red pepper flakes: 1 teaspoon, adjusted to taste
Additional Ingredients
– Olive oil: 2 tablespoons
– Lime juice: 1 tablespoon
– Salt and pepper: to taste
– Garnish: Fresh cilantro, chopped
– Serving suggestion: Lime wedges
When it comes to making Spicy Honey Garlic Shrimp, the right ingredients make all the difference. I always start with fresh, large shrimp. They should be peeled and deveined for the best texture. You want them to soak up all that delicious sauce.
Next, honey plays a crucial role. It adds sweetness that balances the heat. I use three tablespoons for just the right amount. Soy sauce brings in umami, giving the dish depth. Three cloves of minced garlic and a tablespoon of minced ginger add a lovely aromatic touch.
Red pepper flakes are key for that spicy kick. You can adjust them to your taste. If you like it milder, use less. For the cooking process, I use two tablespoons of olive oil. And don’t forget the lime juice! It brightens the dish with a fresh zing.
Salt and pepper round out the flavors. After cooking, a sprinkle of fresh cilantro makes a vibrant garnish. Serve it with lime wedges for a burst of flavor. This mix of ingredients creates a dish that is not only tasty but also very simple to prepare.

Step-by-Step Instructions
Preparation Steps
– Mixing the sauce: In a bowl, combine 3 tablespoons honey, 2 tablespoons soy sauce, 3 minced garlic cloves, 1 tablespoon minced ginger, 1 tablespoon lime juice, and 1 teaspoon red pepper flakes. Whisk until smooth. Set it aside.
– Seasoning shrimp: Take 1 pound of large shrimp. Peel and devein them if not done. Sprinkle salt and pepper on the shrimp. This adds flavor and makes them tasty.
Cooking Steps
– Heating the skillet: Grab a large skillet. Pour in 2 tablespoons of olive oil. Heat it on medium-high until it shimmers. The oil should be hot but not smoking.
– Cooking the shrimp: Place the shrimp in the skillet in a single layer. Cook for 2-3 minutes. Watch as they turn pink and caramelize. This gives them a nice color and flavor.
– Adding sauce: Flip the shrimp over. Pour the honey garlic sauce over them. Cook for another 2-3 minutes. Stir gently to coat the shrimp. The sauce will thicken slightly, making it even better.
Final Touches
– Garnishing with cilantro: Once the shrimp are done, take them off the heat. Chop some fresh cilantro and sprinkle it on top. This adds a pop of color and fresh flavor.
– Tips for a beautiful presentation: Serve the shrimp over jasmine rice or quinoa. Drizzle extra sauce from the skillet on top. Add lime wedges on the side for a fresh touch. This makes your dish look great and taste even better.
Tips & Tricks
How to Achieve the Perfect Flavor
To make your spicy honey garlic shrimp shine, balance is key. Adjusting spice levels is crucial. If you want more heat, add extra red pepper flakes. For less heat, cut back on them. Enjoying the sweet honey combined with the zing of spice makes every bite exciting.
Using soy sauce adds depth. Choose a good quality soy sauce, as it enhances umami flavor. Use it wisely. A little goes a long way. Mix soy sauce well with honey and other ingredients to create a rich sauce.
Cooking Tips
Overcooking shrimp can ruin your dish. Cook shrimp until they turn pink and opaque. This usually takes just 2-3 minutes on each side. They cook quickly, so keep an eye on them. If they curl up tightly, they may be overdone.
To ensure your sauce thickens properly, stir it gently. After adding the sauce to the shrimp, let it bubble for a couple of minutes. This helps the flavors meld together. The sauce should coat the shrimp nicely when done.
Presentation Tips
For an appealing look, serve your shrimp over fluffy jasmine rice or quinoa. The grains soak up the sauce well. Drizzle extra sauce over the shrimp for a beautiful finish.
Add lime wedges on the side for color and freshness. They brighten up the dish. When plating, arrange shrimp in a single layer. This makes it look more inviting. A sprinkle of fresh cilantro on top adds a pop of green.
Pro Tips
- Fresh Ingredients: Use fresh shrimp for the best flavor and texture. Frozen shrimp can be used, but make sure to thaw them completely and pat them dry before cooking.
- Adjust Spice Level: Feel free to adjust the amount of red pepper flakes according to your heat preference. Start with less if you’re unsure and add more as desired.
- Thickening the Sauce: For a thicker sauce, let it bubble for a minute or two after adding the shrimp to allow it to reduce slightly. This will intensify the flavors.
- Serving Suggestions: Serve the shrimp over jasmine rice or quinoa, and garnish with lime wedges for a refreshing burst of flavor. You can also add steamed vegetables for a complete meal.

Variations
Alternative Ingredients
You can switch up the shrimp in this recipe. Here are some tasty options:
– Scallops: These are sweet and cook quickly.
– Chicken: Cut it into small pieces for a hearty bite.
– Fish: Try firm fish like salmon or cod.
If you want a vegan dish, tofu works great. Use firm tofu and press it to remove extra water. You can also use vegetables like bell peppers or zucchini. They add crunch and flavor.
Flavor Variations
You can change the flavor profile by altering a few ingredients.
– Honey substitutes: Agave syrup or maple syrup can replace honey. Both will add a sweet touch.
– Additional spices: Add herbs like basil or cilantro for fresh notes. You can also include spices like cumin or paprika for depth.
Serving Variations
Serving ideas can make your dish exciting.
– Tacos: Serve shrimp in corn tortillas with avocado and salsa.
– Rice bowls: Place shrimp over jasmine rice and top with veggies.
– Salads: Toss cooked shrimp with greens, nuts, and a citrus dressing.
Pair your dish with a light beverage like a crisp white wine or sparkling water. These drinks will enhance the shrimp’s flavors without overpowering them.
Storage Info
Storing Leftovers
To keep your spicy honey garlic shrimp fresh, store it in an airtight container. Place the shrimp inside and cover it well. Refrigerate it right after it cools down. This way, your shrimp stays tasty for up to three days. If you want to keep it longer, you can freeze it. Use a freezer-safe bag and remove as much air as possible. Frozen shrimp dishes can last for up to three months.
Reheating Instructions
When it’s time to eat your leftovers, you can choose between a microwave or a skillet. The microwave is quick, but it may dry out the shrimp. If you want to keep the flavor and texture, use a skillet. Heat it on low and stir gently. Be careful not to overcook the shrimp, as they can become rubbery. Just heat until warm, and it’s ready to enjoy again!
Shelf Life
Cooked shrimp can stay safe to eat for about three to four days in the fridge. After that, they may spoil. Check for signs of spoilage like a bad smell or a slimy texture. If you see any of these signs, it is best to throw it away. Always trust your senses to keep your meals safe!
FAQs
Common Questions About Spicy Honey Garlic Shrimp
What type of shrimp should I use?
Use large shrimp that are peeled and deveined. They cook quickly and absorb the sauce well. You can also use frozen shrimp if fresh is not available. Just thaw them before cooking.
Can I make Spicy Honey Garlic Shrimp ahead of time?
You can prepare the sauce ahead. Store it in the fridge for a day. Cook the shrimp fresh for the best taste and texture.
How do I know when shrimp are fully cooked?
Shrimp turn pink and curl up when cooked. They should be opaque and firm. Avoid overcooking to keep them tender.
Cooking and Preparation Questions
Is there a substitute for soy sauce?
Yes, you can use tamari for a gluten-free option. Coconut aminos also work well for a milder flavor.
Can I use fresh ingredients instead of dried spices?
Yes, you can use fresh ginger instead of dried. Fresh garlic is also great. Just adjust the amounts since fresh ingredients are usually stronger.
Serving Suggestions
What are the best side dishes to serve with shrimp?
Serve your shrimp over steamed jasmine rice or quinoa. Roasted vegetables or a fresh salad are great sides too.
How to store unused sauce?
Store any leftover sauce in an airtight container. Keep it in the fridge and use it within a week. You can also freeze it for future use.
You’ve learned how to make Spicy Honey Garlic Shrimp from start to finish. We covered ingredients, step-by-step preparation, and tips for great flavor and presentation. Remember, this dish is not just tasty; it’s also flexible. You can adjust ingredients and try different proteins. Use these instructions to impress your friends and family. Happy cookin

Spicy Honey Garlic Shrimp
Ingredients
- 1 pound large shrimp, peeled and deveined
- 3 tablespoons honey
- 2 tablespoons soy sauce
- 3 cloves garlic, minced
- 1 tablespoon fresh ginger, minced
- 1 teaspoon red pepper flakes
- 2 tablespoons olive oil
- 1 tablespoon lime juice
- to taste salt and pepper
- to garnish fresh cilantro, chopped
- for serving lime wedges
Instructions
- In a mixing bowl, combine the honey, soy sauce, minced garlic, minced ginger, lime juice, and red pepper flakes. Whisk until well combined and set aside.
- Season the peeled and deveined shrimp with salt and pepper.
- In a large skillet over medium-high heat, heat the olive oil until shimmering.
- Add the shrimp to the skillet in a single layer. Cook for 2-3 minutes on one side until they turn pink and start to caramelize.
- Flip the shrimp and pour the honey garlic sauce over them. Cook for an additional 2-3 minutes, stirring gently to ensure the shrimp are coated and the sauce thickens slightly.
- Once the shrimp are cooked through and the sauce is bubbly, remove from heat.
- Garnish with freshly chopped cilantro before serving.


![Fresh spinach is the star of this soup. You will need 2 cups of roughly chopped spinach. This leafy green adds color and nutrients. Spinach is rich in vitamins A and C, making your soup healthy and vibrant. When you cook it, the spinach wilts and blends well with the other flavors. Tortellini brings heartiness to the soup. You can use fresh or frozen cheese tortellini, about 2 cups. Fresh tortellini cooks quickly, usually in 3-5 minutes. Frozen tortellini takes a bit longer. Whichever you choose, the soft pasta adds texture and a delightful bite to the creamy broth. Aromatics build the flavor base. You will need a medium onion, diced, and 3 minced garlic cloves. These add savory depth to the soup. A grated carrot, about one medium-sized, gives a touch of sweetness. Together, they create a warm, inviting aroma that fills your kitchen. Don't forget the olive oil! You will need 2 tablespoons to sauté the aromatics to perfection. For the full recipe, see the details above. To start, grab a large pot. Heat 2 tablespoons of olive oil over medium heat. Add 1 diced onion and sauté it until it softens, about 4-5 minutes. Next, stir in 3 minced garlic cloves and 1 grated carrot. Cook this mix for another 2-3 minutes. The garlic should smell great at this point. This base gives the soup a rich flavor. Now, pour in 4 cups of vegetable broth. Bring it to a gentle boil. Once boiling, add 2 cups of cheese tortellini. Follow the package instructions to cook them. Fresh tortellini usually takes about 3-5 minutes. You know they are ready when they float to the top. Reduce the heat to low. Stir in 2 cups of roughly chopped spinach, 1 cup of heavy cream, 1 teaspoon of dried basil, 1 teaspoon of salt, and 1/2 teaspoon of black pepper. Let the soup simmer for 5-7 minutes. This allows the spinach to wilt and the flavors to meld. Taste the soup and adjust the seasoning if needed. Serve it hot, topped with grated Parmesan cheese and fresh basil leaves if you wish. For the complete recipe, see the [Full Recipe]. To boost flavor, don't skip the onions and garlic. Sauté them well; it adds depth. A touch of dried basil brings warmth, while salt and pepper brighten all the tastes. If you want more zing, consider red pepper flakes. They give a lovely kick without overpowering the soup. Fresh herbs are also a great choice. Toss in some fresh basil or parsley right before serving for a fresh burst. If you like a thicker soup, add less broth or more cream. You can also use less tortellini. If the soup feels too thick, just stir in a bit more broth or water. This lets you control how creamy or brothy you want your soup. Using a hand blender can also help. Blend just a little bit to create a smoother base while keeping some chunks for texture. Cook the tortellini according to the package instructions. Fresh tortellini usually takes about 3-5 minutes. If you use frozen, check for the right cooking time. Adding them to boiling broth helps them cook quickly and evenly. They are done when they float to the top. Don’t forget to add them at the right time. If they overcook, they'll become mushy and lose their shape. Follow these tips to enjoy the perfect tortellini in your creamy soup. For more details, check the Full Recipe. {{image_2}} You can easily add protein to your creamy spinach tortellini soup. Chicken, turkey, or sausage work well. If you like shrimp, toss some in during the last few minutes of cooking. For a meatless option, try cooked lentils or chickpeas. These additions make your soup heartier and more filling. To make this soup vegan, swap out the heavy cream for coconut milk or cashew cream. Use vegetable broth instead of chicken broth for a rich base. Look for vegan tortellini in stores, or make your own with flour and water. Nutritional yeast can give a cheesy flavor without dairy. Feel free to mix in other veggies. Carrots and peas add sweetness and color. Zucchini or bell peppers can bring in fresh flavors. You can use frozen vegetables for convenience. Just add them during the cooking process so they heat through and blend well with the soup. For the full recipe, see the section above. After making the creamy spinach tortellini soup, let it cool to room temperature. Then, transfer it to an airtight container. Store it in the fridge for up to three days. If you want to enjoy it later, make sure you seal it well. This keeps the flavors fresh and tasty. You can freeze this soup for longer storage. First, let the soup cool completely. Then, pour it into freezer-safe containers. Leave some space at the top for expansion. The soup can freeze for up to three months. When you’re ready to eat it, just thaw it in the fridge overnight. To reheat, pour the soup into a pot over medium heat. Stir often to avoid sticking. Heat until it’s warm all the way through. If the soup is too thick, add a little broth or water. This will help restore its creamy texture. Enjoy this comforting meal again, just like the first time. For the full recipe, check out the earlier sections. Yes, you can use frozen spinach. Just thaw it first and drain excess water. Frozen spinach is often picked at peak freshness, so it can taste great. However, fresh spinach offers a brighter taste and texture. If you like a more vibrant green, go for fresh. You can thicken the soup in a few ways. One method is to add a cornstarch slurry. Mix one tablespoon of cornstarch with two tablespoons of cold water. Stir this into the soup and heat until it thickens. Another option is to blend part of the soup using an immersion blender. This keeps it creamy and rich. Parmesan cheese is a fantastic choice for adding flavor. It melts well and gives a nice salty kick. You can also try adding cream cheese for extra creaminess. If you want a stronger flavor, consider using sharp cheddar. Just sprinkle it in while the soup simmers for a delicious twist. For the complete recipe, check out the Full Recipe section. In this post, I covered the essentials for a delicious tortellini soup. We discussed key ingredients like fresh spinach, various tortellini, and aromatics. I provided step-by-step instructions for preparing and cooking your dish. I shared tips for enhancing flavors and adjusting texture. You also learned about tasty variations and proper storage methods. Remember, small swaps can greatly change your soup. Enjoy trying new flavors and make it your own! Your perfect tortellini soup awaits.](https://dailydishly.com/wp-content/uploads/2025/06/4c17d0e8-c88c-41b6-a4f3-bfc90cf6bf08-768x768.webp)
![To make cheesy scalloped potatoes, you need just a few simple ingredients. Here’s what you’ll need: - 4 large russet potatoes, peeled and thinly sliced - 1 cup sharp cheddar cheese, grated - 1 cup Gruyère cheese, grated - 1 medium onion, finely chopped - 2 cloves garlic, minced - 2 cups heavy cream - 1 tablespoon butter - 1 teaspoon salt - 1/2 teaspoon black pepper - 1/4 teaspoon nutmeg - Fresh parsley, chopped (for garnish) Each ingredient plays a key role in creating that creamy, cheesy goodness. The potatoes provide the base, while the cheeses add flavor and richness. Choosing the right cheese is important. I love using sharp cheddar for its bold flavor. Gruyère brings a nice creaminess and a nutty taste. You can mix these cheeses or use others you like. Just remember, a good melt is what you want. While the basic recipe is tasty, you can add a few seasonings. Consider these: - Fresh thyme for a herbal note - Smoked paprika for a hint of smokiness - Red pepper flakes for some heat These add-ons can elevate your dish. You can adjust them based on your taste. For a full experience, follow the Full Recipe to bring these flavors together perfectly! First, gather all your ingredients. You need four large russet potatoes, sharp cheddar cheese, Gruyère cheese, an onion, garlic, heavy cream, butter, salt, black pepper, nutmeg, and fresh parsley. Peel and thinly slice the potatoes. I often use a mandoline for even slices. Finely chop the onion and mince the garlic. Next, melt one tablespoon of butter in a medium saucepan over medium heat. Add the chopped onion and minced garlic. Sauté until they turn soft and clear, about four to five minutes. This step adds great flavor. Pour in the two cups of heavy cream and mix in the salt, pepper, and nutmeg. Heat until it simmers, but do not boil. Remove from heat. Now, grease a 9x13 inch baking dish. Start by layering half of the sliced potatoes on the bottom. Spread them out evenly. Next, pour half of the cream mixture over the potatoes. Then, sprinkle half of the grated cheddar and Gruyère cheese on top. Do this carefully to cover all the potatoes. Repeat the process with the remaining ingredients. Layer the rest of the potatoes, followed by the cream mixture, and finish with the remaining cheese. This layering gives the dish its rich flavor and texture. Cover the baking dish with aluminum foil. Bake in the preheated oven at 375°F (190°C) for 45 minutes. This helps the potatoes cook through. After 45 minutes, carefully remove the foil. Bake uncovered for an additional 25 to 30 minutes. The top should turn golden brown, and the dish will bubble up. Let the scalloped potatoes cool for about ten minutes before serving. This cooling time helps the layers set. Garnish with fresh parsley for a pop of color. Enjoy this cheesy delight! To get the best creamy texture, use heavy cream. It gives a rich taste. Heat the cream slowly with salt and spices. This helps the flavors mix well. Avoid boiling the cream; just let it simmer. Layer the potatoes and cream mixture evenly in the dish. This allows every bite to be creamy and delicious. To achieve a golden, bubbly cheese top, remove the foil halfway through baking. This lets the heat reach the cheese directly. If you want an extra crispy top, add a bit more cheese before the last baking phase. Broil the dish for a few minutes at the end if you want even more browning. Just watch it closely to avoid burning. One common mistake is cutting the potatoes too thick. Thin slices cook evenly and absorb the cream better. Another mistake is skipping the onion and garlic. These add depth and flavor. Also, don’t rush the baking time. Ensure potatoes are tender before serving. Following the Full Recipe will keep you on track for success. {{image_2}} You can make cheesy scalloped potatoes vegetarian. Simply skip any meat or meat-based broths. Focus on using rich, creamy ingredients like heavy cream and cheese. Add layers of fresh vegetables, too. Spinach, mushrooms, or zucchini give great flavor and texture. They blend well with the potatoes and cheese, making each bite delightful. Cheese is key in this dish. You can play with different cheese blends. Try mozzarella for a gooey texture. Feta adds a nice tang, while gouda gives a smoky flavor. Mix and match your favorites to create a unique taste. Aim for a mix of sharp and creamy cheeses to balance the flavors. Want to make this dish heartier? Add proteins like cooked bacon or ham. Both add savory notes that complement the cheese. You can also sneak in some vegetables. Broccoli or asparagus works well. Simply chop them small and layer them with the potatoes. This not only enhances flavor but also boosts nutrition. For more detailed steps on making these variations, check out the Full Recipe. After you make your cheesy scalloped potatoes, let them cool first. This helps keep them fresh. Store the leftovers in an airtight container. They can stay good in the fridge for about three to four days. If you want to keep them longer, freezing is a great option. You can freeze cheesy scalloped potatoes for up to three months. To do this, make sure they cool completely. Cut them into portions. Wrap each piece tightly with plastic wrap. Then, place them in a freezer-safe bag. Label the bag with the date. This way, you’ll know when to use them. To reheat, take the potatoes out of the fridge or freezer. If frozen, let them thaw overnight in the fridge. Preheat your oven to 350°F (175°C). Place the leftovers in a baking dish. Cover with foil to keep them moist. Bake for about 20 to 30 minutes, or until hot. You can also microwave them, but the oven gives a better texture. Enjoy your cheesy scalloped potatoes just like the first time! For the full recipe, check out the [Full Recipe]. You can make cheesy scalloped potatoes a day before. Prepare the dish fully, then cover it with plastic wrap. Store it in the fridge overnight. When you are ready to bake, remove the wrap and let it sit at room temperature for 30 minutes. Then, bake as instructed in the Full Recipe. This method helps the flavors blend and saves time. Yes, you can use different potatoes. While I prefer russet potatoes for their creaminess, Yukon gold potatoes work well too. They add a nice buttery flavor. Just remember to slice them thinly for even cooking. Avoid waxy potatoes, as they may not soften well in the oven. Cheesy scalloped potatoes pair nicely with many dishes. They complement roast chicken, beef, or pork perfectly. You can also serve them with a fresh salad for a balanced meal. For a special touch, add some steamed green beans or sautéed spinach on the side. These options create a colorful plate and elevate your dining experience. You now know how to make cheesy scalloped potatoes from scratch. We covered essential ingredients, baking steps, and tips to avoid mistakes. Experiment with different cheeses and veggies for your own twist. Remember to store leftovers properly to enjoy later. Use these insights to impress your friends and family at your next meal. Happy cooking; I can’t wait for you to try this dish!](https://dailydishly.com/wp-content/uploads/2025/07/68a68aa2-1fa5-4915-a359-e46e8929230b-768x768.webp)