Spinach Feta Turkey Meatloaf Simple and Healthy Dish

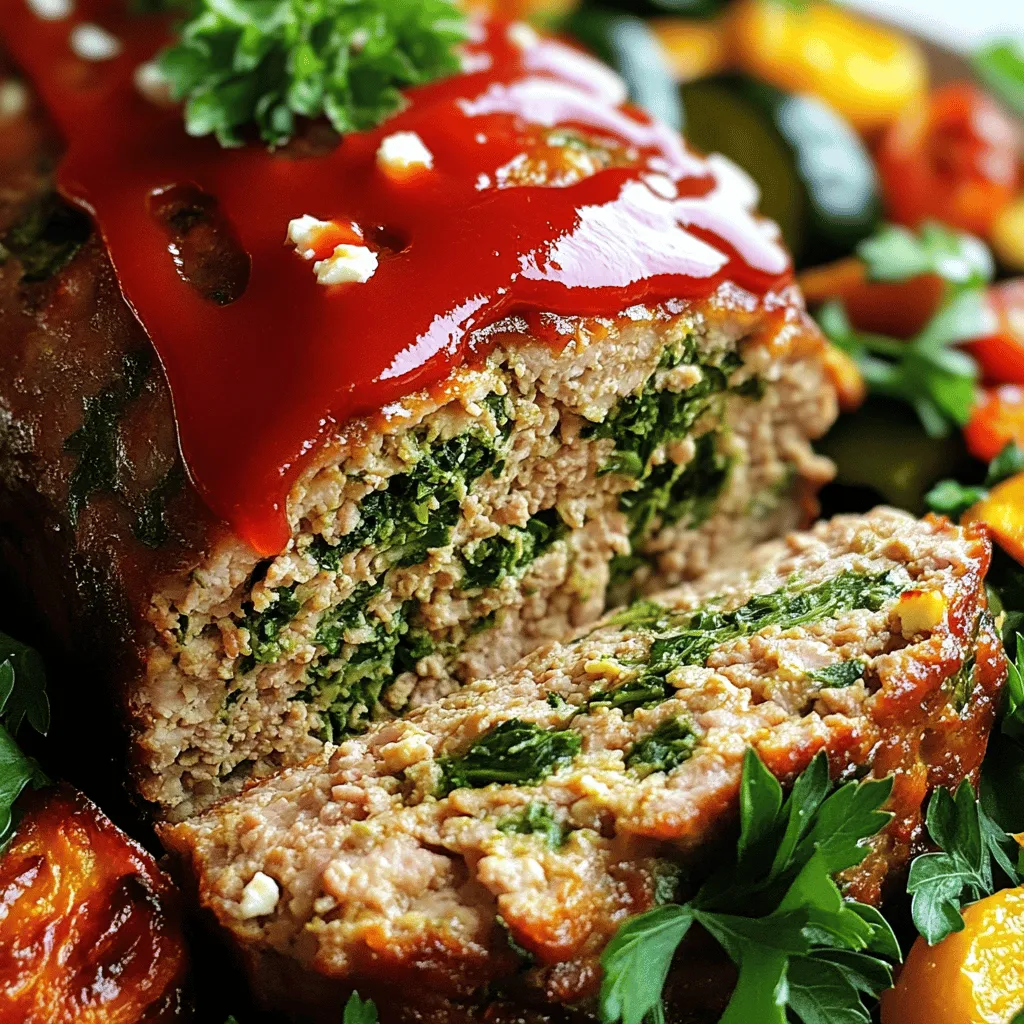
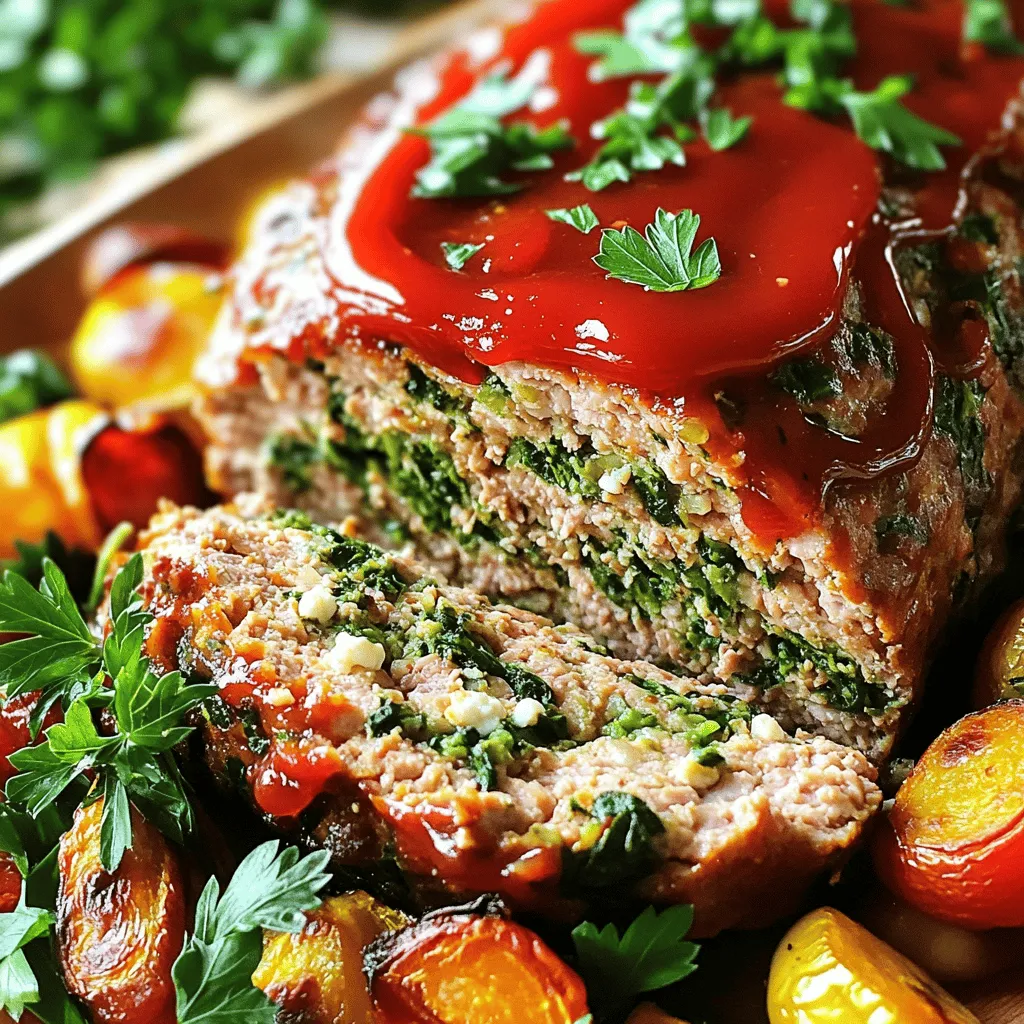
Looking for a simple and healthy dish? Let me introduce you to Spinach Feta Turkey Meatloaf! This tasty meal packs flavor and nutrition into one easy recipe. Ground turkey, fresh spinach, and creamy feta cheese come together to create a guilt-free comfort food classic. Whether you’re meal prepping or cooking for the family, this meatloaf will impress everyone at the table. Ready to dive in? Let’s get cooking!
Ingredients
Main Ingredients List
– 1 lb ground turkey breast
– 1 cup fresh spinach, chopped
– 1/2 cup feta cheese, crumbled
The main ingredients create a healthy base for the meatloaf. The ground turkey breast is lean and packed with protein. Fresh spinach adds nutrients and color. Feta cheese brings a creamy, salty flavor that makes each bite special.
Additional Ingredients
– 1/2 cup breadcrumbs (whole wheat for a healthier option)
– 1 small onion, finely chopped
– 2 cloves garlic, minced
– 1 large egg
– 1 tablespoon olive oil
Breadcrumbs help bind the meatloaf. Whole wheat is a great choice for added health. The onion and garlic add depth to the flavor. The egg helps the loaf hold its shape. Olive oil keeps everything moist.
Seasonings
– 1 teaspoon dried oregano
– 1 teaspoon dried basil
– Salt and pepper to taste
– 1/4 cup ketchup (for topping)
Seasonings are key to making this dish pop. Oregano and basil give it an Italian flair. Salt and pepper enhance all the flavors. Ketchup on top adds a sweet touch and keeps the meatloaf juicy.
Gather these ingredients to create a delicious and healthy meatloaf that everyone will enjoy!
Step-by-Step Instructions
Preparation Steps
First, you need to preheat the oven to 350°F (175°C). This makes sure your meatloaf cooks evenly. Next, grab a large skillet and pour in one tablespoon of olive oil. Heat it over medium heat. Add the finely chopped onion and minced garlic to the pan. Stir them for about 3 to 4 minutes. You want the onion to turn soft and clear. This step brings out their flavors.
Mixing Ingredients
In a large mixing bowl, combine the ground turkey, sautéed onion and garlic, chopped spinach, crumbled feta cheese, breadcrumbs, and one large egg. Add one teaspoon of dried oregano, one teaspoon of dried basil, and a pinch of salt and pepper. Mix gently with your hands or a spoon. Be careful not to overmix, as this keeps your meatloaf tender. Once it’s well mixed, shape the mixture into a loaf.
Baking Process
Now, transfer the meatloaf into a loaf pan. Pour 1/4 cup of ketchup over the top. Spread it evenly for a nice glaze. Place the loaf pan in the preheated oven. Bake for 45 to 50 minutes. Check that the inside reaches 165°F (74°C). This ensures the meatloaf is safe to eat. Once done, take it out and let it rest for about 10 minutes. This helps it hold together when you slice it.
Tips & Tricks
Ensuring Perfect Texture
To get the best texture in your meatloaf, avoid overmixing. When you mix the ingredients, do it gently. This keeps the meatloaf tender and juicy. If you mix too much, the meatloaf can turn out tough.
After baking, let the meatloaf rest. This step is key. Allow it to sit for about 10 minutes before slicing. Resting helps the juices stay inside, making each slice moist.
Enhancing Flavor
To boost flavor, add herbs and spices. The dried oregano and basil in this recipe work well. You can also try fresh herbs for a brighter taste.
Consider variations with sauces or cheeses. Swap feta for goat cheese or add a spicy sauce for a kick. These changes can make the dish feel new and exciting.
Cooking Equipment
Use a good loaf pan for baking. A metal pan helps the meatloaf cook evenly. If you prefer, a glass or ceramic dish also works.
Helpful kitchen tools include a large mixing bowl and a sturdy spatula. A meat thermometer is great for checking doneness, too. Aim for an internal temperature of 165°F (74°C).

Variations
Flavorful Alternatives
You can change the ground meat for your meatloaf. Try using lean ground beef or chicken. Each meat gives a new flavor. You can also use plant-based meat for a veggie option.
Adding other veggies can make it unique. Try grated carrots or bell peppers. You can even add mushrooms for a rich taste. Just chop them small so they mix well.
Dietary Adjustments
If you need gluten-free options, use gluten-free breadcrumbs. They work just as well. You can also skip the breadcrumbs altogether and add more spinach instead.
For low-fat alternatives, choose ground turkey breast, like in this recipe. You can also use less cheese or swap feta for a low-fat version. This keeps the dish healthy without losing flavor.
Serving Suggestions
Pair your meatloaf with tasty sides. Roasted veggies or a light salad go great with it. You can also serve it with mashed potatoes for a classic touch.
For sauces, ketchup is a must, but you can get creative. Try a yogurt sauce with herbs or a spicy mustard. These dips add a fun twist to your meal.
Storage Info
How to Store Leftovers
To keep your spinach feta turkey meatloaf fresh, store it properly. Place the leftovers in an airtight container. Make sure to let it cool first. This helps prevent moisture buildup.
– Refrigeration Tips: Store in the fridge for up to 4 days. Keep it in the main compartment, not the door. This keeps it at a safe temperature.
– Freezing the Meatloaf: You can freeze this meatloaf to enjoy later. Wrap it tightly in plastic wrap. Then place it in a freezer bag. It will last for about 3 months in the freezer.
Reheating Instructions
When reheating, you want to keep it moist and tasty.
– Best Reheating Methods: Use an oven or a microwave. The oven keeps the texture nice. The microwave is quick and easy.
– Time and Temperature for Reheating: If using an oven, preheat to 350°F (175°C). Heat for about 20-25 minutes until warm. For the microwave, heat on medium for 2-3 minutes. Check to ensure it is hot throughout.
Shelf Life
Knowing how long your meatloaf lasts is key.
– How Long It Lasts in the Fridge: In the fridge, it stays good for about 4 days. This time can vary based on storage.
– Best Practices for Longer Storage: To keep it fresh longer, slice it before storing. This helps cool it faster. Always use airtight containers for best results.
FAQs
Common Questions
Can I make this meatloaf ahead of time?
Yes, you can make this meatloaf ahead of time. Just prepare it, shape it, and cover it well. You can store it in the fridge for up to 24 hours before baking. This saves time on busy days.
How do I know when the meatloaf is done?
The best way to check is with a meat thermometer. The meatloaf should reach an internal temperature of 165°F (74°C). You can also check if the meatloaf is firm to the touch and the juices run clear when you cut into it.
Nutritional Information
Caloric content per serving
Each serving of this meatloaf has about 250 calories. This can vary based on the exact ingredients you use.
Nutritional benefits of ingredients
– Ground turkey: A lean protein that helps build muscle.
– Spinach: Packed with vitamins A and C, plus iron and fiber.
– Feta cheese: Adds flavor and some calcium with fewer calories than many other cheeses.
– Whole wheat breadcrumbs: Provide fiber, which is good for digestion.
Substitutions
Can I use other cheeses?
Yes! You can use mozzarella or goat cheese if you prefer. Both will add a different flavor but still keep it creamy.
What can I substitute for breadcrumbs?
You can use oats, crushed crackers, or even almond flour. These options keep the meatloaf moist and hold it together well.
In this post, I shared a simple meatloaf recipe using ground turkey, spinach, and feta. We went through the key steps from preparation to baking, ensuring great texture and flavor. I also offered tips for storage and reheating. Remember, variations and substitutions allow for creativity while cooking. Enjoying this dish can be easier than you think with the right guidance. Try it out and make it your own!


. To start, grab a large mixing bowl. Open the can of black beans, rinse, and drain them. Use a fork or potato masher to mash the beans. Aim for a mostly smooth texture but leave some chunks for bite. Next, add the cooked quinoa, breadcrumbs, and chopped red onion. Toss in the finely chopped bell pepper, minced garlic, and spices: chili powder, cumin, smoked paprika, salt, and pepper. Finally, squeeze in the lime juice. Mix everything until it feels well combined. If the mixture is too wet, sprinkle in more breadcrumbs until it can hold its shape. Once your mixture is ready, divide it into four equal parts. Shape each part into a patty that is about one inch thick. Heat olive oil in a non-stick skillet over medium heat. When the oil is hot, carefully place the patties in the skillet. Cook each side for about 4-5 minutes. Look for a golden brown color and ensure they are heated through. This step gives the burgers a nice crispy edge. Now it's time to serve your spicy black bean burgers! Place each patty on a hamburger bun. Top with your favorite ingredients, like avocado slices, lettuce, tomato, and spicy mayo. For a beautiful plate, pair the burgers with sweet potato fries or a mixed greens salad. The colors will look great together and make your meal even more appetizing. For the full recipe, check the details above. To get the best texture, mash your black beans well. Leave some chunks for that hearty bite. Add cooked quinoa to bind everything together. Use breadcrumbs or oat flour for a firmer patty. If the mix feels too wet, just add more breadcrumbs. This helps the burgers hold their shape. Want more heat? Try adding chopped jalapeños or a dash of cayenne pepper. You can also mix in some hot sauce or sriracha for an extra kick. Don’t forget to taste as you go! Adjust the spices until you get the flavor you want. Fresh herbs like cilantro can brighten up the taste too. Store cooked burgers in an airtight container. They will stay fresh for about three days in the fridge. To reheat, use the skillet on medium heat. Cook for about three minutes on each side. You can also microwave them for a quicker option; just cover them to keep moisture. If you want longer storage, freeze the uncooked patties. They’ll last up to three months in the freezer. Enjoy them anytime with the full recipe! {{image_2}} You can swap black beans for other beans. Chickpeas or kidney beans work well. Each bean brings a unique flavor and texture. For example, chickpeas add a nutty taste. Kidney beans give a softer bite. Just mash them like you do with black beans. Follow the same recipe steps for great results. Want more nutrition? Add grains or veggies to your burger mix. Cooked brown rice or farro can boost fiber. You can also mix in grated carrots or zucchini. These add moisture and flavor. Just remember to squeeze out excess water from veggies. This keeps your burger from getting too wet. Experimenting with spices can change your burger game. Try adding smoked chipotle for heat. Or mix in fresh herbs like cilantro or parsley. For a Mediterranean twist, add oregano and feta cheese. These spices and herbs change the flavor and make it exciting. Don't be afraid to get creative with what you have! For the full recipe, check out the detailed steps above. To keep your cooked spicy black bean burgers fresh, let them cool first. Place them in an airtight container. Store them in the fridge for up to three days. This helps maintain their flavor and texture. Freezing your burgers is a great option for meal prep. After they cool, wrap each burger in plastic wrap. Then, place them in a freezer-safe bag. They can last up to three months in the freezer. When you’re ready to eat, just thaw them in the fridge overnight. Use glass or BPA-free plastic containers for best results. These containers seal tightly and prevent air from entering. This keeps your burgers from drying out. If you’re freezing, look for heavy-duty freezer bags. They help protect against freezer burn. To make your Spicy Black Bean Burgers stick, you need the right balance. Start by mashing the black beans well. Leave some chunks for texture. Mix in breadcrumbs or oat flour. This helps hold the burgers together. If the mix feels too wet, add more breadcrumbs. You want a moldable consistency. This simple trick ensures your burgers stay intact while cooking. You can serve many tasty sides with Spicy Black Bean Burgers. Here are some great options: - Sweet potato fries - Mixed greens salad - Coleslaw - Grilled vegetables - Corn on the cob These sides add color and flavor to your meal. They also complement the burgers well. Feel free to mix and match to find what you like best! Yes, you can bake black bean burgers! Baking is a healthier option. Preheat your oven to 375°F (190°C). Line a baking sheet with parchment paper. Place the shaped patties on it. Bake for about 20-25 minutes. Flip them halfway for even cooking. You’ll still get a nice texture without frying. This method works well and keeps the burgers light! To sum up, we explored how to make tasty spicy black bean burgers. We looked at key ingredients, cooking steps, and tips for the perfect texture. You can try fun variations and learn how to store leftovers. These burgers are easy to tweak for your tastes. They are delicious and healthy. Enjoy making them your own, and share with friends!](https://dailydishly.com/wp-content/uploads/2025/06/bb742c5e-0c76-419c-af3f-f1da08f0abd3-768x768.webp)


![- 4 salmon fillets (about 6 oz each) - 4 tablespoons unsalted butter, melted - 4 cloves garlic, minced - 2 lemons (1 sliced into rounds, 1 juiced) - 1 teaspoon dried oregano The main ingredients for this dish are simple yet flavorful. Salmon fillets are the star. They are rich in omega-3 fatty acids and taste great. The unsalted butter adds creaminess, while garlic gives a punch of flavor. Lemons add freshness and brightness. Dried oregano rounds it out with a hint of earthiness. - 1 cup asparagus, trimmed and cut into 2-inch pieces (optional) - Fresh parsley, chopped (for garnish) - Salt and pepper Feel free to add asparagus for a veggie boost. It adds nice crunch and color. Fresh parsley makes a lovely garnish, giving your dish a pop of green. Don't forget salt and pepper to enhance the taste! - Aluminum foil - Baking sheet - Mixing bowl You will need basic tools to make this recipe easy. Aluminum foil helps with cooking and clean-up. A baking sheet supports the foil packs in the oven. A mixing bowl is great for blending your garlic butter mixture. For the full recipe, you can check [Full Recipe]. 1. Preheating the oven Start by preheating your oven to 400°F (200°C). This ensures your salmon cooks evenly. 2. Preparing aluminum foil Tear off 4 pieces of aluminum foil, each about 12 inches long. This will hold your salmon and veggies. 1. Mixing ingredients in a bowl In a small bowl, combine 4 tablespoons of melted butter, 4 minced garlic cloves, the juice of 1 lemon, and 1 teaspoon of dried oregano. Add salt and pepper to taste. Mix well to blend all the flavors. 2. Drizzling over salmon Take your garlic butter mixture and drizzle it generously over each salmon fillet. This adds rich flavor and moisture. 1. Arranging salmon and asparagus Place a salmon fillet in the center of each foil piece. If you’re using asparagus, divide it evenly around the salmon. This adds great crunch and nutrition. 2. Sealing the packets Fold the sides of the foil over the salmon and asparagus, sealing tightly to create a packet. Ensure no steam can escape during cooking. 1. Baking time and temperature Place the foil packets on a baking sheet. Bake in the preheated oven for 15-20 minutes. This allows the salmon to cook through. 2. Checking for doneness After baking, check if the salmon flakes easily with a fork. If it does, it’s ready to eat. Open the foil packs carefully, as steam will escape. This method makes for a simple and tasty meal. For the full recipe, don’t forget to check out the details! To get the best flavor, season your salmon well. Use salt and pepper generously. The garlic butter mixture adds great taste too. Mix it right before you cook. This keeps the flavors fresh. Letting salmon sit with the mixture for a few minutes helps absorb the flavors. Timing is key for perfect salmon. You want it flaky and moist. Cook for 15-20 minutes in a preheated oven. Check it at 15 minutes. If it flakes easily with a fork, it's ready. Overcooking can make it dry, so watch closely. Oven baking is the easiest way to cook foil packs. It gives even heat and cooks well. Just make sure to preheat your oven. You can also grill the foil packs for a smoky taste. Just place them on a medium grill for about the same time. Flip them halfway for even cooking. If you want another method, try cooking them on the stovetop. Place the foil packs in a large skillet with a lid. Cook on medium heat for about 15 minutes. Serve your garlic butter lemon salmon with a side of rice or quinoa. These add a nice base to soak up the flavors. You can also serve with a fresh salad for a light meal. For presentation, keep it simple. Open the foil packs carefully on plates. Garnish with chopped parsley for a pop of color. Slices of lemon on the side look great too. For the full recipe, check out the details above. {{image_2}} You can change the flavors in these foil packs easily. Try adding fresh herbs like thyme or dill for a new twist. You can also sprinkle in spices like paprika or chili powder for some heat. For a touch of sweetness, consider a drizzle of honey or maple syrup. Using different veggies can also add flavor. Try bell peppers, zucchini, or cherry tomatoes. These vegetables cook well with the salmon. Toss them in the garlic butter mix for extra taste. If you need gluten-free options, this recipe is already safe. All the main ingredients are gluten-free. Just make sure your butter is pure and check labels on any extras. Want a dairy-free version? You can swap the butter for olive oil or a dairy-free spread. The flavor will still shine through, and you'll keep it light. Not a fan of salmon? You can easily substitute it with other fish like trout or tilapia. These fish cook similarly and take on the garlic butter flavor well. You can also use chicken or pork if you prefer. Just make sure to adjust the cooking time. Chicken and pork need a longer time to cook through. Keep an eye on them to ensure they're done. For the full recipe, check out the complete guide on Garlic Butter Lemon Salmon Foil Packs. To keep your garlic butter lemon salmon foil packs fresh, refrigerate them right away. Place the foil packs in a shallow dish to catch any juices. Cover the dish with plastic wrap or a lid. This will keep the salmon moist for up to three days. Always let the packs cool before wrapping them. When you’re ready to enjoy your leftovers, reheating is simple. The best method is to use an oven. Preheat it to 350°F (175°C). Place the foil packs on a baking sheet and heat for about 10 minutes. You can also microwave the salmon. Use a microwave-safe dish and cover it. Heat it in 30-second bursts until warm. Make sure the salmon reaches 145°F (63°C) for safety. If you want to save salmon for later, freezing works well. Wrap each foil pack tightly in plastic wrap and then in aluminum foil. This helps prevent freezer burn. You can freeze them for up to three months. To thaw, move the packs to the fridge overnight. Once thawed, re-cook them in the oven at 350°F (175°C) until hot. This keeps the flavor and texture just right. Enjoy your garlic butter lemon salmon foil packs whenever you like! For the full recipe, check [Full Recipe]. Yes, you can use frozen salmon. Just make sure to thaw it first. Place it in the fridge overnight. If you’re short on time, you can also run it under cold water for about 30 minutes. Thawed salmon cooks more evenly. This will help you get that perfect flake when done. Salmon is done when it flakes easily with a fork. It should look opaque and firm. You can also use a food thermometer. Aim for an internal temp of 145°F (63°C). If you see white juice, called albumin, it’s a good sign it’s cooking well. Don’t worry; this is normal! Absolutely! Grilling adds a fun smoky flavor. Preheat your grill to medium heat. Place the foil packs directly on the grill grates. Cook for about 15-20 minutes, just like in the oven. Keep an eye on them to avoid burning. Enjoy that delicious taste! For the full recipe, check the earlier section. Garlic butter lemon salmon foil packs are simple and tasty. We explored key ingredients like salmon, butter, and garlic. You learned how to prepare, cook, and even store leftovers. This dish is flexible, allowing you to swap in new flavors or proteins. Try grilling for a different taste. Remember, cooking should be fun and creative! Enjoy making your delicious meals with confidence.](https://dailydishly.com/wp-content/uploads/2025/07/636e4153-d701-4cda-a9a1-5094e2b11f0e-768x768.webp)