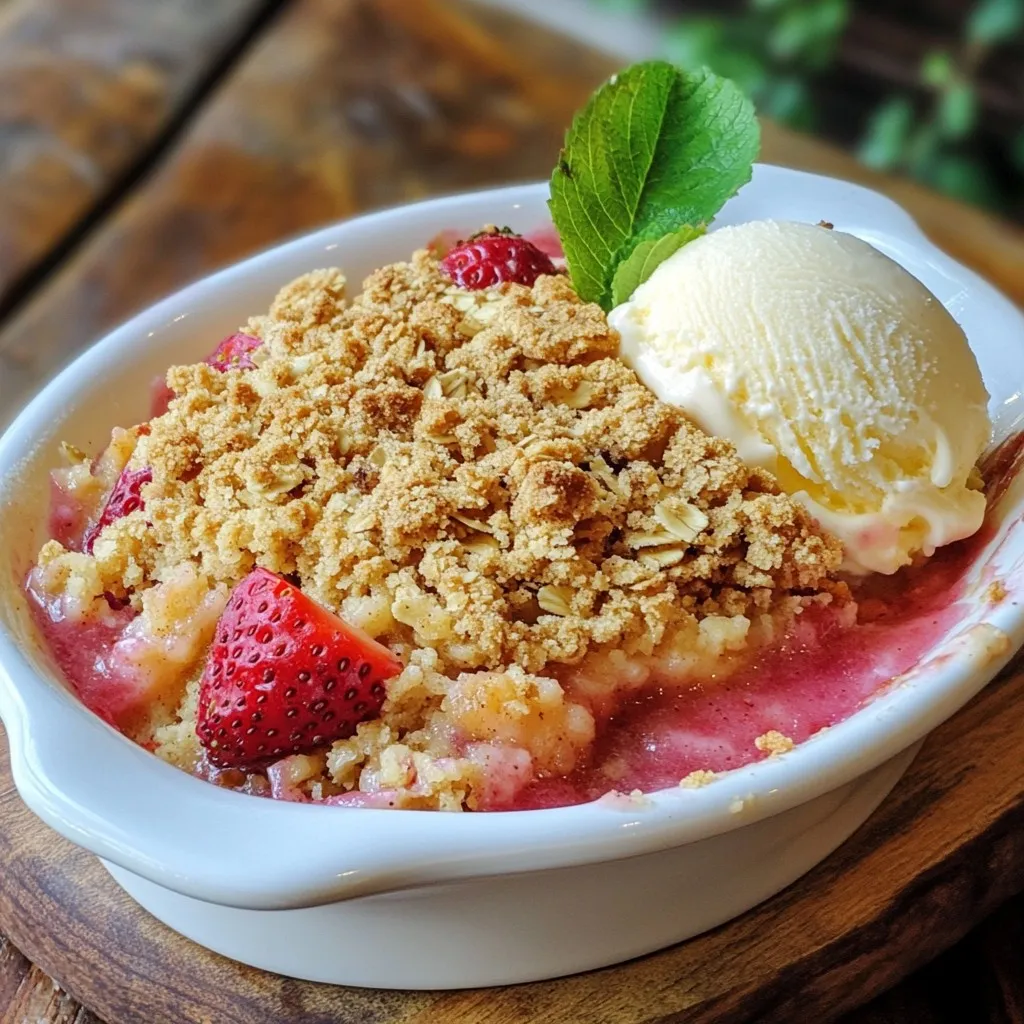
Are you ready to indulge in a simple yet delightful treat? My Strawberry Lemon Crumble is just the ticket! Bursting with juicy strawberries and zesty lemon, this dessert is easy to make and even easier to love. With a crisp topping that balances sweet and tart, it’s perfect for any occasion. Let me guide you through the fresh ingredients and simple steps to create a dessert that will impress everyone at your table.
Why I Love This Recipe
- Fresh and Fruity: This crumble highlights the natural sweetness of strawberries, making it a delightful summer dessert.
- Easy to Make: With simple ingredients and straightforward steps, this recipe is perfect for bakers of all levels.
- Perfectly Tart: The addition of lemon juice and zest adds a refreshing tang that balances the sweetness of the strawberries.
- Versatile Serving Options: Pair it with vanilla ice cream or whipped cream for a delicious contrast that elevates the dish.
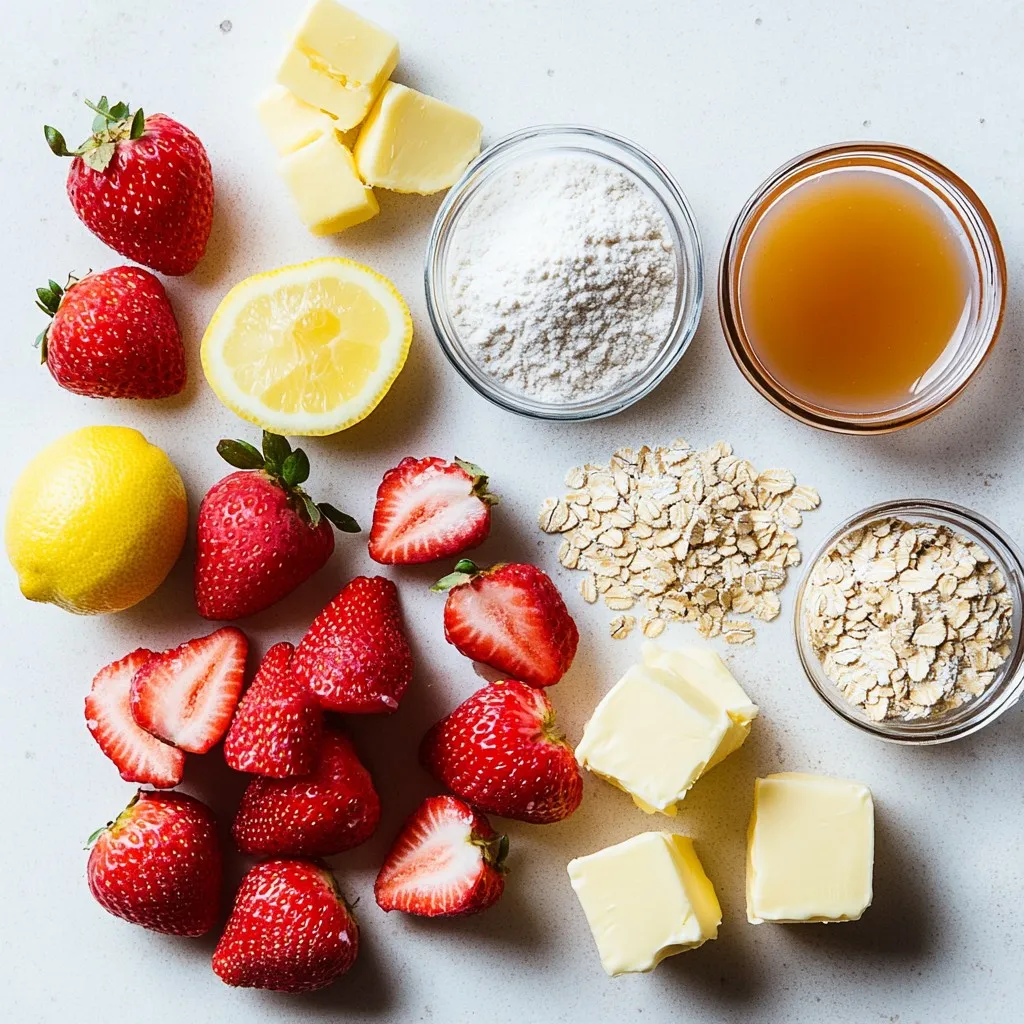
Ingredients
Fresh Ingredients
– 4 cups strawberries, hulled and sliced
– Juice and zest of 1 lemon
Baking Ingredients
– 1 cup all-purpose flour
– 3/4 cup rolled oats
– 1/2 cup brown sugar
Additional Ingredients
– 2 tablespoons granulated sugar
– 1/2 teaspoon ground cinnamon
– 1/4 teaspoon salt
– 1/2 cup cold unsalted butter, cubed
– Optional: Vanilla ice cream or whipped cream for serving
When I make strawberry lemon crumble, I love using fresh, ripe strawberries. Their sweet and juicy flavor makes the dessert shine. I also add lemon juice and zest to brighten the taste. This combo creates a wonderful balance between sweet and tart.
For the crumble, I mix flour, oats, and brown sugar. These ingredients give it a nice texture. The oats add a hearty crunch, while the brown sugar brings a deep sweetness. Ground cinnamon adds warmth and flavor, making it even better.
I use cold, unsalted butter in cubes. This helps the crumble stay crumbly. It forms little bits that bake up golden brown. Granulated sugar adds a bit more sweetness to the mixture.
Finally, I love serving this crumble warm with a scoop of vanilla ice cream or a dollop of whipped cream. The cold creaminess contrasts perfectly with the warm, fruity filling. A sprig of mint is a great way to finish the dish. It looks pretty and adds a hint of freshness.
Step-by-Step Instructions
Prepping the Strawberries
Start with 4 cups of fresh strawberries. First, hull them by removing the green tops. Then, slice the strawberries into smaller pieces. Place the sliced strawberries in a mixing bowl. Add 2 tablespoons of granulated sugar, along with the juice and zest of 1 lemon. Gently toss the strawberries to coat them well. Let them sit for about 10 minutes. This step helps the strawberries release their juices and enhances their flavor.
Making the Crumble Topping
In a separate bowl, mix together 1 cup of all-purpose flour, 3/4 cup of rolled oats, 1/2 cup of brown sugar, 1/2 teaspoon of ground cinnamon, and 1/4 teaspoon of salt. Stir until the dry ingredients are fully combined. Next, add 1/2 cup of cold unsalted butter, cubed, into the flour mixture. Use your fingertips or a pastry cutter to blend the butter. You want the mixture to look like coarse crumbs. This will create a nice, crunchy topping.
Assembling and Baking
Now it’s time to assemble your dessert. Pour the marinated strawberries into a greased 9×9 inch baking dish. Spread them evenly across the bottom. Sprinkle the crumble topping over the strawberries, ensuring it covers them well. Preheat your oven to 350°F (175°C) before baking. Place the dish in the oven and bake for 30-35 minutes. You want the topping to be golden brown and the strawberries to be bubbling. Once done, take it out and let it cool slightly before serving.
Tips & Tricks
Perfecting the Crumble
– Choosing the right butter: Use cold, unsalted butter. It helps create a flaky texture. Cut the butter into small cubes before mixing. This makes it easier to blend into the dry mix.
– Achieving the right crumble texture: You want a mix that looks like coarse crumbs. Don’t overwork it; this keeps it light. Combine the butter gently with the dry mix.
Serving Suggestions
– Serving warm with ice cream or whipped cream: This dessert shines when served warm. A scoop of vanilla ice cream melts into the warm crumble. Whipped cream adds a light touch and balances the fruit’s tartness.
– Garnishing ideas for presentation: Add a sprig of fresh mint on top. It adds color and a hint of freshness. You can also sprinkle some lemon zest for a bright look.
Flavor Pairing Suggestions
– Complementary flavors that enhance the dish: Try pairing it with fresh basil or mint. These herbs add a unique twist. A drizzle of honey can also enhance the sweetness. These flavors work well with the strawberries and lemon.
Pro Tips
- Use Fresh Strawberries: The best flavor comes from ripe, fresh strawberries. Look for bright red berries that are firm and fragrant for the sweetest taste.
- Chill the Butter: Ensure your butter is cold before cutting it into the flour mixture. This helps create a flaky topping that will crisp up nicely in the oven.
- Let It Rest: Allow the crumble to cool slightly before serving. This helps the juices thicken and makes it easier to scoop and serve.
- Experiment with Spices: Feel free to add a pinch of nutmeg or cardamom to the crumble for an extra layer of flavor that complements the strawberries and lemon.
Variations
Fruit Substitutions
You can swap strawberries for other berries. Blueberries, raspberries, or blackberries work well. Each fruit brings its own flavor. You might want to taste the fruit first. Adjust the sugar based on the sweetness of your fruit. If you’re using tart fruit, add a bit more sugar. For sweeter fruits, cut back on the sugar.
Dietary Adjustments
For a gluten-free option, use almond flour or a gluten-free blend instead of all-purpose flour. This keeps the crumble tasty and safe for those with gluten issues. You can also make it vegan by substituting butter. Use coconut oil or vegan butter in equal amounts. This keeps the richness without using animal products.
Flavor Experimentations
You can add spices to change the flavor. Try a pinch of nutmeg or cardamom for warmth. A splash of vanilla extract can also enhance the taste. For a zesty kick, add more lemon zest. This will make the dessert even brighter. Don’t be afraid to get creative with your flavors!
Storage Info
Refrigeration
To keep your strawberry lemon crumble fresh, store it in an airtight container. Make sure it cools down before sealing. This helps prevent moisture, which can make the topping soggy. In the fridge, it stays good for about 3 to 5 days. Always check for freshness before serving. If you see any signs of spoilage, it’s best to toss it.
Freezing Instructions
You can freeze strawberry lemon crumble for later enjoyment. First, let it cool completely. Then, wrap it tightly in plastic wrap or foil. Place the wrapped crumble in a freezer-safe container. It can last up to 3 months in the freezer. For reheating, let it thaw in the fridge overnight. Then, warm it in the oven at 350°F (175°C) for about 15 to 20 minutes. This brings back its crispiness and flavor. Enjoy your tasty treat just like fresh!
FAQs
How to make the crumble topping crispier?
To make your crumble topping crispier, use cold butter. Cut it into small cubes. This helps create a nice texture. Mix it into the dry ingredients until it looks like coarse crumbs. You can also add more oats for extra crunch. Bake until golden brown, around 30-35 minutes. If you want even more crisp, broil it for a minute at the end.
Can I use frozen strawberries?
Yes, you can use frozen strawberries. However, they will change the texture a bit. Frozen strawberries release more juice while baking. This can make the filling a little runnier. To help, drain any excess liquid before adding them to the dish. You might want to add a bit more sugar to balance the flavors.
What’s the best way to reheat leftovers?
To reheat leftovers, use the oven for the best results. Preheat it to 350°F (175°C). Place the crumble in an oven-safe dish. Heat for about 10-15 minutes until warm. You can also use a microwave, but it may make the topping soft. If you want to keep the texture, stick with the oven method.
In this article, we explored how to make a delicious strawberry lemon crumble. We covered the key ingredients, step-by-step instructions, and helpful tips. You learned about the importance of fresh fruit and the right baking techniques. Remember, you can adjust the recipe with different fruits or dietary options to fit your needs. Enjoy serving this dessert warm, especially with ice cream. Happy bakin