Strawberry Pretzel Salad Flavorful with a Crunchy Twist

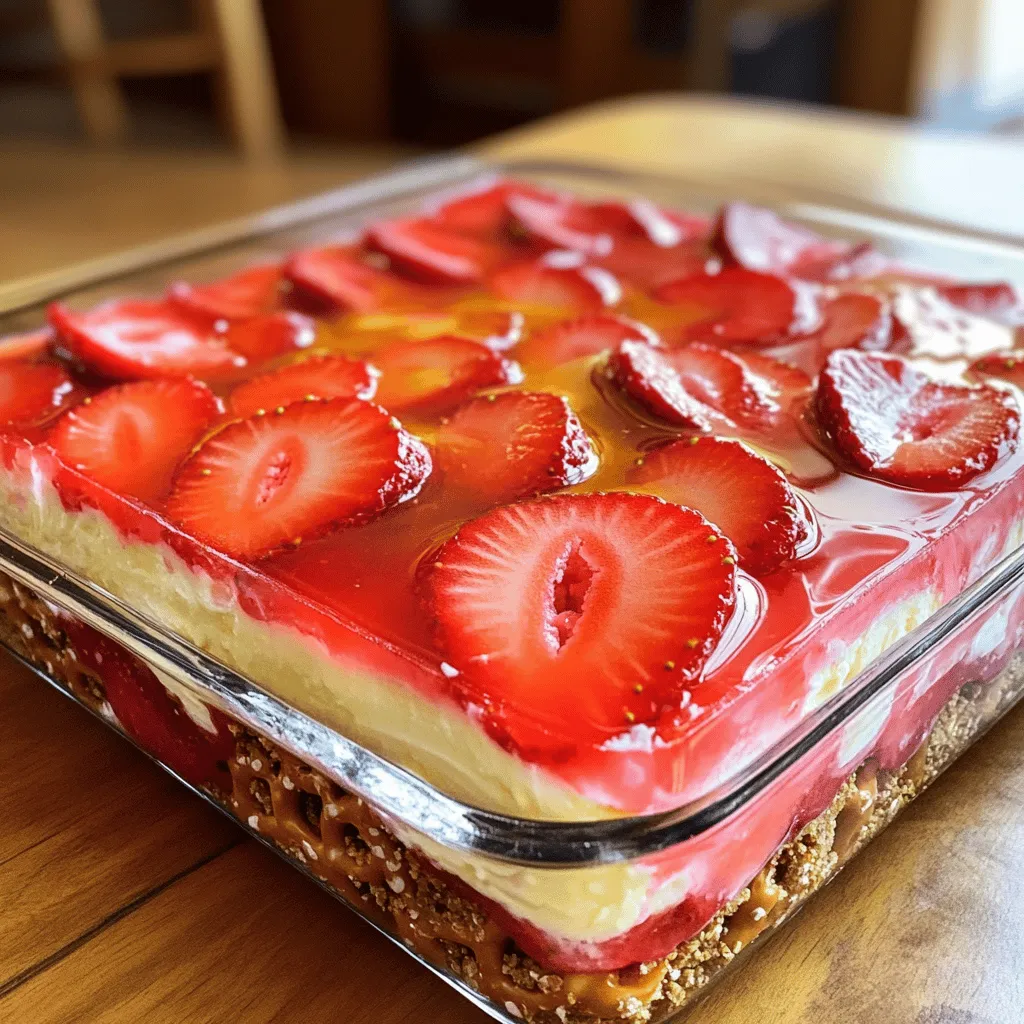
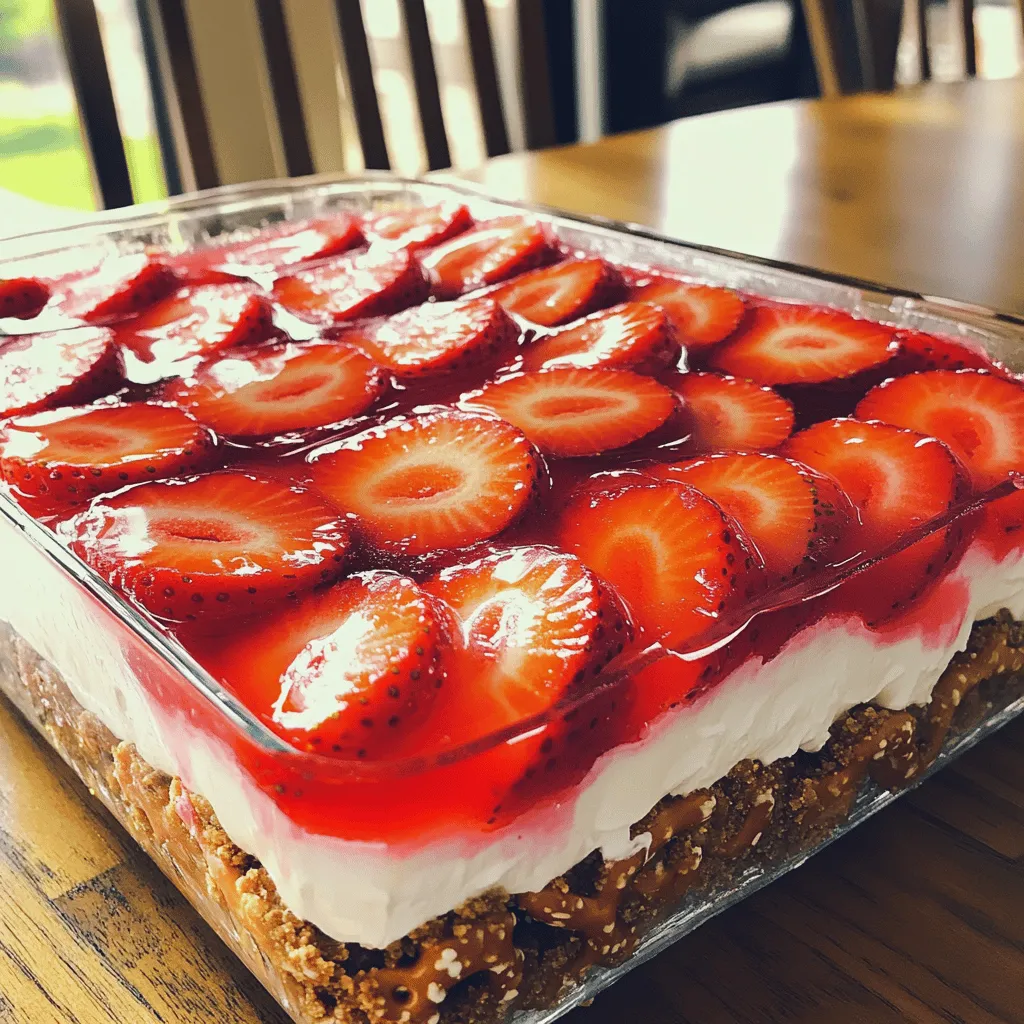
Looking for a dessert that stands out? Strawberry Pretzel Salad delivers a tasty twist! With its crunchy pretzel base, creamy cheese layer, and vibrant strawberries, it’s a perfect blend of flavors. Join me as we explore how to create this delightful treat, along with tips and variations to make it your own. Get ready to impress your friends and family with this colorful and delicious dish!
Ingredients
Key Ingredients
– 2 cups crushed pretzels
– ¾ cup unsalted butter, melted
– ½ cup sugar (for the crust)
– 8 oz cream cheese, softened
– 1 cup powdered sugar
– 1 cup whipped topping (like Cool Whip)
– 2 cups fresh strawberries, sliced
– 1 cup strawberry gelatin powder
– 2 cups boiling water
– 1 cup cold water
The key to making this dish is the balance of sweet and salty. The crushed pretzels give a nice crunch. They mix perfectly with the creamy layer. This starts with unsalted butter and sugar. The buttery base holds everything together.
Cream cheese adds a rich flavor. Mixing it with powdered sugar makes it sweet and smooth. The whipped topping gives it a light, airy feel. Fresh strawberries bring a burst of flavor. They add natural sweetness that brightens the dish.
Strawberry gelatin powder is what makes this salad special. It gives a fun, jiggly layer on top. When you mix it with boiling water, it dissolves quickly. Adding cold water cools it down.
Optional Ingredients
– Additional fruit variations
– Flavor extracts (like vanilla)
– Whipped cream for garnish
You can also add other fruits. Blueberries or raspberries work well. They add new flavors and colors. Flavor extracts, like vanilla, can enhance the taste too. A dollop of whipped cream on top makes it even more fun.Enjoy the mix of flavors and textures!
Step-by-Step Instructions
Preparing the Crust
To start, preheat your oven to 350°F (175°C). This step gets your crust nice and crisp. In a medium bowl, mix together 2 cups of crushed pretzels, ¾ cup of melted unsalted butter, and ½ cup of sugar. Make sure everything combines well. Next, press this mixture firmly into the bottom of a greased 9×13 inch baking dish. Bake it for 10 minutes. After that, take it out and let it cool completely.
Making the Cream Cheese Layer
Now, grab a large bowl. Beat together 8 oz of softened cream cheese and 1 cup of powdered sugar. You want it to be smooth and creamy. Once mixed, gently fold in 1 cup of whipped topping until it’s fully combined. Spread this creamy layer over the cooled pretzel crust. Ensure it has even coverage for the best taste.
Preparing the Strawberry Layer
For the strawberry layer, take a separate bowl. Dissolve 1 cup of strawberry gelatin powder in 2 cups of boiling water. Stir until it is fully dissolved. Then, add 1 cup of cold water and stir again. Don’t let it set just yet; you’ll need it for the next step.
Combining Layers
Now, let’s combine everything! Layer the sliced strawberries evenly over the cream cheese mixture in the baking dish. Pour the gelatin mixture over the strawberries. Make sure everything is covered well to create a beautiful, colorful dessert.
Chilling and Serving
Place your baking dish in the refrigerator. Let it chill for at least 4 hours, or until the gelatin is fully set. When it’s ready, cut it into squares. Serve it chilled, and enjoy the sweet and salty mix of flavors!
Tips & Tricks
Perfecting the Crust
To get a great pretzel crust, pack it down firmly in the dish. Use a flat-bottomed glass or your hands to press it down. This helps it hold together well. To avoid sogginess, let the crust cool completely before adding the cream cheese layer. This step is key to keeping it crispy.
Cream Cheese Layer Tips
For a smooth cream cheese layer, make sure your cream cheese is softened. Cold cream cheese makes lumps. Beat it with the powdered sugar until it’s creamy. When you fold in the whipped topping, do so gently. This keeps it light and fluffy.
Additional Flavor Tips
Don’t be afraid to play with flavors! You can try other fruits like blueberries or raspberries. They add a new twist to the dish. For garnishing, fresh mint leaves or a drizzle of chocolate can make it pop. These small touches can elevate your Strawberry Pretzel Salad, making it even more delightful.

Variations
Fruity Variations
You can change the fruit in this dish to make it unique. Try using blueberries or raspberries instead of strawberries. These berries add a new taste and color. You can also use seasonal fruits like peaches or cherries. When you use fresh fruit, it brightens the dish and makes it more fun.
Healthier Alternatives
If you want a lighter version, swap the cream cheese for low-fat cream cheese. This option keeps the creamy taste while cutting calories. Also, consider using sugar substitutes for the crust. Options like stevia or monk fruit sweetener work well. These swaps help you enjoy this treat without the extra sugar.
A Twist on Flavor
For a fun twist, drizzle melted chocolate or caramel on top. This adds a rich flavor that pairs well with the fruity taste. You can also add nuts like pecans or walnuts for extra crunch. Chopped nuts not only taste great but also add a nice texture. Each of these variations makes the Strawberry Pretzel Salad your own. Try them out for a fresh take!
Storage Info
Refrigeration Guidelines
To keep your Strawberry Pretzel Salad fresh, store any leftovers in an airtight container. This helps keep it cool and prevents it from absorbing other flavors in the fridge. Make sure to place it in the fridge right after serving. This salad tastes best when chilled. If you want to enjoy all the flavors, try to eat it within three days.
Freezing Instructions
Can you freeze Strawberry Pretzel Salad? I do not recommend it. The texture of the pretzel crust changes when frozen. If you must freeze it, only freeze the crust. Wrap it well in plastic wrap, then place it in a freezer-safe bag. To thaw, place it in the fridge for a few hours. Once it’s thawed, top it with the cream cheese layer and fruit before serving. Avoid freezing the cream cheese and gelatin layers, as they may not hold up well.
FAQs
How long does Strawberry Pretzel Salad last in the fridge?
Strawberry Pretzel Salad lasts about 3 to 5 days in the fridge. To keep it fresh, store it in an airtight container. This will help avoid excess moisture and keep the pretzel crust crisp.
Can I make Strawberry Pretzel Salad ahead of time?
Yes, you can make Strawberry Pretzel Salad a day or two ahead of your event. Just make sure to chill it in the fridge for at least 4 hours. This allows the layers to set well. It’s a great make-ahead dessert that saves time on busy days.
What can I substitute for whipped topping?
If you don’t have Cool Whip, you can use homemade whipped cream. Just whip heavy cream with a little sugar until soft peaks form. You can also use Greek yogurt for a healthier option. Both will work well in the cream cheese layer.
What is the best way to serve it?
To serve Strawberry Pretzel Salad, cut it into squares and place on a nice platter. It looks great for gatherings. I like to add a few fresh strawberries on top for color. This dessert is always a hit at parties and family meals!
This blog post covered how to make Strawberry Pretzel Salad, from the crust to the layers. We looked at key ingredients like pretzels, cream cheese, and fresh strawberries. You learned about optional ingredients and variations to suit your taste. I shared tips for perfecting each layer and how to store leftovers.
Now you can make this tasty treat with confidence. Enjoy your dessert, and don’t forget to share it with friends!


 - [Try these unique variations on classic cookie recipes](#) - [Explore more about baking with matcha in this article](#) You learned how to make delicious matcha cookies from scratch. We covered all the key ingredients and steps. Remember to follow the tips for better baking. You can also try different flavors and shapes. Store your cookies properly to keep them fresh. With these skills, you can impress friends and family. Enjoy the process of baking and sharing your treats!](https://dailydishly.com/wp-content/uploads/2025/10/4f6c0078-ad7e-405f-ae22-b14a1484e544_U1-768x768.webp)


. To make blueberry almond overnight oats, start by gathering all your ingredients. This recipe takes just 10 minutes to prep. You can make two servings, perfect for a quick breakfast. In a medium bowl or a mason jar, add these base ingredients: - 1 cup rolled oats - 1 cup almond milk (or any plant-based milk) - ½ cup Greek yogurt (or plant-based yogurt) - 2 tablespoons honey or maple syrup - 1 teaspoon vanilla extract - ½ teaspoon cinnamon - A pinch of salt Mix all these items well. Make sure they blend together smoothly. This mix is the heart of your oats. Now, gently fold in 1 cup of blueberries. If you want, save a few for topping later. Then, add ¼ cup of sliced almonds for crunch. Stir carefully so you don’t mash the blueberries. Cover the bowl or seal the jar, then put it in the fridge. Let it chill overnight. This helps the oats soak up the flavors. The next morning, stir the oats. If they are too thick, add a splash of almond milk. Top with the reserved blueberries and sliced almonds for extra flavor and crunch. You can find the full recipe for this delicious dish above. Enjoy your tasty and nutritious breakfast! To make great overnight oats, follow these steps: - Use rolled oats. They soak up liquid well. - Choose a container you can seal tight. A mason jar works well. - Mix all the base ingredients first. This helps flavors blend. - Refrigerate for at least six hours. This allows the oats to soften. - Stir before serving to combine everything. Add more milk if needed. Personalize your overnight oats easily. Here are some ideas: - Swap almond milk for coconut or oat milk. - Use different fruits like strawberries or bananas. - Add seeds like chia or flax for extra nutrition. - Try nut butters for creaminess and flavor. - Experiment with spices like nutmeg or cardamom. Let’s look at the benefits of the main ingredients: - Rolled oats: They provide fiber, which is good for digestion. - Almond milk: It is low in calories and rich in vitamins. - Greek yogurt: This adds protein and probiotics for gut health. - Blueberries: They are full of antioxidants and vitamins. - Almonds: They offer healthy fats and help keep you full. Each ingredient brings something special to your meal. Enjoy the great taste while knowing you are eating well. For the full recipe, check out the details above. {{image_2}} You can change the taste of your Blueberry Almond Overnight Oats easily. Here are some ideas: - Mixed Berries: Swap blueberries for strawberries, raspberries, or blackberries. - Nut Butters: Stir in a spoon of almond or peanut butter for creaminess. - Chocolate: Add cocoa powder or chocolate chips for a fun twist. - Coconut: Sprinkle in some shredded coconut for a tropical flair. These variations will make your oats more exciting and tasty. If you have special dietary needs, you can still enjoy this recipe. Here are some substitutes: - Dairy-free: Use almond milk and plant-based yogurt for a vegan option. - Sugar-free: Skip the honey or maple syrup. Use ripe bananas for sweetness. - Gluten-free: Make sure you choose certified gluten-free rolled oats. These changes let everyone enjoy this dish. Want to make more servings? Scaling the recipe is simple. Just multiply each ingredient: - For 4 servings, use 2 cups of oats and 2 cups of almond milk. - For 6 servings, use 3 cups of oats and 3 cups of almond milk. You can prepare these oats in a large bowl or several jars. This way, you have breakfast ready for days! For the full recipe, check out the Berry Delights: Blueberry Almond Overnight Oats section. To keep your blueberry almond overnight oats fresh, store them in an airtight container. A mason jar works great because it's easy to seal. Make sure the oats are covered well with the lid. This keeps out air and moisture. If you make a big batch, divide them into individual servings. This way, you grab just what you need. When stored properly in the fridge, blueberry almond overnight oats can last for up to five days. This means you can meal prep for the week! Just remember to check for any changes in smell or texture before eating. If it looks or smells off, it’s best to toss it. You can also freeze your oats for longer storage. To do this, place the oats in a freezer-safe container. Leave some space at the top, as the oats will expand when frozen. They will stay good for up to three months. When you’re ready to eat them, thaw in the fridge overnight. You can warm them up or enjoy them cold. This is a great option for quick breakfasts! For the full recipe, check out the details above. Yes, you can! Other fruits work well too. Try strawberries, raspberries, or bananas. Each fruit adds its unique flavor and texture. Just make sure to adjust the amount based on the fruit’s sweetness. For example, use less honey if your fruit is sweet. Overnight oats stay fresh for up to five days. Store them in a sealed jar or container. This makes them great for meal prep. Just keep an eye on the texture. If they get too thick, add a splash of almond milk before serving. No, sweeteners are not a must. The oats and fruit add natural sweetness. If you prefer less sugar, skip the honey or maple syrup. You can also use ripe bananas or applesauce for sweetness. Adjust it to fit your taste! Blueberry almond overnight oats are simple to make and delicious. We covered the key and optional ingredients, plus tips on choosing the best. The step-by-step instructions guide you from mixing to adding fruit. I shared tips for customizing and highlighted the nutritional benefits of oats. Don't forget the variations you can try to suit your taste. Lastly, we discussed how to store your oats safely. With these insights, you're ready to enjoy a healthy breakfast that keeps you full and satisfied.](https://dailydishly.com/wp-content/uploads/2025/07/39185b14-c6b2-4e99-b0b5-ab17b9785ad3-768x768.webp)
. You learned about tasty no-bake oatmeal cookie bars. We covered the key ingredients and step-by-step instructions for making them. You now know tips for perfect texture and options for variations and storage. These bars are easy to customize. They are healthy snacks that you can enjoy anytime. Keep exploring your flavors and share these bars with friends and family. Enjoy your cooking adventure!](https://dailydishly.com/wp-content/uploads/2025/07/f09ca3d9-767d-43d9-b263-9e4a23fd83a9-768x768.webp)
![- 2 ripe avocados, peeled and pitted - 1/2 cup unsweetened cocoa powder - 1/4 cup maple syrup (or honey) - 1/4 cup almond milk (or any milk of your choice) - 1 teaspoon vanilla extract - A pinch of sea salt - Dark chocolate shavings or berries for garnish (optional) You can swap maple syrup for agave syrup or date syrup. These options give similar sweetness. If you want a sugar-free version, try using a sugar substitute. For non-dairy milk, coconut milk or soy milk work well. Each milk adds a unique flavor and texture. The health benefits of each ingredient are notable. Avocados provide healthy fats and fiber. Cocoa powder is rich in antioxidants. Maple syrup and honey add natural sweetness and vitamins. Almond milk is low in calories and dairy-free. This dessert is not just tasty; it’s also good for you! For those who want to add a twist, consider adding a dash of espresso powder. This can enhance the chocolate flavor. Try using different toppings like crushed nuts for added crunch. Each ingredient brings a special touch to the mousse. You can learn more about these ideas in the [Full Recipe]. To make your chocolate avocado mousse, start by gathering your ingredients. You will need ripe avocados, cocoa powder, maple syrup, almond milk, vanilla extract, and a pinch of sea salt. 1. In a food processor, add the avocados and cocoa powder. 2. Pour in the maple syrup and almond milk. 3. Add the vanilla extract and sea salt. 4. Blend the mixture on high until it is creamy and smooth. 5. If you notice lumps, scrape down the sides of the bowl. This ensures even blending. Achieving a creamy texture is crucial for this mousse. The smoother it is, the better it will taste. If it feels too thick, add a little more almond milk. Blend again until smooth. After blending, transfer the mousse into serving cups or bowls. For the best flavor, chill it in the refrigerator for at least 30 minutes. This helps the mousse firm up and allows the flavors to meld beautifully. When serving, choose elegant glass cups to showcase the rich, dark color of the mousse. You can garnish with dark chocolate shavings or fresh berries. A sprig of mint adds a nice touch too. This will make your dessert look fancy and appetizing. For the full recipe, refer to the earlier section. Enjoy your simple and satisfying treat! How to know if your mousse is ready You want your mousse to be smooth and creamy. It should not feel grainy or chunky. Blend until it feels silky. If you see any lumps, keep blending. The mousse should easily fall off a spoon. Adjusting sweetness post-blending After blending, taste your mousse. If you want it sweeter, add more maple syrup or honey. Blend again for a few seconds. Always taste before adding more. This way, you keep control over the sweetness. Common mistakes to avoid 1. Don't rush the blending. Take your time for a smooth texture. 2. Avoid using unripe avocados. They will not blend well and taste bitter. 3. Don’t skip chilling. It helps the mousse firm up and flavors blend. Recommended kitchen tools for easy preparation You’ll need a good food processor or blender. A spatula helps scrape down the sides. Use measuring cups for accurate amounts. Bowls for serving are also nice. Food processor vs. blender: which to use? Both work well, but I prefer a food processor. It blends better for this creamy dessert. A blender may work too, but watch for lumps. If you have both, try the food processor first. {{image_2}} If you want to tweak this chocolate avocado mousse, you have great options. - Vegan Chocolate Avocado Mousse: To make it vegan, swap maple syrup for agave syrup. Use plant-based milk, like coconut or soy. This keeps the mousse creamy and rich without any animal products. - Keto-friendly adaptation: For a keto version, use erythritol instead of maple syrup. This keeps sugar low while still giving a sweet taste. Also, try using unsweetened coconut milk for a richer flavor. - Flavored variations: You can add fun flavors. Mix in a shot of espresso for coffee lovers. A few drops of peppermint extract can give a refreshing twist. Try orange zest for a zingy surprise. Serving this mousse can be just as fun as making it. - Pairing options: Fresh fruits like strawberries or raspberries pair well. Nuts like chopped almonds or walnuts add a nice crunch. You can also top it with coconut flakes for extra flavor. - Creative dessert ideas: Use the mousse as a filling in pastries or cakes. It can be a layer in a parfait with yogurt and granola. You can even spread it on toast for a decadent breakfast treat. Check out the Full Recipe for more details on how to make this delightful treat! To store leftovers, put the mousse in an airtight container. This keeps it fresh and prevents it from absorbing other smells. The mousse can last in the fridge for about 2 to 3 days. If you see any browning, just give it a quick stir before eating. You do not need to heat the mousse. This dessert is best served cold. If you want to use the mousse in other treats, try it in parfaits or as a cake filling. You can also spread it on toast or mix it into smoothies for a sweet boost. Enjoy being creative with this delicious treat! Can I use frozen avocados? Yes, you can use frozen avocados. Just thaw them before blending. Frozen avocados still give a creamy texture. What makes this dessert healthy? This dessert is healthy because it uses avocados. Avocados provide good fats, fiber, and vitamins. They replace heavy cream found in traditional mousse. How do I make this mousse sugar-free? To make this mousse sugar-free, use a sugar substitute. Try stevia or erythritol instead of maple syrup. Start with a small amount and adjust to taste. Why does my mousse taste too strong? If your mousse tastes too strong, it may have too much cocoa. Reduce the cocoa powder next time. You can also add more maple syrup to balance the flavor. What if my mousse didn't set properly? If your mousse didn't set, you might need more chill time. Refrigerate it longer to firm up. If it’s still too soft, add more cocoa powder next time. Can I make this dessert ahead of time? Yes, you can make this dessert ahead of time! Just store it in the fridge for up to three days. It tastes even better after resting. Caloric content per serving Each serving of this mousse has about 200 calories. This includes healthy fats and nutrients from the avocados. Health benefits of avocado in desserts Avocados add creaminess and nutrients. They are rich in heart-healthy fats. This makes your dessert filling and nutritious. How does this compare to traditional mousse? This avocado mousse has fewer calories than traditional mousse. Traditional mousse often uses cream and sugar. This recipe uses avocados for a healthier twist. This blog post shared how to make a rich and creamy chocolate avocado mousse. We explored the key ingredients, alternatives, and health benefits. You learned the steps to blend and chill for the right texture. I covered tips for consistency and variations to fit your diet. Lastly, we discussed storage and common questions. Enjoy creating this dessert that’s both tasty and good for you!](https://dailydishly.com/wp-content/uploads/2025/07/9a49dd29-ea84-48e8-b3ba-ec236128fd4d-768x768.webp)