Stuffed Mini Bell Peppers Flavorful and Easy Recipe
![- 12 mini bell peppers (assorted colors) - 1 cup cooked quinoa - 1 cup black beans, rinsed and drained - 1 cup corn (fresh, frozen, or canned) - 1/2 cup diced tomatoes (fresh or canned) - 1 cup shredded cheese (cheddar or pepper jack) The mini bell peppers are the stars here. Their sweet crunch makes a great bite. They come in many colors, adding fun to your dish. Quinoa adds protein and a nice texture. Black beans bring fiber and heartiness. Corn adds sweetness and color, while diced tomatoes add moisture and flavor. Finally, shredded cheese melts into a gooey topping that ties everything together. - 1 teaspoon cumin - 1 teaspoon smoked paprika - 1 teaspoon garlic powder - 1/2 teaspoon onion powder - Salt and pepper to taste Seasonings bring life to your dish. Cumin adds warmth and earthiness. Smoked paprika gives a touch of smokiness. Garlic powder adds depth, while onion powder enhances flavor. Salt and pepper balance everything out. This blend will make your stuffed mini bell peppers burst with flavor. - Fresh cilantro, chopped (for garnish) - 1 tablespoon olive oil Garnishes make your dish pretty and fresh. Fresh cilantro adds a pop of color and brightness. Olive oil adds richness and ties the flavors together. Together, they make your stuffed mini bell peppers look and taste amazing. You can find the full recipe [here]. 1. Preheat the oven to 375°F (190°C). This step gets your oven ready for baking. 2. Cut the tops off the mini bell peppers. Use a sharp knife for a clean cut. 3. Remove the seeds and any white parts inside the peppers. This helps reduce bitterness. 1. In a large mixing bowl, combine the cooked quinoa, black beans, corn, and diced tomatoes. 2. Add half a cup of shredded cheese to the mix. This adds creaminess and flavor. 3. Stir in the cumin, smoked paprika, garlic powder, onion powder, salt, and pepper. Mix well until everything is combined. 4. Drizzle one tablespoon of olive oil over the filling and stir again. This keeps it moist. 1. Carefully fill each mini bell pepper with the quinoa mixture. Press down gently to pack it in. 2. Arrange the stuffed peppers upright in a baking dish. If they tip over, use crumpled aluminum foil to help them stand. 3. Sprinkle the rest of the cheese on top of the stuffed peppers. This will melt into a tasty layer. 4. Cover the dish with aluminum foil. Bake for 20 minutes, then remove the foil. 5. Bake for an additional 10-15 minutes, until the peppers are tender and the cheese is bubbly and golden. 6. After baking, let them cool for a few minutes before garnishing with fresh cilantro. For the Full Recipe, refer to the ingredients and precise steps above. Enjoy! You can easily change this recipe. Try using ground turkey instead of black beans. It adds a nice flavor. For some heat, add chili powder or cayenne pepper. This can spice things up! If you want vegan options, skip the cheese and use tofu. For gluten-free, ensure you select gluten-free grains and beans. You have options for cooking. Baking is simple and gives a soft texture. You can also use an air fryer. Air frying makes them crispy and quick. If you want a smoky taste, grilling is great. Just watch the peppers so they don’t burn. Dips enhance the meal. Salsa and guacamole pair well with the stuffed peppers. You can serve them as appetizers or as a fun main dish. They are colorful and bright, making your table look good. For a complete meal, add a fresh salad on the side. You can find the full recipe above, so you have all the details you need. {{image_2}} You can make stuffed mini bell peppers in many tasty ways. For a Mexican twist, add taco seasoning to the filling. This adds spice and flavor. You can use ground meat or keep it vegetarian. For a Mediterranean style, mix in feta cheese and olives. This creates a salty and creamy taste. The tangy flavors work great with the sweet peppers. Both options are fun and easy to try. Feel free to play with the main ingredients. You can swap quinoa for rice if you prefer it. Rice adds a nice texture and flavor. If you want a change, use lentils instead of beans. Lentils cook fast and have a great taste. They also boost the protein in your dish. These swaps let you customize the recipe to your liking. Seasonal changes can inspire new stuffed pepper ideas. In summer, use fresh garden veggies like zucchini or corn. These add brightness and flavor. In winter, try heartier vegetables like mushrooms or kale. They give warmth and comfort to your meal. These seasonal changes keep things interesting and delicious. For the full recipe, check out the details above. After you enjoy your stuffed mini bell peppers, store the leftovers in the fridge. Place them in an airtight container. This keeps them fresh and tasty. If you have a lot, you can stack them, but make sure they are not too crowded. The best containers are glass or BPA-free plastic. They seal well and help keep the flavor. To freeze stuffed peppers, let them cool first. Then, wrap each pepper tightly in plastic wrap. After that, put them in a freezer-safe bag or container. This helps prevent freezer burn. When you want to eat them, take them out. Thaw them in the fridge overnight. You can reheat them in the oven or microwave. If using the oven, bake at 350°F (175°C) until warmed through. Stuffed mini bell peppers last about 3 to 5 days in the fridge. If frozen, they can last up to 3 months. For the best taste, eat them sooner rather than later. Always check for any signs of spoilage before eating. Keeping track of freshness helps you enjoy your meal at its best. Stuffed mini bell peppers are small, colorful peppers filled with a tasty mix. They are often stuffed with ingredients like quinoa, beans, corn, and cheese. After baking, they become soft and flavorful. The peppers add a nice crunch and sweetness. This dish is perfect as an appetizer or a main course. You can enjoy them warm or at room temperature. Yes, you can make stuffed mini bell peppers in advance. Prepare the filling and stuff the peppers. Then, cover and refrigerate them for up to a day. When ready to bake, take them out and let them sit for 15 minutes. This helps them cook evenly. You can also freeze them before baking. To do this, wrap them tightly and store them for up to three months. Thaw in the fridge overnight before baking. Stuffed mini bell peppers pair well with many sides. Here are a few tasty options: - A fresh green salad with vinaigrette - Guacamole and tortilla chips - Rice or quinoa pilaf - A light soup, like tomato or corn chowder - Sparkling water or a light white wine These sides complement the flavors of the stuffed peppers and make the meal more complete. You can tell stuffed mini bell peppers are done by checking a few signs. First, look for the peppers to be tender and slightly wrinkled. The cheese on top should be golden and bubbly. If you poke a pepper with a fork, it should feel soft but not mushy. Cooking time is usually 30 to 35 minutes at 375°F (190°C). If unsure, a food thermometer should read 165°F (74°C) inside the filling. Stuffed mini bell peppers are fun, tasty, and easy to make. We explored their main ingredients, seasonings, and garnishes. You learned how to prep, mix, and bake them perfectly. Plus, I shared great tips for customizing and serving your dish. Don’t forget about storing leftovers for later! Experiment with flavors and try different options. There’s so much you can do with this dish. Enjoy making stuffed peppers that please everyone at your table!](https://dailydishly.com/wp-content/uploads/2025/07/7be91d44-d02b-4978-8cdb-a2e2cd47e9c1.webp)
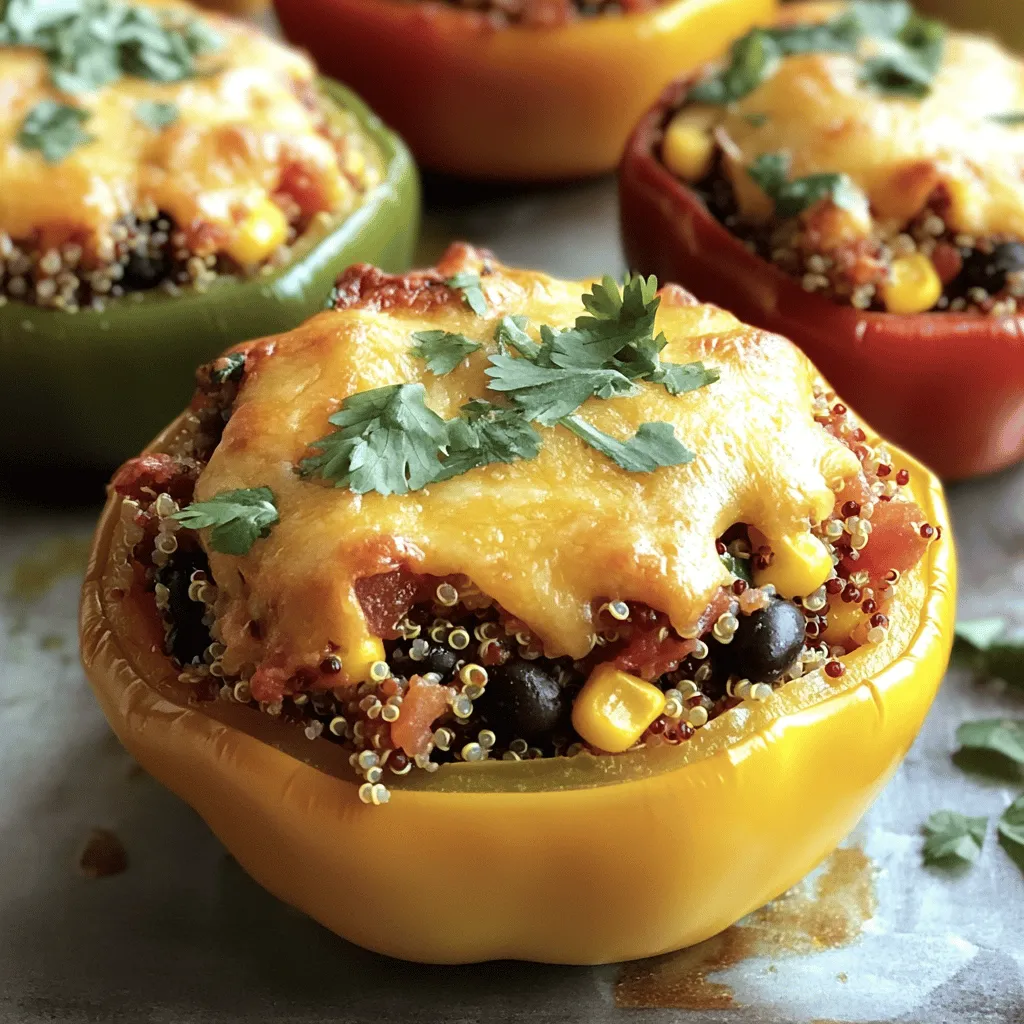
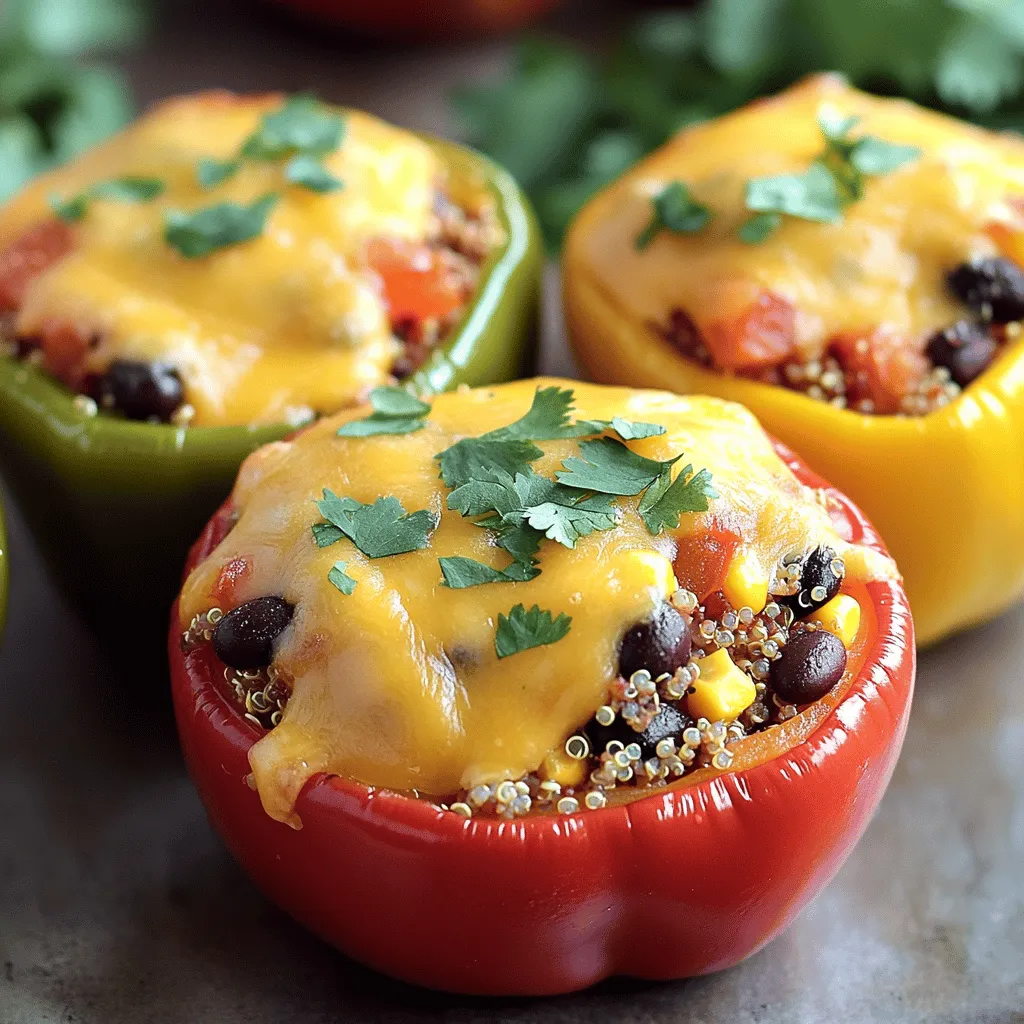
Looking for a quick and tasty dish that impresses? Stuffed mini bell peppers are your answer! With a mix of quinoa, black beans, cheese, and spices, they deliver bold flavor in each bite. In this post, I’ll guide you through my easy recipe, plus share tips on customizing and storing your yummy creations. Whether you’re after a fun appetizer or a filling main dish, you’ll love these vibrant bites!
Ingredients
Main Ingredients
– 12 mini bell peppers (assorted colors)
– 1 cup cooked quinoa
– 1 cup black beans, rinsed and drained
– 1 cup corn (fresh, frozen, or canned)
– 1/2 cup diced tomatoes (fresh or canned)
– 1 cup shredded cheese (cheddar or pepper jack)
The mini bell peppers are the stars here. Their sweet crunch makes a great bite. They come in many colors, adding fun to your dish. Quinoa adds protein and a nice texture. Black beans bring fiber and heartiness. Corn adds sweetness and color, while diced tomatoes add moisture and flavor. Finally, shredded cheese melts into a gooey topping that ties everything together.
Seasonings
– 1 teaspoon cumin
– 1 teaspoon smoked paprika
– 1 teaspoon garlic powder
– 1/2 teaspoon onion powder
– Salt and pepper to taste
Seasonings bring life to your dish. Cumin adds warmth and earthiness. Smoked paprika gives a touch of smokiness. Garlic powder adds depth, while onion powder enhances flavor. Salt and pepper balance everything out. This blend will make your stuffed mini bell peppers burst with flavor.
Garnishes
– Fresh cilantro, chopped (for garnish)
– 1 tablespoon olive oil
Garnishes make your dish pretty and fresh. Fresh cilantro adds a pop of color and brightness. Olive oil adds richness and ties the flavors together. Together, they make your stuffed mini bell peppers look and taste amazing.
Step-by-Step Instructions
Preparation of Peppers
1. Preheat the oven to 375°F (190°C). This step gets your oven ready for baking.
2. Cut the tops off the mini bell peppers. Use a sharp knife for a clean cut.
3. Remove the seeds and any white parts inside the peppers. This helps reduce bitterness.
Mixing the Filling
1. In a large mixing bowl, combine the cooked quinoa, black beans, corn, and diced tomatoes.
2. Add half a cup of shredded cheese to the mix. This adds creaminess and flavor.
3. Stir in the cumin, smoked paprika, garlic powder, onion powder, salt, and pepper. Mix well until everything is combined.
4. Drizzle one tablespoon of olive oil over the filling and stir again. This keeps it moist.
Baking the Stuffed Peppers
1. Carefully fill each mini bell pepper with the quinoa mixture. Press down gently to pack it in.
2. Arrange the stuffed peppers upright in a baking dish. If they tip over, use crumpled aluminum foil to help them stand.
3. Sprinkle the rest of the cheese on top of the stuffed peppers. This will melt into a tasty layer.
4. Cover the dish with aluminum foil. Bake for 20 minutes, then remove the foil.
5. Bake for an additional 10-15 minutes, until the peppers are tender and the cheese is bubbly and golden.
6. After baking, let them cool for a few minutes before garnishing with fresh cilantro.Enjoy!
Tips & Tricks
Customization Ideas
You can easily change this recipe. Try using ground turkey instead of black beans. It adds a nice flavor. For some heat, add chili powder or cayenne pepper. This can spice things up! If you want vegan options, skip the cheese and use tofu. For gluten-free, ensure you select gluten-free grains and beans.
Cooking Methods
You have options for cooking. Baking is simple and gives a soft texture. You can also use an air fryer. Air frying makes them crispy and quick. If you want a smoky taste, grilling is great. Just watch the peppers so they don’t burn.
Serving Suggestions
Dips enhance the meal. Salsa and guacamole pair well with the stuffed peppers. You can serve them as appetizers or as a fun main dish. They are colorful and bright, making your table look good. For a complete meal, add a fresh salad on the side.

Variations
Flavor Combinations
You can make stuffed mini bell peppers in many tasty ways. For a Mexican twist, add taco seasoning to the filling. This adds spice and flavor. You can use ground meat or keep it vegetarian.
For a Mediterranean style, mix in feta cheese and olives. This creates a salty and creamy taste. The tangy flavors work great with the sweet peppers. Both options are fun and easy to try.
Ingredient Swaps
Feel free to play with the main ingredients. You can swap quinoa for rice if you prefer it. Rice adds a nice texture and flavor.
If you want a change, use lentils instead of beans. Lentils cook fast and have a great taste. They also boost the protein in your dish. These swaps let you customize the recipe to your liking.
Seasonal Variations
Seasonal changes can inspire new stuffed pepper ideas. In summer, use fresh garden veggies like zucchini or corn. These add brightness and flavor.
In winter, try heartier vegetables like mushrooms or kale. They give warmth and comfort to your meal. These seasonal changes keep things interesting and delicious.
Storage Info
Leftover Storage
After you enjoy your stuffed mini bell peppers, store the leftovers in the fridge. Place them in an airtight container. This keeps them fresh and tasty. If you have a lot, you can stack them, but make sure they are not too crowded. The best containers are glass or BPA-free plastic. They seal well and help keep the flavor.
Freezing Directions
To freeze stuffed peppers, let them cool first. Then, wrap each pepper tightly in plastic wrap. After that, put them in a freezer-safe bag or container. This helps prevent freezer burn. When you want to eat them, take them out. Thaw them in the fridge overnight. You can reheat them in the oven or microwave. If using the oven, bake at 350°F (175°C) until warmed through.
Shelf Life
Stuffed mini bell peppers last about 3 to 5 days in the fridge. If frozen, they can last up to 3 months. For the best taste, eat them sooner rather than later. Always check for any signs of spoilage before eating. Keeping track of freshness helps you enjoy your meal at its best.
FAQs
What are stuffed mini bell peppers?
Stuffed mini bell peppers are small, colorful peppers filled with a tasty mix. They are often stuffed with ingredients like quinoa, beans, corn, and cheese. After baking, they become soft and flavorful. The peppers add a nice crunch and sweetness. This dish is perfect as an appetizer or a main course. You can enjoy them warm or at room temperature.
Can stuffed mini bell peppers be made ahead of time?
Yes, you can make stuffed mini bell peppers in advance. Prepare the filling and stuff the peppers. Then, cover and refrigerate them for up to a day. When ready to bake, take them out and let them sit for 15 minutes. This helps them cook evenly. You can also freeze them before baking. To do this, wrap them tightly and store them for up to three months. Thaw in the fridge overnight before baking.
What can I serve with stuffed mini bell peppers?
Stuffed mini bell peppers pair well with many sides. Here are a few tasty options:
– A fresh green salad with vinaigrette
– Guacamole and tortilla chips
– Rice or quinoa pilaf
– A light soup, like tomato or corn chowder
– Sparkling water or a light white wine
These sides complement the flavors of the stuffed peppers and make the meal more complete.
How do I know when stuffed peppers are done?
You can tell stuffed mini bell peppers are done by checking a few signs. First, look for the peppers to be tender and slightly wrinkled. The cheese on top should be golden and bubbly. If you poke a pepper with a fork, it should feel soft but not mushy. Cooking time is usually 30 to 35 minutes at 375°F (190°C). If unsure, a food thermometer should read 165°F (74°C) inside the filling.
Stuffed mini bell peppers are fun, tasty, and easy to make. We explored their main ingredients, seasonings, and garnishes. You learned how to prep, mix, and bake them perfectly. Plus, I shared great tips for customizing and serving your dish. Don’t forget about storing leftovers for later!
Experiment with flavors and try different options. There’s so much you can do with this dish. Enjoy making stuffed peppers that please everyone at your table!
![- 12 mini bell peppers (assorted colors) - 1 cup cooked quinoa - 1 cup black beans, rinsed and drained - 1 cup corn (fresh, frozen, or canned) - 1/2 cup diced tomatoes (fresh or canned) - 1 cup shredded cheese (cheddar or pepper jack) The mini bell peppers are the stars here. Their sweet crunch makes a great bite. They come in many colors, adding fun to your dish. Quinoa adds protein and a nice texture. Black beans bring fiber and heartiness. Corn adds sweetness and color, while diced tomatoes add moisture and flavor. Finally, shredded cheese melts into a gooey topping that ties everything together. - 1 teaspoon cumin - 1 teaspoon smoked paprika - 1 teaspoon garlic powder - 1/2 teaspoon onion powder - Salt and pepper to taste Seasonings bring life to your dish. Cumin adds warmth and earthiness. Smoked paprika gives a touch of smokiness. Garlic powder adds depth, while onion powder enhances flavor. Salt and pepper balance everything out. This blend will make your stuffed mini bell peppers burst with flavor. - Fresh cilantro, chopped (for garnish) - 1 tablespoon olive oil Garnishes make your dish pretty and fresh. Fresh cilantro adds a pop of color and brightness. Olive oil adds richness and ties the flavors together. Together, they make your stuffed mini bell peppers look and taste amazing. You can find the full recipe [here]. 1. Preheat the oven to 375°F (190°C). This step gets your oven ready for baking. 2. Cut the tops off the mini bell peppers. Use a sharp knife for a clean cut. 3. Remove the seeds and any white parts inside the peppers. This helps reduce bitterness. 1. In a large mixing bowl, combine the cooked quinoa, black beans, corn, and diced tomatoes. 2. Add half a cup of shredded cheese to the mix. This adds creaminess and flavor. 3. Stir in the cumin, smoked paprika, garlic powder, onion powder, salt, and pepper. Mix well until everything is combined. 4. Drizzle one tablespoon of olive oil over the filling and stir again. This keeps it moist. 1. Carefully fill each mini bell pepper with the quinoa mixture. Press down gently to pack it in. 2. Arrange the stuffed peppers upright in a baking dish. If they tip over, use crumpled aluminum foil to help them stand. 3. Sprinkle the rest of the cheese on top of the stuffed peppers. This will melt into a tasty layer. 4. Cover the dish with aluminum foil. Bake for 20 minutes, then remove the foil. 5. Bake for an additional 10-15 minutes, until the peppers are tender and the cheese is bubbly and golden. 6. After baking, let them cool for a few minutes before garnishing with fresh cilantro. For the Full Recipe, refer to the ingredients and precise steps above. Enjoy! You can easily change this recipe. Try using ground turkey instead of black beans. It adds a nice flavor. For some heat, add chili powder or cayenne pepper. This can spice things up! If you want vegan options, skip the cheese and use tofu. For gluten-free, ensure you select gluten-free grains and beans. You have options for cooking. Baking is simple and gives a soft texture. You can also use an air fryer. Air frying makes them crispy and quick. If you want a smoky taste, grilling is great. Just watch the peppers so they don’t burn. Dips enhance the meal. Salsa and guacamole pair well with the stuffed peppers. You can serve them as appetizers or as a fun main dish. They are colorful and bright, making your table look good. For a complete meal, add a fresh salad on the side. You can find the full recipe above, so you have all the details you need. {{image_2}} You can make stuffed mini bell peppers in many tasty ways. For a Mexican twist, add taco seasoning to the filling. This adds spice and flavor. You can use ground meat or keep it vegetarian. For a Mediterranean style, mix in feta cheese and olives. This creates a salty and creamy taste. The tangy flavors work great with the sweet peppers. Both options are fun and easy to try. Feel free to play with the main ingredients. You can swap quinoa for rice if you prefer it. Rice adds a nice texture and flavor. If you want a change, use lentils instead of beans. Lentils cook fast and have a great taste. They also boost the protein in your dish. These swaps let you customize the recipe to your liking. Seasonal changes can inspire new stuffed pepper ideas. In summer, use fresh garden veggies like zucchini or corn. These add brightness and flavor. In winter, try heartier vegetables like mushrooms or kale. They give warmth and comfort to your meal. These seasonal changes keep things interesting and delicious. For the full recipe, check out the details above. After you enjoy your stuffed mini bell peppers, store the leftovers in the fridge. Place them in an airtight container. This keeps them fresh and tasty. If you have a lot, you can stack them, but make sure they are not too crowded. The best containers are glass or BPA-free plastic. They seal well and help keep the flavor. To freeze stuffed peppers, let them cool first. Then, wrap each pepper tightly in plastic wrap. After that, put them in a freezer-safe bag or container. This helps prevent freezer burn. When you want to eat them, take them out. Thaw them in the fridge overnight. You can reheat them in the oven or microwave. If using the oven, bake at 350°F (175°C) until warmed through. Stuffed mini bell peppers last about 3 to 5 days in the fridge. If frozen, they can last up to 3 months. For the best taste, eat them sooner rather than later. Always check for any signs of spoilage before eating. Keeping track of freshness helps you enjoy your meal at its best. Stuffed mini bell peppers are small, colorful peppers filled with a tasty mix. They are often stuffed with ingredients like quinoa, beans, corn, and cheese. After baking, they become soft and flavorful. The peppers add a nice crunch and sweetness. This dish is perfect as an appetizer or a main course. You can enjoy them warm or at room temperature. Yes, you can make stuffed mini bell peppers in advance. Prepare the filling and stuff the peppers. Then, cover and refrigerate them for up to a day. When ready to bake, take them out and let them sit for 15 minutes. This helps them cook evenly. You can also freeze them before baking. To do this, wrap them tightly and store them for up to three months. Thaw in the fridge overnight before baking. Stuffed mini bell peppers pair well with many sides. Here are a few tasty options: - A fresh green salad with vinaigrette - Guacamole and tortilla chips - Rice or quinoa pilaf - A light soup, like tomato or corn chowder - Sparkling water or a light white wine These sides complement the flavors of the stuffed peppers and make the meal more complete. You can tell stuffed mini bell peppers are done by checking a few signs. First, look for the peppers to be tender and slightly wrinkled. The cheese on top should be golden and bubbly. If you poke a pepper with a fork, it should feel soft but not mushy. Cooking time is usually 30 to 35 minutes at 375°F (190°C). If unsure, a food thermometer should read 165°F (74°C) inside the filling. Stuffed mini bell peppers are fun, tasty, and easy to make. We explored their main ingredients, seasonings, and garnishes. You learned how to prep, mix, and bake them perfectly. Plus, I shared great tips for customizing and serving your dish. Don’t forget about storing leftovers for later! Experiment with flavors and try different options. There’s so much you can do with this dish. Enjoy making stuffed peppers that please everyone at your table!](https://dailydishly.com/wp-content/uploads/2025/07/7be91d44-d02b-4978-8cdb-a2e2cd47e9c1-300x300.webp)

![When making lemon garlic shrimp skewers, you need fresh and simple ingredients. Here’s what you will need: - 1 lb large shrimp, peeled and deveined - 3 tablespoons olive oil - Zest and juice of 2 lemons - 4 cloves garlic, minced - 1 teaspoon red pepper flakes - 1 teaspoon smoked paprika - Salt and pepper to taste - Fresh parsley, chopped - Skewers, soaked if wooden Each ingredient plays a key role in creating the bright and zesty flavor of the dish. The shrimp should be large and fresh for the best taste. This recipe uses lemon juice and zest to add brightness. Minced garlic gives a strong, savory kick. Red pepper flakes add some heat, while smoked paprika gives a nice depth of flavor. Don’t forget to soak wooden skewers in water for at least 30 minutes. This step helps to prevent burning on the grill. You can find the full recipe details in the recipe section. Enjoy the bright, fresh taste of lemon garlic shrimp skewers! To start, gather your ingredients. You will need olive oil, lemon zest, lemon juice, garlic, red pepper flakes, smoked paprika, salt, and pepper. In a large bowl, combine these ingredients. Whisk them together until they blend well. The smell of the lemon and garlic will fill your kitchen. This marinade packs a punch and will soak into the shrimp. Next, add your shrimp to the marinade. Make sure each shrimp gets a good coat of that zesty mix. This step is key for flavor. Once all the shrimp are coated, cover the bowl. Place it in the fridge for at least 30 minutes. This wait allows the flavors to seep into the shrimp, making them taste amazing. Now, it's time to grill. Preheat your grill or grill pan to medium-high heat. While it heats up, thread the marinated shrimp onto skewers. Don’t crowd them; leave some space for even cooking. When the grill is hot, place the skewers on it. Grill each side for 2-3 minutes. You will know the shrimp are done when they turn pink and opaque. This means they are perfectly cooked. Enjoy the aroma as they grill! For the full recipe, check the section above. To get the best shrimp, cook them for 2-3 minutes on each side. Use medium-high heat on your grill or grill pan. Watch for key signs of doneness: the shrimp should turn bright pink and become opaque. If they curl tightly, they may be overcooked. You can adjust the spices to match your taste. Try adding more red pepper flakes for heat, or use fresh herbs like cilantro or basil. If you want to swap oils, avocado oil works great too. You can even add a splash of soy sauce for a different twist. These lemon garlic shrimp skewers pair well with many sides. Try serving them with a fresh salad, rice, or grilled vegetables. For garnishing, sprinkle fresh parsley or lemon zest on top. This adds a pop of color and extra flavor. For the full recipe, check out the [Full Recipe]. {{image_2}} You can make your lemon garlic shrimp skewers even better by adding vegetables. I love using bell peppers, zucchini, or onions. These veggies add color and flavor. Here’s how to do it: - Bell Peppers: Cut them into bite-sized pieces. They add sweetness and crunch. - Zucchini: Slice it into thick rounds. It cooks quickly and stays tender. - Onions: Use red or yellow onions. Cut into wedges for a nice char. For mixed skewers, cook the shrimp and veggies together for about 2-3 minutes on each side. Just keep an eye on the cooking time. You want everything to be tender and cooked through. If you want more or less heat, it’s easy to adjust. To reduce heat, cut back on red pepper flakes. You can also use a milder spice blend. For more heat, add extra red pepper flakes or a dash of hot sauce. Try different marinades for new flavors. A honey-soy mix gives a sweet twist. A cilantro-lime marinade offers a fresh taste. These changes can make your skewers even more fun! If you want to switch things up, consider other seafood. Scallops are a great choice. They cook fast and taste amazing. You can also use firm fish like salmon or tuna. Just cut them into chunks. When cooking different seafood, adjust the cooking time. Fish usually cooks in 4-5 minutes. Scallops need about 2-3 minutes per side. Always look for that perfect pink and opaque look to know it’s done. To keep your shrimp skewers fresh, place them in an airtight container. You can store them in the fridge for up to three days. If you want to keep them longer, freeze them. Wrap each skewer in plastic wrap and then place them in a freezer bag. They can stay in the freezer for up to three months. When you reheat shrimp skewers, do it gently to keep them juicy. The oven works best. Preheat it to 350°F (175°C). Place the skewers on a baking sheet and cover them with foil. Heat for about 10 minutes. You can also use a microwave if you are in a hurry. Just heat them for 30 seconds at a time. Check often to avoid overcooking. Preparing shrimp skewers in advance is easy. You can marinate them the night before and store them in the fridge. This way, all the flavors mix well. If you have leftover shrimp, use them in salads, tacos, or pasta dishes. They add great flavor and protein to your meals. For more fun, try mixing them with veggies to make a stir-fry. For the full recipe, check out the Zesty Lemon Garlic Shrimp Skewers. I recommend marinating the shrimp for at least 30 minutes. This time allows the shrimp to soak up the lemon and garlic flavors. If you have more time, you can marinate them for up to 2 hours. Just don't go too long, or the shrimp may become tough from the acid in the marinade. Yes, you can prepare the skewers ahead of time. Just marinate the shrimp and thread them onto skewers. Cover and store them in the fridge for up to 2 hours before grilling. If you need more time, you can freeze the marinated skewers for later use. Just thaw them in the fridge before cooking. Look for large shrimp, ideally 16-20 count per pound. Large shrimp stay juicy and cook evenly on the grill. Always choose fresh or frozen shrimp that are peeled and deveined for the best results. Fresh shrimp should smell like the sea and have a firm texture. Perfectly cooked shrimp turn pink and opaque. This usually takes about 2-3 minutes per side on the grill. If you see them curl into a C shape, that’s a sign they are done. Overcooking shrimp can make them tough, so keep an eye on them while grilling. You learned how to make delicious lemon garlic shrimp skewers using simple ingredients. We covered marinating, grilling, and tips for perfect shrimp. You can spice it up or add veggies for new flavors. These skewers are easy to store, reheat, and even use in other meals. Enjoy making this dish and impressing friends or family with your grilling skills.](https://dailydishly.com/wp-content/uploads/2025/06/a1f3f783-88f9-44d5-88e1-43cf245073bc-768x768.webp)
![To make crispy vegetable spring rolls, you need a few fresh ingredients. Here’s a list: - 1 cup cabbage, finely shredded - 1 carrot, julienned - 1 bell pepper (any color), julienned - 1 cup bean sprouts - 2 green onions, finely chopped - 1 clove garlic, minced - 1 teaspoon ginger, grated - 1 tablespoon soy sauce - 1 teaspoon sesame oil - 10-12 spring roll wrappers - Vegetable oil for frying - Salt and pepper to taste Choosing fresh ingredients is key for great taste. Look for vibrant colors in your veggies. The cabbage should feel crisp and firm. Fresh carrots are bright and firm too. Bell peppers should have smooth skin. Avoid any that are wrinkled or soft. For the garlic and ginger, choose firm roots with no dark spots. Fresh herbs can also add a nice touch. Quality ingredients make your spring rolls taste even better. You can add optional ingredients for more flavor. Try adding: - Mushrooms for an earthy taste - Spinach for extra greens - Fresh herbs like cilantro or mint - A splash of lime juice for brightness - Chopped chili for spice These extras can enhance the taste and make your spring rolls unique. Mix and match to find your favorite combination! Start by gathering your ingredients. You will need cabbage, carrots, bell peppers, bean sprouts, green onions, garlic, ginger, soy sauce, and sesame oil. Slice all your veggies into small pieces. This helps them cook evenly. In a large bowl, mix the shredded cabbage, julienned carrot, bell pepper, bean sprouts, and chopped green onions. Add the minced garlic and grated ginger. Drizzle the soy sauce and sesame oil over the filling. Season with salt and pepper. Mix everything well until it’s nicely combined. This veggie mix is full of flavor and crunch. Now, it's time to roll! Take a spring roll wrapper and lay it flat on a clean surface. Point one corner toward you. Spoon about 2 tablespoons of your vegetable filling onto the wrapper, about 2 inches from the corner. Fold the corner over the filling. Next, fold in the sides. Roll the wrapper tightly away from you. Use a bit of water on the edge to seal it if needed. Repeat this for all the wrappers. Make sure each spring roll is sealed well so they don’t open while cooking. For crispy spring rolls, proper frying is key. Heat vegetable oil in a large frying pan or deep skillet over medium-high heat. You need enough oil to cover the rolls. Once the oil is hot, carefully add a few spring rolls. Don’t crowd the pan; this helps them fry evenly. Fry each side for about 3-4 minutes until golden brown. Use a slotted spoon to take them out. Place the cooked spring rolls on a paper towel to drain excess oil. Enjoy your crispy spring rolls hot, paired with sweet chili sauce or soy sauce for dipping. To make your spring rolls crispy, use the right oil. Vegetable oil works great. Heat the oil to the right temperature before frying. If it’s too cold, the rolls will soak up oil. If it’s too hot, they will burn. Aim for a temperature around 350°F. Fry in small batches to avoid crowding. This ensures even cooking and crispiness. Once golden brown, place them on paper towels to absorb extra oil. One common mistake is using too much filling. Overstuffed rolls can burst open while frying. It's best to use about two tablespoons of filling per roll. Another error is not sealing the edges well. Use water to help the wrapper stick. Lastly, skip the flour or cornstarch for dusting your surface. It can cause the rolls to stick, making it hard to roll them up tightly. Serve your crispy vegetable spring rolls with a side of sweet chili sauce or soy sauce. These dips add a nice kick and enhance the flavor. You can also add a fresh salad on the side. A simple salad with cucumber and carrots works well. It adds a refreshing crunch. If you want something extra, use a sprinkle of sesame seeds on top. This adds a nice touch and makes your dish look great! For more ideas, check out the Full Recipe. {{image_2}} You can change the veggies in your spring rolls. Try using spinach, mushrooms, or zucchini. These add new flavors and textures. You can also add herbs like basil or cilantro. They give a fresh taste that brightens the rolls. For a protein boost, add tofu or chicken to your filling. Tofu is a great choice for a vegetarian option. Just cube it and fry it lightly before mixing. If you prefer chicken, cook and shred it first. This adds heartiness to your rolls and makes them more filling. If you love heat, add chili paste or slices of jalapeño to your mix. This gives your spring rolls a spicy kick. You can also use chili oil while frying for extra flavor. Experiment with sauces like sriracha or hoisin for dipping. These add layers of taste that make each bite exciting. For the full recipe, check out the [Full Recipe]. To store leftover spring rolls, place them in an airtight container. Make sure they are completely cool before sealing the container. This helps keep them fresh. Store them in the fridge. They can last up to three days. If you want to enjoy them later, consider freezing. Reheating spring rolls can be tricky. You want them crispy, not soggy. The best way is to use an oven or air fryer. Preheat your oven to 375°F (190°C). Place the rolls on a baking sheet. Heat for about 10 minutes, turning halfway. In an air fryer, set it to 350°F (175°C) and heat for about 5-7 minutes. This keeps them crispy. To freeze spring rolls, wrap them tightly in plastic wrap. Then, place them in a freezer bag. Make sure to remove as much air as possible from the bag. They can stay frozen for up to three months. When ready to eat, thaw them in the fridge overnight before reheating. Enjoy your crispy vegetable spring rolls later with full flavors! For the detailed process, check out the Full Recipe. To make crispy vegetable spring rolls, gather your ingredients first. You need cabbage, carrots, bell pepper, bean sprouts, green onions, garlic, ginger, soy sauce, sesame oil, spring roll wrappers, and oil for frying. 1. Mix the filling: In a bowl, combine the cabbage, carrots, bell pepper, bean sprouts, green onions, garlic, and ginger. 2. Season: Add soy sauce and sesame oil. Stir well. 3. Roll the spring rolls: Place a spring roll wrapper on a flat surface. Put about 2 tablespoons of the filling on it. Fold the bottom corner over the filling, then fold in the sides, and roll tightly. 4. Fry: Heat oil in a pan. Fry the rolls until golden and crispy, about 3-4 minutes per side. You can dip spring rolls in many tasty sauces. Sweet chili sauce is a popular choice. Soy sauce also works well. For a kick, try sriracha or a spicy peanut dip. Each dip adds a new flavor to your rolls. Yes, you can bake spring rolls! Preheat your oven to 400°F (200°C). Brush the rolls with oil. Place them on a baking sheet. Bake for about 20-25 minutes or until they are golden and crispy. Baking is a healthier option than frying. You can find crispy vegetable spring rolls in many grocery stores. Check the frozen food aisle for pre-made options. Asian markets often have fresh spring rolls. Restaurants that serve Asian cuisine usually offer them as appetizers. You can easily customize your spring rolls. Add your favorite veggies, like zucchini or mushrooms. For protein, include tofu, shrimp, or chicken. Spices like chili flakes or herbs can also enhance the flavor. Get creative and make it your own! For more details on making these delicious rolls, check out the Full Recipe. In this blog post, we explored the key ingredients for making spring rolls, focusing on freshness and quality. You learned step-by-step how to prepare the filling, roll the spring rolls, and fry them for a crispy finish. I shared tips to avoid common mistakes and suggested various serving options. We also discussed delicious variations, storage tips, and answered common questions. In closing, making spring rolls is fun and rewarding. With the right ingredients and techniques, you will enjoy tasty snacks that everyone loves. Try it out!](https://dailydishly.com/wp-content/uploads/2025/06/947db9c4-fe2b-4e58-90c7-1de163361a05-768x768.webp)


