Sweet and Salty Caramel Popcorn Crunchy Delight

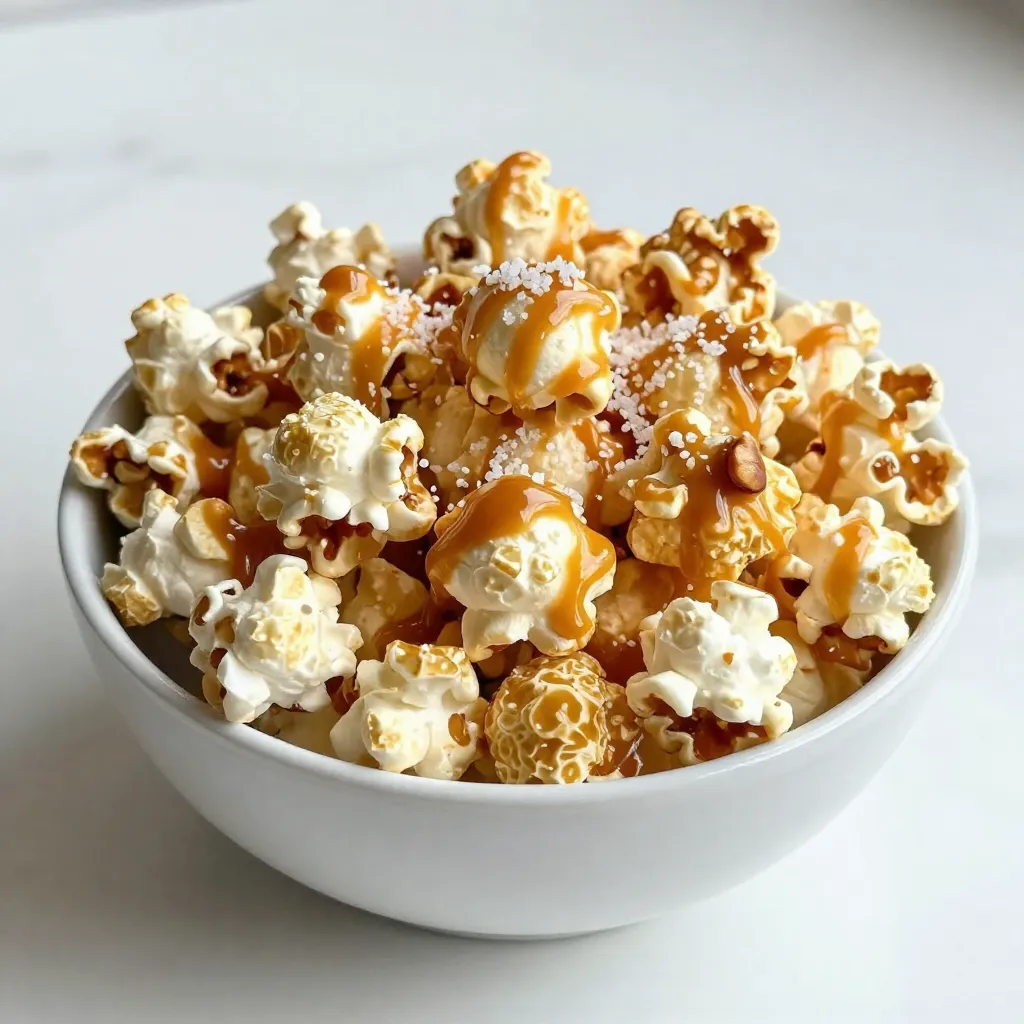
Craving a treat that perfectly blends sweet and salty flavors? You’re in the right place! In this easy-to-follow guide, I’ll help you make Sweet and Salty Caramel Popcorn Crunchy Delight. You’ll learn how to make crispy popcorn, coat it in rich caramel, and balance flavors just right. With simple ingredients and tips, you’ll impress everyone with this delicious snack. Let’s get started on your new favorite treat!
Why I Love This Recipe
- Perfect Balance: This recipe strikes the ideal balance between sweet and salty, making it a delightful treat for any palate.
- Easy to Make: With simple ingredients and straightforward steps, this caramel popcorn is quick and accessible for everyone.
- Customizable: Add your favorite nuts or even chocolate for a personalized twist that suits your taste preferences.
- Great for Sharing: This recipe yields a generous amount, perfect for parties, movie nights, or just a cozy evening at home.
Ingredients
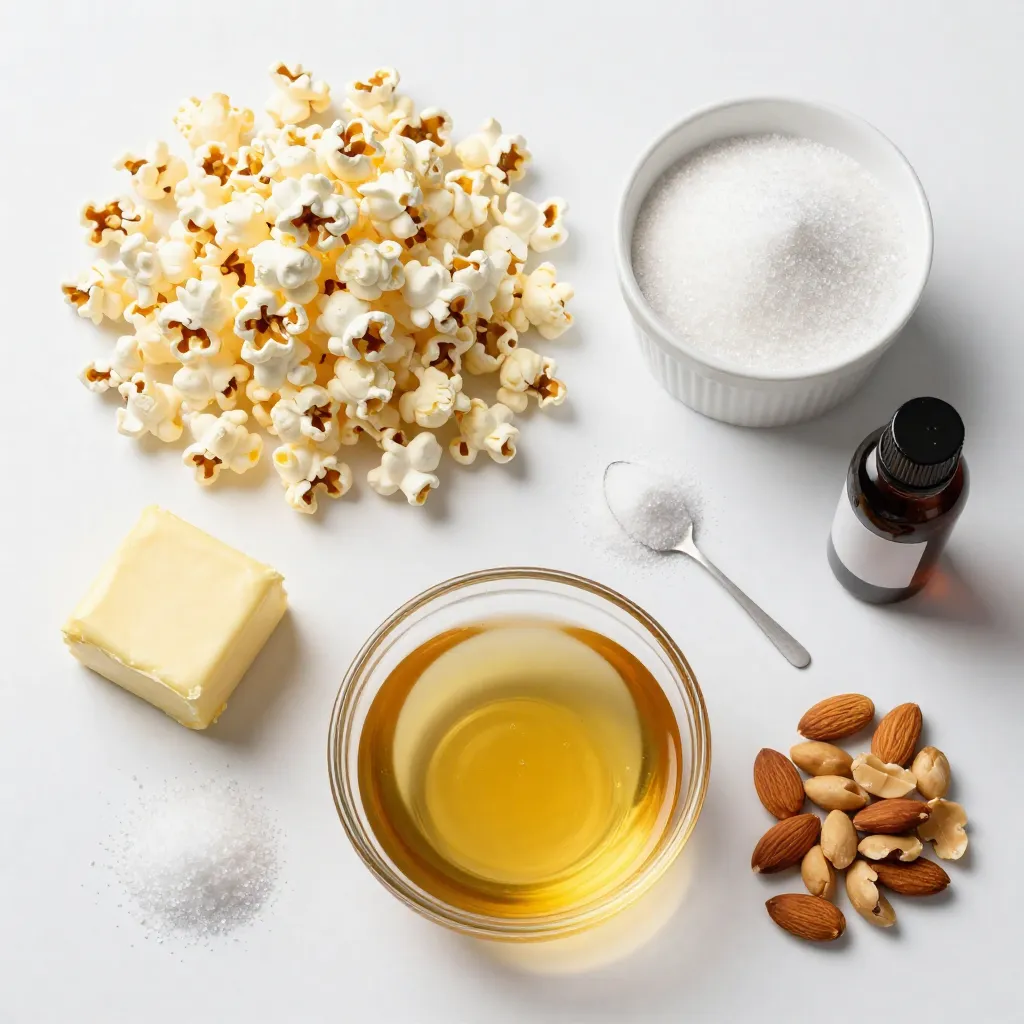
Detailed Ingredient List
– 1 cup popcorn kernels
– 1 cup granulated sugar
– 1/4 cup unsalted butter
– 1/4 cup light corn syrup
– 1/2 teaspoon vanilla extract
– 1/4 teaspoon baking soda
– 1 teaspoon sea salt, plus more for sprinkling
– Optional: 1/2 cup roasted nuts (like almonds or peanuts), for added crunch
Sweet and salty caramel popcorn needs just a few key ingredients. First, you need popcorn kernels. They will turn into fluffy popcorn when popped. Granulated sugar adds sweetness, while unsalted butter gives richness. Light corn syrup helps create a smooth caramel.
Vanilla extract brings out the flavors, and baking soda makes the caramel lighter. Sea salt balances the sweetness. If you want a nutty twist, add some roasted nuts for crunch.
Each ingredient plays a role. The popcorn forms the base. Sugar, butter, and corn syrup create the caramel. Vanilla, baking soda, and salt enhance the taste. Roasted nuts add texture.
Gather these ingredients to make a treat everyone will love. The mix of sweet and salty makes it special. Enjoy the process, and have fun making this crunchy delight!

Step-by-Step Instructions
Popping the Popcorn
You can pop the popcorn using two methods: stovetop or popcorn maker. For stovetop, heat a large pot over medium heat. Add a little oil and let it warm. When it’s hot, add the popcorn kernels and cover. Shake the pot often until popping slows. For a popcorn maker, follow the machine’s instructions for popping. Both methods yield fluffy popcorn!
Here are some tips for perfect popped corn:
– Use fresh kernels for best results.
– Avoid opening the lid while popping.
– Wait for popping to slow down before removing.
Preparing the Caramel
To make the caramel, combine sugar, butter, and corn syrup in a medium saucepan. Set the heat to medium and stir occasionally. Once it boils, stop stirring. Let it boil for 4-5 minutes. It should turn a deep golden color. This color shows it’s ready!
The ideal temperature for caramel is 240°F (115°C). You can check this with a candy thermometer.
Adding Flavorings
When your caramel is ready, remove the saucepan from the heat. Carefully stir in the vanilla extract and baking soda. The mixture will bubble up, so be careful! The baking soda helps make the caramel light and airy. Next, add 1 teaspoon of sea salt to balance the sweetness.
Coating the Popcorn
Pour the hot caramel over the popped popcorn in a large bowl. Use a wooden spoon or spatula to gently fold the popcorn and caramel together. Make sure each piece gets coated evenly. This step is crucial for delicious flavor!
Baking for Crunch
Preheat your oven to 250°F (120°C). Spread the caramel-coated popcorn on a large baking sheet lined with parchment paper. Bake for 1 hour. Stir every 15 minutes to ensure even baking. This will give your popcorn a nice crunch.
Cooling and Serving
Once baked, take the popcorn out and sprinkle a little more sea salt on top. Let it cool completely on the baking sheet. Once cool, break it into clusters. If you want, mix in some roasted nuts for added crunch.
Serve the popcorn in a big bowl. You can also store it in a sealed container for later. Enjoy your sweet and salty treat!
Tips & Tricks
Achieving the Perfect Balance of Sweet and Salty
To find the right mix of sweet and salty, taste as you go. You can add more sugar for sweetness or more salt if you like it saltier. Start with the amounts in the recipe. If you want it sweeter, add a bit more sugar. For a saltier taste, sprinkle on extra sea salt after baking.
Ensuring Even Coating
For the best mix, use a large wooden spoon or spatula. These tools help you gently fold the popcorn with the caramel. Make sure you coat every piece well. Take your time and mix slowly to avoid crushing the popcorn. The goal is to have a nice, even layer of caramel on each piece.
Storing Leftovers
To keep your caramel popcorn fresh, store it in an airtight container. This helps it stay crunchy. If you leave it out, it may become soft. For the best taste, eat your popcorn within a week. If it gets stale, you can warm it in the oven for a few minutes to regain some crunch.
Pro Tips
- Use Fresh Kernels: Ensure your popcorn kernels are fresh for the best popping results. Old kernels may not pop fully, leaving you with unpopped kernels.
- Watch the Caramel: When boiling the sugar mixture, keep a close eye on it to prevent burning. The color should be a rich golden brown, which indicates it’s ready.
- Stir Gently: When folding the caramel into the popcorn, do so gently to avoid crushing the popped kernels. This keeps your popcorn light and airy.
- Add Spices: For a unique flavor twist, consider adding a pinch of cinnamon or cayenne pepper to the caramel mixture for a sweet and spicy kick.
Variations
Nutty Sweet and Salty Caramel Popcorn
Adding nuts to your caramel popcorn is a great idea. Nuts give extra crunch and flavor. You can use roasted almonds, peanuts, or even cashews. Just mix in about 1/2 cup of your chosen nuts when you coat the popcorn. This makes each bite even more satisfying. You can also try different nuts each time. This keeps your snack fresh and fun!
Chocolate Drizzled Version
If you love chocolate, this version is for you! After baking your caramel popcorn, melt some chocolate. Use milk, dark, or white chocolate based on your taste. Drizzle it over the popcorn for a sweet touch. Let it cool so the chocolate hardens. This adds a rich flavor that perfectly pairs with the sweet and salty caramel. It’s a treat you won’t want to miss!
Seasoned Alternatives
Want to change things up? You can explore different seasonings for your popcorn. Try adding spices like cinnamon or cayenne for a twist. You can even sprinkle a bit of garlic powder for a savory touch. Just be sure to add your spices right after coating the popcorn with caramel. This way, the flavors stick well. Experimenting with seasonings can make this sweet and salty treat even more exciting!
Storage Info
Best Storage Containers
To keep your sweet and salty caramel popcorn fresh, use airtight containers. Glass jars work great. Plastic containers also serve well. Seal them tightly to block air. Avoid using paper bags; they let moisture in.
Shelf Life
Your caramel popcorn lasts about one week if stored correctly. To ensure it stays crunchy, keep it in a cool, dry place. Humidity can make it soggy. If you notice any signs of moisture, eat it right away.
Reheating Tips
If your popcorn gets stale, don’t worry! You can restore its crunch. Preheat your oven to 250°F (120°C). Spread the popcorn on a baking sheet. Heat for about 10 minutes. Check often to avoid burning. Once done, let it cool before enjoying again.
FAQs
Can I use microwave popcorn?
Yes, you can use microwave popcorn for this recipe. Just pick plain, unbuttered popcorn. Follow the package instructions to pop it. After popping, check for unpopped kernels. Discard any that remain. This option saves time and is easy to use.
How can I make it less sticky?
To reduce stickiness, use less caramel mixture. You can also bake it a little longer. Make sure to stir it well while baking. This helps to dry out the caramel. Let it cool fully before serving. Adding more sea salt can also help balance the sweetness.
What type of popcorn works best?
I recommend using high-quality kernels for the best taste. Look for butterfly popcorn or mushroom popcorn. Butterfly popcorn pops into light, fluffy pieces. Mushroom popcorn is denser and holds its shape better. Both types can work well, but they give different textures.
Can I make this recipe vegan?
Yes, you can make this recipe vegan. Use coconut oil instead of butter. Replace the light corn syrup with maple syrup or agave nectar. Check that the sugar you use is vegan-friendly. This way, you can enjoy a sweet and salty treat without animal products.
Now you know how to make tasty caramel popcorn at home. We covered essential ingredients, step-by-step directions, and helpful tips. You learned to balance sweet and salty flavors while achieving a perfect crunch. Experiment with different nuts and seasonings for fun variations.
Remember, practice makes perfect. Enjoy making this treat for movie nights or gatherings. Your caramel popcorn will be a hi

Sweet and Salty Caramel Popcorn
Ingredients
- 1 cup popcorn kernels (about 16 cups popped popcorn)
- 1 cup granulated sugar
- 1/4 cup unsalted butter
- 1/4 cup light corn syrup
- 1/2 teaspoon vanilla extract
- 1/4 teaspoon baking soda
- 1 teaspoon sea salt, plus more for sprinkling
- 1/2 cup roasted nuts (like almonds or peanuts), for added crunch
Instructions
- In a popcorn maker or using a stovetop method, pop the popcorn kernels. Set aside in a large bowl, ensuring to remove any unpopped kernels.
- In a medium saucepan over medium heat, combine the sugar, butter, and corn syrup. Stir occasionally until the mixture comes to a boil. Stop stirring and allow it to boil undisturbed for 4-5 minutes, until it turns a deep golden color.
- Remove the saucepan from heat and carefully stir in the vanilla extract, baking soda, and 1 teaspoon of sea salt. Be cautious as the mixture will bubble up!
- Pour the hot caramel mixture over the popped popcorn. Using a wooden spoon or spatula, gently fold the popcorn and caramel together until the popcorn is well coated.
- Preheat your oven to 250°F (120°C). Spread the caramel-coated popcorn onto a large baking sheet lined with parchment paper, in an even layer. Bake in the preheated oven for 1 hour, stirring every 15 minutes to ensure even baking.
- Once baked, remove the popcorn from the oven and sprinkle a little additional sea salt over the top. Allow the popcorn to cool completely on the baking sheet. Once cooled, break into clusters and add optional roasted nuts if desired.
- Serve in a large bowl or always keep some in a sealed container for a sweet and salty snack!


![To make these chocolate-covered banana bites, you will need simple, fresh ingredients. Here is the list: - 2 large bananas - 1 cup dark chocolate chips (or semi-sweet) - 1 tablespoon coconut oil - 1/4 cup chopped nuts (walnuts, almonds, or pistachios) - Sea salt for sprinkling - Optional toppings: 1/4 cup shredded coconut or mini marshmallows These ingredients work together for a tasty treat. The bananas add natural sweetness, while the dark chocolate provides rich flavor. Coconut oil helps the chocolate melt smoothly and adds a hint of tropical taste. The nuts give a nice crunch, and sea salt balances the sweetness. You can also mix in optional toppings like shredded coconut or mini marshmallows for fun twists. When choosing bananas, look for ones that are ripe but not too soft. This way, they will hold their shape when coated. For chocolate, dark chocolate chips melt well and taste great, but you can pick semi-sweet if you prefer. Once you gather your ingredients, you’re ready to make a delightful snack. For the complete process, check the Full Recipe. - Peel and slice bananas into bite-sized rounds. - Arrange banana slices on a parchment-lined baking sheet. Start with ripe bananas. They should be firm but not too soft. Slice them about one inch thick. This size helps them hold their shape when coated in chocolate. Lining the baking sheet with parchment paper keeps the bites from sticking. - Combine chocolate chips and coconut oil in a microwave-safe bowl. - Microwave in intervals, stirring, until smooth. Use dark chocolate chips for a rich taste. The coconut oil makes the chocolate smooth and shiny. Heat in short bursts of thirty seconds. Stir after each burst to prevent burning. When melted, the chocolate should be silky and easy to dip. - Use a fork or toothpick to coat banana slices in chocolate. - Allow excess chocolate to drip off. Hold the banana slice with a fork or toothpick. Dip it fully into the melted chocolate. Let any extra chocolate fall back into the bowl. This step ensures a nice, even coat. - Sprinkle nuts onto chocolate-coated banana bites. - Optionally, add shredded coconut or mini marshmallows. While the chocolate is still wet, add your favorite toppings. Nuts give a nice crunch. Coconut and marshmallows add a fun twist. Get creative with your choices! - Place the baking sheet in the freezer. - Chill for 15-20 minutes until the chocolate sets. Freezing helps the chocolate harden quickly. This step gives you a perfect bite. Keep an eye on them to make sure they don’t freeze too long. - Arrange on a serving platter. - Sprinkle with sea salt for extra flavor. Once chilled, place the banana bites on a nice platter. A light sprinkle of sea salt can enhance the flavor. These treats are perfect for sharing with friends or family. For the complete recipe, check out the [Full Recipe]. For melting, I recommend dark chocolate or semi-sweet chocolate. Both types melt well and give a rich flavor. Avoid chocolate with added ingredients, as they may not melt smoothly. To stop chocolate from seizing, add a bit of coconut oil. This helps keep the chocolate smooth and shiny while you dip your bananas. You can get creative with toppings! Try adding chopped nuts like walnuts or almonds for crunch. For a fun twist, sprinkle on shredded coconut or mini marshmallows. Bananas pair well with peanut butter too. Drizzle some on top after dipping for a tasty combo. If you're feeling adventurous, add a pinch of cinnamon for warmth. Present your chocolate-covered banana bites on a colorful platter. For a fun touch, use mini cupcake liners. They look cute and make for easy serving. Pair these bites with a glass of cold milk or a warm cup of tea. They also go well with vanilla ice cream for a sweet dessert combo. Enjoy your tasty creation! {{image_2}} You can easily make these bites vegan or dairy-free. Use plant-based chocolate chips instead of dark chocolate. Look for brands that are labeled dairy-free. You can also skip the nuts if you need a nut-free version. Simply leave them out or choose seeds like pumpkin or sunflower for crunch. You can switch up the chocolate for fun. Try white chocolate for a sweet twist. Milk chocolate is another tasty choice. If you want to get creative, add spices like cinnamon or nutmeg. Extracts like vanilla or almond also bring unique flavors. These small changes make a big impact on taste. Bananas are great, but other fruits work well too. Strawberries and apples both taste amazing with chocolate. You can even mix bananas with berries. Slice them small to make bite-sized treats. This way, you get a variety of flavors in one bite. Enjoy experimenting with different fruits! To keep your chocolate-covered banana bites fresh, store them in the fridge. Use an airtight container to prevent odors. Place parchment paper between layers if stacking them. This keeps the chocolate from sticking. If you want to store them longer, freezing works well too. Just place them on a baking sheet first. Once frozen, transfer them to a freezer-safe bag. This prevents them from clumping together. To thaw, just leave them in the fridge for a few hours before enjoying. When stored well in the fridge, these treats last about a week. If you freeze them, they can last up to two months. Check for signs of spoilage like brown spots on the bananas or a change in texture. If they look or smell off, it’s best to toss them. If you have leftover melted chocolate, don’t waste it! You can reuse it for other treats. Drizzle it on popcorn, or dip pretzels for a sweet and salty snack. You can also make chocolate-covered strawberries or marshmallows. Just be sure to reheat it gently to keep it smooth. For the best results, use the Full Recipe to make your banana bites. Enjoy the fun of creating delicious snacks while managing your storage effectively! Yes, you can use milk chocolate. It adds a sweeter taste. Dark chocolate has a richer flavor. Dark chocolate also has more health benefits, like antioxidants. It has less sugar than milk chocolate, making it a better choice for some. If you prefer sweet, go for milk chocolate. If you want a deeper flavor, stick with dark. To keep the chocolate firm, store the bites in a cool place. A fridge works great, but avoid the freezer after setting. You can also use a chocolate with a higher cocoa content. This type melts less easily. If you serve them warm, try using coconut oil. It helps the chocolate stay solid longer. Yes, you can make these bites ahead of time. They store well in the fridge for about a week. Just place them in an airtight container. If you want to keep them longer, you can freeze them. Make sure to separate layers with parchment paper to avoid sticking. Thaw them in the fridge before serving for the best taste. Chocolate-covered banana bites can be healthy in moderation. Bananas provide potassium and fiber. Dark chocolate has antioxidants, which are good for you. However, watch your portions. Eating too many can add extra sugar and calories. Pair these bites with a balanced diet for better health. Enjoy them as a treat rather than a daily snack. For the full recipe, check out the details above. You learned how to make tasty chocolate-covered banana bites. We covered the simple steps, from slicing bananas to melting chocolate. You can mix and match ingredients for fun variations. Remember, storing them well keeps them fresh and tasty for longer. Whether serving these bites at a party or enjoying them yourself, they are a delightful treat. Experiment with toppings and flavors to make them yours. Enjoy creating your own chocolate-covered banana bites!](https://dailydishly.com/wp-content/uploads/2025/06/88d9cc62-4f1a-4e00-b9c6-f86f49f25fdc-768x768.webp)
. To make blueberry almond overnight oats, start by gathering all your ingredients. This recipe takes just 10 minutes to prep. You can make two servings, perfect for a quick breakfast. In a medium bowl or a mason jar, add these base ingredients: - 1 cup rolled oats - 1 cup almond milk (or any plant-based milk) - ½ cup Greek yogurt (or plant-based yogurt) - 2 tablespoons honey or maple syrup - 1 teaspoon vanilla extract - ½ teaspoon cinnamon - A pinch of salt Mix all these items well. Make sure they blend together smoothly. This mix is the heart of your oats. Now, gently fold in 1 cup of blueberries. If you want, save a few for topping later. Then, add ¼ cup of sliced almonds for crunch. Stir carefully so you don’t mash the blueberries. Cover the bowl or seal the jar, then put it in the fridge. Let it chill overnight. This helps the oats soak up the flavors. The next morning, stir the oats. If they are too thick, add a splash of almond milk. Top with the reserved blueberries and sliced almonds for extra flavor and crunch. You can find the full recipe for this delicious dish above. Enjoy your tasty and nutritious breakfast! To make great overnight oats, follow these steps: - Use rolled oats. They soak up liquid well. - Choose a container you can seal tight. A mason jar works well. - Mix all the base ingredients first. This helps flavors blend. - Refrigerate for at least six hours. This allows the oats to soften. - Stir before serving to combine everything. Add more milk if needed. Personalize your overnight oats easily. Here are some ideas: - Swap almond milk for coconut or oat milk. - Use different fruits like strawberries or bananas. - Add seeds like chia or flax for extra nutrition. - Try nut butters for creaminess and flavor. - Experiment with spices like nutmeg or cardamom. Let’s look at the benefits of the main ingredients: - Rolled oats: They provide fiber, which is good for digestion. - Almond milk: It is low in calories and rich in vitamins. - Greek yogurt: This adds protein and probiotics for gut health. - Blueberries: They are full of antioxidants and vitamins. - Almonds: They offer healthy fats and help keep you full. Each ingredient brings something special to your meal. Enjoy the great taste while knowing you are eating well. For the full recipe, check out the details above. {{image_2}} You can change the taste of your Blueberry Almond Overnight Oats easily. Here are some ideas: - Mixed Berries: Swap blueberries for strawberries, raspberries, or blackberries. - Nut Butters: Stir in a spoon of almond or peanut butter for creaminess. - Chocolate: Add cocoa powder or chocolate chips for a fun twist. - Coconut: Sprinkle in some shredded coconut for a tropical flair. These variations will make your oats more exciting and tasty. If you have special dietary needs, you can still enjoy this recipe. Here are some substitutes: - Dairy-free: Use almond milk and plant-based yogurt for a vegan option. - Sugar-free: Skip the honey or maple syrup. Use ripe bananas for sweetness. - Gluten-free: Make sure you choose certified gluten-free rolled oats. These changes let everyone enjoy this dish. Want to make more servings? Scaling the recipe is simple. Just multiply each ingredient: - For 4 servings, use 2 cups of oats and 2 cups of almond milk. - For 6 servings, use 3 cups of oats and 3 cups of almond milk. You can prepare these oats in a large bowl or several jars. This way, you have breakfast ready for days! For the full recipe, check out the Berry Delights: Blueberry Almond Overnight Oats section. To keep your blueberry almond overnight oats fresh, store them in an airtight container. A mason jar works great because it's easy to seal. Make sure the oats are covered well with the lid. This keeps out air and moisture. If you make a big batch, divide them into individual servings. This way, you grab just what you need. When stored properly in the fridge, blueberry almond overnight oats can last for up to five days. This means you can meal prep for the week! Just remember to check for any changes in smell or texture before eating. If it looks or smells off, it’s best to toss it. You can also freeze your oats for longer storage. To do this, place the oats in a freezer-safe container. Leave some space at the top, as the oats will expand when frozen. They will stay good for up to three months. When you’re ready to eat them, thaw in the fridge overnight. You can warm them up or enjoy them cold. This is a great option for quick breakfasts! For the full recipe, check out the details above. Yes, you can! Other fruits work well too. Try strawberries, raspberries, or bananas. Each fruit adds its unique flavor and texture. Just make sure to adjust the amount based on the fruit’s sweetness. For example, use less honey if your fruit is sweet. Overnight oats stay fresh for up to five days. Store them in a sealed jar or container. This makes them great for meal prep. Just keep an eye on the texture. If they get too thick, add a splash of almond milk before serving. No, sweeteners are not a must. The oats and fruit add natural sweetness. If you prefer less sugar, skip the honey or maple syrup. You can also use ripe bananas or applesauce for sweetness. Adjust it to fit your taste! Blueberry almond overnight oats are simple to make and delicious. We covered the key and optional ingredients, plus tips on choosing the best. The step-by-step instructions guide you from mixing to adding fruit. I shared tips for customizing and highlighted the nutritional benefits of oats. Don't forget the variations you can try to suit your taste. Lastly, we discussed how to store your oats safely. With these insights, you're ready to enjoy a healthy breakfast that keeps you full and satisfied.](https://dailydishly.com/wp-content/uploads/2025/07/39185b14-c6b2-4e99-b0b5-ab17b9785ad3-768x768.webp)