Teriyaki Chicken Lettuce Cups Fresh and Tasty Meal

Looking for a fresh and tasty meal that’s quick to make? These Teriyaki Chicken Lettuce Cups are your answer! They offer a perfect blend of juicy chicken and crisp lettuce, wrapped up for a fun, healthy bite. In this post, I’ll share simple ingredients, easy steps, and expert tips to make your meal a hit. Let’s dive into making this delicious dish together!
Why I Love This Recipe
- Flavorful Marinade: The combination of soy sauce, honey, and sesame oil creates a rich and savory flavor that enhances the chicken beautifully.
- Healthy Option: Using lettuce cups instead of traditional wraps makes this dish lighter and packed with fresh veggies.
- Quick and Easy: This recipe comes together in about 50 minutes, making it perfect for a weeknight dinner.
- Customizable: You can easily swap out vegetables or add your favorite toppings to make it your own.
Ingredients
Main Ingredients for Teriyaki Chicken
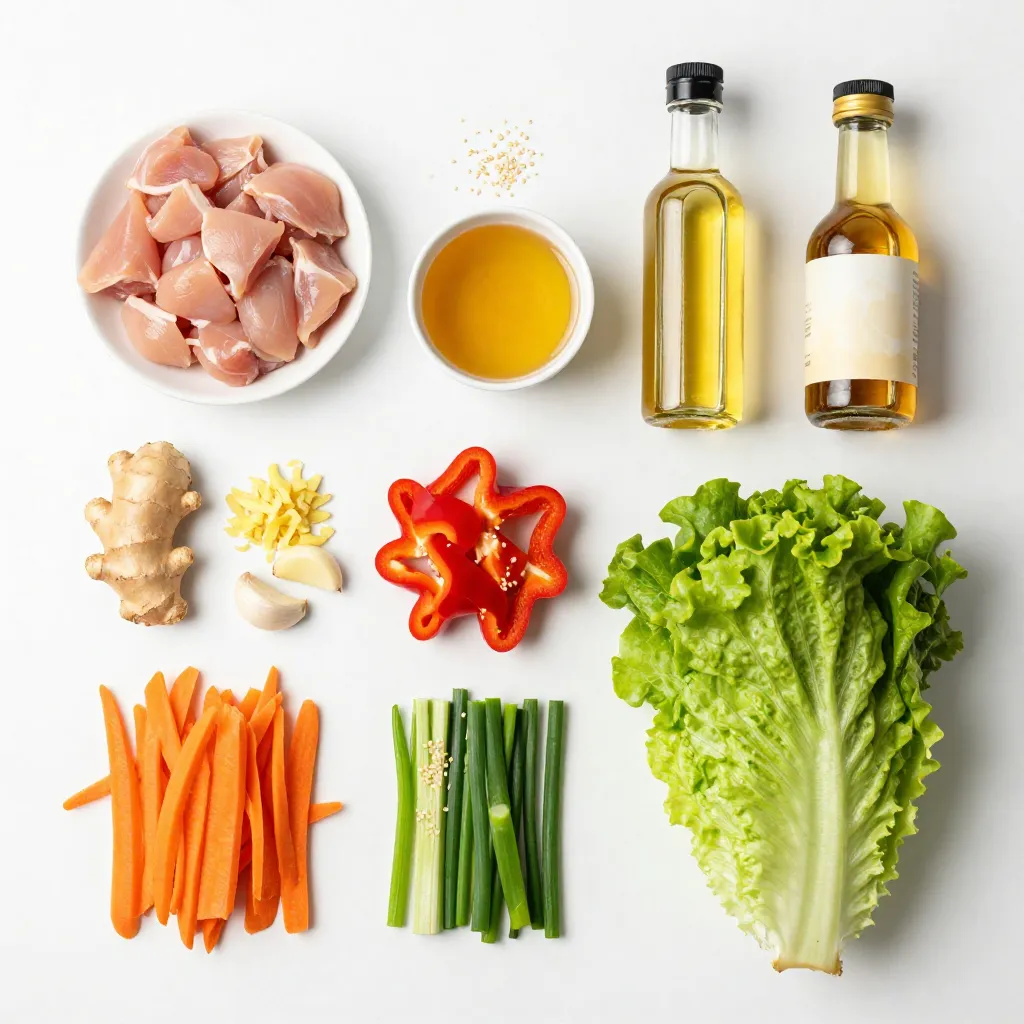
To make teriyaki chicken, you need simple, fresh items. Here’s what you will use:
– 1 pound boneless, skinless chicken thighs, diced
– 1 red bell pepper, diced
– 1 carrot, shredded
– 3 green onions, sliced
– 1 head of butter or iceberg lettuce, leaves separated
These main ingredients create a great base for your dish. Chicken thighs add juiciness and flavor. The peppers and carrots bring color and crunch.
Condiments and Seasonings
The right sauces and spices make teriyaki chicken shine. You will need:
– 1/4 cup soy sauce
– 1/4 cup honey
– 2 tablespoons rice vinegar
– 2 tablespoons sesame oil
– 1 tablespoon fresh ginger, grated
– 3 cloves garlic, minced
– Salt and pepper to taste
These condiments add sweetness and depth. The soy sauce gives umami, while honey adds a touch of sweetness. Ginger and garlic deliver a nice kick.
Suggested Toppings
Toppings can add extra flavor and texture. Here are some to consider:
– 1 tablespoon sesame seeds
Sprinkle sesame seeds on top for a nutty finish. They add a delightful crunch and look great on your plate. Enjoy customizing your lettuce cups with these tasty options!

Step-by-Step Instructions
How to Prepare the Teriyaki Marinade
To start, gather your ingredients. In a bowl, mix the following:
– 1/4 cup soy sauce
– 1/4 cup honey
– 2 tablespoons rice vinegar
– 2 tablespoons sesame oil
– 1 tablespoon fresh ginger, grated
– 3 cloves garlic, minced
This mix creates a sweet and savory teriyaki marinade. It adds lots of flavor to the chicken. You want to marinate the chicken for at least 30 minutes. If you have time, two hours in the fridge makes it even better.
Cooking the Chicken and Vegetables
After marinating, heat a large skillet over medium-high heat. Add the marinated chicken and the marinade to the pan. Cook for about 8 to 10 minutes. Stir occasionally. The chicken should be cooked through and caramelized.
Once the chicken is ready, add these veggies:
– 1 red bell pepper, diced
– 1 carrot, shredded
Cook the veggies for another 3 to 4 minutes. They should be tender but still crisp. Remove the skillet from heat. Then, stir in:
– 3 green onions, sliced
– 1 tablespoon sesame seeds
Season the mix with salt and pepper to taste.
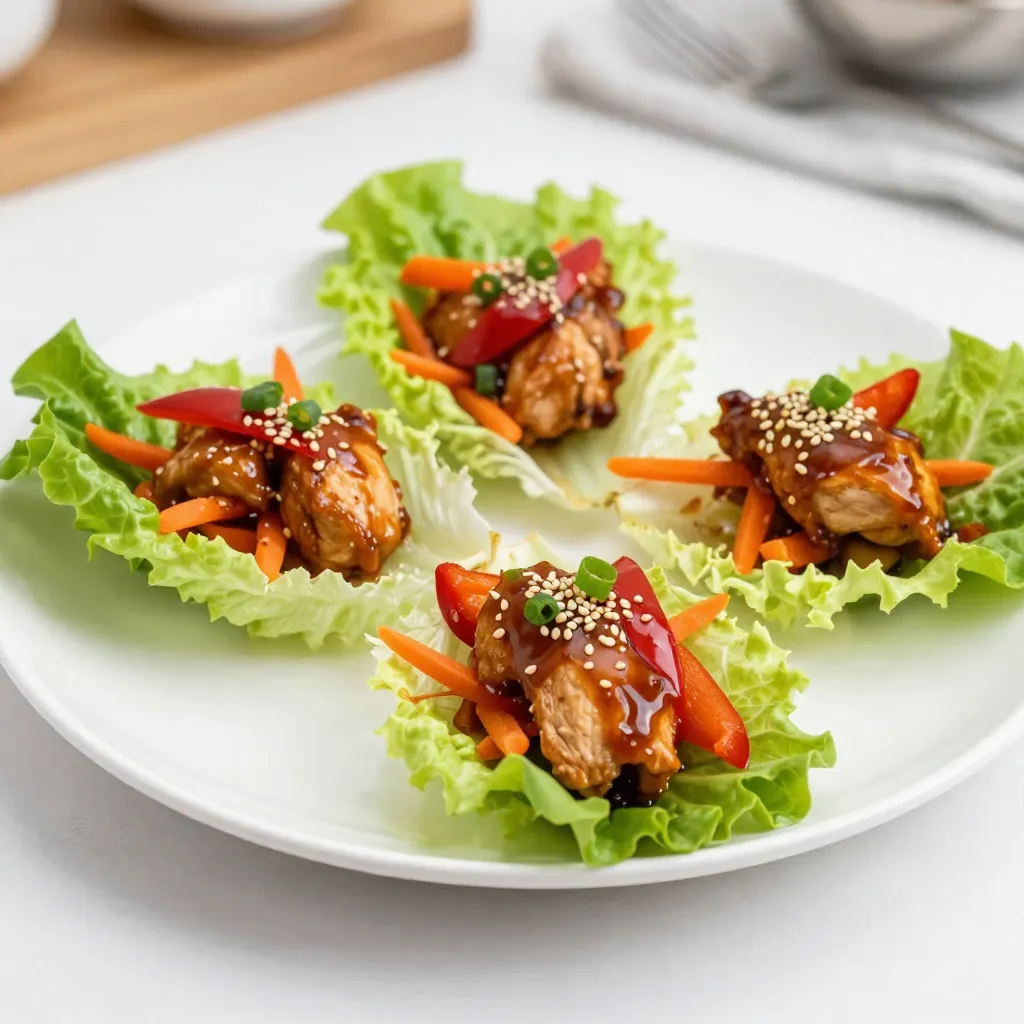
Assembling the Lettuce Cups
Now it’s time to serve! Take a head of butter or iceberg lettuce. Separate the leaves carefully. On a platter, arrange the leaves. Spoon the teriyaki chicken mixture into each leaf. These cups are fun to eat and full of flavor! Enjoy your fresh and tasty meal!
Tips & Tricks
Best Chicken Cuts for Teriyaki
I recommend using boneless, skinless chicken thighs. They have more flavor and stay juicy. Chicken breasts can dry out, so thighs are better for this dish. If you prefer chicken breast, cut it into small pieces to help it cook evenly.
How to Achieve the Perfect Caramelization
To get that nice caramel color, use a hot skillet. The sugar in the honey helps with this. Start cooking the chicken without stirring for a minute. This allows it to brown before you mix it. Stir occasionally, but not too much. Let it sit to develop that rich flavor.
Cooking Time Adjustments based on Chicken Size
Cooking time depends on the size of your chicken pieces. For small diced chicken, cook for about 8-10 minutes. If your pieces are larger, increase the time to 12-15 minutes. Always check that the chicken is fully cooked. It should reach 165°F to be safe to eat.
Pro Tips
- Marinate for Maximum Flavor: Allowing the chicken to marinate for longer, up to 2 hours, helps the flavors penetrate deeper, resulting in a more flavorful dish.
- Use Fresh Ingredients: Fresh ginger and garlic elevate the dish significantly, offering a more vibrant and aromatic taste compared to dried alternatives.
- Customize Your Veggies: Feel free to substitute or add vegetables based on your preference; snap peas, cucumbers, or even shredded cabbage can add great texture and flavor.
- Serving Suggestion: For added crunch and flavor, serve with a sprinkle of additional sesame seeds or a drizzle of sriracha for those who enjoy a little heat.
Variations
Vegetarian Alternative with Tofu
You can use tofu instead of chicken for a tasty vegetarian option. Choose firm or extra-firm tofu for the best texture. First, drain the tofu and press it to remove excess moisture. Cut the tofu into small cubes. Marinate the tofu in the same teriyaki sauce for flavor. Cook it in the skillet until golden brown, about 8-10 minutes. The tofu absorbs the sauce well, giving a rich taste.
Low-Carb Options Using Different Lettuce
Lettuce cups are fun and healthy. Try using romaine, butter, or even endive leaves. Each type adds a unique crunch and flavor. Romaine is sturdy and great for holding more filling. Butter lettuce is soft and wraps nicely. Endive has a slight bitterness that pairs well with the sweet teriyaki sauce. Choose your favorite for a low-carb meal packed with flavor.
Flavor Variations with Other Sauces
You can mix things up with different sauces. Try hoisin sauce for a sweet and salty twist. Sriracha adds heat if you like spice. Peanut sauce gives a nutty flavor, while teriyaki sauce is sweet and savory. Experiment with these sauces to find your favorite blend. Each adds a new layer of taste, keeping your meals exciting.
Storage Information
How to Store Leftovers
After enjoying your teriyaki chicken lettuce cups, store any leftovers in an airtight container. Make sure to cool the chicken mixture before sealing it. This keeps the flavors fresh. You can keep the chicken and the lettuce leaves separate. Store lettuce in a damp paper towel to keep them crisp. Leftover teriyaki chicken will last up to three days in the fridge.
Reheating Tips
When you’re ready to enjoy your leftovers, reheat the chicken gently. Place it in a skillet over medium heat. Stir it often to heat evenly. You can add a splash of water or broth to keep it moist. It should take about five minutes to warm through. Avoid using a microwave, as it may make the chicken tough.
Freezing Guidelines for Teriyaki Chicken
If you want to save some for later, freezing is a good option. Place the cooled chicken in a freezer-safe bag. Remove as much air as possible before sealing. Label the bag with the date. The teriyaki chicken will stay fresh for up to three months in the freezer. When you’re ready to eat, thaw it in the fridge overnight before reheating.
FAQs
Can I use chicken breast instead of thighs?
Yes, you can use chicken breast. Thighs have more flavor and stay juicy. Chicken breast can dry out if cooked too long. If you use chicken breast, watch the cooking time closely. Cut it into small pieces to help it cook evenly.
What lettuce is best for lettuce cups?
Butter or iceberg lettuce works best for cups. They are sturdy and hold the filling well. Butter lettuce has a soft, sweet taste. Iceberg lettuce is crunchy and refreshing. Both types make a great base for your teriyaki chicken.
How can I make this dish gluten-free?
To make it gluten-free, switch to gluten-free soy sauce. Many brands offer this option. Check labels to ensure no gluten ingredients are included. Also, you can use coconut aminos as a soy sauce alternative. This keeps the flavor while making it gluten-free.
This blog post covered how to make delicious teriyaki chicken. We looked at key ingredients and helpful tips for great flavor. You learned step-by-step instructions for marinating and cooking. I also shared tasty variations and smart storage advice.
In making this dish, focus on fresh ingredients and the right cooking time. With practice, your teriyaki chicken will impress everyone. Enjoy your cooking and experimenting with flavor

Teriyaki Chicken Lettuce Cups
Ingredients
- 1 pound boneless, skinless chicken thighs, diced
- 0.25 cup soy sauce
- 0.25 cup honey
- 2 tablespoons rice vinegar
- 2 tablespoons sesame oil
- 1 tablespoon fresh ginger, grated
- 3 cloves garlic, minced
- 1 red bell pepper diced
- 1 carrot shredded
- 3 green onions sliced
- 1 tablespoon sesame seeds
- 1 head butter or iceberg lettuce, leaves separated
- to taste salt and pepper
Instructions
- In a bowl, mix together the soy sauce, honey, rice vinegar, sesame oil, ginger, and garlic to create the teriyaki marinade.
- Add the diced chicken thighs to the marinade and let them marinate for at least 30 minutes (or up to 2 hours in the refrigerator).
- Heat a large skillet over medium-high heat. Add the marinated chicken along with the marinade to the pan. Cook for about 8-10 minutes, stirring occasionally until the chicken is cooked through and caramelized.
- Add the diced red bell pepper and shredded carrot to the skillet; cook for an additional 3-4 minutes until the vegetables are tender.
- Remove the skillet from heat and stir in the sliced green onions and sesame seeds. Season with salt and pepper to taste.
- To serve, arrange the lettuce leaves on a platter, and spoon the teriyaki chicken mixture into each leaf.


![For a vibrant and tasty treat, use a mix of colorful fruits. Here’s what you need: - 1 cup strawberries, hulled - 1 cup orange segments - 1 cup pineapple chunks - 1 cup green grapes - 1 cup blueberries - 1 cup purple grapes or blackberries These fruits not only look great, but they also pack in vitamins. Each fruit adds its own flavor and texture. You can choose fresh, ripe fruits for the best taste. If you want to add a bit of sweetness, consider these options: - 2 tablespoons honey (optional) Honey brings a natural sweetness to the skewers. Drizzle it on before serving. It works well with all the fruits. Garnishing makes your skewers look even better. Use fresh mint leaves for a pop of color. Arrange the skewers on a platter for a fun display. You can also place them in a glass jar for a playful touch. This way, everyone can grab their own skewer! For the full recipe, check the detailed steps to make these beautiful treats. Start by washing all the fruits well. Rinse strawberries, grapes, blueberries, and oranges under cool water. Hull the strawberries, removing the green tops. Cut large strawberries in half for easier skewering. Peel the oranges and break them into segments. For the pineapple, slice it into bite-sized pieces. Finally, rinse the green and purple grapes. Grab wooden skewers and now it’s time to thread the fruits. Begin with a strawberry, then add an orange segment. Next, add a pineapple chunk and follow with a green grape. Then, add a blueberry and finish with a purple grape or blackberry. Aim for a vibrant pattern with all the colors of the rainbow. Each skewer should look fun and inviting! If you want to add a bit of sweetness, drizzle honey over the skewers. This step is optional, but it can enhance the flavors. For a refreshing treat, chill the skewers in the fridge for about 30 minutes before serving. Arrange them on a lovely platter and add fresh mint leaves for a pop of color. These simple steps make your rainbow fruit skewers look and taste amazing. For more detailed instructions, check the Full Recipe. Choosing ripe fruits is key for tasty skewers. Look for bright colors and firm texture. For strawberries, pick those that are deep red. Oranges should feel heavy and have smooth skin. Pineapples should have a sweet smell and give slightly when pressed. Grapes are ripe when they are plump and not wrinkled. Blueberries should be deep blue, while purple grapes should show no signs of green. When skewering, use sturdy wooden sticks or metal skewers. Start with a strawberry at the bottom. Follow with an orange segment and then a pineapple chunk. Next, add a green grape and a blueberry. Finish with a purple grape or blackberry on top. This order keeps the colors bright and fun. Space the fruits a bit apart to allow for easy eating. For parties, arrange your skewers on a big platter. Display them upright in a tall glass or jar. This makes them easy to grab. You can add a small bowl of honey for dipping. Fresh mint leaves add a nice touch and flavor. Guests will love the colors and the taste! For more ideas, check out the Full Recipe. {{image_2}} You can switch up the fruits in your skewers. Try using kiwi instead of orange for a tangy taste. Swap in mango for a sweeter flavor, or use raspberries for a tart kick. Here are some great options: - Kiwi - Mango - Raspberries - Peaches - Apples These fruits add different colors, flavors, and textures. You can mix and match based on what you like. Get creative with your combinations! Dips can make your fruit skewers even more fun. You can serve them with yogurt or chocolate sauce. Here are some tasty ideas: - Vanilla yogurt - Honey yogurt - Chocolate sauce - Nut butter Dipping adds a new layer of flavor. You can make a small bowl for each dip. This way, everyone can enjoy their favorite! Make your skewers special for holidays or parties. For a birthday, use colorful sprinkles on your yogurt dip. For summer picnics, create a “beach” theme with coconut flakes. You can also arrange the fruits in shapes, like stars or hearts. This adds a fun touch to your dish. For more details on making these colorful treats, check the Full Recipe. To keep your rainbow fruit skewers fresh, store them in the fridge. Place them in an airtight container. This helps prevent the fruits from drying out or absorbing odors. If you plan to serve them later, keep the honey separate until just before serving. This way, the skewers stay crisp and colorful. When prepping your skewers, wash and cut your fruits ahead of time. Keep them in separate containers for easy access. This makes it simple to assemble the skewers when you’re ready. If you want to make them in advance, prepare them a few hours before serving. Just remember to refrigerate them to keep them fresh. Most fruits have a good shelf life when stored correctly. Here’s a quick guide: - Strawberries: 3–5 days - Oranges: 1–2 weeks - Pineapple: 3–5 days - Grapes: 1 week - Blueberries: 1 week - Blackberries: 3–5 days Always check for freshness before using any fruit. By following these tips, your rainbow fruit skewers will stay vibrant, tasty, and ready to enjoy! For the full recipe, check back on the main article. Yes, you can use frozen fruits for skewers. However, they may not hold their shape well. Frozen fruits often lose some water when thawed. This can make them mushy. If you want to use them, let them thaw first. Pat them dry with a towel to reduce excess moisture. This way, they won’t drip and make a mess. To boost the nutrition of your rainbow fruit skewers, consider these tips: - Add a source of protein. Use yogurt, cheese cubes, or nuts. - Include seeds. Sprinkle chia or flaxseed on the fruit. - Use whole fruits instead of fruit juice. Whole fruits have more fiber. - Mix in some veggies. Cherry tomatoes or cucumber slices can add crunch. These small changes can make your skewers even healthier without losing flavor. For a summer picnic, the best fruits are those that are sweet and refreshing. Here are some great choices: - Strawberries: Juicy and easy to eat. - Watermelon: Hydrating and fun to slice. - Pineapple: Sweet and tangy. - Grapes: Bite-sized and portable. - Blueberries: Packed with antioxidants. - Raspberries: Tart and flavorful. These fruits not only taste great but also look beautiful on your skewers. You can find the full recipe for rainbow fruit skewers [here]. Enjoy! Rainbow fruit skewers are fun and easy to make. We covered the best fruits, optional sweeteners, and cool presentation ideas. You learned how to prep the fruit and assemble the skewers step by step. I shared tips on choosing ripe fruit and serving them at gatherings. We also explored variations, like adding dips and themed designs. Finally, I discussed how to store your skewers for freshness. Now, grab your favorites and get creative with your skewers! Enjoy these tasty treats while having fun with friends and family.](https://dailydishly.com/wp-content/uploads/2025/06/1f4123b9-dd53-4d15-af26-e58167d567ef-768x768.webp)
![To make a refreshing Lemon Basil Chickpea Salad, you need the following: - 1 can (15 oz) chickpeas, drained and rinsed - 1 cup cherry tomatoes, halved - 1 cucumber, diced - 1 bell pepper (any color), diced - 1/4 red onion, finely chopped - 1/4 cup fresh basil leaves, chopped - Juice of 1 lemon - 3 tablespoons extra-virgin olive oil - Salt and pepper to taste - 1/4 teaspoon garlic powder - 1/4 teaspoon red pepper flakes (optional) When picking your produce, choose firm tomatoes and bright, crisp cucumbers. Look for bell peppers that feel heavy for their size. Fresh basil should smell sweet and look vibrant. These tips help ensure your salad shines with flavor. You can add extra flavor and texture to your salad with these options: - Avocado, diced for creaminess - Feta cheese, crumbled for a salty kick - Olives, sliced for a briny touch - Grilled corn for sweetness Feel free to swap ingredients based on what’s in season. For example, use zucchini in summer or roasted butternut squash in fall. This flexibility makes the salad fun and fresh all year long. For the complete recipe, check out the [Full Recipe]. To make the Lemon Basil Chickpea Salad, start with a large bowl. Combine the following ingredients: - 1 can (15 oz) chickpeas, drained and rinsed - 1 cup cherry tomatoes, halved - 1 cucumber, diced - 1 bell pepper (any color), diced - 1/4 red onion, finely chopped - 1/4 cup fresh basil leaves, chopped Mix these well. The chickpeas add protein and texture. The tomatoes and cucumber bring freshness and crunch. The bell pepper adds color, while the onion gives a mild zing. Once mixed, let’s prepare the dressing. You can serve the salad right away, but I suggest letting it sit for at least 10 minutes. This time helps the flavors blend nicely. For the dressing, grab a small bowl. Whisk together these ingredients: - Juice of 1 lemon - 3 tablespoons extra-virgin olive oil - Salt and pepper to taste - 1/4 teaspoon garlic powder - 1/4 teaspoon red pepper flakes (optional) The lemon juice gives a bright, tangy taste. Olive oil adds richness. Adjust the salt and pepper to your liking. If you want a kick, add the red pepper flakes. Aim for a smooth blend in your dressing. Drizzle it over your salad and toss gently. Taste the salad and adjust seasoning if needed. Enjoy this vibrant dish fresh, or chill it for a refreshing bite. For the full recipe, check out the detailed instructions. You can pair Lemon Basil Chickpea Salad with many dishes. It goes well with grilled chicken or fish. You can also serve it with warm pita bread for a filling meal. For a light lunch, try it with a scoop of quinoa. When presenting the salad, use a large, bright bowl. This makes the colors pop and draws attention. Garnish with extra basil leaves or lemon slices for a fresh look. Adjusting the seasonings can make this salad perfect for your taste. If you like more zest, add extra lemon juice. For added heat, sprinkle in more red pepper flakes. You can also mix in more garlic powder for a stronger flavor. If you have leftovers, store them in an airtight container. To enhance the flavors, let the salad rest for a bit before eating. Reheating is not usually needed, but you can warm it slightly if you prefer. Just be careful not to heat it too much, as the fresh veggies taste best cold. {{image_2}} You can easily switch up the vegetables in your Lemon Basil Chickpea Salad. Here are some ideas: - Zucchini: Grate or dice it for a fresh crunch. - Carrots: Shred them for a sweet touch. - Corn: Add sweet corn for extra flavor and texture. You can also swap out chickpeas for other legumes: - Black beans: They add a rich, earthy taste. - Lentils: These will make your salad even heartier. For herbs, feel free to get creative: - Mint: It gives a refreshing twist. - Cilantro: Perfect if you love its bold flavor. When it comes to dressings, you can personalize it: - Balsamic vinaigrette: Adds a tangy sweetness. - Greek yogurt dressing: For a creamy element. This salad is versatile for different diets. To make it vegan, simply ensure the dressing is plant-based. You can replace any non-vegan ingredients with plant-friendly options: - Use nutritional yeast instead of cheese for a cheesy flavor without dairy. For gluten-free needs, this salad is already safe! Just make sure any added ingredients are gluten-free. To lower calories, skip the oil or use less. You can also add more veggies to bulk it up without extra calories. If you want to boost protein, consider these options: - Feta cheese: Crumble it on top for creamy richness. - Grilled chicken: Adds heartiness and flavor. With these variations, your Lemon Basil Chickpea Salad can fit any taste or diet. Check out the Full Recipe for all the details! To keep your Lemon Basil Chickpea Salad fresh, store it in an airtight container. Glass containers work well, but plastic ones are fine too. Make sure the lid closes tightly. Place the salad in the fridge right away. This helps lock in flavors and keeps everything crisp. If you have extra dressing, store it separately. This way, your salad won’t get soggy. When you’re ready to eat, simply drizzle the dressing over the salad and toss it again. Your salad will stay fresh in the fridge for about three days. After that, the veggies may lose their crunch. Look for signs of spoilage. If the salad smells off or looks slimy, it’s time to toss it. Make sure to check the basil too. If the leaves turn brown or wilt, it’s best to discard them. Enjoy your salad while it’s fresh for the best taste. For the full recipe, check [Full Recipe]. What can I add to make this salad heartier? You can add cooked quinoa or farro for more fiber. Chopped avocado adds creaminess. Grilled chicken or shrimp boosts protein. Can I make this salad ahead of time? Yes, you can make this salad ahead. It tastes even better after sitting for a while. Just store it in the fridge. Is there a substitute for chickpeas in this recipe? If you don't have chickpeas, try black beans or cannellini beans. Both offer protein and a nice texture. This salad is not just tasty; it’s healthy too. One serving has about 250 calories. It has 10 grams of fat and 12 grams of protein. - Chickpeas provide protein and fiber. - Tomatoes add vitamins and antioxidants. - Cucumbers keep the salad light and refreshing. - Basil offers flavor and has anti-inflammatory properties. How to make the salad more flavorful? To enhance the taste, add more lemon juice or fresh herbs. A pinch of cumin can also add depth. Recommendation for preparing for meal prepping When meal prepping, keep the dressing separate. This keeps the salad fresh and crisp. Store it in airtight containers for best results. This blog post walked you through making a fresh and tasty Lemon Basil Chickpea Salad. We covered the main ingredients and tips for choosing the best produce. You learned how to make a flavorful dressing and plenty of serving ideas. In conclusion, this salad is easy to customize for any diet and season. With proper storage, it stays fresh and tasty for days. Enjoy making this salad and share it with friends and family for a healthy treat!](https://dailydishly.com/wp-content/uploads/2025/07/d3747d36-0043-45e0-9a82-fe789303a34f-768x768.webp)


![To make crispy baked sweet potato fries, you need a few key ingredients: - 2 large sweet potatoes, cut into fries - 2 tablespoons olive oil - 1 teaspoon cornstarch - 1 teaspoon paprika - 1/2 teaspoon garlic powder - 1/2 teaspoon onion powder - 1/4 teaspoon cayenne pepper (optional for heat) - Salt and pepper to taste - Fresh parsley, chopped (for garnish) Using quality ingredients makes a big difference in taste. Fresh sweet potatoes give your fries a lovely flavor. Good olive oil adds richness. The cornstarch helps achieve that perfect crispiness. You can enhance your fries with extra seasonings. Try adding: - Chili powder for a smoky kick - Italian herbs for a fresh taste - Parmesan cheese for a savory touch When it comes to dips, the options are endless! Serve your fries with: - Spicy mayo for some heat - Ketchup for a classic combo - Garlic aioli for a fancy twist These additions make your crispy baked sweet potato fries even more fun and tasty! For the complete recipe, check out the [Full Recipe]. 1. Preheat your oven to 425°F (220°C). This helps the fries crisp up well. 2. Line a baking sheet with parchment paper. This keeps the fries from sticking. 3. Cut the sweet potatoes into strips. Aim for uniform sizes for even cooking. 4. In a large bowl, toss the fries with olive oil. Ensure they are nicely coated. 5. Sprinkle cornstarch, paprika, garlic powder, onion powder, cayenne pepper, salt, and pepper. Toss again until all fries are coated. 1. Spread the fries in a single layer on the baking sheet. Do not crowd them. 2. Bake for 25 to 30 minutes. Flip them halfway for even crispiness. 3. Check for a crispy golden brown color on the edges. This means they are done. 1. Once baked, remove the fries from the oven and let them cool for a few minutes. 2. Garnish with fresh parsley for a pop of color. 3. Serve the fries in a cone or basket lined with parchment paper. 4. Add a small bowl of your favorite dip, like spicy mayo or ketchup, for fun. For a full recipe, check the detailed guide provided earlier. To make your sweet potato fries crispy, follow a few key steps. First, coat the fries in olive oil. This helps them brown nicely. Next, add cornstarch to the mix. Cornstarch absorbs moisture and creates a crispy outer layer. When you place the fries on the baking sheet, spread them out. Do not overcrowd the pan. If they are too close, they will steam instead of crisp. Give each fry room to breathe, so they can cook evenly. Avoid cutting the fries too thick. Thin fries cook better and become crispier. Another mistake is not flipping the fries halfway through baking. Flipping ensures even cooking and browning on both sides. If your fries turn out soggy, check the oil and cornstarch amounts. You may need to adjust these. Also, ensure that your baking sheet is not crowded. If you follow these tips, you will have perfect crispy fries every time! {{image_2}} You can change the taste of your crispy baked sweet potato fries with different seasonings. Here are some ideas: - Cajun Spice: Use Cajun seasoning for a bold flavor. - Italian Herbs: Mix in dried oregano and basil for a fresh twist. - Cinnamon Sugar: For a sweet option, dust with cinnamon and sugar after baking. - Taco Seasoning: Add taco seasoning for a fun, zesty kick. Experiment with spice blends and herbs to find your favorite taste. You can cook sweet potato fries in different ways. Each method gives a unique texture and flavor. - Air Frying: This method uses less oil and can make fries even crispier. Cook at 400°F for about 20 minutes. - Deep Frying: For a classic taste, deep fry in hot oil until golden. This method gives a crunchy exterior but uses more oil. - Baking: The original method yields a lighter fry. Bake at 425°F for 25-30 minutes, flipping halfway through. Each method has its pros and cons, so try them all to find your favorite! To store your crispy baked sweet potato fries, first, let them cool completely. This step helps keep them crispy. Place the fries in an airtight container. Use a container that has a tight seal to prevent moisture. You can keep them in the fridge for up to three days. When you're ready to eat them, reheat in the oven at 400°F (200°C) for about 10-15 minutes. This method helps restore their crunch. You can freeze both raw and cooked sweet potato fries. For raw fries, cut and coat them as you would for baking. Spread them in a single layer on a baking sheet. Freeze them for about two hours until solid. Then, transfer the fries to a freezer bag. Remove as much air as possible before sealing. They can stay in the freezer for up to three months. To cook from frozen, preheat the oven to 425°F (220°C). Spread the frozen fries on a baking sheet. Bake for 25-30 minutes, flipping halfway through. This method gives you crispy fries without thawing. Enjoy your delicious fries anytime! For the full recipe, check out the detailed steps above. Bake sweet potato fries at 425°F for 25 to 30 minutes. This time gives you crispy edges and soft centers. Flip them halfway through to ensure even cooking. Keep an eye on them. Ovens can vary, so adjust the time as needed. Look for a golden color to know they are done. Yes, you can use other potatoes. Regular russet potatoes work great for fries. They may not be as sweet, but they can still be crispy. You could also try Yukon gold or purple potatoes. Each type gives a different taste and texture. Just remember to adjust the baking time as needed. To add heat, sprinkle cayenne pepper over the fries. You can also add chili powder or crushed red pepper flakes. Mix spices with olive oil before coating the fries. This helps the heat stick better. Start with a little and taste as you go. Adjust based on your spice tolerance. In this post, we explored how to make perfect sweet potato fries. We covered essential ingredients, preparation steps, and cooking methods. I shared tips to achieve crispiness and avoid common mistakes. You also learned about flavor variations and the best ways to store leftovers. Making great fries can be easy and fun. By using quality ingredients and following the steps, you’ll enjoy delicious, crispy fries every time. Now, gather your supplies and get cooking for a tasty treat!](https://dailydishly.com/wp-content/uploads/2025/07/5c45319a-0858-4d48-b29a-502acd419023-768x768.webp)
