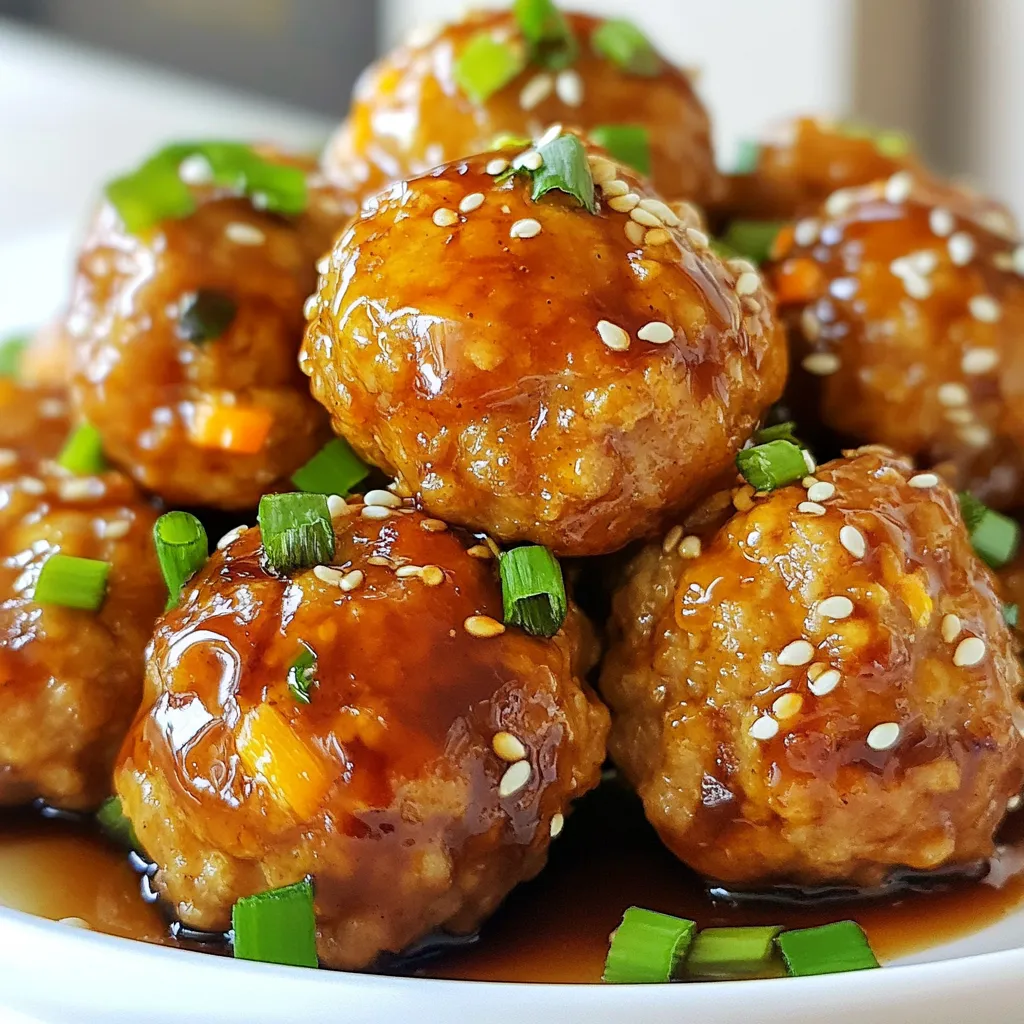
Looking for a quick and tasty dinner idea? Dive into my Teriyaki Chicken Meatballs recipe! This dish is simple to make and packed with flavor. With just a few key ingredients, you can whip up juicy meatballs, covered in a sweet and savory teriyaki sauce. Perfect for busy weeknights or meal prep! Let’s get started and make your new favorite dinner!
Why I Love This Recipe
- Quick and Easy: This recipe can be prepared in just 15 minutes, making it a perfect weeknight dinner option.
- Flavorful Teriyaki Sauce: The homemade teriyaki sauce adds a sweet and savory punch that pairs perfectly with the chicken meatballs.
- Healthy Ingredients: Packed with lean protein and veggies like carrots and green onions, these meatballs are a nutritious choice.
- Versatile Dish: These meatballs can be served on their own, over rice, or in a wrap, making them incredibly versatile.
Ingredients
Main Ingredients for Teriyaki Chicken Meatballs
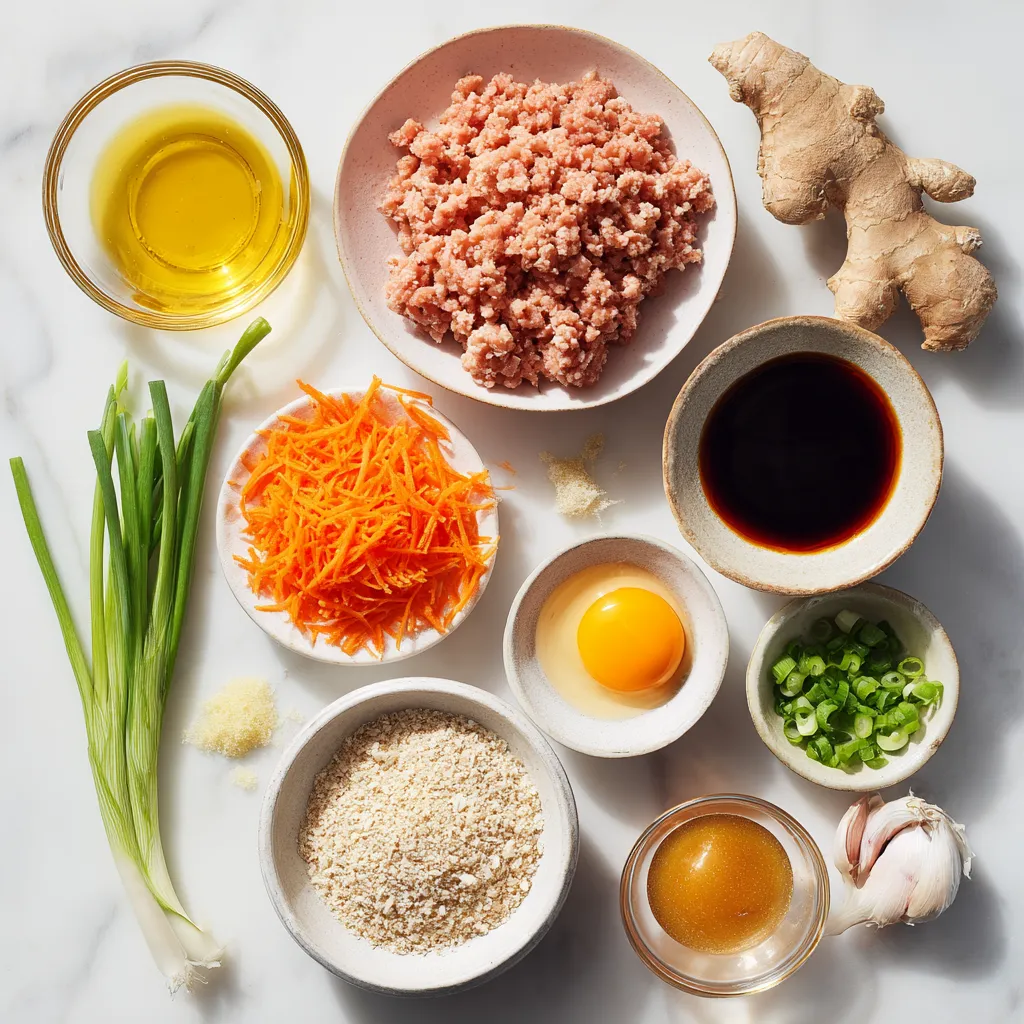
– 1 lb ground chicken
– 1/4 cup breadcrumbs
– 1/4 cup grated carrot
– 1/4 cup green onions, finely chopped
– 1 garlic clove, minced
– 1 tablespoon ginger, minced
– 1 egg, lightly beaten
For the meatballs, I use ground chicken. This keeps them light and tasty. Breadcrumbs help bind everything together. Grated carrot adds sweetness and color. I love using green onions for a fresh kick. Minced garlic and ginger give a great flavor boost. I add a beaten egg to hold the mixture well.
Teriyaki Sauce Ingredients
– 1/4 cup soy sauce
– 2 tablespoons honey
– 1 tablespoon rice vinegar
– 1 tablespoon sesame oil
– 1 teaspoon cornstarch mixed with 1 tablespoon water (slurry for sauce)
The teriyaki sauce is simple yet packed with flavor. Soy sauce brings a savory depth. Honey adds sweetness that balances the salt. Rice vinegar gives a nice tang. Sesame oil adds a unique aroma. The cornstarch slurry thickens the sauce just right.
Garnishing Ingredients
– Sesame seeds
– Additional green onions
For garnish, I sprinkle sesame seeds on top. They add crunch and a nutty flavor. I also like to add more green onions for color and freshness.
Step-by-Step Instructions
Preparation of Meatball Mixture
– In a large bowl, combine:
– 1 lb ground chicken
– 1/4 cup breadcrumbs
– 1/4 cup grated carrot
– 1/4 cup finely chopped green onions
– 1 minced garlic clove
– 1 tablespoon minced ginger
– 1 lightly beaten egg
– Mix these ingredients well. Make sure they blend together.
Baking Meatballs
– Preheat your oven to 400°F (200°C).
– Line a baking sheet with parchment paper.
– Using your hands, form tablespoon-sized meatballs. Place them on the sheet. Leave about an inch between each.
– Bake for 15-20 minutes. Look for golden brown meatballs that are fully cooked.
Making the Teriyaki Sauce
– In a small saucepan, combine:
– 1/4 cup soy sauce
– 2 tablespoons honey
– 1 tablespoon rice vinegar
– 1 tablespoon sesame oil
– Heat this mixture over medium heat. Stir until it warms and mixes well.
– To thicken, add 1 teaspoon cornstarch mixed with 1 tablespoon water. Keep stirring for 1-2 minutes until thickened.
– Remove from heat and set aside.
Now, your teriyaki chicken meatballs are almost ready!
Tips & Tricks
Achieving Perfect Meatballs
To keep your meatballs moist, use ground chicken with some fat. The fat helps keep them juicy. You can also mix in grated carrot, which adds both moisture and flavor. Form the meatballs gently; avoid pressing them too hard. This keeps them light. For even cooking, place them on a baking sheet with space in between. This allows hot air to circulate.
Sauce Consistency
If you want a thicker sauce, just add more cornstarch slurry. Mix one teaspoon of cornstarch with one tablespoon of water. Stir this mixture into the sauce over heat. If the sauce is too thick, add a splash of water or more soy sauce. You can also play with flavors. Try adding pineapple juice for sweetness, or chili paste for heat.
Serving Suggestions
Serve your meatballs over rice or noodles. The sauce coats everything nicely. Steamed broccoli or snap peas make great sides. If you have leftovers, store them in an airtight container. You can reheat them in the microwave or oven. They taste great on their own or in a sandwich, too!
Pro Tips
- Choose the Right Chicken: Using ground chicken thigh instead of breast will yield juicier and more flavorful meatballs.
- Don’t Overmix: Mix the meatball ingredients just until combined to avoid tough meatballs; a gentle hand goes a long way.
- Uniform Size Matters: Ensure all meatballs are roughly the same size for even cooking and consistent texture.
- Let it Rest: Allow the meatballs to rest for a few minutes after baking; this helps them retain their juices and enhances flavor.
Variations
Alternative Sauces
You can change up the flavor of your teriyaki chicken meatballs. Here are two tasty options:
– Sweet and spicy teriyaki: Add some chili paste or sriracha to the sauce. This gives the dish a nice kick and balances the sweet flavors.
– Peanut sauce variation: Mix peanut butter into the teriyaki sauce. This makes it creamy and rich. It pairs well with the chicken meatballs.
Ingredient Swaps
You don’t have to stick with just ground chicken. Here are some swaps to try:
– Using turkey or pork: Ground turkey works well and is leaner. Ground pork adds richness and flavor. Both are great options.
– Gluten-free options: Use gluten-free soy sauce. This keeps the dish safe for those with gluten allergies. You can also swap breadcrumbs for gluten-free crumbs.
Cooking Methods
You can cook your meatballs in different ways. Here are two methods to consider:
– Pan-frying vs baking: Pan-frying gives a crispy outside. Baking is easier and healthier. Both methods work great for cooking meatballs.
– Slow cooker teriyaki meatballs: You can cook meatballs in a slow cooker. Just mix them with teriyaki sauce. Cook on low for 4-6 hours for tender, flavorful meatballs.
Storage Info
Storing Leftover Meatballs
To keep your teriyaki chicken meatballs fresh, follow these tips:
– Refrigerating: Place the meatballs in an airtight container. They stay good for 3-4 days in the fridge.
– Freezing: If you want to freeze them, use a freezer-safe bag. They can last for up to 3 months in the freezer.
Reheating Tips
When it’s time to enjoy leftovers, you have options:
– Microwave: Heat meatballs on a microwave-safe plate. This takes about 1-2 minutes.
– Oven: Preheat your oven to 350°F (175°C). Bake meatballs for about 10-15 minutes.
To keep meatballs moist, add a splash of water or teriyaki sauce before reheating.
Meal Prep Suggestions
Make weeknights easier by prepping ahead:
– Prepping: Form meatballs ahead of time. Store them in the fridge or freezer.
– Sauce: Keep the teriyaki sauce separate. This prevents the meatballs from getting soggy.
FAQs
How do I know when the meatballs are fully cooked?
You can tell meatballs are done by checking their color and temperature. They should be golden brown on the outside, and the inside should be white and firm. Use a meat thermometer to check if they reach 165°F (74°C). This ensures they are safe to eat. The baking time is usually 15-20 minutes, but keep an eye on them. If they look juicy and cooked through, you are good to go!
Can I make teriyaki chicken meatballs ahead of time?
Yes, you can make teriyaki chicken meatballs ahead of time! You can prepare the meatballs and keep them in the fridge for up to 24 hours. Just cover them well. If you want to freeze them, place uncooked meatballs on a tray. Freeze them for a few hours until firm, then transfer to a bag. They can last up to three months in the freezer. When ready, bake from frozen, adding a few extra minutes to the cooking time.
What can I pair with teriyaki chicken meatballs?
Teriyaki chicken meatballs taste great with many sides! Here are a few ideas:
– Steamed rice: White or brown rice works well.
– Vegetables: Try steamed broccoli, snap peas, or bell peppers.
– Noodles: Serve them over soba or rice noodles for a fun twist.
– Salad: A fresh green salad can balance the flavors.
– Dipping sauces: Offer soy sauce or a spicy mayo for extra flavor.
These pairings make your meal tasty and colorful!
You learned how to make tasty teriyaki chicken meatballs. We covered the key ingredients, from ground chicken to the sauce. I shared step-by-step instructions for making the meatballs and sauce. You also got tips for perfect cooking and storing leftovers.
These meatballs are versatile and fun to make. Try different sauces and cooking methods to suit your taste. Enjoy making and sharing this dish with friends and famil


