Teriyaki Salmon Rice Bowls Healthy and Flavorful Dish

If you’re searching for a quick, tasty meal, look no further than Teriyaki Salmon Rice Bowls. This dish is packed with flavor and offers a healthy option for dinner. You can enjoy tender salmon, soft rice, and a tasty sauce all in one bowl. Whether you need dinner for one or a family feast, you will love this dish. Let’s dive into the simple steps to create this satisfying meal!
Why I Love This Recipe
- Delicious Flavor Combination: This teriyaki salmon rice bowl is a perfect blend of savory, sweet, and umami flavors that will leave your taste buds wanting more.
- Healthy Ingredients: Packed with nutritious ingredients like salmon, broccoli, and carrots, this recipe is not only delicious but also health-conscious.
- Quick and Easy to Prepare: With a total time of just 40 minutes, this recipe is perfect for busy weeknights when you still want a wholesome meal.
- Customizable Options: You can easily modify this recipe by adding your favorite vegetables or adjusting the sauce to suit your taste preferences.
Ingredients
Essential Ingredients for Teriyaki Salmon Rice Bowls
To make a tasty teriyaki salmon rice bowl, you’ll need:
– 2 salmon fillets (about 6 oz each)
– 1 cup jasmine rice
– 2 cups water or broth (for cooking rice)
– 1/4 cup soy sauce (low sodium)
– 2 tablespoons honey or maple syrup
– 1 tablespoon rice vinegar
– 1 teaspoon sesame oil
– 1 tablespoon fresh ginger, minced
– 2 cloves garlic, minced
– 1 cup steamed broccoli florets
– 1 cup shredded carrots
– 2 green onions, sliced
– Sesame seeds for garnish
These ingredients create a delightful balance of flavors. The salmon brings a rich taste, while the vegetables add freshness.
Optional Ingredients for Enhanced Flavor
You can take your teriyaki salmon rice bowls to the next level with these extras:
– 1 tablespoon cornstarch (for thickening the sauce)
– Additional veggies like bell peppers or snap peas
– Chili flakes for a spicy kick
These options let you customize the dish to your liking. Feel free to get creative!
Cooking Tools Needed
You will need a few simple tools to make this dish:
– A pot for cooking the rice
– A small saucepan for the sauce
– A non-stick skillet for the salmon
– A fork for fluffing the rice
– Serving bowls for assembling the meal
Having the right tools makes cooking easier. It also helps you enjoy the process more.

Step-by-Step Instructions
Preparing the Rice
Start by rinsing 1 cup of jasmine rice under cold water. Keep rinsing until the water runs clear. This helps remove extra starch. Next, put the rinsed rice in a pot with 2 cups of water or broth. Bring it to a boil. Once boiling, reduce the heat to low. Cover the pot and let it simmer for 15 minutes. The water should be absorbed by then. After 15 minutes, remove the pot from heat. Let it sit, still covered, for 5 more minutes. Finally, fluff the rice with a fork.
Making the Teriyaki Sauce
In a small saucepan, mix together 1/4 cup of low-sodium soy sauce, 2 tablespoons of honey, 1 tablespoon of rice vinegar, and 1 teaspoon of sesame oil. Add 1 tablespoon of minced ginger and 2 cloves of minced garlic. Stir it well. Heat the saucepan over medium heat until it simmers. If you want a thicker sauce, mix 1 tablespoon of cornstarch with 1 tablespoon of water. Add this mix to the sauce while stirring. Once thickened, remove from heat and set aside.
Cooking the Salmon
Take 2 salmon fillets and place them skin-side down in a non-stick skillet. Heat the skillet over medium-high heat. Cook the salmon for about 4 to 5 minutes. Don’t move the salmon; this helps the skin get crispy. After that, flip the fillets and cook for an additional 3 to 4 minutes. Drizzle half of the teriyaki sauce over the salmon in the last minute of cooking. This adds a nice glaze.
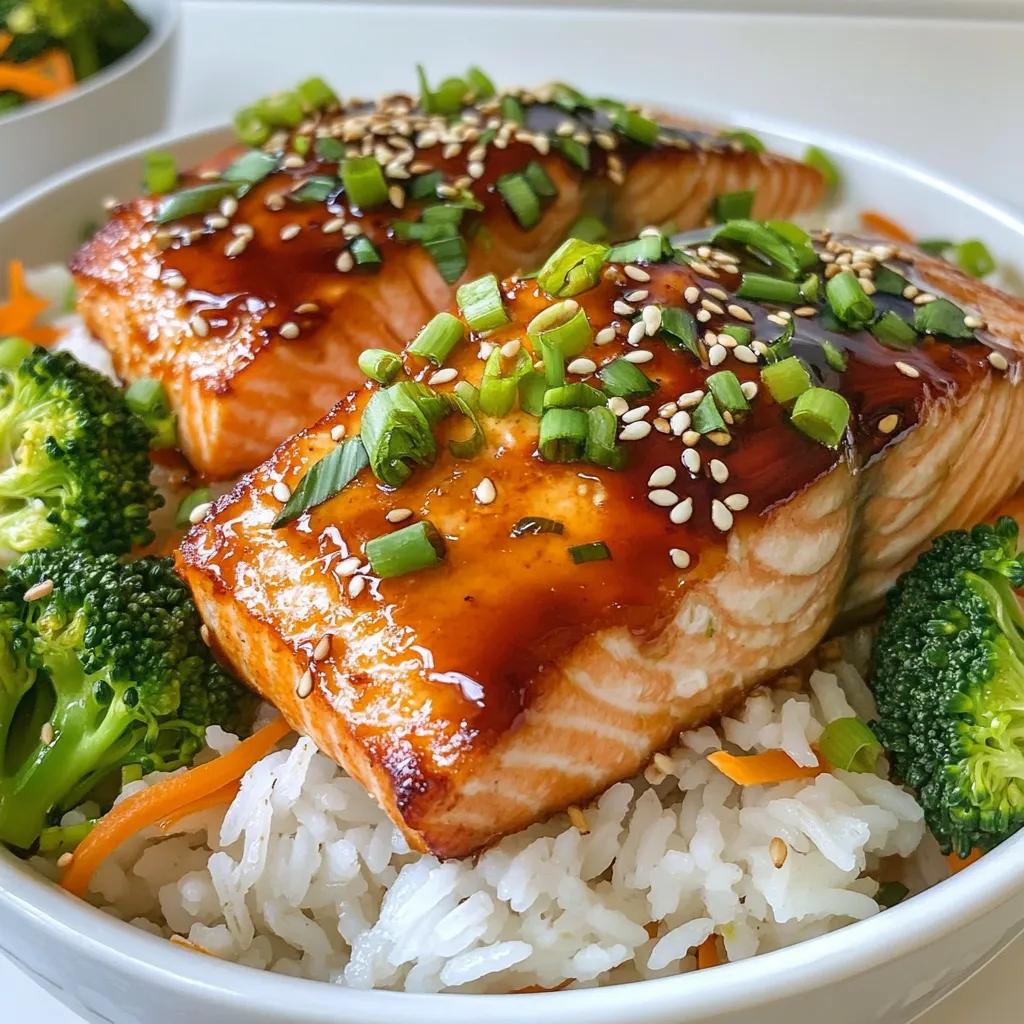
Assembling the Rice Bowls
Grab your serving bowls. Start by adding a generous portion of jasmine rice as the base. Next, add some steamed broccoli florets and shredded carrots on top. Finally, place a salmon fillet in each bowl. Drizzle the remaining teriyaki sauce over everything.
Garnishing and Serving Tips
To finish, sprinkle sliced green onions and sesame seeds on top. This adds flavor and a nice crunch. Serve the bowls warm for the best taste. Enjoy the bright colors and flavors!
Tips & Tricks
How to Achieve Perfectly Cooked Salmon
To cook salmon perfectly, start with fresh fillets. Place the salmon skin-side down in a hot non-stick skillet. Cook for 4-5 minutes without moving it. This helps the skin get crispy. Then, flip the salmon gently and cook for another 3-4 minutes. It should be tender and flaky. For extra flavor, drizzle half of the teriyaki sauce over the salmon during the last minute.
Techniques for Fluffy Jasmine Rice
To make fluffy jasmine rice, rinse it well under cold water. This removes excess starch. Combine the rinsed rice with water or broth in a pot. Bring it to a boil, then cover and reduce heat. Let it simmer for 15 minutes. After that, remove it from heat and let it rest covered for 5 minutes. Fluff the rice gently with a fork to keep it light and airy.
Tips for Homemade Teriyaki Sauce
Making teriyaki sauce at home is simple and tasty. Start by whisking soy sauce, honey or maple syrup, rice vinegar, sesame oil, minced ginger, and garlic in a small saucepan. Heat the mixture over medium heat until it simmers. For a thicker sauce, mix cornstarch with water, then stir it into the sauce and cook until it thickens. This adds a nice glaze to your salmon and rice.
Pro Tips
- Fresh Salmon is Key: Always choose the freshest salmon you can find for the best flavor and texture. Look for vibrant color and a clean, ocean-like smell.
- Perfect Rice Every Time: Rinsing the rice helps remove excess starch, resulting in fluffier grains. Don’t skip this step for the best rice texture!
- Customize Your Vegetables: Feel free to swap in your favorite vegetables or whatever you have on hand. Bell peppers, snap peas, or bok choy are great alternatives.
- Let It Rest: Allow the salmon to rest for a minute after cooking. This helps the juices redistribute, making for a moist and flavorful fillet.

Variations
Substituting Salmon with Other Proteins
You can swap salmon for other proteins. Chicken, shrimp, or tofu work well. For chicken, use boneless thighs or breasts. Cook them the same way as salmon. For shrimp, just grill or sauté them until pink. Tofu is a great option for a plant-based meal. Press it to remove water, then marinate it in the teriyaki sauce. Cook it in a non-stick skillet until golden.
Adding More Vegetables
You can boost the health factor by adding more veggies. Try bell peppers, snap peas, or bok choy. They add color and crunch. Just stir-fry them lightly before adding to your rice bowl. You want them tender but still crisp. Mix in some edamame for protein and fiber. This makes your bowl even more filling and nutritious.
Vegan or Vegetarian Ingredients Alternatives
If you want a vegan or vegetarian option, change the base protein. Use tempeh or seitan instead of fish. Both soak up flavors well and add a nice texture. For the sauce, ensure you use a vegan soy sauce or tamari. Replace honey with maple syrup or agave to keep it plant-based. With these swaps, you can enjoy a tasty, healthy dish that fits your dietary needs.
Storage Info
Refrigerating Leftovers
To keep your teriyaki salmon rice bowls fresh, store leftovers in the fridge. Place them in an airtight container. They will last for about 2 to 3 days. Make sure to cool the dish to room temperature before sealing it up. This helps prevent bacteria growth.
Freezing Tips for Teriyaki Salmon
You can freeze teriyaki salmon for later meals. Wrap the salmon fillets tightly in plastic wrap. Then, place them in a freezer-safe bag or container. This method keeps the salmon good for up to 3 months. For best taste, freeze the salmon without the rice and veggies. They don’t freeze well.
Reheating Instructions
To reheat, thaw the salmon overnight in the fridge if frozen. You can warm it in a skillet over medium heat. Add a splash of water to keep it moist. For the rice, add a little water and microwave it for about 1 minute. Stir both before serving. Enjoy your tasty meal again!
FAQs
Can I use other types of rice?
Yes, you can use other types of rice. Brown rice is a healthy choice. It has more fiber and takes longer to cook. You can also try sushi rice for a stickier texture. Just adjust the cooking times based on the rice type you choose.
What can I substitute for soy sauce?
If you need a soy sauce substitute, try tamari. It’s gluten-free and has a similar taste. Coconut aminos is another great choice. It’s sweeter and less salty than soy sauce. Both options will still give your dish a nice flavor.
How do I know when the salmon is fully cooked?
To check if the salmon is cooked, use a fork to flake it. If it flakes easily and looks opaque, it’s ready. The center should not be translucent. The internal temperature should reach 145°F. Always use a meat thermometer for the best results.
Is teriyaki sauce gluten-free?
Traditional teriyaki sauce contains soy sauce, which often has gluten. However, you can find gluten-free teriyaki sauce made with tamari or coconut aminos. Always check the label to be sure. Making your own sauce lets you control the ingredients too.
Can the recipe be doubled for larger servings?
Yes, you can easily double the recipe. Just double all the ingredients. This will give you more salmon and rice. Make sure your cooking pots are big enough for the extra food. This recipe works well for meal prep or family gatherings.
This article covers how to make Teriyaki Salmon Rice Bowls from start to finish. We explored key ingredients, cooking tools, and simple instructions. You learned tips for perfect salmon and fluffy rice, as well as variations and storage advice.
Making delicious meals at home can be easy. With these steps, you can impress your family and friends. Enjoy trying new flavors and don’t hesitate to experimen

Teriyaki Salmon Rice Bowls
Ingredients
- 2 fillets salmon fillets (about 6 oz each)
- 1 cup jasmine rice
- 2 cups water or broth (for cooking rice)
- 1 4 cup soy sauce (low sodium)
- 2 tablespoons honey or maple syrup
- 1 tablespoon rice vinegar
- 1 teaspoon sesame oil
- 1 tablespoon fresh ginger, minced
- 2 cloves garlic, minced
- 1 tablespoon cornstarch (optional, for thickening sauce)
- 1 cup steamed broccoli florets
- 1 cup shredded carrots
- 2 green onions sliced
- to taste sesame seeds for garnish
Instructions
- Prepare the Rice: Rinse the jasmine rice under cold water until the water runs clear. In a pot, combine rinsed rice and water (or broth). Bring to a boil, then reduce the heat to low, cover, and simmer for 15 minutes or until water is absorbed. Remove from heat and let it sit covered for 5 minutes before fluffing with a fork.
- Make the Teriyaki Sauce: In a small saucepan, whisk together soy sauce, honey (or maple syrup), rice vinegar, sesame oil, minced ginger, and garlic. Bring the mixture to a simmer over medium heat. If you prefer a thicker sauce, mix the cornstarch with 1 tablespoon of water and add to the sauce, stirring until thickened. Remove from heat and set aside.
- Cook the Salmon: In a non-stick skillet over medium-high heat, add the salmon fillets skin-side down. Cook for about 4-5 minutes without moving until the skin is crispy. Flip the salmon and cook for an additional 3-4 minutes or until cooked to your liking. Drizzle half of the teriyaki sauce over the salmon in the last minute of cooking.
- Assemble the Bowls: In serving bowls, add a portion of jasmine rice as the base. Top with steamed broccoli, shredded carrots, and a salmon fillet. Drizzle the remaining teriyaki sauce over the top.
- Garnish and Serve: Sprinkle sliced green onions and sesame seeds on top for added texture and flavor. Serve immediately while warm.


. To start, grab a large mixing bowl. Open the can of black beans, rinse, and drain them. Use a fork or potato masher to mash the beans. Aim for a mostly smooth texture but leave some chunks for bite. Next, add the cooked quinoa, breadcrumbs, and chopped red onion. Toss in the finely chopped bell pepper, minced garlic, and spices: chili powder, cumin, smoked paprika, salt, and pepper. Finally, squeeze in the lime juice. Mix everything until it feels well combined. If the mixture is too wet, sprinkle in more breadcrumbs until it can hold its shape. Once your mixture is ready, divide it into four equal parts. Shape each part into a patty that is about one inch thick. Heat olive oil in a non-stick skillet over medium heat. When the oil is hot, carefully place the patties in the skillet. Cook each side for about 4-5 minutes. Look for a golden brown color and ensure they are heated through. This step gives the burgers a nice crispy edge. Now it's time to serve your spicy black bean burgers! Place each patty on a hamburger bun. Top with your favorite ingredients, like avocado slices, lettuce, tomato, and spicy mayo. For a beautiful plate, pair the burgers with sweet potato fries or a mixed greens salad. The colors will look great together and make your meal even more appetizing. For the full recipe, check the details above. To get the best texture, mash your black beans well. Leave some chunks for that hearty bite. Add cooked quinoa to bind everything together. Use breadcrumbs or oat flour for a firmer patty. If the mix feels too wet, just add more breadcrumbs. This helps the burgers hold their shape. Want more heat? Try adding chopped jalapeños or a dash of cayenne pepper. You can also mix in some hot sauce or sriracha for an extra kick. Don’t forget to taste as you go! Adjust the spices until you get the flavor you want. Fresh herbs like cilantro can brighten up the taste too. Store cooked burgers in an airtight container. They will stay fresh for about three days in the fridge. To reheat, use the skillet on medium heat. Cook for about three minutes on each side. You can also microwave them for a quicker option; just cover them to keep moisture. If you want longer storage, freeze the uncooked patties. They’ll last up to three months in the freezer. Enjoy them anytime with the full recipe! {{image_2}} You can swap black beans for other beans. Chickpeas or kidney beans work well. Each bean brings a unique flavor and texture. For example, chickpeas add a nutty taste. Kidney beans give a softer bite. Just mash them like you do with black beans. Follow the same recipe steps for great results. Want more nutrition? Add grains or veggies to your burger mix. Cooked brown rice or farro can boost fiber. You can also mix in grated carrots or zucchini. These add moisture and flavor. Just remember to squeeze out excess water from veggies. This keeps your burger from getting too wet. Experimenting with spices can change your burger game. Try adding smoked chipotle for heat. Or mix in fresh herbs like cilantro or parsley. For a Mediterranean twist, add oregano and feta cheese. These spices and herbs change the flavor and make it exciting. Don't be afraid to get creative with what you have! For the full recipe, check out the detailed steps above. To keep your cooked spicy black bean burgers fresh, let them cool first. Place them in an airtight container. Store them in the fridge for up to three days. This helps maintain their flavor and texture. Freezing your burgers is a great option for meal prep. After they cool, wrap each burger in plastic wrap. Then, place them in a freezer-safe bag. They can last up to three months in the freezer. When you’re ready to eat, just thaw them in the fridge overnight. Use glass or BPA-free plastic containers for best results. These containers seal tightly and prevent air from entering. This keeps your burgers from drying out. If you’re freezing, look for heavy-duty freezer bags. They help protect against freezer burn. To make your Spicy Black Bean Burgers stick, you need the right balance. Start by mashing the black beans well. Leave some chunks for texture. Mix in breadcrumbs or oat flour. This helps hold the burgers together. If the mix feels too wet, add more breadcrumbs. You want a moldable consistency. This simple trick ensures your burgers stay intact while cooking. You can serve many tasty sides with Spicy Black Bean Burgers. Here are some great options: - Sweet potato fries - Mixed greens salad - Coleslaw - Grilled vegetables - Corn on the cob These sides add color and flavor to your meal. They also complement the burgers well. Feel free to mix and match to find what you like best! Yes, you can bake black bean burgers! Baking is a healthier option. Preheat your oven to 375°F (190°C). Line a baking sheet with parchment paper. Place the shaped patties on it. Bake for about 20-25 minutes. Flip them halfway for even cooking. You’ll still get a nice texture without frying. This method works well and keeps the burgers light! To sum up, we explored how to make tasty spicy black bean burgers. We looked at key ingredients, cooking steps, and tips for the perfect texture. You can try fun variations and learn how to store leftovers. These burgers are easy to tweak for your tastes. They are delicious and healthy. Enjoy making them your own, and share with friends!](https://dailydishly.com/wp-content/uploads/2025/06/bb742c5e-0c76-419c-af3f-f1da08f0abd3-768x768.webp)


![For my roasted veggie tacos, I love using a mix of colorful veggies. Here’s what I suggest: - 1 zucchini, diced - 1 red bell pepper, diced - 1 yellow bell pepper, diced - 1 red onion, diced - 1 cup cherry tomatoes, halved These veggies not only taste great, but they also look vibrant. You can easily swap in your favorites. To make these tacos truly flavorful, I use some simple seasonings: - 2 tablespoons olive oil - 1 teaspoon ground cumin - 1 teaspoon smoked paprika - Salt and pepper to taste These spices bring out the best flavors in the veggies. The olive oil helps them roast perfectly. Once your tacos are ready, it's time for the fun part: the toppings! I recommend: - 8 small corn tortillas - 1 avocado, sliced - Fresh cilantro, for garnish - Lime wedges, for serving The creamy avocado and fresh cilantro add a nice touch. Squeezing lime over the tacos gives them a bright finish. For the full recipe, check out the detailed cooking steps! Start by preheating your oven to 425°F (220°C). This high heat helps the veggies roast well. You want them to be soft and slightly charred. Next, gather your vegetables. You will need: - 1 zucchini, diced - 1 red bell pepper, diced - 1 yellow bell pepper, diced - 1 red onion, diced - 1 cup cherry tomatoes, halved In a large bowl, toss all the diced veggies together. This ensures they mix well. Drizzle 2 tablespoons of olive oil over the vegetables. Then, add: - 1 teaspoon ground cumin - 1 teaspoon smoked paprika - Salt and pepper to taste Mix everything together until the veggies are well coated. Spread them out on a baking sheet in a single layer. Roast for 20 to 25 minutes. Stir halfway through to make sure they cook evenly. While the veggies roast, heat 8 small corn tortillas in a dry skillet. Warm them for about 30 seconds on each side. This makes them soft and easy to fold. Once the veggies are ready, take them out of the oven. To make your tacos, place a generous spoonful of roasted veggies on each tortilla. Top with slices of avocado and sprinkle fresh cilantro on top. Serve with lime wedges on the side for that extra zing. For the full recipe, check [Full Recipe]. For great roasted veggie tacos, pick vegetables that roast well. I love using: - Zucchini - Bell peppers - Red onion - Cherry tomatoes These veggies bring color and flavor. You can also try mushrooms or eggplant. The key is to cut them into similar sizes. This ensures even cooking. Spices can change the whole taco game. I often use: - Ground cumin - Smoked paprika - Salt and pepper These add a nice warmth. For a kick, try chili powder or cayenne pepper. You can also mix in garlic powder or onion powder for depth. Feel free to experiment based on your taste! Tortillas are the base of your tacos. Small corn tortillas work best. They are soft and tasty. You can also use flour tortillas if you prefer. For a fun twist, try lettuce wraps for a low-carb option. Just make sure your tortillas are warm. This makes them easier to fold and eat. For the complete dish, check out the Full Recipe. {{image_2}} You can add proteins to your roasted veggie tacos for more flavor. Chicken, beef, or shrimp work well. If you want a plant-based option, try black beans or chickpeas. Just cook them separately, then mix them with the roasted veggies in your taco. This adds texture and makes the meal more filling. These tacos are easy to make vegan and gluten-free. Use corn tortillas, which are naturally gluten-free. For a vegan twist, skip any dairy toppings. You can use plant-based sour cream or cashew cream instead. This way, everyone can enjoy these tasty tacos without worry. Toppings can change the whole taco experience. You can use fresh salsa or a spicy sauce for a kick. Try pickled onions for tangy flavor. If you like crunch, add shredded cabbage. For creaminess, avocado is a perfect choice. Experiment with different toppings to find your favorite combination. For the full recipe, check out the Roasted Veggie Tacos instructions above. To keep your leftover tacos fresh, place them in an airtight container. This helps prevent sogginess. Store them in the fridge for up to three days. If you have extra roasted veggies, keep them separate. You can use them in salads or wraps later. When you want to eat your tacos again, reheating is easy. You can use a skillet or the microwave. If you use a skillet, heat it over medium heat. Place the tacos in the skillet for about two minutes on each side. For the microwave, warm them for about 30 seconds. Make sure they are hot all the way through. You can freeze the roasted veggies for later use. Store them in a freezer-safe bag. Press out as much air as possible before sealing. They will last for about three months in the freezer. To use them, thaw overnight in the fridge and then reheat. Enjoy your tasty roasted veggie tacos again with minimal work! For the complete recipe, check out the Full Recipe above. I love using a mix of colorful veggies. Zucchini, bell peppers, red onions, and cherry tomatoes work best. These vegetables roast well and bring great flavors. You can also try corn, mushrooms, or sweet potatoes for variety. Each veggie adds its own taste and texture. Roasted veggie tacos stay fresh for about three to four days in the fridge. Make sure to store them in an airtight container. The veggies may lose some crunch, but they will still taste good. Just reheat them before eating for the best flavor. Yes, you can prepare the veggies a day ahead. Chop them and store them in the fridge. This saves time on taco night. You can also roast them in advance and keep them in the fridge. Just warm them up before serving. Roasted veggie tacos pair well with many sides. I recommend serving them with fresh guacamole, salsa, or a zesty salad. You can also add rice or beans for a hearty meal. A side of tortilla chips adds a nice crunch too. For the full recipe, check out the Roasted Veggie Tacos section! Roasted veggie tacos are a great way to enjoy healthy, tasty meals. We covered the best ingredients, from fresh vegetables to tasty seasonings. You now have step-by-step instructions for making these delicious tacos at home. Plus, you learned useful tips for storage and variations to suit your needs. Remember, cooking should be fun and easy. Try different vegetables and toppings to make it your own. Enjoy your taco journey!](https://dailydishly.com/wp-content/uploads/2025/07/2cc26e34-4f45-47fb-a3bd-ef05b980d92e-768x768.webp)