Teriyaki Tofu Rice Bowls Flavorful and Quick Meal

Are you looking for a quick and tasty meal? Teriyaki Tofu Rice Bowls are packed with flavor and are super easy to make. You’ll learn how to prepare the perfect tofu, rice, and fresh veggies all in one bowl. Plus, I’ll share tips on storage and delicious variations. Let’s dive in and create a healthy dish you’ll love!
Why I Love This Recipe
- Delicious Flavor Combination: The sweet and savory teriyaki sauce perfectly complements the tofu and vegetables, creating a mouthwatering dish that satisfies every palate.
- Nutritious Ingredients: This recipe is packed with protein from the tofu and vitamins from the colorful vegetables, making it a healthy meal option.
- Easy to Customize: You can easily swap out vegetables or add extra toppings to make this dish your own, tailoring it to your taste preferences.
- Quick and Simple Preparation: With just a few steps and minimal cooking time, this recipe is perfect for busy weeknight dinners.
Ingredients
Essential Ingredients for Teriyaki Tofu Rice Bowls
To make Teriyaki Tofu Rice Bowls, gather these key items:
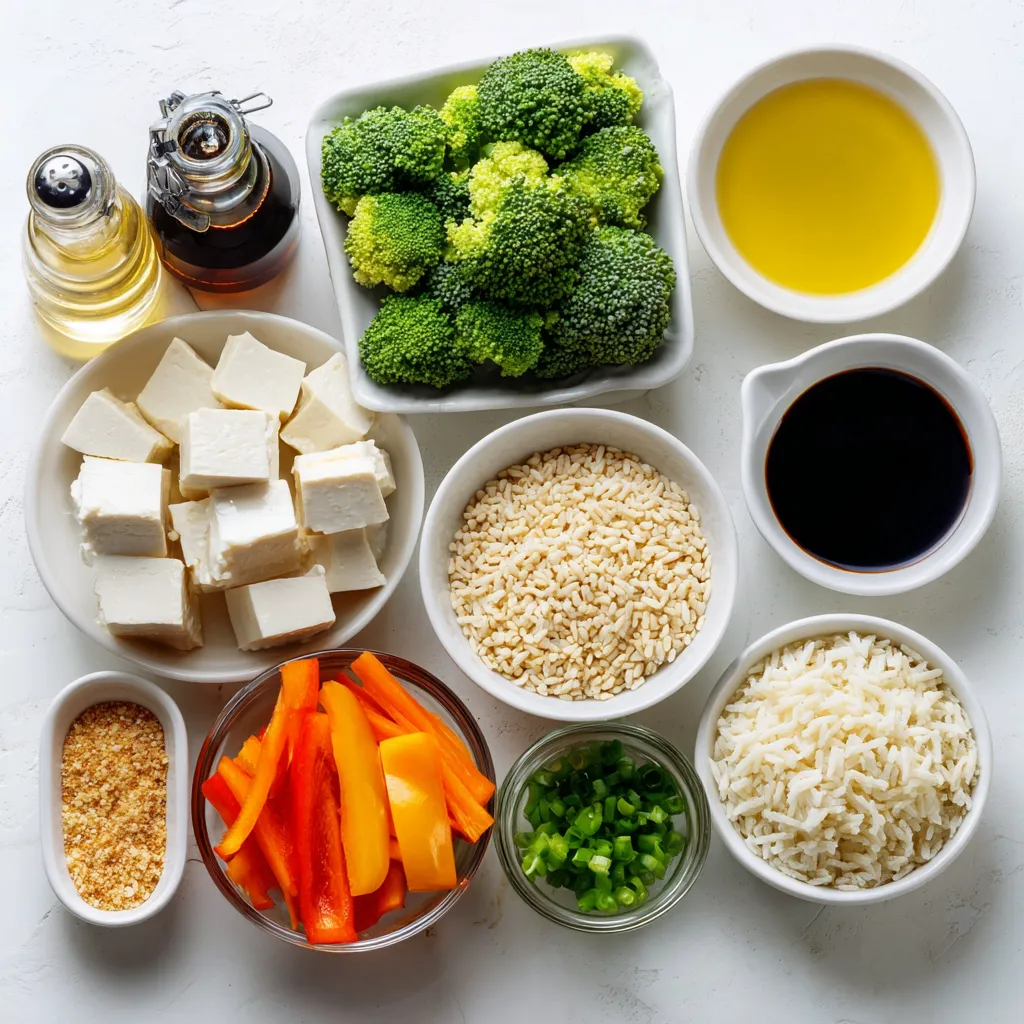
– 1 block (14 oz) firm tofu, pressed and cubed
– 1 cup brown rice
– 2 cups vegetable broth (or water)
– 1 cup broccoli florets
– 1 bell pepper, sliced (any color)
– 1 carrot, julienned
– 2 tablespoons vegetable oil
– 1 tablespoon sesame oil
– 4 tablespoons soy sauce
– 2 tablespoons mirin (or substitute with additional honey or agave syrup)
– 2 tablespoons honey (or agave syrup for vegan option)
– 1 teaspoon grated fresh ginger
– 1 garlic clove, minced
– 1 tablespoon sesame seeds
– Green onions, chopped for garnish
These ingredients create a perfect balance of flavors and textures.
Measuring the Right Quantities
Measuring your ingredients helps keep the dish tasty and balanced. Use a liquid measuring cup for the vegetable broth and a dry one for the rice. Make sure to press the tofu well. This step removes excess water and helps the tofu absorb flavor. Each ingredient plays a role. The rice serves as a hearty base, while the tofu adds protein and richness. The vegetables bring color and crunch.
Recommended Substitutions for Ingredients
You can customize your Teriyaki Tofu Rice Bowls easily. If you want a different grain, use quinoa or jasmine rice instead of brown rice. For the tofu, try tempeh for a unique flavor. If you need a soy-free option, coconut aminos works well in place of soy sauce. You can also swap out vegetables based on your tastes. Snow peas, zucchini, or mushrooms make great alternatives. Just remember, keep the cooking times similar for best results.

Step-by-Step Instructions
Cooking the Brown Rice
To start, rinse 1 cup of brown rice under cold water. This helps remove excess starch. Next, combine the rinsed rice and 2 cups of vegetable broth or water in a pot. Bring this mixture to a boil. Once boiling, reduce the heat to low. Cover the pot and let it simmer for about 45 minutes. The rice is ready when all the liquid is absorbed. Fluff the rice with a fork and set it aside.
Making the Teriyaki Sauce
While the rice cooks, you can whip up the teriyaki sauce. In a small bowl, mix together 4 tablespoons of soy sauce, 2 tablespoons of mirin, and 2 tablespoons of honey. Add in 1 teaspoon of grated fresh ginger and 1 minced garlic clove. Whisk it all together until smooth. Set this tasty sauce aside for later.
Perfectly Browning the Tofu
Now, let’s turn to the tofu. Heat 2 tablespoons of vegetable oil in a large skillet over medium-high heat. Once hot, add 1 block of pressed and cubed tofu. Cook the tofu for about 5 to 7 minutes. You want it to be golden brown on all sides. This step adds great flavor and texture. After browning, pour the teriyaki sauce over the tofu. Let it simmer for 2 to 3 minutes so the sauce thickens a bit.
Stir-Frying the Vegetables
In another skillet, heat 1 tablespoon of sesame oil over medium heat. Add 1 cup of broccoli florets, 1 sliced bell pepper, and 1 julienned carrot. Stir-fry these veggies for about 5 minutes. You want them to be tender but still crisp. This adds a nice crunch to your bowls.
Assembling the Rice Bowls
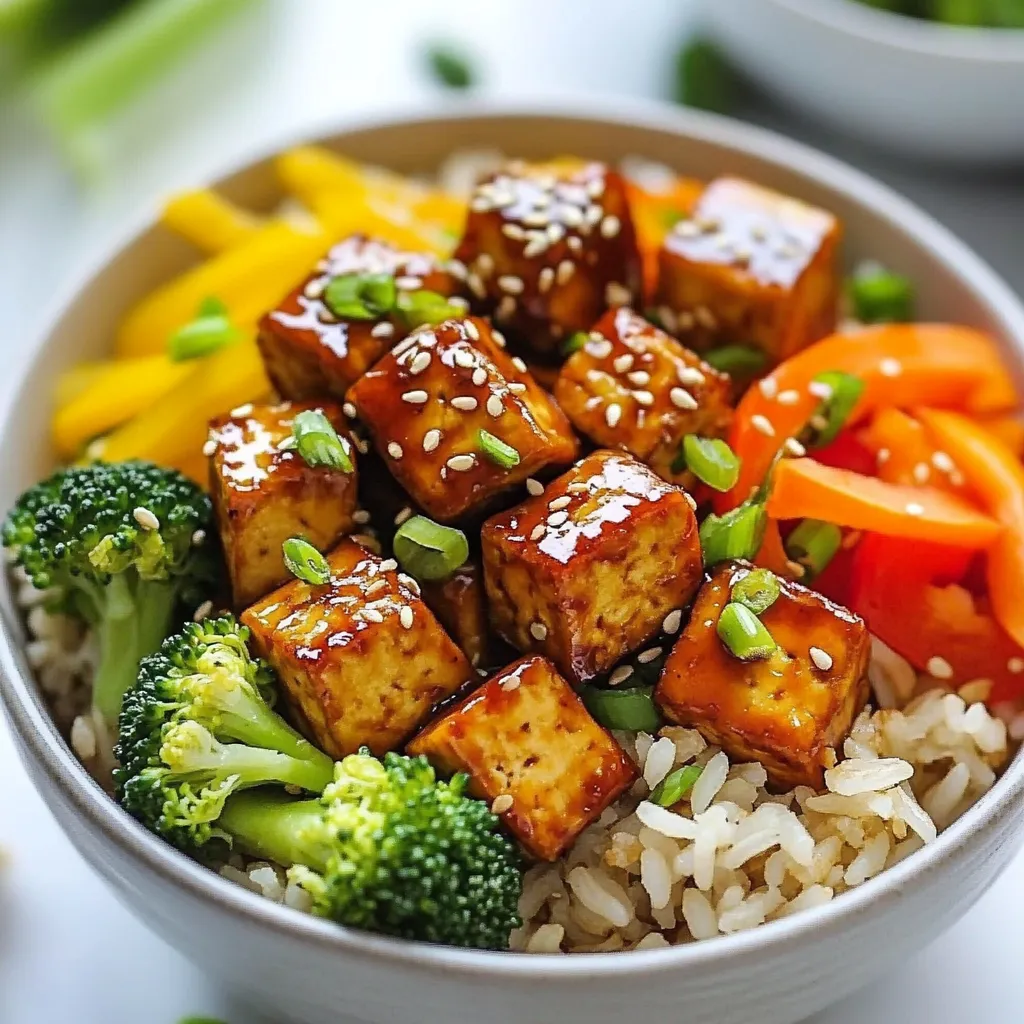
Now it’s time to put it all together! Start with a generous scoop of the brown rice at the bottom of each bowl. Top it with the glazed tofu and the stir-fried vegetables. For a finishing touch, sprinkle sesame seeds on top and add chopped green onions for color and flavor. Enjoy your Teriyaki Tofu Rice Bowls!
Tips & Tricks
How to Press Tofu Properly
Tofu holds water, which makes it less tasty. Pressing removes this water. Wrap the tofu in a clean towel. Place a heavy object on top, like a skillet or canned goods. Let it sit for at least 15 to 30 minutes. This step helps the tofu absorb flavors better.
Achieving the Best Flavors in Teriyaki Sauce
A good teriyaki sauce is key. Start with soy sauce for saltiness. Mirin adds sweetness and a hint of tang. Honey or agave syrup can enhance this sweetness too. Fresh ginger brings warmth, and garlic adds depth. Mix all these ingredients well, and let them sit a few minutes. This lets the flavors blend and grow strong.
Cooking the Vegetables: Timing and Techniques
Timing is crucial for cooking vegetables. Heat your skillet well before adding oil. Use medium heat for even cooking. Add the broccoli, bell pepper, and carrot together. Stir-fry them for about 5 minutes. You want them tender but still crisp. This keeps their bright colors and nutrients intact. Enjoy the fresh taste they bring to your bowl.
Pro Tips
- Press Tofu Well: Make sure to press the tofu for at least 30 minutes to remove excess moisture. This helps it absorb more flavor and achieve a crispy texture when cooked.
- Customize Vegetables: Feel free to swap in your favorite vegetables based on what you have on hand or what’s in season. Zucchini, snap peas, or bok choy can work beautifully in this dish.
- Make Extra Sauce: If you love a saucy bowl, consider doubling the teriyaki sauce ingredients. You can drizzle more over the assembled bowls for added flavor.
- Garnish Generously: Don’t skip the garnishes! Fresh green onions and sesame seeds add not only flavor but also a lovely visual appeal to your rice bowls.

Variations
Vegan and Gluten-Free Options
You can easily make this dish vegan. Just use agave syrup instead of honey. For a gluten-free option, choose gluten-free soy sauce. Many brands offer this. This way, you still enjoy the sweet and savory taste of teriyaki.
Alternative Vegetables to Include
Feel free to mix in other veggies. Snow peas, snap peas, or zucchini work well. You can also add mushrooms for a meaty texture. These changes keep your bowl fresh and exciting. Each vegetable adds unique flavors and colors.
Flavor Enhancements
You can boost flavor with spices and herbs. Try adding red pepper flakes for heat. A sprinkle of Chinese five-spice adds depth. Fresh cilantro or basil can brighten the dish. Experiment with what you love. Each addition makes your rice bowl special.
Storage Info
Best Practices for Storing Leftover Rice Bowls
To keep your Teriyaki Tofu Rice Bowls fresh, store them in airtight containers. Let the bowls cool down before sealing them. This helps prevent moisture buildup. You can keep them in the fridge for up to three days. If you want to enjoy them later, portion them out. This makes reheating easier.
Reheating Tips for Optimal Texture and Flavor
When it’s time to eat your leftovers, reheating is key. Use the microwave for quick meals. Place your rice bowl in a microwave-safe dish. Add a splash of water to keep the rice moist. Cover it with a lid or microwave-safe wrap. Heat for about 2-3 minutes. Stir halfway through for even heating. If you want crispy tofu again, reheat it in a skillet. Warm it over medium heat for 5-7 minutes.
Freezing Options and Tips
Freezing is a great way to save your Teriyaki Tofu Rice Bowls. Make sure to cool the bowls completely. Then, divide them into single portions. Use freezer-safe containers or bags. Label them with the date. They can last for about three months in the freezer. To reheat, let them thaw in the fridge overnight. Then, use the microwave or skillet as mentioned above. Enjoy your tasty meal anytime!
FAQs
How do I make Teriyaki Tofu Rice Bowls vegan?
You can easily make Teriyaki Tofu Rice Bowls vegan. Just replace honey with agave syrup. This simple swap keeps the sweetness. All other ingredients in the recipe are already vegan. Tofu, rice, and veggies are all plant-based.
Can I use different types of rice for this recipe?
Yes, you can use different types of rice. White rice, jasmine rice, or even quinoa works well. Each type of rice gives a unique taste and texture. Just adjust the cooking time as needed. For example, white rice cooks faster than brown rice.
What can I pair with Teriyaki Tofu Rice Bowls?
You can pair many things with Teriyaki Tofu Rice Bowls. Try adding edamame for protein. You can also serve with a side salad for freshness. Pickled vegetables or seaweed salad adds extra flavor. These sides will make your meal more exciting!
How long can I store the leftovers in the fridge?
You can store leftovers in the fridge for about three to four days. Make sure to keep them in an airtight container. This helps maintain freshness and flavor. When you’re ready to enjoy them, simply reheat in the microwave or on the stove.
Teriyaki tofu rice bowls are easy to make and fun to enjoy. We covered the key ingredients, cooking steps, and tips to perfect your dish. You can try different veggies and flavors, too, to make it your own. Store your leftovers right for the best taste later. Now you have everything to create a tasty meal at home. Enjoy the process and savor every bit

Teriyaki Tofu Rice Bowls
Ingredients
- 1 block firm tofu, pressed and cubed
- 1 cup brown rice
- 2 cups vegetable broth (or water)
- 1 cup broccoli florets
- 1 whole bell pepper, sliced (any color)
- 1 whole carrot, julienned
- 2 tablespoons vegetable oil
- 1 tablespoon sesame oil
- 4 tablespoons soy sauce
- 2 tablespoons mirin (or substitute with additional honey or agave syrup)
- 2 tablespoons honey (or agave syrup for vegan option)
- 1 teaspoon grated fresh ginger
- 1 clove garlic, minced
- 1 tablespoon sesame seeds
- to taste none green onions, chopped for garnish
Instructions
- Start by cooking the brown rice. Rinse the rice under cold water, then combine it with vegetable broth in a pot. Bring to a boil, then reduce heat to low, cover, and simmer for 45 minutes or until liquid is absorbed. Fluff with a fork and set aside.
- While the rice is cooking, prepare the teriyaki sauce. In a small bowl, whisk together soy sauce, mirin, honey, grated ginger, and minced garlic. Set it aside.
- Heat vegetable oil in a large skillet over medium-high heat. Add cubed tofu and cook until golden brown on all sides, about 5-7 minutes.
- Once the tofu is browned, pour the teriyaki sauce over the tofu and let it simmer for 2-3 minutes, allowing the sauce to thicken slightly.
- In another skillet or pan, heat sesame oil over medium heat. Add broccoli, bell pepper, and carrot, and stir-fry for about 5 minutes until they are tender yet crisp.
- To assemble the bowls, place a generous scoop of brown rice at the bottom. Top with the glazed tofu and the stir-fried vegetables.
- Sprinkle sesame seeds over the top and garnish with chopped green onions for added flavor and presentation.


![- 400g spaghetti - 6 cloves garlic, thinly sliced - ½ cup extra virgin olive oil - 1 teaspoon red pepper flakes - Grated Parmesan cheese for serving - Freshly cracked black pepper - 1 cup fresh parsley, chopped - 1 lemon (zest and juice) - Salt to taste When making Spaghetti Aglio e Olio, you want to keep it simple. The main ingredients shine through. Start with quality spaghetti, as it forms the base of your dish. I always use 400g for four servings. For that distinct flavor, thinly slice 6 cloves of garlic. The garlic adds a rich aroma and taste as it cooks. Don't forget the olive oil! Use ½ cup of extra virgin olive oil to sauté the garlic. To kick it up a notch, consider some optional ingredients. A teaspoon of red pepper flakes adds heat. Adjust it to fit your spice level. If you love cheese, grated Parmesan is a nice touch for serving. Freshly cracked black pepper adds a lovely finish. For freshness, I like to add a cup of chopped parsley. It brings color and taste to the dish. The zest and juice from one lemon brighten the flavors. Salt is essential for enhancing every ingredient. Feel free to adjust the salt to your preference. This recipe is all about balance and freshness. Gather these ingredients for a quick and delicious meal. For the complete recipe, check out the [Full Recipe]. 1. Boil water and salt: Start by filling a large pot with water. Add a generous amount of salt to make it flavorful. Bring it to a rolling boil. 2. Cook until al dente: Add the spaghetti to the boiling water. Stir occasionally. Cook according to package instructions until it is al dente, which means firm to the bite. 3. Reserve pasta water before draining: Before you drain the pasta, remember to save about one cup of that starchy pasta water. It helps to make the sauce creamy later. 1. Heat olive oil in a skillet: In a large skillet, pour in the olive oil. Turn the heat to medium. Let the oil warm up but not smoke. 2. Sauté garlic until golden: Add the thinly sliced garlic to the warm oil. Cook it gently for about 2-3 minutes. Watch it closely until it turns golden and fragrant. Be careful not to let it burn. 3. Mix in red pepper flakes: Stir in the red pepper flakes. Let them cook for an extra minute. This step adds a nice kick to the oil. 1. Toss spaghetti with garlic oil: Add the drained spaghetti to the skillet with the garlic oil. Toss it well to coat every strand. 2. Add reserved pasta water: Pour in a bit of the reserved pasta water. This helps to keep the spaghetti moist and binds the flavors. 3. Incorporate parsley, lemon, and seasoning: Off the heat, mix in the chopped parsley, lemon zest, and juice. Taste it and adjust the salt if needed. This easy recipe gives you a simple yet flavorful dish. For the full recipe, check out the details above. Enjoy every bite of your savory spaghetti aglio e olio! - Avoid overcooking pasta: Cook spaghetti until it's al dente. This means it should be firm when you bite into it. This texture helps the pasta hold up better when you mix it with the sauce. - Importance of seasoning the boiling water: Always add salt to your boiling water. This helps flavor the pasta from the inside. Use about 1-2 tablespoons for every 4 quarts of water. - Timing for sautéing garlic: Add sliced garlic to the oil once it’s hot. Cook it for about 2-3 minutes. This timing helps unlock its rich flavor without going too far. - How to avoid burning garlic: Keep an eye on the garlic as it cooks. If it starts to turn brown too quickly, lower the heat. Burnt garlic can taste bitter and ruin your dish. - Presentation tips for a restaurant-style dish: Serve your spaghetti on warmed plates. This keeps the pasta hot longer. Add a sprinkle of fresh parsley on top for color. A lemon wedge on the side adds a nice touch. - Pairing options for sides or drinks: A simple green salad pairs well with spaghetti. You can also serve it with garlic bread for a full meal. For drinks, a glass of white wine complements the flavors nicely. For more details on how to make this dish, check out the Full Recipe. {{image_2}} You can change some ingredients to fit your needs. If you want gluten-free spaghetti, you can find many great options in stores. These work well in this recipe. If you prefer garlic-infused oil, use it instead of plain olive oil. This option adds even more garlic flavor to your dish. Adding vegetables makes this dish even better. Try mixing in fresh spinach or sweet cherry tomatoes. These add color and nutrients. You can also mix in proteins like shrimp or grilled chicken. Both options create a heartier meal and offer more flavors. Fresh herbs can brighten up this dish. Basil or oregano are great choices. Just chop them finely and mix them in at the end. If you like heat, adjust the spice level. Use different types of peppers, like jalapeños or serranos, to switch things up. Each pepper brings its own unique flavor to your spaghetti. For the Full Recipe, check out the complete details! To keep your Spaghetti Aglio e Olio fresh, store it in the fridge. Place the leftover pasta in an airtight container. This helps to keep moisture in and prevents the pasta from drying out. You can also cover the container tightly with plastic wrap. The best containers for storage are glass or BPA-free plastic. Glass containers allow you to see the food inside. They also do not absorb odors. Plastic containers are lightweight and easy to stack. Just make sure they seal well. When it's time to eat your leftovers, you have two options: the microwave or the stove. The microwave is quick. Place the pasta in a microwave-safe dish. Cover it with a lid or damp paper towel to keep moisture in. Heat for 1-2 minutes, stirring halfway through. Using the stove gives you better results. Add a splash of olive oil or water to a skillet. Heat over low to medium heat. Stir gently until warm. This method helps keep the pasta moist. Yes, you can freeze Spaghetti Aglio e Olio! Freezing is great for making meals ahead of time. First, let the pasta cool completely. Then, place it in a freezer-safe container. Make sure to leave some space at the top for expansion. To freeze, follow these steps: 1. Portion the pasta into single servings. 2. Seal each portion tightly in a plastic bag or container. 3. Label the bags with the date for easy tracking. When you want to eat it, thaw it in the fridge overnight. Reheat as described above. Enjoy your easy dinner later! For the full recipe, check the Full Recipe section above. Spaghetti Aglio e Olio can last in the fridge for up to three days. Store it in an airtight container to keep it fresh. It’s best to eat it within this time for the best flavor. Yes, you can make Spaghetti Aglio e Olio ahead of time. Cook the pasta and sauce, then cool them down. You can store them separately in the fridge. When ready to serve, just reheat and combine. This dish is quick to prepare, so making it fresh is great too. You can serve Spaghetti Aglio e Olio with many tasty options. Consider garlic bread for a crunchy side. A simple salad with fresh greens works well too. You might also enjoy antipasto or bruschetta to start your meal. To reheat Spaghetti Aglio e Olio, follow these steps: 1. Place the pasta in a skillet over low heat. 2. Add a splash of reserved pasta water or olive oil to prevent sticking. 3. Stir gently until heated through, about 5 minutes. 4. Serve hot to enjoy the full flavor of the dish. For the full recipe, check out the detailed instructions for a perfect dish every time! Spaghetti Aglio e Olio is simple yet flavorful. We covered the main and optional ingredients, how to cook and combine them, plus tips for the best results. Variations allow for personal twists, making this dish your own. Proper storage and reheating ensure you enjoy it later. Whether you stick to tradition or experiment, this dish will impress. Enjoy cooking and sharing this tasty meal!](https://dailydishly.com/wp-content/uploads/2025/05/5a127dfa-b261-495f-ad6e-6f110f891143-768x768.webp)

