Triple Berry Cobbler Delightful and Simple Recipe

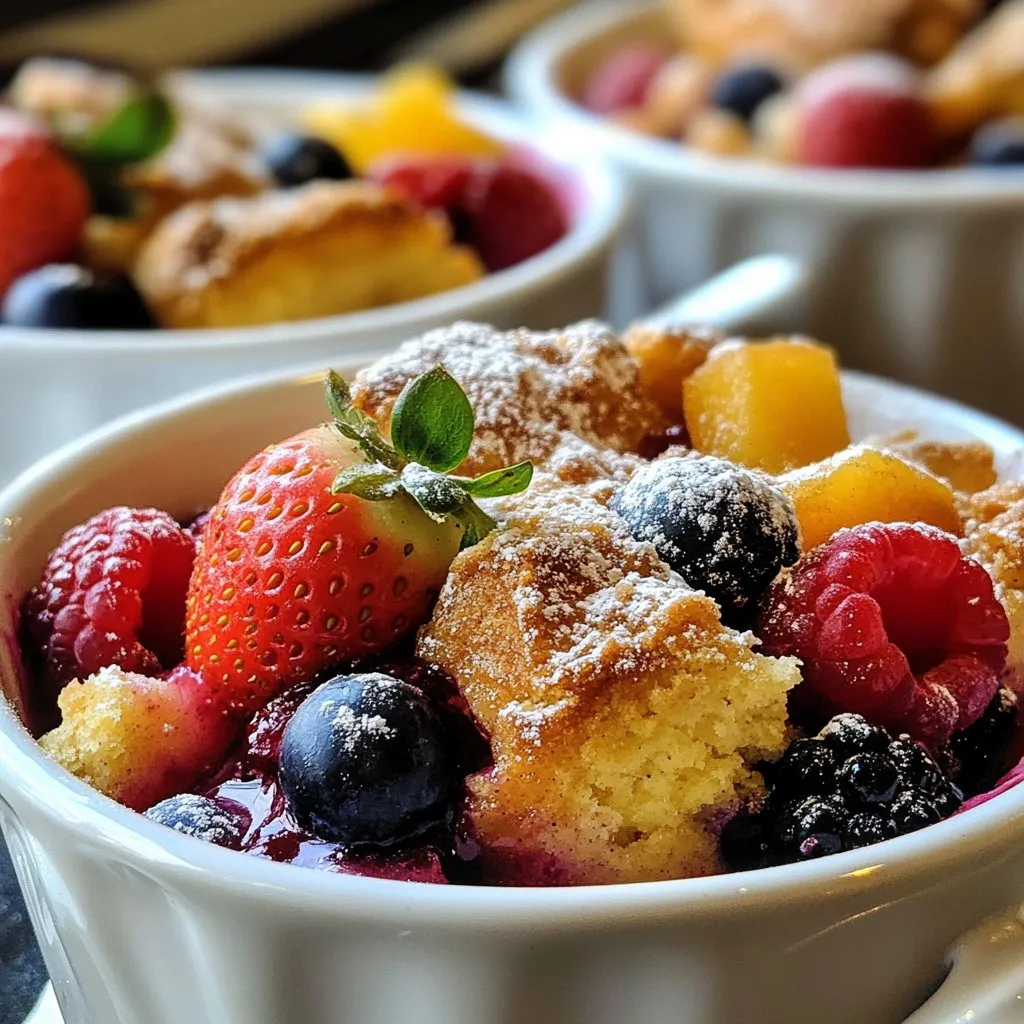
Are you ready to impress your family with a sweet treat? My Triple Berry Cobbler recipe is easy to make and bursting with flavor. Using fresh berries, simple ingredients, and clear steps, you can whip up this dessert in no time. Whether you’re a baking novice or a pro, you’ll love how delightful this cobbler is. Let’s jump in and create a dessert that everyone will love!
Why I Love This Recipe
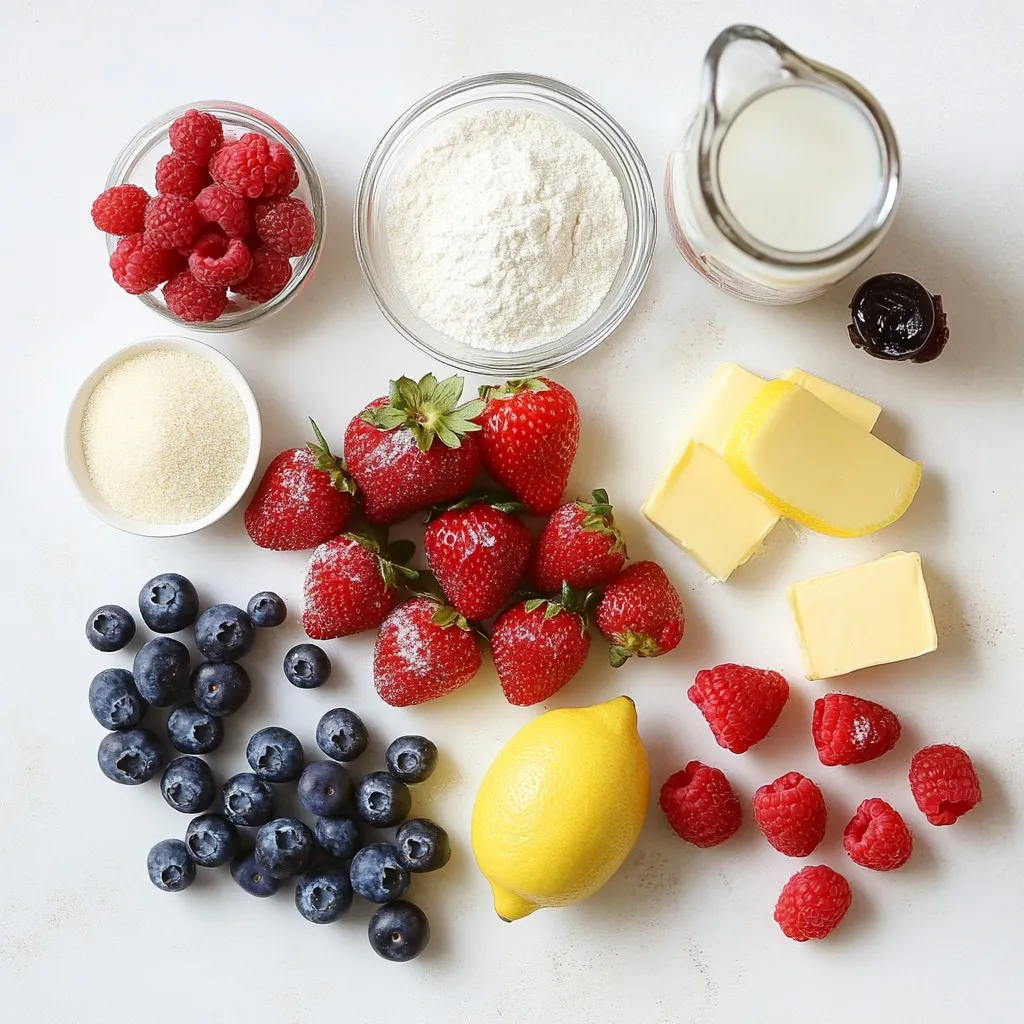
- Fresh and Fruity: This cobbler features a delightful mix of strawberries, blueberries, and raspberries, providing a burst of flavor in every bite.
- Easy to Make: With simple ingredients and straightforward steps, this recipe is perfect for bakers of all levels.
- Perfectly Sweet: The balance of sweetness from the sugar and the natural tartness of the berries makes this dessert irresistibly delicious.
- Great for Sharing: With generous servings, this cobbler is ideal for gatherings, ensuring everyone gets a taste of this delightful dessert.
Ingredients
Fresh Berries
For this recipe, you need:
– 1 cup strawberries, hulled and sliced
– 1 cup blueberries
– 1 cup raspberries
These berries bring bright color and sweet flavor to the cobbler. They mix well together. You can use fresh or frozen berries, but fresh gives the best taste.
Dry Ingredients
Gather these dry items:
– 1 cup granulated sugar, divided
– 1 tablespoon cornstarch
– 1 ½ cups all-purpose flour
– 2 teaspoons baking powder
– ½ teaspoon salt
– 1 teaspoon ground cinnamon
– 1 tablespoon sugar for topping
These dry ingredients give structure and sweetness to your cobbler. The cornstarch helps thicken the berry juices.
Wet Ingredients
Now, for the wet items:
– 2 tablespoons lemon juice
– 1 teaspoon vanilla extract
– ½ cup unsalted butter, melted
– 1 cup milk
These wet ingredients make the batter rich and moist. The lemon juice adds a nice zing that balances the sweetness.

Step-by-Step Instructions
Preparing the Oven and Baking Dish
First, preheat your oven to 350°F (175°C). This step warms the oven for even baking. Next, grease a 9×13-inch baking dish with butter or spray. This helps the cobbler release easily when done.
Berry Mixture Preparation
In a large bowl, combine the following berries:
– 1 cup strawberries, hulled and sliced
– 1 cup blueberries
– 1 cup raspberries
Next, add these ingredients:
– ½ cup granulated sugar
– 2 tablespoons lemon juice
– 1 tablespoon cornstarch
– 1 teaspoon vanilla extract
Gently toss the berries to coat them well. Pour this sweet berry mixture into the greased baking dish.
Cobbler Batter Creation
In another bowl, whisk together:
– 1 ½ cups all-purpose flour
– 2 teaspoons baking powder
– ½ teaspoon salt
– ½ cup granulated sugar
Add in:
– ½ cup unsalted butter, melted
– 1 cup milk
Stir until just mixed. Avoid overmixing to keep the batter light.
Assembling the Cobbler
Now, pour the cobbler batter over the berry mixture. Use a spatula to spread it gently. It’s okay if some berries peek through the batter. This makes it look rustic and inviting.
Baking Process
Place the baking dish in the preheated oven. Bake for 45-50 minutes. Keep an eye on it. The top should turn golden brown. To check if it’s done, insert a toothpick into the batter; it should come out clean.
Once baked, let it cool for 10-15 minutes. This will help set the juices and flavors. Enjoy your warm triple berry cobbler!
Tips & Tricks
Selecting the Best Berries
For the best flavor, choose ripe berries. Look for bright colors and no soft spots. Fresh strawberries should be red and firm. Blueberries should be plump and deep blue. Raspberries need to be bright and intact. If you can, buy organic berries. They taste better and are safer.
Achieving the Perfect Cobbler Texture
To get a soft and fluffy cobbler, mix the batter gently. Overmixing makes it dense. When you pour the batter over the berries, do not worry if it doesn’t cover them completely. The berries will bubble through while baking. Use melted butter for moisture, and make sure your baking powder is fresh for a good rise.
Serving Suggestions
Serve the cobbler warm for the best taste. Top it with a scoop of vanilla ice cream or whipped cream. You can also sprinkle fresh berries on top for color. If you like a little crunch, add nuts or granola as a topping. For a twist, drizzle honey or caramel sauce over each serving.
Pro Tips
- Choose Fresh Berries: Make sure to select berries that are ripe and firm for the best flavor and texture in your cobbler.
- Mix the Batter Gently: When combining the wet and dry ingredients, stir just until mixed to avoid a tough texture.
- Let it Cool: Allow the cobbler to rest before serving; this helps the juices thicken and makes it easier to serve.
- Serving Suggestions: Enhance the dish by pairing it with vanilla ice cream or a dollop of whipped cream for a delightful contrast.

Variations
Gluten-Free Options
You can easily adapt this recipe for gluten-free diets. Use a gluten-free flour blend instead of all-purpose flour. Look for a mix that works well for baking. This will keep the texture light and fluffy. You can also add a bit more cornstarch for extra binding.
Different Berry Combinations
Feel free to mix and match your berries. You can use blackberries or even cherries. Each berry brings a unique flavor. Experiment with different combinations for a fun twist. Just remember to keep the total amount of berries around three cups.
Adding Flavor Enhancements
To boost flavor, try adding spices like nutmeg or ginger. A splash of almond extract can add a lovely depth. You can also stir in some lemon zest for a fresh zing. These small changes can make your cobbler stand out. Don’t be afraid to get creative!
Storage Info
Storing Leftovers
After you enjoy your triple berry cobbler, you might have some left. Let it cool fully before storing. Place it in an airtight container. It stays fresh in the fridge for up to three days. This way, you can savor those delicious flavors again.
Reheating Instructions
When you’re ready to eat the leftovers, reheat them in the oven. Set the oven to 350°F (175°C). Place the cobbler in an oven-safe dish. Cover it with foil to keep it moist. Heat for about 15-20 minutes. If you like, you can microwave a slice for about 30-60 seconds. Enjoy it warm, just like fresh!
Freezing Tips
If you want to save some cobbler for later, freezing works great. Cut the cooled cobbler into pieces. Wrap each piece in plastic wrap and then foil. Store them in a freezer bag or airtight container. It can last up to three months. When you’re ready to enjoy it, thaw in the fridge overnight. Then, reheat as mentioned before. This way, you get to enjoy that berry goodness anytime!
FAQs
Can I use frozen berries for this recipe?
Yes, you can use frozen berries. They work well in cobbler. Just make sure to thaw them first. Drain any excess juice to avoid a soggy cobbler. Using frozen berries makes this recipe easy all year long.
How do I know when the cobbler is done?
Check the cobbler after 45 minutes of baking. The top should be golden brown. Insert a toothpick in the batter. If it comes out clean, the cobbler is ready. If not, bake for a few more minutes.
What is the best way to serve triple berry cobbler?
Serve the cobbler warm for the best taste. Top it with a scoop of vanilla ice cream. You can also add whipped cream for extra creaminess. Fresh berries on top make it look pretty and add flavor.
Can I substitute ingredients for dietary restrictions?
Yes, you can make substitutions. For a gluten-free option, use a gluten-free flour blend. To reduce sugar, use a sugar substitute. You can also swap dairy milk for almond or oat milk. These changes keep the cobbler tasty and fun.
This article covered how to make a delicious berry cobbler. We explored fresh and dry ingredients, plus the steps to create the perfect batter. I shared tips for selecting the best berries and achieving great texture. You even learned about gluten-free options and how to store your leftovers.
With these pointers, you can whip up a tasty dessert. Enjoy your berry cobbler and get creative with your favorite flavor

Triple Berry Cobbler
Ingredients
- 1 cup strawberries, hulled and sliced
- 1 cup blueberries
- 1 cup raspberries
- 1 cup granulated sugar, divided
- 2 tablespoons lemon juice
- 1 tablespoon cornstarch
- 1 teaspoon vanilla extract
- 1.5 cups all-purpose flour
- 2 teaspoons baking powder
- 0.5 teaspoon salt
- 0.5 cup unsalted butter, melted
- 1 cup milk
- 1 teaspoon ground cinnamon
- 1 tablespoon sugar for topping
Instructions
- Preheat your oven to 350°F (175°C). Grease a 9x13-inch baking dish.
- In a large bowl, combine the sliced strawberries, blueberries, and raspberries. Add ½ cup of sugar, lemon juice, cornstarch, and vanilla extract. Toss to coat the berries evenly. Pour the mixture into the prepared baking dish.
- In another bowl, whisk together the flour, baking powder, salt, and the remaining ½ cup of sugar. Add in the melted butter and milk. Stir until just combined; be careful not to overmix.
- Pour the batter over the berry mixture in the baking dish. Spread it out gently to cover as much of the berries as possible. Don’t worry if some of the berries poke through.
- In a small bowl, mix together the ground cinnamon and 1 tablespoon of sugar. Sprinkle this mixture over the cobbler batter.
- Bake in the preheated oven for about 45-50 minutes, or until the top is golden brown and a toothpick inserted into the batter comes out clean.
- Allow the cobbler to cool for about 10-15 minutes. Serve warm with a scoop of vanilla ice cream or whipped cream if desired.


![To make the Viral Blueberry Lemon Loaf, gather these ingredients for a fresh and tasty treat: - 1 ½ cups all-purpose flour - 1 teaspoon baking powder - ½ teaspoon baking soda - ¼ teaspoon salt - ½ cup unsalted butter, softened - 1 cup granulated sugar - 2 large eggs - 1 teaspoon vanilla extract - Zest of 1 lemon - ¼ cup fresh lemon juice - ½ cup plain Greek yogurt - 1 ½ cups fresh blueberries (plus extra for garnish) Each item plays a key role in building flavor and texture. The all-purpose flour gives structure. The baking powder and baking soda help the loaf rise. Butter and sugar add richness and sweetness. Eggs bind the mixture and add moisture. Vanilla extract brings warmth, while lemon zest and juice give a bright, zesty flavor. Greek yogurt keeps the loaf moist and tender. Fresh blueberries provide bursts of sweetness in every bite. To follow the full recipe, you can refer to the detailed instructions provided earlier. Enjoy the process of mixing these ingredients to create a delicious loaf! 1. Preheating the oven Start by preheating your oven to 350°F (175°C). This step ensures even baking, which is key for your loaf. 2. Greasing the loaf pan Grease a 9x5 inch loaf pan. Use butter or cooking spray. You can also line it with parchment paper for easy removal. 3. Mixing dry ingredients In a medium bowl, whisk together the all-purpose flour, baking powder, baking soda, and salt. Set this mixture aside to keep it fresh. 1. Creaming butter and sugar In a large bowl, cream together the softened butter and granulated sugar. Use an electric mixer for about 3-4 minutes until it’s light and fluffy. 2. Adding eggs and flavorings Add the eggs one at a time. Mix well after each addition. Then stir in the vanilla extract, lemon zest, and lemon juice. 3. Incorporating dry and wet mixtures Gradually add the dry ingredients to the wet mixture. Alternate with Greek yogurt. Start and end with the flour mix. Mix just until combined. 1. Pouring batter into the pan Carefully pour the batter into your prepared loaf pan. Use a spatula to smooth the top. 2. Baking time and checking for doneness Bake in the preheated oven for 55-60 minutes. To check if it’s done, insert a toothpick into the center. If it comes out clean, your loaf is ready! Now, you have a delicious Viral Blueberry Lemon Loaf ready to impress. For the complete recipe, check the [Full Recipe]. Enjoy your baking adventure! To make your loaf fluffy, follow these tips: - Use room temperature butter: Softened butter mixes better with sugar, creating air pockets. - Don’t overmix: Mix until just combined. This helps keep the loaf light. When folding in blueberries, be gentle: - Use a rubber spatula: This lets you lift the batter without squishing the berries. - Fold in batches: Add a few blueberries at a time, ensuring they stay whole. For a beautiful presentation: - Slice the loaf evenly: Use a sharp knife for clean cuts. - Add garnishes: Place fresh blueberries on top and dust with powdered sugar. When it comes to pairing, consider these ideas: - Beverages: Serve with iced tea or lemonade for a refreshing combo. - Sides: A dollop of whipped cream adds richness and balance to the tangy loaf. For the full recipe, check out the [Full Recipe]. {{image_2}} You can make your blueberry lemon loaf even more exciting. One fun way is to add nuts. Chopped walnuts or pecans bring a nice crunch. They also add a rich flavor. You can mix in ½ cup of nuts when you fold in the blueberries. You can also try adding other fruits. Fresh raspberries or strawberries work well too. They will change the taste a bit, but they still pair nicely with lemon and blueberries. If you want to adjust the sweetness, you can cut back on sugar. Use ¾ cup instead of 1 cup. This makes the loaf less sweet. If you like tartness, add more lemon juice or zest. A teaspoon more can brighten the loaf. For those who need gluten-free options, you can swap the all-purpose flour. Use a gluten-free flour blend instead. Make sure it has xantham gum to help with texture. This keeps the loaf fluffy and moist. If you have allergies, you can replace the butter with coconut oil. This also gives a nice flavor. For egg allergies, use a flax egg. Mix 1 tablespoon of ground flaxseed with 2.5 tablespoons of water. Let it sit for five minutes before adding it to your mix. These simple changes let everyone enjoy the blueberry lemon loaf. You can find the full recipe to see how all these ingredients come together. To keep your blueberry lemon loaf fresh, let it cool completely. This step is key. Place it on a wire rack for even cooling. Once cool, wrap the loaf tightly in plastic wrap. This keeps moisture in and prevents drying. You can also use aluminum foil for added protection. Store the wrapped loaf in the fridge for up to one week. This method keeps it moist and tasty. If you want to save some for later, freezing is a great option. Wrap the cooled loaf tightly in plastic wrap and then in aluminum foil. This double-wrap prevents freezer burn. Label the loaf with the date to track freshness. You can freeze it for up to three months. When you’re ready to enjoy it, take it out of the freezer. Let it thaw in the fridge overnight. For a quick thaw, leave it on the counter for a few hours. Once thawed, enjoy your delicious loaf with a cup of tea or coffee. You can use sour cream instead of Greek yogurt. It gives a similar texture and taste. If you want a dairy-free option, try using coconut yogurt. Both will keep your loaf moist and flavorful. To check if the loaf is done, insert a toothpick in the center. If it comes out clean or with a few crumbs, the loaf is ready. If the toothpick has wet batter, bake it a little longer. Yes, you can use frozen blueberries! Just toss them in a bit of flour before adding to the batter. This helps prevent them from sinking to the bottom while baking. Keep in mind that frozen blueberries may make the batter a bit more purple. If you want vibrant colors, try adding them straight from the freezer. For the full recipe, check the details above. You learned how to bake a delicious loaf using simple ingredients and steps. We covered each stage, from mixing to baking and serving. Remember to follow the tips for texture and presentation. Feel free to explore variations to make the recipe yours. Store leftovers properly to keep them fresh. Baking is fun and rewarding. Enjoy your tasty loaf with family and friends. Your baking adventure starts now!](https://dailydishly.com/wp-content/uploads/2025/07/415bfa61-4575-4544-97a5-bb1f598d6192-768x768.webp)

![- 1 cup all-purpose flour - 1 cup whole wheat flour - 2 tablespoons brown sugar - 2 teaspoons baking powder - 1 teaspoon baking soda - 1 teaspoon ground cinnamon - 1 teaspoon ground nutmeg - 1/2 teaspoon ground ginger - 1/4 teaspoon ground cloves - 1/4 teaspoon salt - 1 cup pumpkin puree - 1 1/2 cups milk (dairy or non-dairy) - 2 large eggs - 1/4 cup melted butter or coconut oil - 1 teaspoon vanilla extract - Maple syrup - Whipped cream - Powdered sugar - Extra cinnamon To make perfect Pumpkin Spice Waffles, you need to gather all the right ingredients. Start with your flours. I use both all-purpose and whole wheat flour for a nice texture. Brown sugar adds a touch of sweetness that balances the spices well. Next, you have your leavening agents. Baking powder and baking soda work together to create fluffy waffles. The spices make this dish special. Ground cinnamon, nutmeg, ginger, and cloves give that warm, cozy taste we love in fall. Don’t forget the salt; it helps enhance all the flavors. Pumpkin puree is the star here. It adds moisture and that lovely pumpkin flavor. I prefer using fresh puree, but canned works just fine too. For the liquid, milk brings everything together; you can use dairy or a non-dairy option. Eggs bind the batter and add richness. Butter or coconut oil adds fat, making the waffles tender. Lastly, vanilla extract gives a lovely aroma. Don't skip the toppings! Maple syrup is a must, and whipped cream makes it feel special. A dusting of powdered sugar or cinnamon can take it to the next level. With these ingredients ready, you can follow the Full Recipe for a delightful breakfast treat. Preheat your waffle iron according to the manufacturer’s instructions. This step helps your waffles cook evenly and become crispy. In a large bowl, whisk together the following dry ingredients: - 1 cup all-purpose flour - 1 cup whole wheat flour - 2 tablespoons brown sugar - 2 teaspoons baking powder - 1 teaspoon baking soda - 1 teaspoon ground cinnamon - 1 teaspoon ground nutmeg - 1/2 teaspoon ground ginger - 1/4 teaspoon ground cloves - 1/4 teaspoon salt This mix gives your waffles their warm, spice flavor. In another bowl, mix the wet ingredients until smooth: - 1 cup pumpkin puree - 1 1/2 cups milk (dairy or non-dairy) - 2 large eggs - 1/4 cup melted butter or coconut oil - 1 teaspoon vanilla extract The pumpkin puree adds moisture and a rich taste. Pour the wet ingredients into the dry mix. Stir gently until just combined. A few lumps are okay; overmixing makes the waffles tough. Lightly grease the waffle iron if needed. Pour an appropriate amount of batter into the preheated iron. Cook until golden brown. This usually takes a few minutes. Serve your waffles hot. Drizzle with maple syrup, add whipped cream, and sprinkle cinnamon for extra flavor. Don't forget to check out the Full Recipe for more details! To make your waffles light and fluffy, follow these tips: - Use fresh baking powder and baking soda. This gives your waffles the lift they need. - Mix the batter until just combined. A few lumps are okay; overmixing can make them tough. - Let the batter rest for a few minutes before cooking. This helps the waffles rise better. - Preheat your waffle iron well. A hot iron ensures a crispy outside and soft inside. You can add fun twists to your pumpkin spice waffles. Here are some ideas: - Fold in chocolate chips for a sweet surprise. They melt and create a lovely gooey texture. - Add chopped nuts like walnuts or pecans for crunch. They bring a nice contrast to the soft waffles. - Mix in dried fruit, such as cranberries or raisins, for extra sweetness and chewiness. - Try a splash of maple extract for a deeper flavor. It pairs perfectly with pumpkin. Taking care of your waffle iron is key for great results. Here are some best practices: - Always preheat your waffle iron according to the manufacturer’s instructions. A hot iron cooks evenly. - Lightly grease the iron with butter or oil if needed. This prevents sticking and ensures a clean release. - Don't open the waffle iron too soon. Wait until the steam stops before checking for doneness. - Clean your waffle iron after each use. This keeps it in good shape and ready for your next batch. For the full recipe, check out the [Full Recipe]. {{image_2}} To make gluten-free pumpkin spice waffles, you can swap out the all-purpose flour. Use a gluten-free all-purpose flour blend instead. Make sure it has xanthan gum for the right texture. You can also add a bit of almond flour for extra flavor. This will give the waffles a nice nutty taste. Check the baking powder to ensure it is gluten-free as well. This simple change makes your breakfast safe for everyone. Want to make these waffles vegan? It's easy! Replace the eggs with flax eggs. Mix one tablespoon of ground flaxseed with three tablespoons of water for each egg. Let it sit for five minutes to thicken. Use almond milk or any other non-dairy milk instead of regular milk. Swap the butter for coconut oil or a vegan butter alternative. These changes keep the flavor while making it plant-based. You can add more fun to your pumpkin spice waffles. Try mixing in chocolate chips for a sweet twist. Nuts like walnuts or pecans add a crunchy texture. You can also use different spices. Try cardamom for a unique taste or allspice for a warm flavor. Adding a splash of maple extract can make it even more delicious. Feel free to experiment and find your favorite flavors! To keep your leftover waffles fresh, place them in an airtight container. You can also wrap them in plastic wrap or aluminum foil. Store them in the fridge for up to three days. When you want to eat them, just warm them up in the toaster or microwave. If you want to save waffles for later, freezing is a great option. First, let the waffles cool completely. Then, place a piece of parchment paper between each waffle. This prevents them from sticking together. Store them in a freezer bag or container. They can last up to three months in the freezer. To reheat, pop them in a toaster or bake them in the oven. This keeps them crispy. Waffles stored in the fridge last about three days. If frozen, they remain good for three months. After that, they may lose flavor and texture. Always check for any signs of spoilage before enjoying your waffles. Enjoy them fresh for the best taste! You can use several options if you don't have pumpkin puree. Here are some ideas: - Sweet potato puree: It has a similar texture and flavor. - Butternut squash puree: This option is also sweet and creamy. - Homemade pumpkin puree: Just roast fresh pumpkin until soft, then blend. Using these alternatives may change the flavor slightly, but they still taste great. To get your waffles nice and crispy, follow these tips: - Preheat your waffle iron: Make sure it’s hot before adding batter. - Use a little extra oil: Adding a bit more oil to the batter can help. - Don't overmix the batter: A few lumps are fine; this helps keep them light. - Cook longer: If they are not crispy enough, cook them a little longer. These tricks will help you achieve that perfect crunch. Yes, you can prepare the batter ahead of time. Here’s how: - Store in the fridge: Keep the batter in an airtight container for up to 24 hours. - Stir before use: Give it a gentle stir if it separates. Keep in mind that letting the batter sit too long may affect the rise. You can find pre-made pumpkin spice waffles in many stores. Check these places: - Supermarkets: Look in the frozen breakfast section. - Health food stores: They often carry organic or gluten-free options. - Online retailers: Websites like Amazon may have several brands available. Brands like Eggo and Nature's Path often sell great options. Toppings can enhance your pumpkin spice waffles. Here are some ideas: - Maple syrup: A classic choice that complements the spices well. - Whipped cream: Adds creaminess and sweetness. - Powdered sugar: A light dusting makes them look fancy. - Extra cinnamon: Sprinkle some on top for added flavor. These toppings will take your waffles to the next level! In this article, we explored how to craft perfect pumpkin spice waffles from scratch. We covered ingredient lists, step-by-step instructions, and tips for the best flavor and texture. I also shared ways to vary the recipe for gluten-free or vegan options, plus storage advice. Enjoying homemade waffles can be simple and fun. You can impress your family with these warm, delicious treats at breakfast or brunch. Give them a try, and savor every bite!](https://dailydishly.com/wp-content/uploads/2025/06/28ffe532-610a-4fe8-ab83-510bf8d3c6f3-768x768.webp)

![To make a tasty no-bake strawberry cheesecake, you need a few key ingredients: - 200g digestive biscuits, crushed - 100g unsalted butter, melted - 400g cream cheese, softened - 100g powdered sugar - 1 teaspoon vanilla extract - 250ml heavy cream - 300g fresh strawberries, hulled and sliced - 100g strawberry jam These ingredients work together to create a rich and creamy dessert. The digestive biscuits form a crunchy base, while the cream cheese and heavy cream give it a smooth texture. You can customize your cheesecake with a few optional ingredients: - Fresh mint leaves for garnish - Additional fruit toppings like blueberries or raspberries - A splash of lemon juice for a tangy flavor - Chocolate shavings for a sweet touch These extras allow you to add your personal flair to the cheesecake. If you need substitutions, here are some ideas: - Use graham crackers instead of digestive biscuits for the base. - Swap cream cheese with Greek yogurt for a lighter option. - Try coconut cream instead of heavy cream for a dairy-free version. - Use honey instead of powdered sugar for a natural sweetener. These alternatives can make the recipe fit your needs while still tasting great. For the full recipe, check the detailed steps to create this delightful dessert. To start, gather your ingredients. You need crushed digestive biscuits and melted butter. In a mixing bowl, combine these two. Mix until you see a texture that looks like wet sand. Next, take a 9-inch springform pan. Press the biscuit mixture firmly into the bottom. Make sure it is even. This will be the base of your cheesecake. After that, refrigerate the pan for about 10 minutes. This helps the base to set nicely. Now, let’s make that creamy filling. In a new bowl, add softened cream cheese, powdered sugar, and vanilla extract. Beat these together until they become smooth and creamy. In another bowl, whip the heavy cream. Keep whipping until stiff peaks form. This means it will hold its shape well. Now, gently fold the whipped cream into the cream cheese mixture. Do this carefully so the filling stays light and airy. Once your filling is ready, pour it over the chilled biscuit base. Spread it evenly with a spatula. Now, let’s add some color. Arrange the sliced strawberries on top of the cheesecake. You can be creative with this step! In a small saucepan, melt the strawberry jam over low heat. Once it is runny, let it cool a little. Drizzle the jam over the strawberries for a shiny finish. Finally, cover your cheesecake with plastic wrap. Refrigerate it for at least 4 hours, or even overnight. This waiting time helps it set perfectly. For the full recipe, check the earlier section. When making a no-bake strawberry cheesecake, a few common mistakes can spoil your treat. First, don’t skip chilling the biscuit base. It needs to set before adding the filling. Second, make sure your cream cheese is fully softened. Cold cream cheese can create lumps in your mixture. Lastly, don’t rush the whipping of the heavy cream. Whip it until stiff peaks form for the best texture. To get a creamy and smooth texture, follow these steps. Mix the cream cheese, powdered sugar, and vanilla extract until it’s really smooth. Then, whip the heavy cream separately until it’s nice and fluffy. When you fold the whipped cream into the cream cheese mix, do it gently. This keeps air in the mixture, making it light and fluffy. Serving your cheesecake can be fun and creative. Cut slices and place them on pretty dessert plates. You can add fresh mint leaves on top for a pop of color. For extra sweetness, drizzle more strawberry jam over the slices. You can also serve it with a side of fresh strawberries. This adds a nice touch and makes the dessert look even better. For the full recipe, refer to the earlier sections. {{image_2}} You can change up the fruity flavor of your cheesecake. Swap strawberries for other berries like blueberries or raspberries. You can also use peaches, mangoes, or even kiwi. Just chop the fruit and layer it on top or mix it into the filling. This makes your dessert colorful and fun. Want a richer taste? Try adding chocolate or caramel. For chocolate, mix in cocoa powder or melted chocolate into the cream cheese. Drizzle caramel sauce on top for a sweet touch. Both options give your cheesecake a new twist that chocolate lovers will adore. If you need a gluten-free option, use gluten-free cookies for the base. Many brands offer tasty gluten-free biscuits. Check the label to be sure. This way, everyone can enjoy this delicious treat without worry. Make sure to use gluten-free cream cheese and whipped cream too. For the full recipe, check out the [Full Recipe]. To keep your No-Bake Strawberry Cheesecake fresh, store it in the fridge. Use an airtight container to prevent any odors from mixing in. If you don’t have one, cover the cheesecake tightly with plastic wrap. This keeps it safe and tasty. Your cheesecake stays fresh in the fridge for about 3 to 5 days. After that, the texture may change, and the flavor might fade. Keep an eye on any signs of spoilage, like a sour smell or discoloration. Yes, you can freeze No-Bake Strawberry Cheesecake. Wrap it well in plastic wrap and then foil. This keeps out air and prevents freezer burn. It can last up to 3 months in the freezer. When ready to eat, thaw it in the fridge for a few hours. Enjoy the creamy goodness! For the full recipe, check out the details above. Baked cheesecakes use heat to set the filling. This process gives a dense, rich texture. No-bake cheesecakes rely on cold temperatures to firm up. They often taste lighter and creamier. Baked cheesecakes need time in the oven, while no-bake ones chill in the fridge. This makes no-bake cheesecakes quicker to prepare. To make your cheesecake firmer, try these tips: - Use full-fat cream cheese. This adds richness and firmness. - Add gelatin to the filling. Dissolve it in water and mix it in. - Chill the cheesecake longer. Let it set overnight for the best results. - Avoid overmixing the cream cheese. This keeps air out and helps it firm up. Yes, you can use frozen strawberries. Just thaw them first and drain excess liquid. The flavor will still be great, but the texture may change slightly. Fresh strawberries give a firmer bite and vibrant look. For best results, try to use fresh strawberries in the recipe. For the full recipe, check the main article. No-bake strawberry cheesecake is easy and fun to make. We explored key ingredients, like strawberries and cream cheese, and even how to customize them. I shared step-by-step instructions to help you prepare the base, filling, and assembly. Tips on avoiding common mistakes will guide you to the perfect texture. With various topping options, you can get creative. Finally, proper storage keeps your cheesecake fresh longer. Remember, this dessert is versatile, so don't hesitate to experiment. Enjoy every bite of your delicious creation!](https://dailydishly.com/wp-content/uploads/2025/06/5274bd3f-8d96-4968-97f1-1841490db53b-768x768.webp)
