Zesty Fiesta Taco Salad Flavorful and Fresh Meal

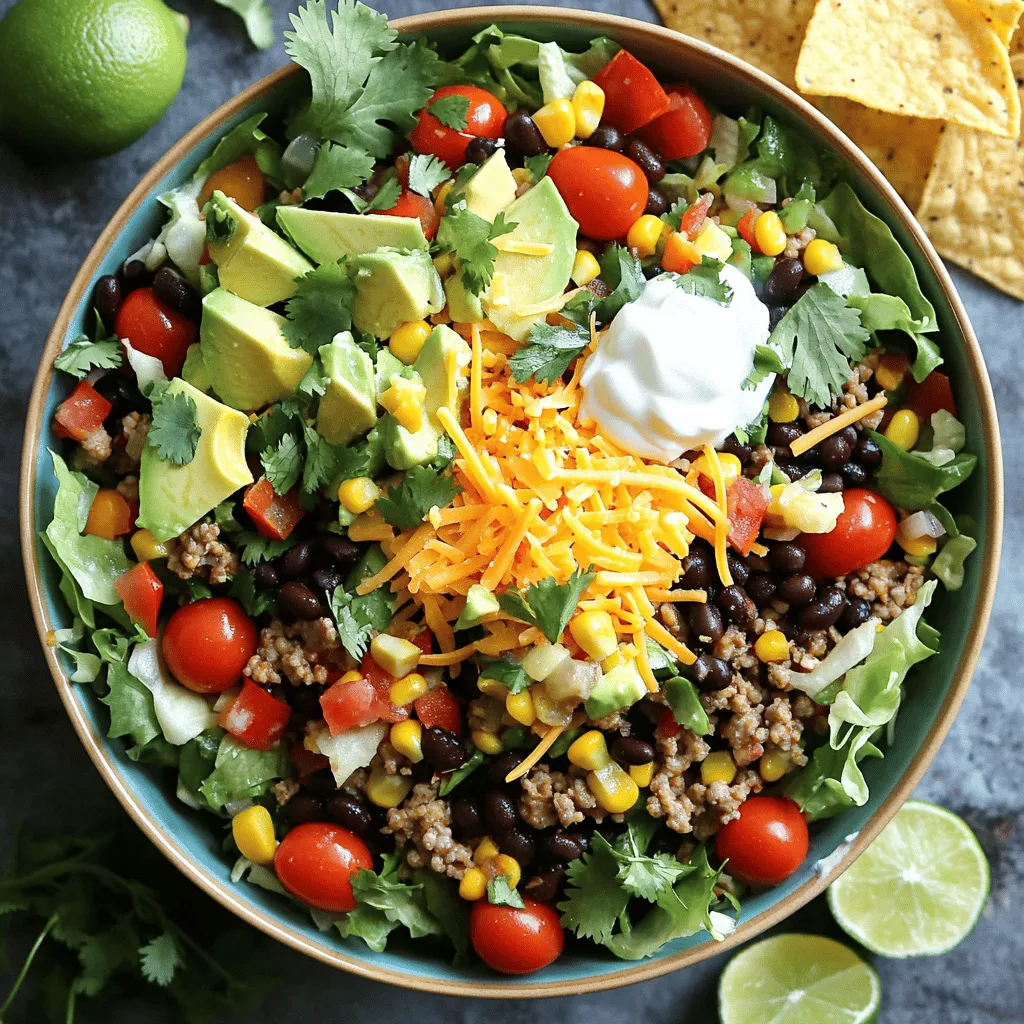
Are you ready to spice up your mealtime? My Zesty Fiesta Taco Salad is both fresh and flavorful! This dish is packed with vibrant ingredients and can be tailored to your taste. You’ll love how easy it is to prepare and customize. In this blog post, I’ll share everything you need to know, from ingredient choices to step-by-step instructions. Get your taste buds excited—let’s dive in!It mixes fresh veggies with savory meat and zesty toppings. This salad is great for lunch or dinner. You can make it in just 30 minutes.
Main Ingredients
Here are the main ingredients you will need:
– 1 lb ground turkey (or beef)
– 1 packet taco seasoning
– 1 can (15 oz) black beans, rinsed and drained
– 1 can (15 oz) corn, drained
– 1 large bell pepper, diced (any color)
– 1 cup cherry tomatoes, halved
– 1 avocado, diced
– 1 cup shredded lettuce (romaine or iceberg)
– 1/2 cup shredded cheese (cheddar or a Mexican blend)
– 1/4 cup sour cream
– 1/4 cup salsa
– 1/4 cup fresh cilantro, chopped
– Tortilla chips for garnish
– Lime wedges for serving
Each ingredient adds its own flavor and texture. The ground turkey or beef gives protein. The beans and corn add fiber and sweetness. The fresh veggies bring bright colors and crunch.
Optional Ingredients for Added Flavor
You can add extra ingredients to make the salad even better:
– Sliced jalapeños for heat
– Chopped green onions for sharpness
– A squeeze of lime juice for zest
– Avocado dressing for creaminess
These options let you customize the salad to your taste. Feel free to get creative!
Step-by-Step Instructions
Preparing the Taco Meat
To start, heat a skillet over medium heat. Add 1 pound of ground turkey or beef. Cook the meat until it turns brown. Use a spatula to break the meat apart. Next, sprinkle in the taco seasoning. Pour in 1/2 cup of water and stir well. Bring this mix to a simmer for about 5 minutes. Keep an eye on it until the sauce thickens. After that, remove it from heat and let it cool a bit.
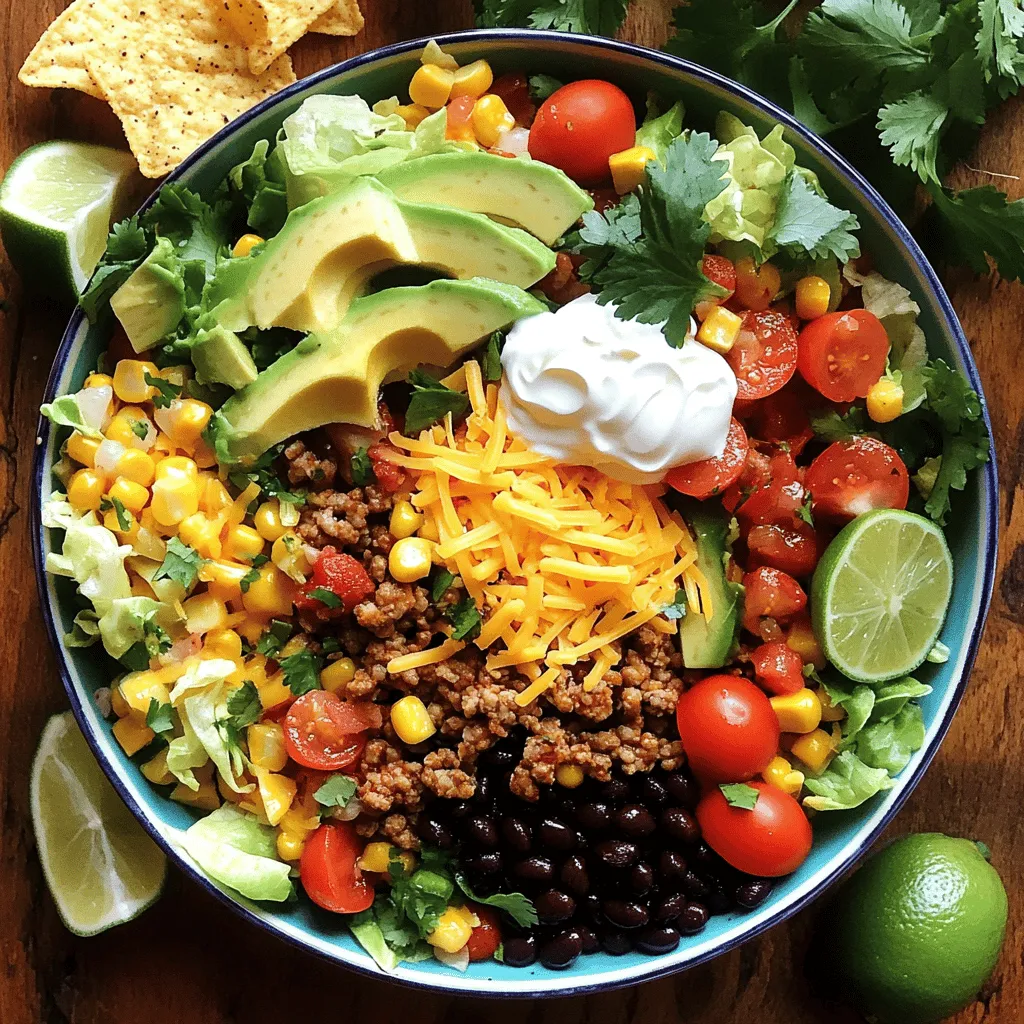
Assembling the Salad Base
While the meat cools, grab a large mixing bowl. Add 1 can of black beans, rinsed and drained. Then, toss in 1 can of corn that is drained. Chop up 1 large bell pepper and add it. Next, halve 1 cup of cherry tomatoes and add them too. Don’t forget to dice 1 avocado and toss that in as well. Finally, add 1 cup of shredded lettuce. Gently mix all the ingredients together.
Combining Ingredients
Once the taco meat has cooled, add it to your salad base. Use a spoon to gently toss everything together. Make sure the meat and veggies mix well. If you aren’t serving it right away, seal the salad in an airtight container. When you’re ready, divide the zesty taco salad into bowls. Top each bowl with 1/2 cup shredded cheese and a dollop of sour cream. Add a spoonful of salsa for flavor. Finish it off with fresh cilantro and a handful of tortilla chips. Serve lime wedges on the side for an extra burst of flavor.
Tips & Tricks
Cooking Tips for Success
For a tasty taco salad, always start with fresh ingredients. They make a big difference. If using ground turkey, make sure to brown it well. This adds flavor. Don’t skip the taco seasoning; it brings the dish to life. Remember to let the meat cool before mixing it with the veggies. This keeps the lettuce crisp and fresh.
Presentation Ideas
To make your salad look great, layer the ingredients in a large bowl. Start with lettuce, then add the meat, beans, and veggies. Top it with cheese and a dollop of sour cream. Sprinkle fresh cilantro on top for a pop of color. Serve it in clear bowls to show off the layers. Add tortilla chips on the side for crunch.
How to Adjust Spiciness
If you like heat, add some diced jalapeños to the salad. You can also mix hot salsa in with the sour cream for extra kick. For a milder taste, stick with mild salsa and skip the jalapeños. Taste as you go to find the right heat level for you. This way, everyone will enjoy your zesty fiesta taco salad.

Variations
Vegetarian Option
You can easily switch up the Zesty Fiesta Taco Salad to make it vegetarian. Use a mix of beans instead of meat. Black beans and kidney beans work great together. You can also add lentils for a nice texture. Just season them with taco seasoning for that classic flavor. This option is rich in protein and fiber. Plus, it keeps the salad light and fresh!
Salsa and Dressing Suggestions
Salsa adds a burst of flavor to your salad. You can use any salsa you like—mild, medium, or hot. Fresh pico de gallo is also a tasty choice. For a twist, try a creamy avocado dressing. It pairs well with the tangy elements in the salad. You can even mix yogurt with lime juice and cilantro for a zesty kick!
Ingredient Swaps for Healthier Choices
There are many ways to make this salad healthier. Swap ground turkey for lean chicken or tofu. Use Greek yogurt instead of sour cream to cut calories. You can also replace cheese with nutritional yeast for a dairy-free option. If you want more crunch, add sliced radishes or cucumbers. These swaps keep the salad tasty while adding nutrients.
Storage Info
Refrigerating Leftovers
Store your Zesty Fiesta Taco Salad in an airtight container. This keeps it fresh. It lasts up to three days in the fridge. Before you eat, check for any signs of spoilage. If it looks or smells off, throw it away. To keep it tasty, store toppings like cheese and sour cream separately. This helps avoid sogginess.
Freezing Guidelines
Freezing taco salad is not ideal. The veggies can get mushy. However, you can freeze the taco meat. Place it in a freezer-safe bag. It lasts up to three months in the freezer. When you’re ready to eat, let it thaw in the fridge overnight. You can then add fresh toppings to your salad.
Reheating Tips for Best Flavor
To reheat the taco meat, place it in a skillet over low heat. Stir often to warm it evenly. Add a splash of water if it seems dry. Heat until it’s hot, but don’t overcook it. You want it juicy! Once warm, mix it back with fresh salad ingredients for the best flavor. Enjoy your meal just as fresh as the first time!
FAQs
Can I use a different meat type?
Yes, you can use different meats in this salad. Ground turkey is lean and tasty. If you prefer beef, that works too. You can also try chicken or pork. For a vegetarian option, use black beans or lentils instead. These choices add nice flavor and protein.
How can I make it gluten-free?
To make this taco salad gluten-free, check your taco seasoning. Some brands add gluten. Use certified gluten-free seasoning to stay safe. Also, choose gluten-free tortilla chips. Most fresh veggies, beans, and cheese are naturally gluten-free. This way, everyone can enjoy the meal!
What is the best way to serve leftovers?
Store leftovers in an airtight container in the fridge. Keep the salad and toppings separate. This helps keep everything fresh. When ready to eat, combine the salad again. You can add a splash of lime for flavor. Enjoy it within three days for the best taste.
This blog post covered how to make a tasty taco salad. We explored the key and optional ingredients, along with step-by-step instructions for making the dish. Cooking tips ensured your success, while variations let you customize flavors. Understanding storage and addressing common questions helps you enjoy your meal longer. With these insights, you can create a taco salad that fits your taste and needs. Happy cooking!


![- 1 pound ground turkey - 1/4 cup breadcrumbs - 1 tablespoon soy sauce - 1 tablespoon sesame oil Ground turkey is the star here. It gives a lean, juicy bite. Breadcrumbs help bind the meatballs. Soy sauce adds depth and umami. Sesame oil brings a nutty flavor that rounds it all out. - 1 tablespoon grated fresh ginger - 2 cloves garlic, minced - 1/4 cup green onions, finely chopped Fresh ginger adds warmth and spice. Minced garlic gives a savory kick. Chopped green onions add a fresh crunch. Together, these flavors make the meatballs sing. - 1/4 cup teriyaki sauce - 1 tablespoon honey - 1 teaspoon rice vinegar - 1 teaspoon cornstarch (optional) Teriyaki sauce is key for that sweet, tangy glaze. Honey enhances the sweetness. Rice vinegar adds a touch of acidity. Cornstarch thickens the sauce if you prefer a sticky coating. For the full recipe, check the [Full Recipe] link. To make the meatballs, start by combining the ingredients. In a large bowl, mix together these items: - 1 pound ground turkey - 1/4 cup breadcrumbs - 1 tablespoon soy sauce - 1 tablespoon sesame oil - 1 tablespoon grated fresh ginger - 2 cloves garlic, minced - 1/4 cup green onions, finely chopped - 1/4 teaspoon black pepper Mix well until everything is blended. You want a smooth and even mixture. Now, it's time to form the meatballs. With wet hands, take small amounts of the mixture and roll them into balls. Aim for about 1 inch in diameter. This size helps them cook evenly. Place the meatballs on a baking sheet lined with parchment paper. Next, preheat your oven to 400°F (200°C). This ensures the meatballs cook through and get nice and golden. Once the oven is ready, bake the meatballs for 20 minutes. Keep an eye on them. They should be golden brown and fully cooked. You can use a meat thermometer if you want to check; the internal temperature should reach 165°F (74°C). While the meatballs bake, you can make the teriyaki glaze. In a small saucepan, combine these ingredients: - 1/4 cup teriyaki sauce - 1 tablespoon honey - 1 teaspoon rice vinegar - 1 teaspoon cornstarch (optional, for thickening) Heat the mixture over medium heat. Stir it often until it starts to simmer. This means the sauce is thickening nicely. Once the meatballs are done, toss them in the warm teriyaki sauce until they are fully coated. This step adds all the flavor! Find the full recipe for more details on how to enjoy these teriyaki turkey meatballs! To get the best texture for your meatballs, keep some tips in mind. Use fresh ground turkey for moisture and flavor. Mixing the ingredients well helps bind them together. Avoid overmixing, as it can make the meatballs tough. For even cooking, use a uniform size. Aim for each meatball to be about one inch. This size cooks in about 20 minutes at 400°F (200°C). Use a baking sheet lined with parchment paper to prevent sticking and ensure even browning. You can easily adjust the teriyaki sauce to your taste. If you like it sweeter, add more honey. For a spicy kick, mix in some red pepper flakes. If you want to swap ingredients, try using coconut aminos instead of soy sauce for a different flavor. For a thicker sauce, add cornstarch to the mix. Make sure to stir the sauce while it cooks to avoid lumps. Garnish your teriyaki turkey meatballs with extra chopped green onions for color and crunch. You can also sprinkle sesame seeds on top for added flavor. Pair these meatballs with steamed rice or quinoa for a complete meal. Roasted veggies or a fresh salad also make great side dishes. For a fun touch, serve them in lettuce wraps! You can find the full recipe for Teriyaki Turkey Meatballs in the main article. {{image_2}} You can swap ground turkey for other proteins. Chicken works great, too. Use ground chicken for a lighter taste. Beef meatballs add a richer flavor. Just keep in mind that cooking times may change. If you prefer a veggie option, try using lentils or chickpeas. Blend them with spices and breadcrumbs. This makes a tasty meatball without meat. You can enjoy all the teriyaki flavor while keeping it plant-based. The teriyaki sauce is key here, but you can mix it up. Sweet and sour sauce gives a tangy twist. It pairs well with the meatballs. You can also try different Asian BBQ sauces. These bring a smoky flavor that is simply delicious. Feel free to experiment with your favorite sauces. Each option opens a new taste experience. Batch cooking is perfect for busy days. Make a big batch of meatballs and freeze them. They freeze well and are easy to reheat. This way, you can have a quick meal ready in no time. Pair your meatballs with rice or noodles for a full meal. Add steamed veggies for extra nutrition. Mixing and matching helps keep dinners exciting. Check out the Full Recipe for all the details. You can store leftover teriyaki turkey meatballs in the fridge. They last for about 3 to 4 days. Make sure to use airtight containers. This keeps them fresh and safe to eat. If you use a glass container, it helps avoid odors. If you want to store meatballs for longer, freezing is a great choice. Place the meatballs on a baking sheet to freeze them first. This step stops them from sticking together. After they are frozen, move them to a freezer-safe bag. They can last up to 3 months in the freezer. To thaw, place the meatballs in the fridge overnight. You can also use the microwave for a quick thaw. Just be careful to avoid cooking them too much. This way, you keep the great texture. You can reheat your meatballs in the oven or microwave. To use the oven, preheat it to 350°F. Place the meatballs on a baking tray and cover them with foil. This keeps them moist. Heat for about 15 minutes. In the microwave, place them on a plate. Cover them with a damp paper towel. This keeps them from drying out. Heat in short bursts of 30 seconds. Check often to ensure they are hot but not overcooked. For the best taste, always reheat with the teriyaki sauce. It adds flavor and moisture back to the meatballs. Enjoy your meal! To check if your meatballs are done, you need to look for two key signs: - Cooking temperature indicators: The meatballs should reach an internal temperature of 165°F (74°C). This is safe for ground turkey. - Checking for doneness: Cut one meatball in half. The inside should be no longer pink, and the juices should run clear. If you see pink, they need more time. Yes, you can easily make this recipe gluten-free by swapping out a few ingredients: - Gluten-free alternatives for sauces and breadcrumbs: Use gluten-free breadcrumbs or crushed rice crackers instead of regular breadcrumbs. For the sauce, choose a gluten-free soy sauce or tamari instead of standard soy sauce. This keeps all the flavor while making it safe for those with gluten sensitivities. Pairing side dishes with your meatballs can enhance your meal. Here are some great options: - Recommended side dishes and accompaniments: Serve with steamed rice or quinoa for a filling meal. You can also add stir-fried vegetables for a colorful plate. A fresh salad with a light dressing makes a nice, crisp side. If you like, top your meatballs with extra green onions for added flavor and crunch. For the complete recipe, check out the Full Recipe. In this post, I shared how to make Teriyaki Turkey Meatballs. We explored main ingredients like ground turkey and breadcrumbs, and flavor enhancers like ginger and garlic. I also explained how to prepare and bake the meatballs, and create a delicious teriyaki glaze. Don't forget to customize your sauce and try different proteins or sides. Whether for a quick meal or meal prep, these meatballs offer great taste and flexibility. Enjoy making this recipe and share it with friends for a tasty meal!](https://dailydishly.com/wp-content/uploads/2025/07/96065441-bacf-48e9-8896-75bdb8bd513a-768x768.webp)
![To make a delicious Margherita pizza, you need the following items: - 2 cups all-purpose flour - 1 teaspoon active dry yeast - ¾ cup warm water (about 110°F) - 1 teaspoon sugar - 1 teaspoon salt - 1 tablespoon olive oil These ingredients create a perfect dough. The flour gives it structure, while the yeast helps it rise. The sugar feeds the yeast, and the salt adds flavor. For the toppings, gather these simple ingredients: - 1 cup canned San Marzano tomatoes, crushed - 1 cup fresh mozzarella cheese, sliced - Fresh basil leaves (about 8-10 leaves) - Salt and pepper to taste - Extra olive oil for drizzling San Marzano tomatoes are sweeter and richer in taste. Fresh mozzarella melts beautifully, and basil adds a fragrant touch. The salt and pepper boost the flavors, while olive oil gives a nice finish. This combination makes the pizza flavorful and fresh, just like you would find in Italy. For the full recipe, check out the details above. - Combine warm water, sugar, and yeast. Let it foam for about 5-10 minutes. - Mix flour and salt in a bowl. Create a well in the center, then add the yeast mixture. - Knead the dough on a floured surface until it's smooth and elastic, about 8-10 minutes. - Shape the dough into a ball. Place it in an oiled bowl and cover it with a damp cloth. - Preheat your oven to its highest setting, usually between 475°F and 500°F. - Prepare the sauce using crushed San Marzano tomatoes. Season it with salt and pepper. - After the dough rises, punch it down. Shape it into a 12-inch round. - Transfer the dough to a pizza peel or baking sheet. Spread the sauce thinly over the dough. - Evenly place slices of fresh mozzarella on top of the sauce. Tear fresh basil leaves and sprinkle them over the cheese. - Bake the pizza in the oven for about 10-12 minutes. Look for a golden crust and bubbling cheese. Use the Full Recipe for detailed steps and measurements to create this classic dish! To make great dough, you want it elastic but not sticky. When you knead, aim for about eight to ten minutes. This builds the right texture. If the dough feels too wet, add a bit more flour. If it’s too dry, a splash of water helps. The goal is a smooth and stretchy dough. For the sauce, use high-quality San Marzano tomatoes. They make a big difference in taste. Crush them gently, and add salt and pepper to enhance the flavor. Be careful not to overload your pizza with toppings. Less is more for a perfect bake. This lets the dough rise and crisp up nicely. A pizza stone is a fantastic tool for a crispier crust. Preheat it in the oven to get it really hot. If you don’t have one, a baking sheet works too. Just keep an eye on your pizza while it bakes. You might need to adjust the baking time based on your oven and your taste. Aim for a golden crust and bubbling cheese for the best results. Using these tips will help you craft a classic Margherita pizza that impresses. For the full recipe, check out our detailed instructions and ingredient list. {{image_2}} You can make your Margherita pizza even better by trying different cheeses. Burrata adds a creamy texture that melts beautifully. Smoked mozzarella brings a rich, savory flavor. Both options will change the taste while keeping it classic. Don’t be afraid to get creative with toppings. Arugula adds a peppery bite that pairs well with the cheese. Prosciutto gives a salty, savory kick. A drizzle of truffle oil can elevate the dish with its earthy aroma. These changes can delight your taste buds while keeping the pizza true to its roots. If you want to mix things up, consider using different sauces. Pesto offers a fresh, herbal twist that complements the cheese. White sauce can add a creamy richness that contrasts nicely with the crust. These variations keep the spirit of Margherita while letting you explore new flavors. For the full recipe, check out the [Full Recipe] section! Store your leftover pizza in the refrigerator. Use an airtight container to keep it fresh. It will stay good for up to 3 days. This way, you can enjoy your pizza a bit longer. Want to save pizza for later? You can freeze unbaked pizza for easy meals. Wrap it tightly in plastic wrap and then in foil. This keeps the flavors intact for future enjoyment. To reheat your pizza, the oven is the best choice. Set it to 375°F and bake for about 10 minutes. This method keeps the crust crispy and the cheese melty. If you're in a hurry, use a skillet. Heat it on medium-low for quicker results. Just cover it with a lid to warm the toppings evenly. Margherita pizza comes from Naples, Italy. It was created in 1889 for Queen Margherita of Savoy. The colors of the pizza match the Italian flag: red tomatoes, white mozzarella, and green basil. This dish is simple but full of flavor. It shows how good food can be made from just a few fresh ingredients. To make gluten-free Margherita pizza, use gluten-free flour. You can mix it with xanthan gum for better texture. Here’s a simple list of gluten-free ingredients: - 2 cups gluten-free flour - 1 teaspoon active dry yeast - ¾ cup warm water - 1 teaspoon sugar - 1 teaspoon salt - 1 tablespoon olive oil Follow the same steps as the regular recipe, and you’ll have a tasty gluten-free pizza. Yes, you can make Margherita pizza without a pizza stone. You can use a baking sheet instead. Just preheat the baking sheet in the oven. It helps to create a nice crust. Place the assembled pizza on the hot sheet and bake as directed. You may also use a cast-iron skillet for a crispy base. An authentic Margherita pizza has key elements. It uses San Marzano tomatoes, fresh mozzarella, and basil. The dough must be hand-stretched and thin. The pizza should be baked at a high temperature for a short time. This method creates a soft inside and crisp outside. This recipe yields 2 to 4 servings. It depends on how big you slice the pizza. If you want more, just double the ingredients. You can also make smaller pizzas for a fun meal with friends or family. The number 19 is special because it refers to the recipe's order in this article. Each recipe is numbered for easy reference. In this case, Margherita pizza is recipe number 19. It highlights the importance of classic dishes in my collection. Classic Margherita pizza combines simple ingredients for a delightful dish. You learned the essential components, from fresh basil to San Marzano tomatoes. Following clear steps, you can create perfect dough and rich toppings. Remember to use quality ingredients for the best taste. Feel free to experiment with variations and storage tips. Making this pizza at home is rewarding and fun. Enjoy the process, and savor the delicious results every time.](https://dailydishly.com/wp-content/uploads/2025/06/379b831d-c22e-427f-bef4-29b7c3a1d548-768x768.webp)
![- 1 lb (450g) flank steak, sliced thinly against the grain - 2 cups broccoli florets - 1 red bell pepper, thinly sliced - 3 cloves garlic, minced - 1 inch ginger, grated - 3 tablespoons soy sauce - 2 tablespoons oyster sauce (optional) - 1 tablespoon cornstarch - 1 tablespoon sesame oil - 2 tablespoons vegetable oil - Cooked jasmine rice, for serving - Sesame seeds, for garnish - Green onions, sliced, for garnish The flank steak is key to this dish. It cooks fast and stays tender. When you slice it against the grain, you get a nice, soft bite. Broccoli adds crunch and bright green color. The red bell pepper brings sweetness and color, making it look great. Garlic and ginger provide a warm, aromatic flavor that makes your dish shine. Soy sauce adds saltiness and umami. Oyster sauce, if you choose to use it, gives a rich depth. Cornstarch helps thicken the sauce. Sesame oil adds a nutty flavor to finish it off. For the best flavor, choose fresh, high-quality flank steak. Look for a nice, bright red color with good marbling. Fresh broccoli should be bright green, firm, and not wilted. When choosing bell peppers, look for ones that are firm and shiny. Fresh garlic and ginger can make a big difference in taste. Use low-sodium soy sauce for a healthier option. If you can, find a good-quality oyster sauce. Finally, use pure sesame oil for the best flavor. Each ingredient plays a role in making your Beef and Broccoli Stir-Fry delicious. Check the [Full Recipe] for more detailed cooking steps. To start, you want to make the beef tender and tasty. Take 1 pound of flank steak and slice it thinly. Slice against the grain for the best texture. In a medium bowl, mix the sliced beef with 3 tablespoons of soy sauce, 2 tablespoons of oyster sauce (if you like), and 1 tablespoon of cornstarch. Make sure all the beef is coated well. Let it sit for 15 minutes. This step makes a big difference in flavor. While the beef marinates, it’s time to prep the broccoli. Grab 2 cups of broccoli florets. Bring a pot of water to a boil. Once boiling, add the broccoli and blanch it for 2 minutes. This keeps the broccoli bright and crisp. After 2 minutes, put the florets in an ice bath to stop cooking. Drain the broccoli and set it aside. This step ensures the broccoli stays green and crunchy. Now, let’s get cooking! Heat a large pan or wok over medium-high heat. Add 2 tablespoons of vegetable oil once it's hot. Next, add the marinated beef in a single layer. Cook for about 2 to 3 minutes until it turns brown. Remove the beef and set it aside. In the same pan, add 3 cloves of minced garlic and 1 inch of grated ginger. Sauté for 30 seconds until it smells great. Then, add the red bell pepper and your blanched broccoli. Stir for another 2 to 3 minutes. Finally, return the beef to the pan. Pour in 1 tablespoon of sesame oil. Stir everything together and cook for 2 more minutes. This helps the flavors mix well. Taste your stir-fry and add more soy sauce if you want. Serve it hot over jasmine rice. Don’t forget to garnish with sesame seeds and sliced green onions for an extra touch. For the full recipe, check the details above. To get tender beef, choose flank steak. Slice it thinly against the grain. This helps break down tough fibers. Marinate the beef for at least 15 minutes. Use soy sauce and cornstarch for extra tenderness. The cornstarch creates a nice coating that locks in juices. Don't cook the beef too long. Just 2-3 minutes in a hot pan will do. Remove it quickly to keep it tender. For bright green, crisp broccoli, blanch it first. Boil water and add the florets for 2 minutes. This softens them but keeps their color. After boiling, quickly transfer them to an ice bath. This stops the cooking and keeps the crunch. Stir-fry the blanched broccoli for just a few minutes. This will make it hot without losing its color or texture. To boost flavor, add garlic and ginger when cooking. These ingredients bring a strong, fresh taste. You can also add red bell pepper for sweetness. If you want a richer taste, use oyster sauce. Just a tablespoon can add depth. Taste your dish before serving. If it needs more saltiness, add extra soy sauce. A sprinkle of sesame seeds and green onions on top adds a nice touch. For the detailed recipe, check the Full Recipe. {{image_2}} You can switch beef for other proteins. Chicken works great in this dish. You can also use shrimp or tofu for a different taste. Each choice brings its own flavor and texture. Try marinating them the same way. This keeps the dish simple and tasty, just like the Full Recipe. Feel free to add more veggies for color and taste. Carrots, snap peas, or mushrooms can enhance the dish. Just chop them up and toss them in with the broccoli. They will cook quickly, adding crunch and nutrition. If you need a gluten-free version, use tamari instead of soy sauce. For a vegan meal, replace the beef with tofu or seitan. You can also skip the oyster sauce or use a vegan version. This way, you can enjoy a delicious meal while meeting your dietary needs. To keep your beef and broccoli stir-fry fresh, store it in an airtight container. Let the dish cool down to room temperature before sealing it. Place the container in the fridge and eat the leftovers within three days. This helps maintain flavor and quality. When you're ready to enjoy your leftovers, reheat them in a pan. Add a splash of water or broth to avoid drying out the meal. Heat on medium until warm, stirring often. You can also use the microwave. Cover the dish and heat in short bursts, stirring in between. This ensures even heating. If you want to freeze your stir-fry, first let it cool completely. Portion it into freezer bags or containers. Remove as much air as possible before sealing. Label the bags with the date. You can freeze it for up to three months. When you’re ready to eat, thaw it overnight in the fridge before reheating. This method preserves taste and texture well. For the full recipe, check out the Beefy Broccoli Bonanza. Making Beef and Broccoli Stir-Fry takes about 30 minutes. This time includes prep and cooking. You will spend 15 minutes prepping the ingredients and marinating the beef. The cooking process will take about 15 minutes. This quick time makes it perfect for busy weeknights. Yes, you can use frozen broccoli. Frozen broccoli is convenient and saves time. It also cooks quickly, which fits well with stir-frying. Just make sure to thaw it before use. Drain any excess water to avoid sogginess in your dish. Beef and Broccoli Stir-Fry pairs well with jasmine rice. This rice soaks up the savory sauce nicely. You can also serve it with noodles for a different twist. Adding spring rolls or dumplings makes it a complete meal. For a fresh touch, include a side salad with crisp greens. Check out the Full Recipe for more ideas! Beef and broccoli stir-fry is simple and fun to make. You learned about key ingredients and best cooking practices. I offered tips for tender beef and tasty broccoli. You can also try different proteins and some easy swaps. Lastly, I explained how to store leftovers well. Enjoy this dish tonight or any night. It fits any table and delights many tastes. Your kitchen will shine with this easy recipe!](https://dailydishly.com/wp-content/uploads/2025/06/c1b8a640-846d-4588-a3be-4e7860c53d8e-768x768.webp)