
Teriyaki Chicken Lettuce Wraps Flavorful and Fresh Meal


Craving a meal that’s both tasty and healthy? Teriyaki Chicken Lettuce Wraps are your perfect answer! I’m excited to share this easy recipe that bursts with flavor. You’ll learn about the fresh ingredients, cooking methods, and tips to make the wraps just right. Whether you want a quick dinner or a fun lunch, these wraps fit the bill. Let’s dive into making a meal that everyone will love!
Why I Love This Recipe
- Quick and Easy: This recipe comes together in just 30 minutes, making it perfect for busy weeknights.
- Flavorful Marinade: The teriyaki sauce combined with ginger and garlic adds a delicious depth of flavor to the chicken.
- Healthy and Fresh: Using lettuce wraps instead of tortillas means you get a lighter, healthier meal packed with veggies.
- Customizable: You can easily swap out the vegetables or adjust the seasoning to suit your taste preferences.
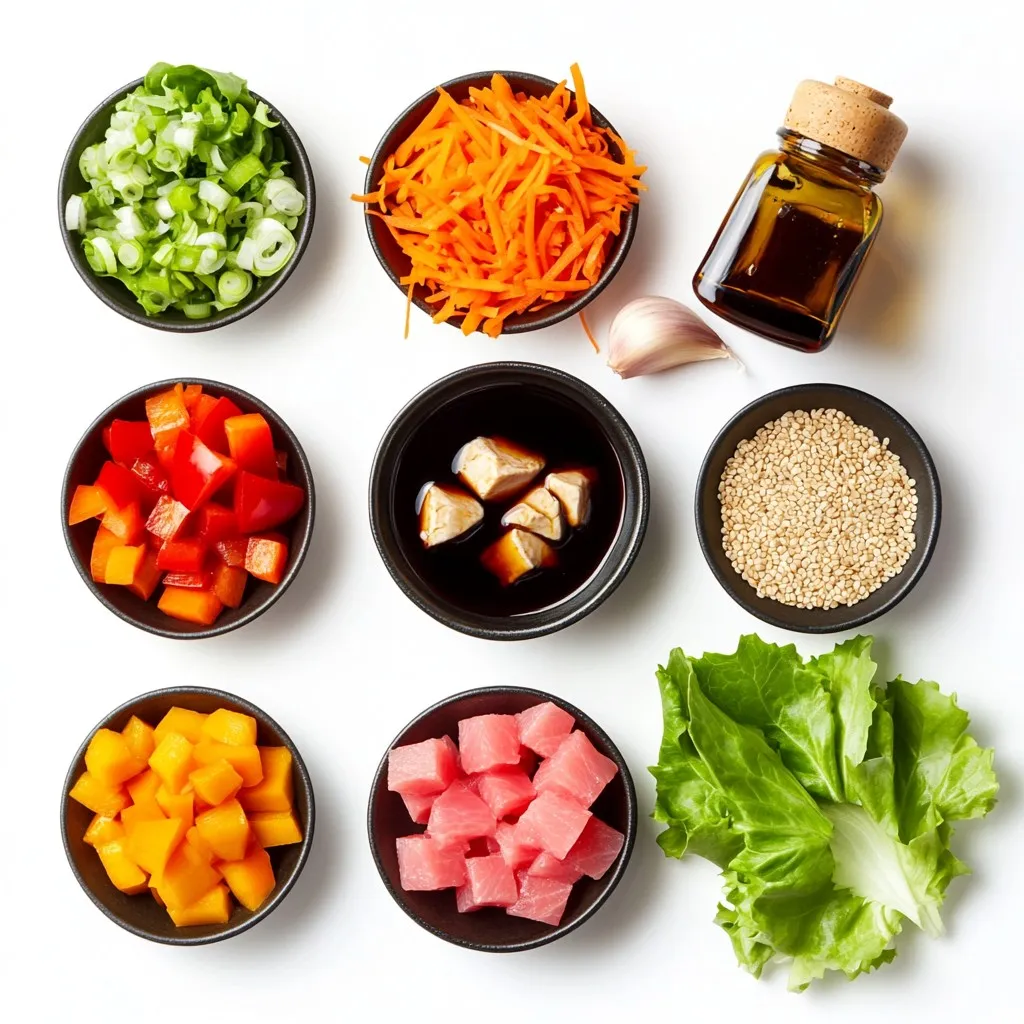
Ingredients
Main Ingredients for Teriyaki Chicken Lettuce Wraps
For these tasty wraps, you need a few key items:
– 1 lb boneless, skinless chicken thighs, diced
– 1/3 cup teriyaki sauce
– 1 tablespoon sesame oil
– 1 tablespoon fresh ginger, minced
– 2 garlic cloves, minced
– 1 red bell pepper, diced
– 1 carrot, shredded
– 2 green onions, chopped
– 1 tablespoon sesame seeds
– 1 head of butter lettuce or romaine leaves for wrapping
– Salt and pepper to taste
These ingredients work together to create a dish that is both savory and fresh. The chicken thighs provide a juicy base, while the teriyaki sauce adds a sweet and salty flavor.
Seasoning and Marinade Components
The teriyaki sauce is the star here. It gives the chicken a rich flavor. Fresh ginger and garlic add depth and warmth. You’ll also use sesame oil for cooking. This oil brings a nutty taste that complements the chicken.
Marinating the chicken is key. Let it soak in the sauce for 15 minutes. This step ensures every bite is full of flavor.
Optional Garnishes and Toppings
You can enhance your wraps with some fun toppings. Consider adding:
– Chopped cilantro
– Sliced jalapeños
– Crunchy peanuts
– Extra sesame seeds
These options add texture and extra flavor. Feel free to mix and match. The wraps are flexible, so get creative with your toppings!
Step-by-Step Instructions
Preparing the Chicken Marinade
Start by gathering your chicken and marinade ingredients. In a medium bowl, mix the diced chicken thighs with the teriyaki sauce, minced ginger, and minced garlic. This mixture gives the chicken a rich flavor. Let it marinate for 15 minutes. This step makes your chicken tender and tasty.
Cooking the Chicken and Vegetables
Next, heat the sesame oil in a large skillet over medium heat. Once the oil is hot, add the marinated chicken. Make sure to discard any leftover marinade. Cook the chicken for about 8 to 10 minutes. Stir it often until it turns brown and is fully cooked. After that, add the diced red bell pepper and shredded carrot. Sauté these for another 3 to 4 minutes. You want the veggies to stay crisp but get a bit tender.
Assembling the Lettuce Wraps
Once cooked, remove the skillet from the heat. Stir in the chopped green onions and sesame seeds. Season with salt and pepper to add more flavor. Now, take your butter lettuce leaves and carefully separate them. Spoon the chicken mixture into the center of each leaf. Wrap them up like a taco. Each bite will burst with flavor and freshness. Enjoy your meal!
Tips & Tricks
Perfecting the Marinade
To make great teriyaki chicken, start with the marinade. Combine chicken thighs, teriyaki sauce, minced ginger, and minced garlic in a bowl. Let it sit for 15 minutes. This step adds flavor and moisture. Remember, the longer you marinate, the better. Just don’t exceed two hours to avoid mushy chicken.
Cooking Techniques for Juicy Chicken
When cooking, use medium heat and sesame oil. Heat the pan before adding the chicken. This helps to sear the meat and lock in juices. Cook the chicken for about 8-10 minutes. Stir occasionally to ensure even cooking. Once browned, add diced red bell pepper and shredded carrot. Sauté these for 3-4 minutes. You want them tender but still crisp.
Serving Suggestions for the Wraps
For serving, use fresh butter lettuce or romaine leaves. These hold the filling well. Spoon the chicken mixture into each leaf. Top with chopped green onions and sesame seeds for extra crunch. Wrap them like a taco, and enjoy! Feel free to add hot sauce for a spicy kick.
Pro Tips
- Marinate for Maximum Flavor: Allow the chicken to marinate for at least 15 minutes, but if time permits, marinating for a few hours or overnight will enhance the flavors even more.
- Use Fresh Ingredients: Fresh ginger and garlic make a significant difference in taste. Avoid using pre-minced versions for the best flavor.
- Choose the Right Lettuce: Butter lettuce or romaine leaves are ideal for wraps as they are sturdy enough to hold the filling without tearing.
- Customize Your Fillings: Feel free to add other vegetables like shredded cabbage or sliced cucumbers for extra crunch and nutrition in your wraps.

Variations
Substitutions for Chicken Thighs
You can swap chicken thighs for chicken breasts. Breasts are leaner but dry faster. You could also use turkey, which works well too. For a fun twist, try diced shrimp. Just remember, cooking times may change.
Vegetarian or Vegan Options
For a vegetarian dish, use firm tofu. Press it to remove water, then dice it. Sauté it in sesame oil until golden. If you want a vegan option, try tempeh. It has a nutty flavor and absorbs sauces well. You can also use chickpeas for protein.
Alternative Sauces and Flavors
While teriyaki sauce is tasty, you can try other sauces. Hoisin sauce gives a sweet and salty kick. For a spicy twist, add sriracha to your marinade. You can also use a mix of soy sauce and honey for a classic taste. Don’t hesitate to experiment with flavors!
Storage Info
How to Store Leftover Lettuce Wraps
To keep your leftover lettuce wraps fresh, store them in an airtight container. Place the chicken mixture in one container and store the lettuce leaves separately. This prevents the lettuce from getting soggy. Leftovers can last up to three days in the fridge.
Reheating Tips for Teriyaki Chicken
When reheating the teriyaki chicken, use a skillet over medium heat. Add a splash of water or broth to keep it moist. Stir the chicken frequently until it’s hot. You can also use a microwave, but be careful not to overheat it. Heat in short bursts, stirring in between.
Freezing and Meal Prep Suggestions
You can freeze the chicken mixture for up to three months. Cool it completely before placing it in a freezer bag. Make sure to remove excess air to prevent freezer burn. When ready to eat, thaw it overnight in the fridge. Reheat it before serving with fresh lettuce. Meal prepping is easy; just prepare the chicken and store it in portions. This way, you can enjoy quick meals during the week.
FAQs
How can I make teriyaki chicken lettuce wraps gluten-free?
To make teriyaki chicken lettuce wraps gluten-free, choose a gluten-free teriyaki sauce. Many brands offer this option. Always check the label to ensure it meets your needs. Use fresh ingredients like chicken thighs and veggies. This way, you keep it safe and tasty.
Can I use different vegetables in the wraps?
Yes, you can use different vegetables in these wraps. Feel free to add cucumbers, shredded cabbage, or even avocado. These veggies add crunch and color. Get creative with your choices! Just make sure to chop them small for easy wrapping.
What can I serve with teriyaki chicken lettuce wraps?
You can serve several items with teriyaki chicken lettuce wraps. Rice is a great side dish. You might also enjoy a light salad or some steamed veggies. For a fun twist, add some fruit like pineapple or mango. These sides balance the meal well and add more flavors.
You learned how to make tasty teriyaki chicken lettuce wraps. We covered key ingredients, the steps to cook, and tips for success. Remember to experiment with variations and storage options. This dish is fun and flexible, perfect for any meal. Try new flavors and enjoy each bite. Your kitchen can turn into a place of creativity with these wraps. Keep practicing, and you’ll impress everyone with your skills. Enjoy your cooking adventur

Savoury Teriyaki Chicken Lettuce Wraps
Ingredients
- 1 lb boneless, skinless chicken thighs, diced
- 1 cup teriyaki sauce
- 1 tablespoon sesame oil
- 1 tablespoon fresh ginger, minced
- 2 cloves garlic, minced
- 1 medium red bell pepper, diced
- 1 medium carrot, shredded
- 2 stalks green onions, chopped
- 1 tablespoon sesame seeds
- 1 head butter lettuce or romaine leaves for wrapping
- to taste salt and pepper
Instructions
- In a medium bowl, combine the diced chicken thighs, teriyaki sauce, minced ginger, and minced garlic. Allow to marinate for 15 minutes.
- Heat the sesame oil in a large skillet over medium heat. Once hot, add the marinated chicken (discarding any excess marinade) and cook for about 8-10 minutes, stirring occasionally, until the chicken is cooked through and browned.
- Add the diced red bell pepper and shredded carrot to the skillet. Sauté for an additional 3-4 minutes until the vegetables are slightly tender but still crisp.
- Remove from heat and stir in the chopped green onions and sesame seeds. Season with salt and pepper to taste.
- To serve, carefully separate the lettuce leaves and spoon the chicken mixture into the center of each leaf. Wrap them up like a taco.


![For a vibrant and tasty treat, use a mix of colorful fruits. Here’s what you need: - 1 cup strawberries, hulled - 1 cup orange segments - 1 cup pineapple chunks - 1 cup green grapes - 1 cup blueberries - 1 cup purple grapes or blackberries These fruits not only look great, but they also pack in vitamins. Each fruit adds its own flavor and texture. You can choose fresh, ripe fruits for the best taste. If you want to add a bit of sweetness, consider these options: - 2 tablespoons honey (optional) Honey brings a natural sweetness to the skewers. Drizzle it on before serving. It works well with all the fruits. Garnishing makes your skewers look even better. Use fresh mint leaves for a pop of color. Arrange the skewers on a platter for a fun display. You can also place them in a glass jar for a playful touch. This way, everyone can grab their own skewer! For the full recipe, check the detailed steps to make these beautiful treats. Start by washing all the fruits well. Rinse strawberries, grapes, blueberries, and oranges under cool water. Hull the strawberries, removing the green tops. Cut large strawberries in half for easier skewering. Peel the oranges and break them into segments. For the pineapple, slice it into bite-sized pieces. Finally, rinse the green and purple grapes. Grab wooden skewers and now it’s time to thread the fruits. Begin with a strawberry, then add an orange segment. Next, add a pineapple chunk and follow with a green grape. Then, add a blueberry and finish with a purple grape or blackberry. Aim for a vibrant pattern with all the colors of the rainbow. Each skewer should look fun and inviting! If you want to add a bit of sweetness, drizzle honey over the skewers. This step is optional, but it can enhance the flavors. For a refreshing treat, chill the skewers in the fridge for about 30 minutes before serving. Arrange them on a lovely platter and add fresh mint leaves for a pop of color. These simple steps make your rainbow fruit skewers look and taste amazing. For more detailed instructions, check the Full Recipe. Choosing ripe fruits is key for tasty skewers. Look for bright colors and firm texture. For strawberries, pick those that are deep red. Oranges should feel heavy and have smooth skin. Pineapples should have a sweet smell and give slightly when pressed. Grapes are ripe when they are plump and not wrinkled. Blueberries should be deep blue, while purple grapes should show no signs of green. When skewering, use sturdy wooden sticks or metal skewers. Start with a strawberry at the bottom. Follow with an orange segment and then a pineapple chunk. Next, add a green grape and a blueberry. Finish with a purple grape or blackberry on top. This order keeps the colors bright and fun. Space the fruits a bit apart to allow for easy eating. For parties, arrange your skewers on a big platter. Display them upright in a tall glass or jar. This makes them easy to grab. You can add a small bowl of honey for dipping. Fresh mint leaves add a nice touch and flavor. Guests will love the colors and the taste! For more ideas, check out the Full Recipe. {{image_2}} You can switch up the fruits in your skewers. Try using kiwi instead of orange for a tangy taste. Swap in mango for a sweeter flavor, or use raspberries for a tart kick. Here are some great options: - Kiwi - Mango - Raspberries - Peaches - Apples These fruits add different colors, flavors, and textures. You can mix and match based on what you like. Get creative with your combinations! Dips can make your fruit skewers even more fun. You can serve them with yogurt or chocolate sauce. Here are some tasty ideas: - Vanilla yogurt - Honey yogurt - Chocolate sauce - Nut butter Dipping adds a new layer of flavor. You can make a small bowl for each dip. This way, everyone can enjoy their favorite! Make your skewers special for holidays or parties. For a birthday, use colorful sprinkles on your yogurt dip. For summer picnics, create a “beach” theme with coconut flakes. You can also arrange the fruits in shapes, like stars or hearts. This adds a fun touch to your dish. For more details on making these colorful treats, check the Full Recipe. To keep your rainbow fruit skewers fresh, store them in the fridge. Place them in an airtight container. This helps prevent the fruits from drying out or absorbing odors. If you plan to serve them later, keep the honey separate until just before serving. This way, the skewers stay crisp and colorful. When prepping your skewers, wash and cut your fruits ahead of time. Keep them in separate containers for easy access. This makes it simple to assemble the skewers when you’re ready. If you want to make them in advance, prepare them a few hours before serving. Just remember to refrigerate them to keep them fresh. Most fruits have a good shelf life when stored correctly. Here’s a quick guide: - Strawberries: 3–5 days - Oranges: 1–2 weeks - Pineapple: 3–5 days - Grapes: 1 week - Blueberries: 1 week - Blackberries: 3–5 days Always check for freshness before using any fruit. By following these tips, your rainbow fruit skewers will stay vibrant, tasty, and ready to enjoy! For the full recipe, check back on the main article. Yes, you can use frozen fruits for skewers. However, they may not hold their shape well. Frozen fruits often lose some water when thawed. This can make them mushy. If you want to use them, let them thaw first. Pat them dry with a towel to reduce excess moisture. This way, they won’t drip and make a mess. To boost the nutrition of your rainbow fruit skewers, consider these tips: - Add a source of protein. Use yogurt, cheese cubes, or nuts. - Include seeds. Sprinkle chia or flaxseed on the fruit. - Use whole fruits instead of fruit juice. Whole fruits have more fiber. - Mix in some veggies. Cherry tomatoes or cucumber slices can add crunch. These small changes can make your skewers even healthier without losing flavor. For a summer picnic, the best fruits are those that are sweet and refreshing. Here are some great choices: - Strawberries: Juicy and easy to eat. - Watermelon: Hydrating and fun to slice. - Pineapple: Sweet and tangy. - Grapes: Bite-sized and portable. - Blueberries: Packed with antioxidants. - Raspberries: Tart and flavorful. These fruits not only taste great but also look beautiful on your skewers. You can find the full recipe for rainbow fruit skewers [here]. Enjoy! Rainbow fruit skewers are fun and easy to make. We covered the best fruits, optional sweeteners, and cool presentation ideas. You learned how to prep the fruit and assemble the skewers step by step. I shared tips on choosing ripe fruit and serving them at gatherings. We also explored variations, like adding dips and themed designs. Finally, I discussed how to store your skewers for freshness. Now, grab your favorites and get creative with your skewers! Enjoy these tasty treats while having fun with friends and family.](https://dailydishly.com/wp-content/uploads/2025/06/1f4123b9-dd53-4d15-af26-e58167d567ef-768x768.webp)

![To make Honey Sriracha Brussels Sprouts, gather the following ingredients: - 1 pound Brussels sprouts, trimmed and halved - 3 tablespoons olive oil - 2 tablespoons honey - 2 tablespoons Sriracha sauce - 1 teaspoon garlic powder - Salt and pepper to taste - Optional garnish: 1 tablespoon sesame seeds - Optional garnish: 2 green onions, chopped Each ingredient plays a key role. The Brussels sprouts give a hearty base. Olive oil helps to crisp them up. Honey adds sweetness, while Sriracha brings heat. Garlic powder enhances flavor. Salt and pepper bring everything together. If you want to add flair, sprinkle sesame seeds and green onions on top. You can find the full recipe in the article. Enjoy the sweet and spicy blend! - Preheat your oven to 425°F (220°C). - Line a large baking sheet with parchment paper. - In a large bowl, mix the halved Brussels sprouts, olive oil, honey, Sriracha sauce, garlic powder, salt, and pepper. - Toss well to coat each sprout evenly. - Spread the Brussels sprouts on the baking sheet, cut side down. - Roast for 20-25 minutes until they are tender and crispy. I love the way the heat from the Sriracha blends with the sweetness of honey. It creates a perfect balance. The garlic powder adds a subtle depth. Remember, tossing halfway helps them cook evenly. If you want to know more, check out the Full Recipe for all the details! To get crispy Brussels sprouts, start with fresh sprouts. Make sure to trim and halve them. Oven heat is key; preheat to 425°F (220°C). Use a baking sheet lined with parchment paper. This helps with cleanup and browning. Toss the sprouts halfway through cooking. This ensures even heat and crispiness. If you skip this step, some may burn while others stay soggy. For extra flavor, think about adding spices. A pinch of cayenne or paprika can bring heat. Fresh herbs like thyme or rosemary also work great. They add depth to the sweet and spicy mix. Try different types of honey or Sriracha, too. Each honey has its own unique taste. You might prefer a lighter honey for a sweet touch. A spicier Sriracha can kick up the heat. Experiment and find your favorite mix. For the full recipe, check out the details above. {{image_2}} You can swap Brussels sprouts for other veggies. Broccoli, cauliflower, or green beans work well. Each adds a unique taste and texture. Try mixing these veggies for fun flavors. You can also explore different sauces. Instead of honey and Sriracha, use teriyaki or balsamic glaze. This change will give you a new flavor profile. Want to make this recipe vegan? Replace honey with maple syrup or agave nectar. This keeps the sweet taste without animal products. You can also make it gluten-free. Just ensure your Sriracha and any other sauces are gluten-free. For low-carb options, skip the honey or use a sugar substitute. This keeps the dish tasty while reducing carbs. Check the [Full Recipe] for more ideas on how to adapt this dish! To keep your Honey Sriracha Brussels sprouts fresh, store leftovers in the fridge. Place them in an airtight container. This helps keep the flavors intact. Make sure to cool them down first. If you plan to eat them soon, they can last up to four days. For longer storage, you can freeze them. Use a freezer-safe bag or container. Make sure to remove as much air as possible. They can last up to three months in the freezer. When you're ready to enjoy your Brussels sprouts again, reheating is key. The best method is using an oven. Preheat it to 350°F (175°C). Spread the sprouts on a baking sheet. Heat for about 10-15 minutes. This will help keep them crispy. If you're in a hurry, you can use a microwave. Place them in a microwave-safe dish. Heat in short bursts of 30 seconds. Check often to avoid sogginess. To keep that crunch, try reheating in a skillet. Just a few minutes over medium heat will do the trick. Enjoy the sweet and spicy goodness of these Brussels sprouts again! For the full recipe, check the earlier section. What do I serve with Honey Sriracha Brussels Sprouts? You can serve these sprouts with rice or quinoa. They also pair well with grilled chicken or fish. For a hearty meal, try them alongside a steak. The sweet and spicy flavors complement many dishes. Can I use frozen Brussels sprouts for this recipe? Yes, you can use frozen Brussels sprouts. Just thaw them first and pat them dry. This helps to get a nice crispy texture. The cooking time may be a bit longer, so keep an eye on them. How spicy are these Brussels sprouts? The heat level depends on how much Sriracha you use. Two tablespoons give a nice kick, but you can adjust it to your taste. If you prefer less heat, use one tablespoon of Sriracha. How do I make the recipe ahead of time? You can prepare the Brussels sprouts up to a day in advance. Toss them in the sauce and store in the fridge. When ready to cook, spread them on the baking sheet and roast as directed. Can I make this on the stovetop? Yes, you can cook these on the stovetop. Heat oil in a large pan over medium heat. Add the Brussels sprouts cut side down and cook until browned. Then, toss them with the sauce and cover to steam until tender. What are some popular side dishes to pair with it? Some great side dishes include mashed potatoes or a fresh salad. You can also serve them with roasted carrots or sweet potatoes for a colorful plate. These sides balance the flavors well. You learned how to make delicious Honey Sriracha Brussels sprouts. Using simple ingredients, we created the perfect balance of sweet and spicy flavors. I shared tips for achieving that crispy texture and ideas for variations, like different veggies or sauces. Don’t forget the best storage and reheating methods to keep them tasty. Enjoy these sprouts as a side dish or a fun main course. Cooking can be easy and satisfying. Try it out, and make it your own!](https://dailydishly.com/wp-content/uploads/2025/06/e27bd237-cd9d-45ea-93fd-8494cb919a9a-768x768.webp)