Honey Garlic Chicken Stir Fry Flavorful Dinner Delight
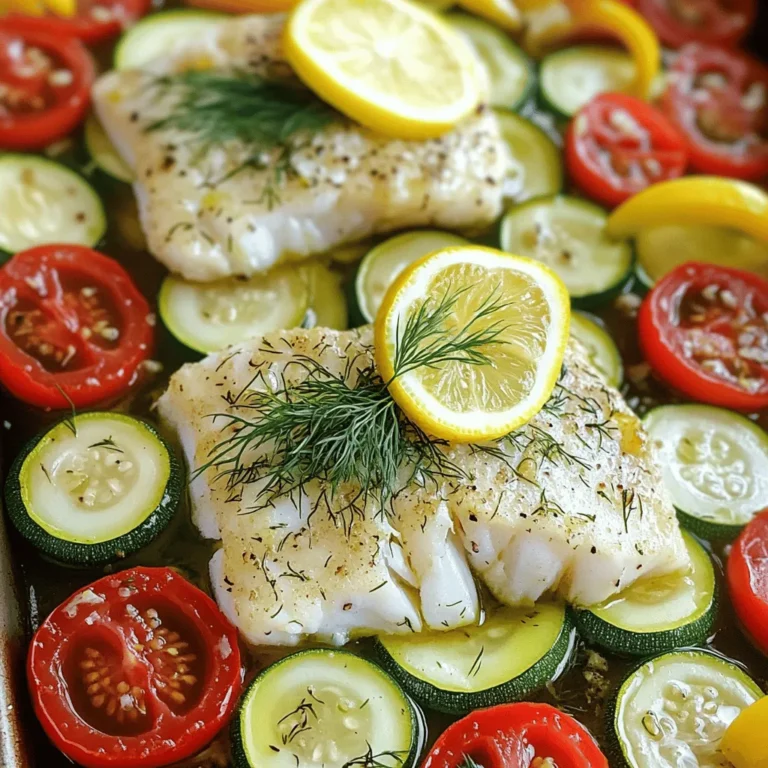
![- Chicken and Vegetables - 2 boneless, skinless chicken breasts, sliced into thin strips - 1 red bell pepper, sliced - 1 cup broccoli florets - 1 cup snap peas - 1 carrot, julienned - Sauces and Seasonings - 2 tablespoons honey - 4 cloves garlic, minced - 2 tablespoons soy sauce (low sodium) - 1 tablespoon sesame oil - 2 tablespoons vegetable oil - Salt and pepper to taste - Optional Garnishes - Sesame seeds - Green onions, sliced This dish shines with fresh ingredients. Each one adds a unique flavor and texture. The chicken provides protein, while the vegetables give crunch and color. Honey and garlic create a sweet and savory sauce that ties everything together. Using low sodium soy sauce keeps the dish healthy. Sesame oil adds depth and richness. Don’t skip the garnishes; they add a lovely finish. You can find the full recipe in the detailed section above. Enjoy your cooking! Whisking the Honey Garlic Sauce In a small bowl, combine honey, minced garlic, soy sauce, and sesame oil. Use a whisk to mix until smooth. This sauce gives the dish a sweet and savory flavor. Set it aside for later. Seasoning the Chicken Take your sliced chicken and sprinkle salt and pepper over it. This adds flavor and prepares the chicken for cooking. Make sure to coat all sides evenly. Preparing the Vegetables Wash and chop your vegetables. Slice the red bell pepper, julienne the carrot, and get the broccoli florets and snap peas ready. Fresh veggies add color and crunch to the dish. Sautéing the Chicken Heat one tablespoon of vegetable oil in a large skillet or wok over medium-high heat. Once hot, add the seasoned chicken strips. Cook for 5 to 7 minutes, stirring often. The chicken should turn golden and be fully cooked. Remove it from the skillet and set aside. Stir-Frying the Vegetables In the same skillet, add the remaining tablespoon of vegetable oil. Toss in the red bell pepper, broccoli, snap peas, and carrot. Stir-fry for about 3 to 4 minutes. You want them crisp-tender, not mushy. Combining Chicken and Sauce Return the cooked chicken to the skillet with the veggies. Pour your prepared honey garlic sauce over everything. Stir well to coat all the ingredients evenly. Cook for an additional 2 to 3 minutes to let the sauce thicken slightly. Plating the Dish Serve your honey garlic chicken stir fry in shallow bowls. A bed of fluffy rice or noodles makes it even better. This adds substance and absorbs the sauce. Garnishing Tips Top your dish with sesame seeds and sliced green onions for extra flavor and color. A wedge of lime on the side gives a nice citrus kick. For the complete recipe, check out the [Full Recipe]. Optimal Cooking Temperature Heat is key for a great stir fry. Start with medium-high heat. This temperature helps brown the chicken and keeps veggies crisp. Too low, and your food stews instead of fries. Too high, and you might burn everything. Keep an eye on the pan! Avoiding Overcooked Chicken and Vegetables Cook the chicken until it's just done. It should be golden, not dry. Remove it from the pan as soon as it’s cooked. For the veggies, stir-fry for 3-4 minutes. They should be bright and a bit crunchy. Overcooked veggies lose their color and nutrients. Choosing the Best Chicken Cuts I always use boneless, skinless chicken breasts for this dish. They cook quickly and stay juicy. You can also use thighs if you prefer more flavor. Just cut them into thin strips for even cooking. Freshness of Vegetables Fresh veggies make a big difference. Look for bright colors and firm textures. Bell peppers, broccoli, and snap peas should feel crisp. Avoid any limp or brown spots. The better the veggies, the better your stir fry will taste. Pairing Suggestions (Rice, Noodles, etc.) Serve this stir fry over fluffy rice or noodles. Both absorb the honey garlic sauce well. For rice, jasmine or basmati works great. If you choose noodles, try egg noodles or rice noodles for a nice touch. Customizing for Dietary Preferences You can easily adapt this recipe. Want it vegetarian? Use firm tofu instead of chicken. Gluten-free? Swap soy sauce for tamari or coconut aminos. Make it your own while keeping the flavor! For more ideas, check out the Full Recipe. {{image_2}} You can mix it up with different proteins. Tofu works great for a vegetarian option. Beef strips add a rich flavor. Just remember to adjust cooking times for each protein. When it comes to veggies, the options are endless. You can add mushrooms for an earthy touch. Zucchini gives a nice crunch. Carrots, bell peppers, and snap peas are also good choices. Feel free to use what you have in your fridge. Want to boost the flavor? Try adding new sauces or spices. A splash of sriracha can add heat. Ginger adds a nice zing. Experiment with different flavors to find your perfect mix. Adjust the sweetness to your liking too. If you prefer less sweetness, cut the honey by half. For a sweeter taste, add more honey. Taste as you go to find what works best for you. You can make this dish in an Instant Pot or slow cooker. For the Instant Pot, sauté first, then pressure cook for quick results. In a slow cooker, let it simmer for a few hours. Grilling or baking can also work well. Grill the chicken for a smoky flavor. Bake it in the oven for a hands-off approach. No matter the method, the taste will still be amazing. If you're looking for the full recipe, check out the Honey Garlic Chicken Stir Fry ! To keep your honey garlic chicken stir fry fresh, store any leftovers in an airtight container. Place the container in the fridge right after the meal. This helps lock in flavors and prevent bacteria growth. You should enjoy your leftovers within 3 to 4 days for the best taste. If you want to save your stir fry for later, freezing is a great option. First, let the dish cool completely before packing it. Use freezer-safe bags or containers for best results. Be sure to remove as much air as possible to prevent freezer burn. Your honey garlic chicken stir fry can last up to 3 months in the freezer. When you're ready to eat, thaw the stir fry overnight in the fridge. Then, reheat it on the stovetop over low heat. Stir occasionally until it’s hot. You can also microwave it, but ensure you stir it every minute to heat evenly. Enjoy your meal all over again! Can I use frozen vegetables? Yes, you can use frozen vegetables. They save time and are easy to find. Just add them directly to the pan. You might need to cook them a bit longer. This will help them get warm and tender. How to make this dish gluten-free? To make this dish gluten-free, use tamari instead of soy sauce. Tamari is a great gluten-free option. Check the labels to ensure no gluten ingredients are included. What to do if the sauce is too thick? If the sauce is too thick, add a little water or chicken broth. Stir it in slowly. This will help loosen the sauce and keep it tasty. How do I know when the chicken is fully cooked? Check the chicken's color and texture. It should be white and firm. The safest way is to use a meat thermometer. The internal temperature should reach 165°F (75°C). Can this recipe be made ahead of time? Yes, you can prepare the chicken and sauce ahead of time. Store them in the fridge for up to two days. Then, cook the stir fry when you are ready to eat. What's the best way to reheat stir fry? Reheat the stir fry in a skillet over medium heat. Add a splash of water to keep it moist. Stir often until it’s hot. This will help keep the flavors fresh. For the full recipe, check out the Honey Garlic Chicken Stir Fry. To make a great Honey Garlic Chicken Stir Fry, we discussed all the key ingredients, steps, and tips. Start with fresh chicken and vibrant vegetables. Whisk together a yummy sauce and cook everything just right. Don’t forget to play with flavors or cooking methods to suit your taste. Proper storage keeps leftovers tasty for later. With a few variations, this dish can easily fit your dietary needs. Enjoy your stir-fry and impress family or friends with your new skills!](https://dailydishly.com/wp-content/uploads/2025/07/ad7e2fa8-e610-4152-a96e-e496d4740468.webp)
Are you ready for a fun, tasty dinner? Honey Garlic Chicken Stir Fry is the perfect dish. It bursts with sweet and savory flavor, yet it’s simple to make. In just a few easy steps, you’ll have a meal that pleases everyone at the table. Curious about how to whip up this flavorful delight? Let’s dive into the ingredients and see how you can make this quick, delicious stir fry tonight!
Ingredients
Complete List of Ingredients
– Chicken and Vegetables
– 2 boneless, skinless chicken breasts, sliced into thin strips
– 1 red bell pepper, sliced
– 1 cup broccoli florets
– 1 cup snap peas
– 1 carrot, julienned
– Sauces and Seasonings
– 2 tablespoons honey
– 4 cloves garlic, minced
– 2 tablespoons soy sauce (low sodium)
– 1 tablespoon sesame oil
– 2 tablespoons vegetable oil
– Salt and pepper to taste
– Optional Garnishes
– Sesame seeds
– Green onions, sliced
This dish shines with fresh ingredients. Each one adds a unique flavor and texture. The chicken provides protein, while the vegetables give crunch and color. Honey and garlic create a sweet and savory sauce that ties everything together.
Using low sodium soy sauce keeps the dish healthy. Sesame oil adds depth and richness. Don’t skip the garnishes; they add a lovely finish.Enjoy your cooking!
Step-by-Step Instructions
Preparation Steps
Whisking the Honey Garlic Sauce
In a small bowl, combine honey, minced garlic, soy sauce, and sesame oil. Use a whisk to mix until smooth. This sauce gives the dish a sweet and savory flavor. Set it aside for later.
Seasoning the Chicken
Take your sliced chicken and sprinkle salt and pepper over it. This adds flavor and prepares the chicken for cooking. Make sure to coat all sides evenly.
Preparing the Vegetables
Wash and chop your vegetables. Slice the red bell pepper, julienne the carrot, and get the broccoli florets and snap peas ready. Fresh veggies add color and crunch to the dish.
Cooking Process
Sautéing the Chicken
Heat one tablespoon of vegetable oil in a large skillet or wok over medium-high heat. Once hot, add the seasoned chicken strips. Cook for 5 to 7 minutes, stirring often. The chicken should turn golden and be fully cooked. Remove it from the skillet and set aside.
Stir-Frying the Vegetables
In the same skillet, add the remaining tablespoon of vegetable oil. Toss in the red bell pepper, broccoli, snap peas, and carrot. Stir-fry for about 3 to 4 minutes. You want them crisp-tender, not mushy.
Combining Chicken and Sauce
Return the cooked chicken to the skillet with the veggies. Pour your prepared honey garlic sauce over everything. Stir well to coat all the ingredients evenly. Cook for an additional 2 to 3 minutes to let the sauce thicken slightly.
Serving Suggestions
Plating the Dish
Serve your honey garlic chicken stir fry in shallow bowls. A bed of fluffy rice or noodles makes it even better. This adds substance and absorbs the sauce.
Garnishing Tips
Top your dish with sesame seeds and sliced green onions for extra flavor and color. A wedge of lime on the side gives a nice citrus kick.
Tips & Tricks
Cooking Tips for Perfect Stir Fry
Optimal Cooking Temperature
Heat is key for a great stir fry. Start with medium-high heat. This temperature helps brown the chicken and keeps veggies crisp. Too low, and your food stews instead of fries. Too high, and you might burn everything. Keep an eye on the pan!
Avoiding Overcooked Chicken and Vegetables
Cook the chicken until it’s just done. It should be golden, not dry. Remove it from the pan as soon as it’s cooked. For the veggies, stir-fry for 3-4 minutes. They should be bright and a bit crunchy. Overcooked veggies lose their color and nutrients.
Ingredient Tips
Choosing the Best Chicken Cuts
I always use boneless, skinless chicken breasts for this dish. They cook quickly and stay juicy. You can also use thighs if you prefer more flavor. Just cut them into thin strips for even cooking.
Freshness of Vegetables
Fresh veggies make a big difference. Look for bright colors and firm textures. Bell peppers, broccoli, and snap peas should feel crisp. Avoid any limp or brown spots. The better the veggies, the better your stir fry will taste.
Serving Advice
Pairing Suggestions (Rice, Noodles, etc.)
Serve this stir fry over fluffy rice or noodles. Both absorb the honey garlic sauce well. For rice, jasmine or basmati works great. If you choose noodles, try egg noodles or rice noodles for a nice touch.
Customizing for Dietary Preferences
You can easily adapt this recipe. Want it vegetarian? Use firm tofu instead of chicken. Gluten-free? Swap soy sauce for tamari or coconut aminos. Make it your own while keeping the flavor!
Variations
Substitutions and Additions
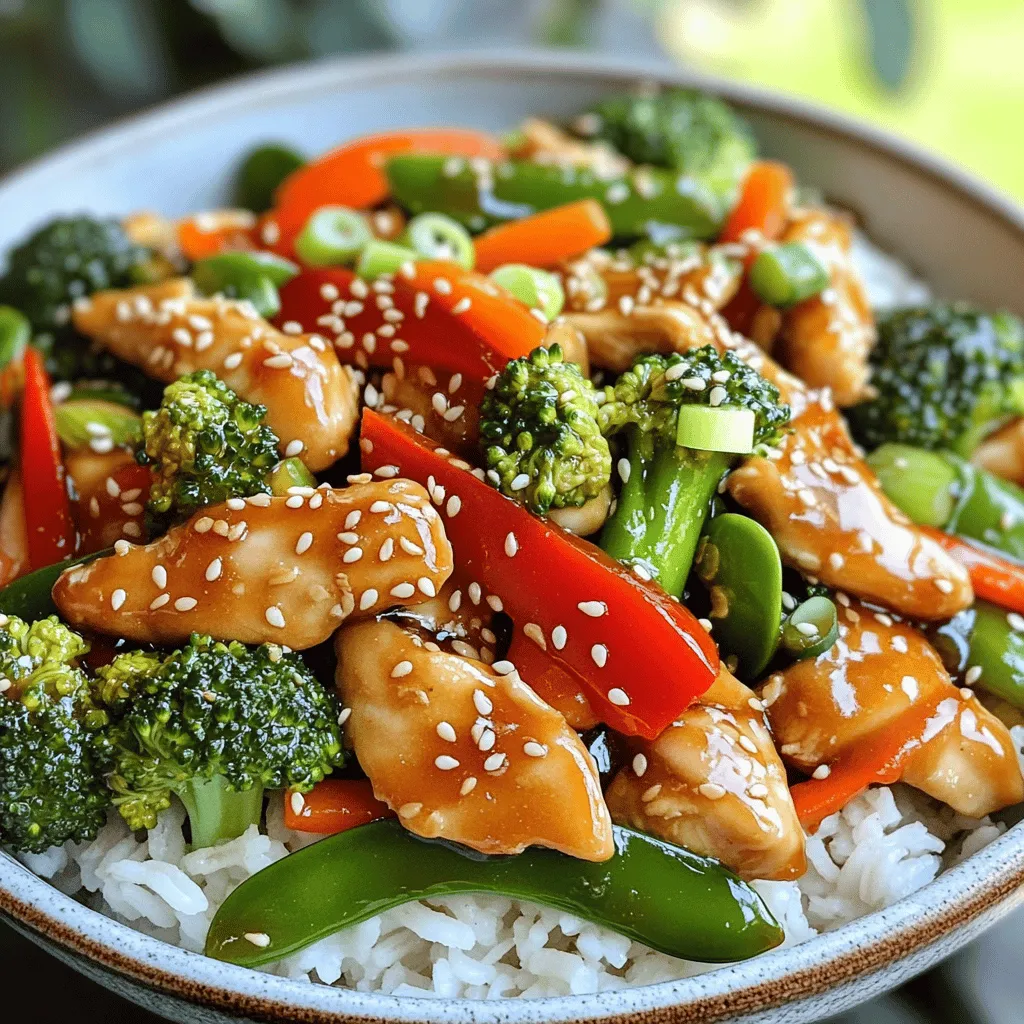
You can mix it up with different proteins. Tofu works great for a vegetarian option. Beef strips add a rich flavor. Just remember to adjust cooking times for each protein.
When it comes to veggies, the options are endless. You can add mushrooms for an earthy touch. Zucchini gives a nice crunch. Carrots, bell peppers, and snap peas are also good choices. Feel free to use what you have in your fridge.
Flavor Enhancements
Want to boost the flavor? Try adding new sauces or spices. A splash of sriracha can add heat. Ginger adds a nice zing. Experiment with different flavors to find your perfect mix.
Adjust the sweetness to your liking too. If you prefer less sweetness, cut the honey by half. For a sweeter taste, add more honey. Taste as you go to find what works best for you.
Cooking Method Variations
You can make this dish in an Instant Pot or slow cooker. For the Instant Pot, sauté first, then pressure cook for quick results. In a slow cooker, let it simmer for a few hours.
Grilling or baking can also work well. Grill the chicken for a smoky flavor. Bake it in the oven for a hands-off approach. No matter the method, the taste will still be amazing.
Storage Info
Refrigeration Guidelines
To keep your honey garlic chicken stir fry fresh, store any leftovers in an airtight container. Place the container in the fridge right after the meal. This helps lock in flavors and prevent bacteria growth. You should enjoy your leftovers within 3 to 4 days for the best taste.
Freezing Tips
If you want to save your stir fry for later, freezing is a great option. First, let the dish cool completely before packing it. Use freezer-safe bags or containers for best results. Be sure to remove as much air as possible to prevent freezer burn. Your honey garlic chicken stir fry can last up to 3 months in the freezer.
When you’re ready to eat, thaw the stir fry overnight in the fridge. Then, reheat it on the stovetop over low heat. Stir occasionally until it’s hot. You can also microwave it, but ensure you stir it every minute to heat evenly. Enjoy your meal all over again!
FAQs
Common Questions About Honey Garlic Chicken Stir Fry
Can I use frozen vegetables?
Yes, you can use frozen vegetables. They save time and are easy to find. Just add them directly to the pan. You might need to cook them a bit longer. This will help them get warm and tender.
How to make this dish gluten-free?
To make this dish gluten-free, use tamari instead of soy sauce. Tamari is a great gluten-free option. Check the labels to ensure no gluten ingredients are included.
What to do if the sauce is too thick?
If the sauce is too thick, add a little water or chicken broth. Stir it in slowly. This will help loosen the sauce and keep it tasty.
Cooking-Related Inquiries
How do I know when the chicken is fully cooked?
Check the chicken’s color and texture. It should be white and firm. The safest way is to use a meat thermometer. The internal temperature should reach 165°F (75°C).
Can this recipe be made ahead of time?
Yes, you can prepare the chicken and sauce ahead of time. Store them in the fridge for up to two days. Then, cook the stir fry when you are ready to eat.
What’s the best way to reheat stir fry?
Reheat the stir fry in a skillet over medium heat. Add a splash of water to keep it moist. Stir often until it’s hot. This will help keep the flavors fresh.
To make a great Honey Garlic Chicken Stir Fry, we discussed all the key ingredients, steps, and tips. Start with fresh chicken and vibrant vegetables. Whisk together a yummy sauce and cook everything just right. Don’t forget to play with flavors or cooking methods to suit your taste. Proper storage keeps leftovers tasty for later. With a few variations, this dish can easily fit your dietary needs. Enjoy your stir-fry and impress family or friends with your new skills!
![- Chicken and Vegetables - 2 boneless, skinless chicken breasts, sliced into thin strips - 1 red bell pepper, sliced - 1 cup broccoli florets - 1 cup snap peas - 1 carrot, julienned - Sauces and Seasonings - 2 tablespoons honey - 4 cloves garlic, minced - 2 tablespoons soy sauce (low sodium) - 1 tablespoon sesame oil - 2 tablespoons vegetable oil - Salt and pepper to taste - Optional Garnishes - Sesame seeds - Green onions, sliced This dish shines with fresh ingredients. Each one adds a unique flavor and texture. The chicken provides protein, while the vegetables give crunch and color. Honey and garlic create a sweet and savory sauce that ties everything together. Using low sodium soy sauce keeps the dish healthy. Sesame oil adds depth and richness. Don’t skip the garnishes; they add a lovely finish. You can find the full recipe in the detailed section above. Enjoy your cooking! Whisking the Honey Garlic Sauce In a small bowl, combine honey, minced garlic, soy sauce, and sesame oil. Use a whisk to mix until smooth. This sauce gives the dish a sweet and savory flavor. Set it aside for later. Seasoning the Chicken Take your sliced chicken and sprinkle salt and pepper over it. This adds flavor and prepares the chicken for cooking. Make sure to coat all sides evenly. Preparing the Vegetables Wash and chop your vegetables. Slice the red bell pepper, julienne the carrot, and get the broccoli florets and snap peas ready. Fresh veggies add color and crunch to the dish. Sautéing the Chicken Heat one tablespoon of vegetable oil in a large skillet or wok over medium-high heat. Once hot, add the seasoned chicken strips. Cook for 5 to 7 minutes, stirring often. The chicken should turn golden and be fully cooked. Remove it from the skillet and set aside. Stir-Frying the Vegetables In the same skillet, add the remaining tablespoon of vegetable oil. Toss in the red bell pepper, broccoli, snap peas, and carrot. Stir-fry for about 3 to 4 minutes. You want them crisp-tender, not mushy. Combining Chicken and Sauce Return the cooked chicken to the skillet with the veggies. Pour your prepared honey garlic sauce over everything. Stir well to coat all the ingredients evenly. Cook for an additional 2 to 3 minutes to let the sauce thicken slightly. Plating the Dish Serve your honey garlic chicken stir fry in shallow bowls. A bed of fluffy rice or noodles makes it even better. This adds substance and absorbs the sauce. Garnishing Tips Top your dish with sesame seeds and sliced green onions for extra flavor and color. A wedge of lime on the side gives a nice citrus kick. For the complete recipe, check out the [Full Recipe]. Optimal Cooking Temperature Heat is key for a great stir fry. Start with medium-high heat. This temperature helps brown the chicken and keeps veggies crisp. Too low, and your food stews instead of fries. Too high, and you might burn everything. Keep an eye on the pan! Avoiding Overcooked Chicken and Vegetables Cook the chicken until it's just done. It should be golden, not dry. Remove it from the pan as soon as it’s cooked. For the veggies, stir-fry for 3-4 minutes. They should be bright and a bit crunchy. Overcooked veggies lose their color and nutrients. Choosing the Best Chicken Cuts I always use boneless, skinless chicken breasts for this dish. They cook quickly and stay juicy. You can also use thighs if you prefer more flavor. Just cut them into thin strips for even cooking. Freshness of Vegetables Fresh veggies make a big difference. Look for bright colors and firm textures. Bell peppers, broccoli, and snap peas should feel crisp. Avoid any limp or brown spots. The better the veggies, the better your stir fry will taste. Pairing Suggestions (Rice, Noodles, etc.) Serve this stir fry over fluffy rice or noodles. Both absorb the honey garlic sauce well. For rice, jasmine or basmati works great. If you choose noodles, try egg noodles or rice noodles for a nice touch. Customizing for Dietary Preferences You can easily adapt this recipe. Want it vegetarian? Use firm tofu instead of chicken. Gluten-free? Swap soy sauce for tamari or coconut aminos. Make it your own while keeping the flavor! For more ideas, check out the Full Recipe. {{image_2}} You can mix it up with different proteins. Tofu works great for a vegetarian option. Beef strips add a rich flavor. Just remember to adjust cooking times for each protein. When it comes to veggies, the options are endless. You can add mushrooms for an earthy touch. Zucchini gives a nice crunch. Carrots, bell peppers, and snap peas are also good choices. Feel free to use what you have in your fridge. Want to boost the flavor? Try adding new sauces or spices. A splash of sriracha can add heat. Ginger adds a nice zing. Experiment with different flavors to find your perfect mix. Adjust the sweetness to your liking too. If you prefer less sweetness, cut the honey by half. For a sweeter taste, add more honey. Taste as you go to find what works best for you. You can make this dish in an Instant Pot or slow cooker. For the Instant Pot, sauté first, then pressure cook for quick results. In a slow cooker, let it simmer for a few hours. Grilling or baking can also work well. Grill the chicken for a smoky flavor. Bake it in the oven for a hands-off approach. No matter the method, the taste will still be amazing. If you're looking for the full recipe, check out the Honey Garlic Chicken Stir Fry ! To keep your honey garlic chicken stir fry fresh, store any leftovers in an airtight container. Place the container in the fridge right after the meal. This helps lock in flavors and prevent bacteria growth. You should enjoy your leftovers within 3 to 4 days for the best taste. If you want to save your stir fry for later, freezing is a great option. First, let the dish cool completely before packing it. Use freezer-safe bags or containers for best results. Be sure to remove as much air as possible to prevent freezer burn. Your honey garlic chicken stir fry can last up to 3 months in the freezer. When you're ready to eat, thaw the stir fry overnight in the fridge. Then, reheat it on the stovetop over low heat. Stir occasionally until it’s hot. You can also microwave it, but ensure you stir it every minute to heat evenly. Enjoy your meal all over again! Can I use frozen vegetables? Yes, you can use frozen vegetables. They save time and are easy to find. Just add them directly to the pan. You might need to cook them a bit longer. This will help them get warm and tender. How to make this dish gluten-free? To make this dish gluten-free, use tamari instead of soy sauce. Tamari is a great gluten-free option. Check the labels to ensure no gluten ingredients are included. What to do if the sauce is too thick? If the sauce is too thick, add a little water or chicken broth. Stir it in slowly. This will help loosen the sauce and keep it tasty. How do I know when the chicken is fully cooked? Check the chicken's color and texture. It should be white and firm. The safest way is to use a meat thermometer. The internal temperature should reach 165°F (75°C). Can this recipe be made ahead of time? Yes, you can prepare the chicken and sauce ahead of time. Store them in the fridge for up to two days. Then, cook the stir fry when you are ready to eat. What's the best way to reheat stir fry? Reheat the stir fry in a skillet over medium heat. Add a splash of water to keep it moist. Stir often until it’s hot. This will help keep the flavors fresh. For the full recipe, check out the Honey Garlic Chicken Stir Fry. To make a great Honey Garlic Chicken Stir Fry, we discussed all the key ingredients, steps, and tips. Start with fresh chicken and vibrant vegetables. Whisk together a yummy sauce and cook everything just right. Don’t forget to play with flavors or cooking methods to suit your taste. Proper storage keeps leftovers tasty for later. With a few variations, this dish can easily fit your dietary needs. Enjoy your stir-fry and impress family or friends with your new skills!](https://dailydishly.com/wp-content/uploads/2025/07/ad7e2fa8-e610-4152-a96e-e496d4740468-300x300.webp)
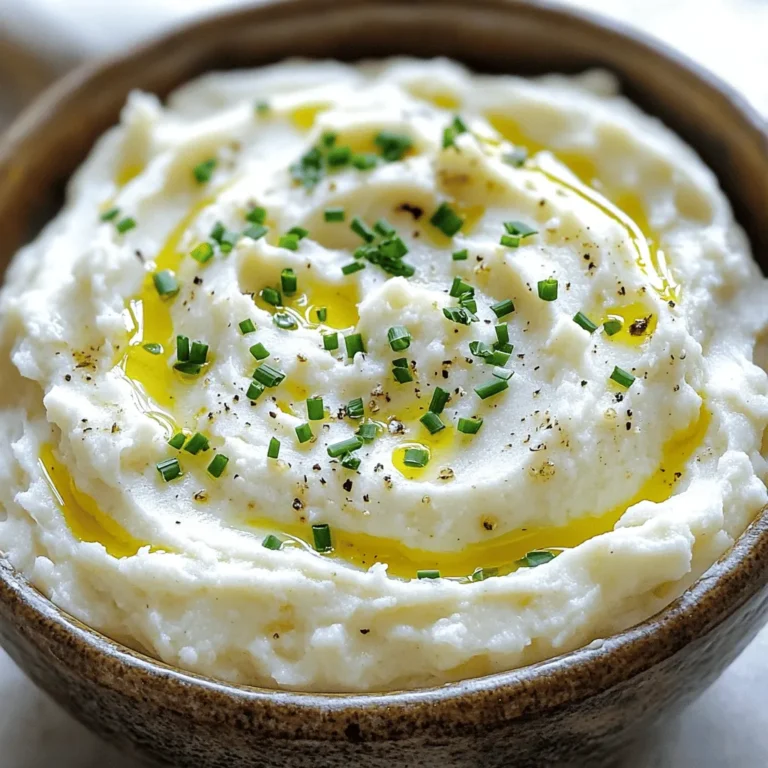
![- Chicken and rice requirements - 4 boneless, skinless chicken thighs - 2 cups long-grain rice - Seasoning and flavor enhancers - 4 tablespoons unsalted butter - 5 cloves garlic, minced - 1 onion, finely chopped - 3 cups chicken broth - 1 teaspoon dried oregano - 1 teaspoon paprika - Salt and pepper to taste - Optional garnishes and additions - 1 cup frozen peas - Fresh parsley, chopped (for garnish) Gathering these ingredients sets the stage for a dish that bursts with flavor. Each item plays a key role. The chicken thighs offer rich taste and tenderness. The long-grain rice absorbs all the savory broth. Butter and garlic create a lovely aroma and depth. Onions bring sweetness, while seasonings elevate the whole dish. Feel free to add peas for a pop of color and nutrition. Fresh parsley adds a lovely touch on top. This simple yet flavorful dish uses ingredients you can find easily. Check out the Full Recipe to see how everything comes together! 1. Sautéing onion and garlic Start by melting 2 tablespoons of butter in a large skillet over medium heat. Add the finely chopped onion. Sauté for about 5 minutes until it turns translucent. Next, toss in 5 cloves of minced garlic. Cook for another minute until it smells amazing. 2. Cooking chicken thighs Season 4 boneless, skinless chicken thighs with 1 teaspoon of dried oregano, 1 teaspoon of paprika, salt, and pepper. Move the onion and garlic to the side of the skillet. Place the chicken thighs in the center. Cook for 6-7 minutes on each side until they are browned and cooked through. Once done, remove the chicken and set it aside. 3. Toasting rice and adding broth In the same skillet, add the other 2 tablespoons of butter. Stir in 2 cups of long-grain rice. Let it toast for about 2-3 minutes. Then, pour in 3 cups of chicken broth. Stir to combine and bring the mixture to a boil. 1. Combining chicken and rice Once the broth boils, reduce the heat to low. Carefully place the cooked chicken thighs on top of the rice. Cover the skillet and let it simmer for 15-20 minutes. You want the rice to be tender and soak up most of the broth. 2. Simmering for perfect texture In the last 5 minutes of cooking, add 1 cup of frozen peas on top of the rice. Do not stir. Let the peas steam with the rice for added color and flavor. 3. Final touches before serving After cooking, turn off the heat. Let the dish sit covered for another 5 minutes. Fluff the rice with a fork and gently mix in the peas. Serve warm and garnish with fresh chopped parsley for a beautiful finish. For the full recipe, check out the complete instructions and tips! To get the best flavor from your chicken, use the right seasonings. I like to mix oregano, paprika, salt, and pepper. This blend gives the chicken a tasty kick. Let the chicken sit for a few minutes after seasoning. This helps the spices soak in. When cooking, aim for a golden brown on each side. Cook the chicken for about 6-7 minutes per side. This timing ensures juicy chicken. Use a meat thermometer to check the inside. It should reach 165°F. To avoid mushy rice, rinse it before cooking. This removes excess starch. Use a 1:1.5 ratio of rice to liquid. For this recipe, use 3 cups of chicken broth for 2 cups of rice. Bring the broth to a boil before adding rice. Once boiling, reduce the heat and cover the skillet. Let the rice simmer for 15-20 minutes. This technique gives you fluffy rice that absorbs all the flavors. Garnishing adds a nice touch. Fresh herbs like parsley brighten the dish. Chop the parsley finely and sprinkle it on before serving. For a great look, serve the chicken on top of the rice. This way, the colors mix well. You can also add a lemon wedge on the side for a pop of freshness. Enjoy your meal! For the full recipe, check [Full Recipe]. {{image_2}} You can switch out the chicken for other meats. Try boneless pork chops or even tofu. Each option brings a new taste. If you want a different grain, choose quinoa or farro. These grains add unique textures and flavors to the dish. Adding vegetables is a great way to boost flavor and nutrition. Consider bell peppers, carrots, or spinach. These veggies cook well and add color. You can also use different herbs and spices. Basil, thyme, or even a kick of chili flakes can change the whole dish. To make this dish gluten-free, use rice and check your broth. Many brands offer gluten-free options. For low-carb choices, replace rice with cauliflower rice. It’s a great substitute and keeps the meal light. You don’t lose flavor, and it stays filling. Explore the [Full Recipe] for more tips and ideas! To keep your Garlic Butter Chicken and Rice fresh, refrigerate it within two hours. Use an airtight container for best results. Store it in the fridge for up to three days. For longer storage, freezing is a great option. Place the dish in a freezer-safe container. It can last up to three months in the freezer. Just remember to label it with the date. When it's time to enjoy leftovers, reheating is key. For rice, add a splash of water before reheating. This helps keep the rice fluffy. You can use a microwave or a stovetop for this. For chicken, use a low heat setting. This keeps the chicken juicy and flavorful. Make sure to cover it while reheating to trap moisture. Enjoy your delicious meal again! For the full recipe, check out the section above. What can I serve with Garlic Butter Chicken and Rice? You can serve this dish with a side of steamed veggies. Broccoli or green beans work well. A fresh salad adds crunch. Garlic bread can also enhance the meal. Can I make this dish ahead of time? Yes, you can prepare Garlic Butter Chicken and Rice in advance. Cook it, then cool it down. Store in an airtight container in the fridge. Reheat before serving, and it will taste great. How do I ensure my chicken is tender? To keep chicken tender, do not overcook it. Use a meat thermometer to check for doneness. Aim for 165°F. Marinating the chicken can also help it stay juicy. Why is my rice still hard? If your rice is hard, it may need more liquid. Add a bit of broth or water and simmer longer. Cover the pot to trap steam, which helps cook the rice. What if I don't have chicken broth? If you lack chicken broth, you can use water. Add extra seasonings to boost flavor. You can also use vegetable broth as a substitute. Can I use brown rice instead? Yes, you can use brown rice instead of white rice. Just know that brown rice takes longer to cook. Increase the simmer time to about 30-40 minutes. Adjust the liquid as needed. This blog post covered a complete guide to making Garlic Butter Chicken and Rice. You learned about the key ingredients and step-by-step instructions. I shared tips to ensure flavorful chicken and perfect rice. You also discovered variations and storage info. In closing, this dish is simple and flexible. Adjust it to your taste and dietary needs. Enjoy your cooking journey and share this recipe with others!](https://dailydishly.com/wp-content/uploads/2025/05/2b69aced-7351-4258-8c9e-dc4a3c9f0304-768x768.webp)