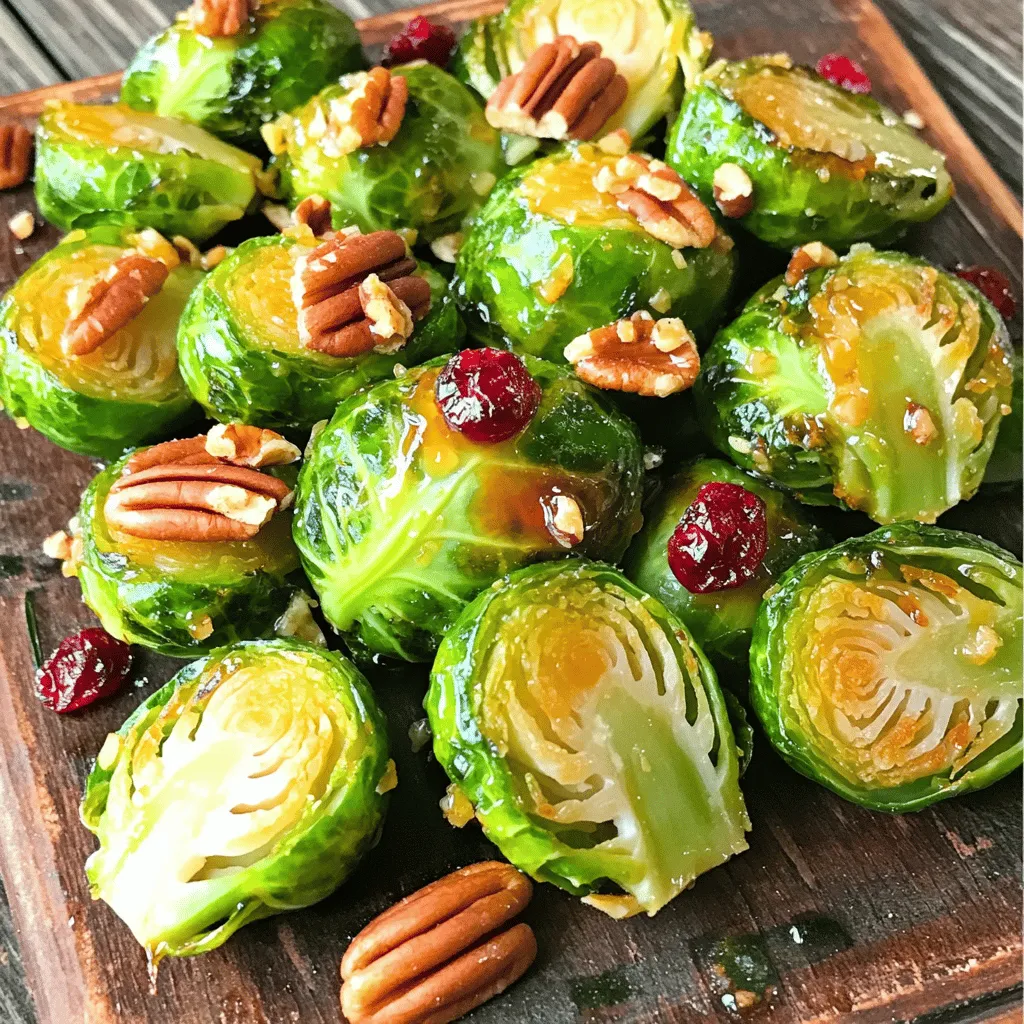
Maple Roasted Brussels Sprouts Tasty and Simple Recipe
. You can store your Maple Roasted Brussels Sprouts in an airtight container. They stay fresh for up to 4 days. This helps keep the flavors intact and prevents spoilage. If you have leftovers, this is a simple way to enjoy them later. To enjoy your Brussels sprouts again, warm them in the oven or microwave. For best results, the oven method is ideal. Preheat your oven to 350°F (175°C) and place the sprouts on a baking sheet. Heat for about 10 minutes. This way, they regain their crispiness. You can freeze Maple Roasted Brussels Sprouts, but some texture may change. When you thaw them, they might be softer. To freeze, let them cool first, then place them in a freezer bag. This allows you to keep them for up to 3 months. When ready to eat, thaw in the fridge overnight, then reheat as mentioned above. To prep Brussels sprouts, first, wash them well. Trim off the tough ends and remove any yellow leaves. Then, cut each sprout in half. This helps them cook evenly and allows for better flavor absorption. Yes, you can prepare these Brussels sprouts in advance. Just roast them and let them cool. Store them in the fridge. When you are ready to eat, reheat them in the oven or microwave. This makes meal prep easy and saves time. These sprouts are great with many dishes. They pair well with meats like chicken, pork, or turkey. You can also serve them as part of a vegetarian meal, adding grains or other greens for a full plate. For the full recipe, check out the Maple Roasted Brussels Sprouts 🥬. In this article, I shared how to make Maple Roasted Brussels Sprouts. You learned about key ingredients like Brussels sprouts, olive oil, and maple syrup. The step-by-step guide makes cooking easy, from prepping to roasting. Remember, you can add nuts and cranberries for extra crunch. In the end, these sprouts are tasty and healthy. They fit well with many meals. Give this recipe a try and explore the variations to make it your own. Enjoy your cooking!](https://dailydishly.com/wp-content/uploads/2025/07/44b5f92b-02cd-478b-85d5-cb90a80bf444.webp)
If you want a side dish that’s both sweet and simple, you’ve come to the right place! Maple roasted Brussels sprouts are a tasty treat you can make in no time. With just a few fresh ingredients and easy steps, you can impress everyone at your table. Let’s dive into this fast recipe that brings out the best in these little green gems!
Ingredients
Main Ingredients
– 1 pound Brussels sprouts, halved
– 3 tablespoons olive oil
– 2 tablespoons pure maple syrup
– 1 teaspoon balsamic vinegar
– 1 teaspoon garlic powder
I love using fresh Brussels sprouts for this dish. They are packed with flavor and nutrients. Halving them helps them roast evenly and soak up all the tasty ingredients.
Seasonings
– 1/2 teaspoon salt
– 1/2 teaspoon black pepper
Salt and pepper are key to enhance the natural taste of the Brussels sprouts. They help to balance the sweetness of the maple syrup.
Optional Additions
– 1/4 cup chopped pecans
– 1/4 cup dried cranberries
Adding pecans gives a nice crunch. Dried cranberries add a sweet and chewy contrast. You can mix and match these options based on your taste.Enjoy crafting this delightful dish!
Step-by-Step Instructions
Preheat the Oven
Set your oven to 400°F (200°C). This temperature helps the Brussels sprouts get crispy and sweet.
Prepare the Maple Mixture
In a large bowl, combine the following ingredients:
– 3 tablespoons olive oil
– 2 tablespoons pure maple syrup
– 1 teaspoon balsamic vinegar
– 1 teaspoon garlic powder
– 1/2 teaspoon salt
– 1/2 teaspoon black pepper
Mix these well until they blend into a smooth sauce. This mixture gives the sprouts a lovely sweet and savory flavor.
Coat the Brussels Sprouts
Take 1 pound of halved Brussels sprouts and add them to the bowl. Toss the sprouts in the maple mixture. Make sure each piece gets a nice coating. This step is key for great taste.
Roast the Brussels Sprouts
Spread the coated Brussels sprouts on a baking sheet. Try to keep them in a single layer. This way, they roast evenly. Bake them in your preheated oven for 20-25 minutes. Stir halfway through. The sprouts should be tender and slightly caramelized.
Add Optional Ingredients
If you like, you can add some crunch. Include 1/4 cup of chopped pecans during the last 5 minutes of roasting. For a sweet touch, sprinkle 1/4 cup of dried cranberries on top before serving. This adds color and flavor, making your dish pop.Enjoy your delicious Maple Roasted Brussels Sprouts!
Tips & Tricks
Choosing the Best Brussels Sprouts
Look for firm, tightly packed sprouts. Fresh sprouts have a bright green color. Avoid any that feel soft or look yellow. You want Brussels sprouts that are small to medium in size. Smaller sprouts taste sweeter and cook evenly.
Getting the Perfect Roast
Stir halfway through cooking for even roasting. This step helps all sides get crispy. It takes about 20 to 25 minutes to roast them at 400°F (200°C). Keep an eye on them. You want a nice caramelized color but not burnt edges.
Enhancing Flavor
Add herbs like thyme or rosemary for extra depth. Fresh herbs can brighten the dish. You can chop them finely and mix them into the maple sauce. This simple change can take your Brussels sprouts to the next level. If you want a hint of heat, try adding some red pepper flakes.
Variations
Maple Balsamic Glaze
You can switch the maple syrup for a balsamic reduction. This change adds a tangy taste that balances the sweetness. The flavor mix is wonderful and makes the dish unique. Just drizzle the balsamic reduction over the Brussels sprouts before roasting. It will caramelize and create a rich glaze.
Add Spices
Want a little kick? Try adding cayenne pepper. It gives a nice heat that pairs well with the sweet maple. For a different flavor, use smoked paprika. This spice adds a warm, earthy taste. A pinch of either spice can change the whole dish.
Alternate Nuts and Fruits
You can also switch out the pecans. Use walnuts or almonds for a different crunch. If you prefer a sweeter bite, try raisins instead of cranberries. These small changes can make the dish feel fresh and exciting. Feel free to mix and match!
Storage Info
Refrigeration
You can store your Maple Roasted Brussels Sprouts in an airtight container. They stay fresh for up to 4 days. This helps keep the flavors intact and prevents spoilage. If you have leftovers, this is a simple way to enjoy them later.
Reheating
To enjoy your Brussels sprouts again, warm them in the oven or microwave. For best results, the oven method is ideal. Preheat your oven to 350°F (175°C) and place the sprouts on a baking sheet. Heat for about 10 minutes. This way, they regain their crispiness.
Freezing
You can freeze Maple Roasted Brussels Sprouts, but some texture may change. When you thaw them, they might be softer. To freeze, let them cool first, then place them in a freezer bag. This allows you to keep them for up to 3 months. When ready to eat, thaw in the fridge overnight, then reheat as mentioned above.
FAQs
How do I prepare Brussels sprouts before cooking?
To prep Brussels sprouts, first, wash them well. Trim off the tough ends and remove any yellow leaves. Then, cut each sprout in half. This helps them cook evenly and allows for better flavor absorption.
Can I make Maple Roasted Brussels Sprouts ahead of time?
Yes, you can prepare these Brussels sprouts in advance. Just roast them and let them cool. Store them in the fridge. When you are ready to eat, reheat them in the oven or microwave. This makes meal prep easy and saves time.
What can I serve with Maple Roasted Brussels Sprouts?
These sprouts are great with many dishes. They pair well with meats like chicken, pork, or turkey. You can also serve them as part of a vegetarian meal, adding grains or other greens for a full plate.
In this article, I shared how to make Maple Roasted Brussels Sprouts. You learned about key ingredients like Brussels sprouts, olive oil, and maple syrup. The step-by-step guide makes cooking easy, from prepping to roasting. Remember, you can add nuts and cranberries for extra crunch.
In the end, these sprouts are tasty and healthy. They fit well with many meals. Give this recipe a try and explore the variations to make it your own. Enjoy your cooking!
. You can store your Maple Roasted Brussels Sprouts in an airtight container. They stay fresh for up to 4 days. This helps keep the flavors intact and prevents spoilage. If you have leftovers, this is a simple way to enjoy them later. To enjoy your Brussels sprouts again, warm them in the oven or microwave. For best results, the oven method is ideal. Preheat your oven to 350°F (175°C) and place the sprouts on a baking sheet. Heat for about 10 minutes. This way, they regain their crispiness. You can freeze Maple Roasted Brussels Sprouts, but some texture may change. When you thaw them, they might be softer. To freeze, let them cool first, then place them in a freezer bag. This allows you to keep them for up to 3 months. When ready to eat, thaw in the fridge overnight, then reheat as mentioned above. To prep Brussels sprouts, first, wash them well. Trim off the tough ends and remove any yellow leaves. Then, cut each sprout in half. This helps them cook evenly and allows for better flavor absorption. Yes, you can prepare these Brussels sprouts in advance. Just roast them and let them cool. Store them in the fridge. When you are ready to eat, reheat them in the oven or microwave. This makes meal prep easy and saves time. These sprouts are great with many dishes. They pair well with meats like chicken, pork, or turkey. You can also serve them as part of a vegetarian meal, adding grains or other greens for a full plate. For the full recipe, check out the Maple Roasted Brussels Sprouts 🥬. In this article, I shared how to make Maple Roasted Brussels Sprouts. You learned about key ingredients like Brussels sprouts, olive oil, and maple syrup. The step-by-step guide makes cooking easy, from prepping to roasting. Remember, you can add nuts and cranberries for extra crunch. In the end, these sprouts are tasty and healthy. They fit well with many meals. Give this recipe a try and explore the variations to make it your own. Enjoy your cooking!](https://dailydishly.com/wp-content/uploads/2025/07/44b5f92b-02cd-478b-85d5-cb90a80bf444-300x300.webp)
![- 1 lb (450g) flank steak, sliced thinly against the grain - 2 cups broccoli florets - 1 red bell pepper, thinly sliced - 3 cloves garlic, minced - 1 inch ginger, grated - 3 tablespoons soy sauce - 2 tablespoons oyster sauce (optional) - 1 tablespoon cornstarch - 1 tablespoon sesame oil - 2 tablespoons vegetable oil - Cooked jasmine rice, for serving - Sesame seeds, for garnish - Green onions, sliced, for garnish The flank steak is key to this dish. It cooks fast and stays tender. When you slice it against the grain, you get a nice, soft bite. Broccoli adds crunch and bright green color. The red bell pepper brings sweetness and color, making it look great. Garlic and ginger provide a warm, aromatic flavor that makes your dish shine. Soy sauce adds saltiness and umami. Oyster sauce, if you choose to use it, gives a rich depth. Cornstarch helps thicken the sauce. Sesame oil adds a nutty flavor to finish it off. For the best flavor, choose fresh, high-quality flank steak. Look for a nice, bright red color with good marbling. Fresh broccoli should be bright green, firm, and not wilted. When choosing bell peppers, look for ones that are firm and shiny. Fresh garlic and ginger can make a big difference in taste. Use low-sodium soy sauce for a healthier option. If you can, find a good-quality oyster sauce. Finally, use pure sesame oil for the best flavor. Each ingredient plays a role in making your Beef and Broccoli Stir-Fry delicious. Check the [Full Recipe] for more detailed cooking steps. To start, you want to make the beef tender and tasty. Take 1 pound of flank steak and slice it thinly. Slice against the grain for the best texture. In a medium bowl, mix the sliced beef with 3 tablespoons of soy sauce, 2 tablespoons of oyster sauce (if you like), and 1 tablespoon of cornstarch. Make sure all the beef is coated well. Let it sit for 15 minutes. This step makes a big difference in flavor. While the beef marinates, it’s time to prep the broccoli. Grab 2 cups of broccoli florets. Bring a pot of water to a boil. Once boiling, add the broccoli and blanch it for 2 minutes. This keeps the broccoli bright and crisp. After 2 minutes, put the florets in an ice bath to stop cooking. Drain the broccoli and set it aside. This step ensures the broccoli stays green and crunchy. Now, let’s get cooking! Heat a large pan or wok over medium-high heat. Add 2 tablespoons of vegetable oil once it's hot. Next, add the marinated beef in a single layer. Cook for about 2 to 3 minutes until it turns brown. Remove the beef and set it aside. In the same pan, add 3 cloves of minced garlic and 1 inch of grated ginger. Sauté for 30 seconds until it smells great. Then, add the red bell pepper and your blanched broccoli. Stir for another 2 to 3 minutes. Finally, return the beef to the pan. Pour in 1 tablespoon of sesame oil. Stir everything together and cook for 2 more minutes. This helps the flavors mix well. Taste your stir-fry and add more soy sauce if you want. Serve it hot over jasmine rice. Don’t forget to garnish with sesame seeds and sliced green onions for an extra touch. For the full recipe, check the details above. To get tender beef, choose flank steak. Slice it thinly against the grain. This helps break down tough fibers. Marinate the beef for at least 15 minutes. Use soy sauce and cornstarch for extra tenderness. The cornstarch creates a nice coating that locks in juices. Don't cook the beef too long. Just 2-3 minutes in a hot pan will do. Remove it quickly to keep it tender. For bright green, crisp broccoli, blanch it first. Boil water and add the florets for 2 minutes. This softens them but keeps their color. After boiling, quickly transfer them to an ice bath. This stops the cooking and keeps the crunch. Stir-fry the blanched broccoli for just a few minutes. This will make it hot without losing its color or texture. To boost flavor, add garlic and ginger when cooking. These ingredients bring a strong, fresh taste. You can also add red bell pepper for sweetness. If you want a richer taste, use oyster sauce. Just a tablespoon can add depth. Taste your dish before serving. If it needs more saltiness, add extra soy sauce. A sprinkle of sesame seeds and green onions on top adds a nice touch. For the detailed recipe, check the Full Recipe. {{image_2}} You can switch beef for other proteins. Chicken works great in this dish. You can also use shrimp or tofu for a different taste. Each choice brings its own flavor and texture. Try marinating them the same way. This keeps the dish simple and tasty, just like the Full Recipe. Feel free to add more veggies for color and taste. Carrots, snap peas, or mushrooms can enhance the dish. Just chop them up and toss them in with the broccoli. They will cook quickly, adding crunch and nutrition. If you need a gluten-free version, use tamari instead of soy sauce. For a vegan meal, replace the beef with tofu or seitan. You can also skip the oyster sauce or use a vegan version. This way, you can enjoy a delicious meal while meeting your dietary needs. To keep your beef and broccoli stir-fry fresh, store it in an airtight container. Let the dish cool down to room temperature before sealing it. Place the container in the fridge and eat the leftovers within three days. This helps maintain flavor and quality. When you're ready to enjoy your leftovers, reheat them in a pan. Add a splash of water or broth to avoid drying out the meal. Heat on medium until warm, stirring often. You can also use the microwave. Cover the dish and heat in short bursts, stirring in between. This ensures even heating. If you want to freeze your stir-fry, first let it cool completely. Portion it into freezer bags or containers. Remove as much air as possible before sealing. Label the bags with the date. You can freeze it for up to three months. When you’re ready to eat, thaw it overnight in the fridge before reheating. This method preserves taste and texture well. For the full recipe, check out the Beefy Broccoli Bonanza. Making Beef and Broccoli Stir-Fry takes about 30 minutes. This time includes prep and cooking. You will spend 15 minutes prepping the ingredients and marinating the beef. The cooking process will take about 15 minutes. This quick time makes it perfect for busy weeknights. Yes, you can use frozen broccoli. Frozen broccoli is convenient and saves time. It also cooks quickly, which fits well with stir-frying. Just make sure to thaw it before use. Drain any excess water to avoid sogginess in your dish. Beef and Broccoli Stir-Fry pairs well with jasmine rice. This rice soaks up the savory sauce nicely. You can also serve it with noodles for a different twist. Adding spring rolls or dumplings makes it a complete meal. For a fresh touch, include a side salad with crisp greens. Check out the Full Recipe for more ideas! Beef and broccoli stir-fry is simple and fun to make. You learned about key ingredients and best cooking practices. I offered tips for tender beef and tasty broccoli. You can also try different proteins and some easy swaps. Lastly, I explained how to store leftovers well. Enjoy this dish tonight or any night. It fits any table and delights many tastes. Your kitchen will shine with this easy recipe!](https://dailydishly.com/wp-content/uploads/2025/06/c1b8a640-846d-4588-a3be-4e7860c53d8e-768x768.webp)
![For my roasted veggie tacos, I love using a mix of colorful veggies. Here’s what I suggest: - 1 zucchini, diced - 1 red bell pepper, diced - 1 yellow bell pepper, diced - 1 red onion, diced - 1 cup cherry tomatoes, halved These veggies not only taste great, but they also look vibrant. You can easily swap in your favorites. To make these tacos truly flavorful, I use some simple seasonings: - 2 tablespoons olive oil - 1 teaspoon ground cumin - 1 teaspoon smoked paprika - Salt and pepper to taste These spices bring out the best flavors in the veggies. The olive oil helps them roast perfectly. Once your tacos are ready, it's time for the fun part: the toppings! I recommend: - 8 small corn tortillas - 1 avocado, sliced - Fresh cilantro, for garnish - Lime wedges, for serving The creamy avocado and fresh cilantro add a nice touch. Squeezing lime over the tacos gives them a bright finish. For the full recipe, check out the detailed cooking steps! Start by preheating your oven to 425°F (220°C). This high heat helps the veggies roast well. You want them to be soft and slightly charred. Next, gather your vegetables. You will need: - 1 zucchini, diced - 1 red bell pepper, diced - 1 yellow bell pepper, diced - 1 red onion, diced - 1 cup cherry tomatoes, halved In a large bowl, toss all the diced veggies together. This ensures they mix well. Drizzle 2 tablespoons of olive oil over the vegetables. Then, add: - 1 teaspoon ground cumin - 1 teaspoon smoked paprika - Salt and pepper to taste Mix everything together until the veggies are well coated. Spread them out on a baking sheet in a single layer. Roast for 20 to 25 minutes. Stir halfway through to make sure they cook evenly. While the veggies roast, heat 8 small corn tortillas in a dry skillet. Warm them for about 30 seconds on each side. This makes them soft and easy to fold. Once the veggies are ready, take them out of the oven. To make your tacos, place a generous spoonful of roasted veggies on each tortilla. Top with slices of avocado and sprinkle fresh cilantro on top. Serve with lime wedges on the side for that extra zing. For the full recipe, check [Full Recipe]. For great roasted veggie tacos, pick vegetables that roast well. I love using: - Zucchini - Bell peppers - Red onion - Cherry tomatoes These veggies bring color and flavor. You can also try mushrooms or eggplant. The key is to cut them into similar sizes. This ensures even cooking. Spices can change the whole taco game. I often use: - Ground cumin - Smoked paprika - Salt and pepper These add a nice warmth. For a kick, try chili powder or cayenne pepper. You can also mix in garlic powder or onion powder for depth. Feel free to experiment based on your taste! Tortillas are the base of your tacos. Small corn tortillas work best. They are soft and tasty. You can also use flour tortillas if you prefer. For a fun twist, try lettuce wraps for a low-carb option. Just make sure your tortillas are warm. This makes them easier to fold and eat. For the complete dish, check out the Full Recipe. {{image_2}} You can add proteins to your roasted veggie tacos for more flavor. Chicken, beef, or shrimp work well. If you want a plant-based option, try black beans or chickpeas. Just cook them separately, then mix them with the roasted veggies in your taco. This adds texture and makes the meal more filling. These tacos are easy to make vegan and gluten-free. Use corn tortillas, which are naturally gluten-free. For a vegan twist, skip any dairy toppings. You can use plant-based sour cream or cashew cream instead. This way, everyone can enjoy these tasty tacos without worry. Toppings can change the whole taco experience. You can use fresh salsa or a spicy sauce for a kick. Try pickled onions for tangy flavor. If you like crunch, add shredded cabbage. For creaminess, avocado is a perfect choice. Experiment with different toppings to find your favorite combination. For the full recipe, check out the Roasted Veggie Tacos instructions above. To keep your leftover tacos fresh, place them in an airtight container. This helps prevent sogginess. Store them in the fridge for up to three days. If you have extra roasted veggies, keep them separate. You can use them in salads or wraps later. When you want to eat your tacos again, reheating is easy. You can use a skillet or the microwave. If you use a skillet, heat it over medium heat. Place the tacos in the skillet for about two minutes on each side. For the microwave, warm them for about 30 seconds. Make sure they are hot all the way through. You can freeze the roasted veggies for later use. Store them in a freezer-safe bag. Press out as much air as possible before sealing. They will last for about three months in the freezer. To use them, thaw overnight in the fridge and then reheat. Enjoy your tasty roasted veggie tacos again with minimal work! For the complete recipe, check out the Full Recipe above. I love using a mix of colorful veggies. Zucchini, bell peppers, red onions, and cherry tomatoes work best. These vegetables roast well and bring great flavors. You can also try corn, mushrooms, or sweet potatoes for variety. Each veggie adds its own taste and texture. Roasted veggie tacos stay fresh for about three to four days in the fridge. Make sure to store them in an airtight container. The veggies may lose some crunch, but they will still taste good. Just reheat them before eating for the best flavor. Yes, you can prepare the veggies a day ahead. Chop them and store them in the fridge. This saves time on taco night. You can also roast them in advance and keep them in the fridge. Just warm them up before serving. Roasted veggie tacos pair well with many sides. I recommend serving them with fresh guacamole, salsa, or a zesty salad. You can also add rice or beans for a hearty meal. A side of tortilla chips adds a nice crunch too. For the full recipe, check out the Roasted Veggie Tacos section! Roasted veggie tacos are a great way to enjoy healthy, tasty meals. We covered the best ingredients, from fresh vegetables to tasty seasonings. You now have step-by-step instructions for making these delicious tacos at home. Plus, you learned useful tips for storage and variations to suit your needs. Remember, cooking should be fun and easy. Try different vegetables and toppings to make it your own. Enjoy your taco journey!](https://dailydishly.com/wp-content/uploads/2025/07/2cc26e34-4f45-47fb-a3bd-ef05b980d92e-768x768.webp)