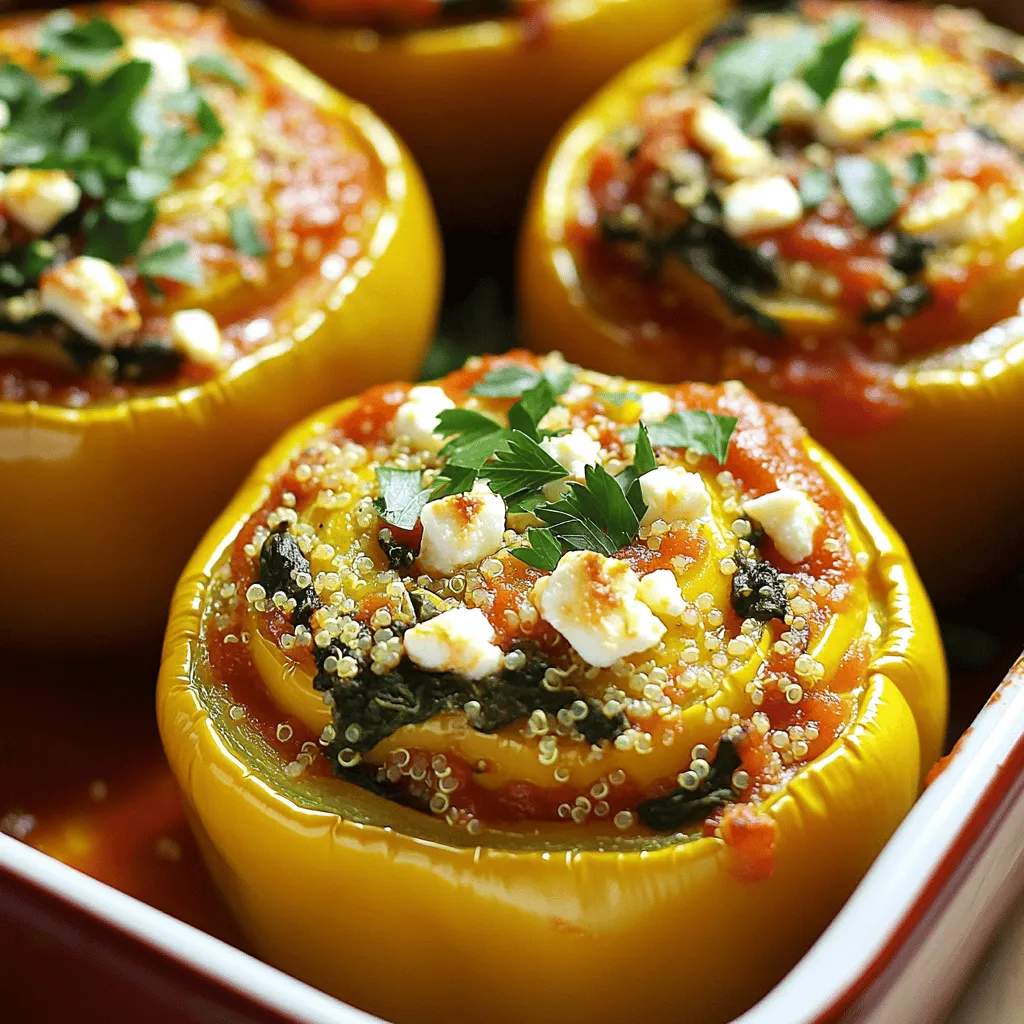
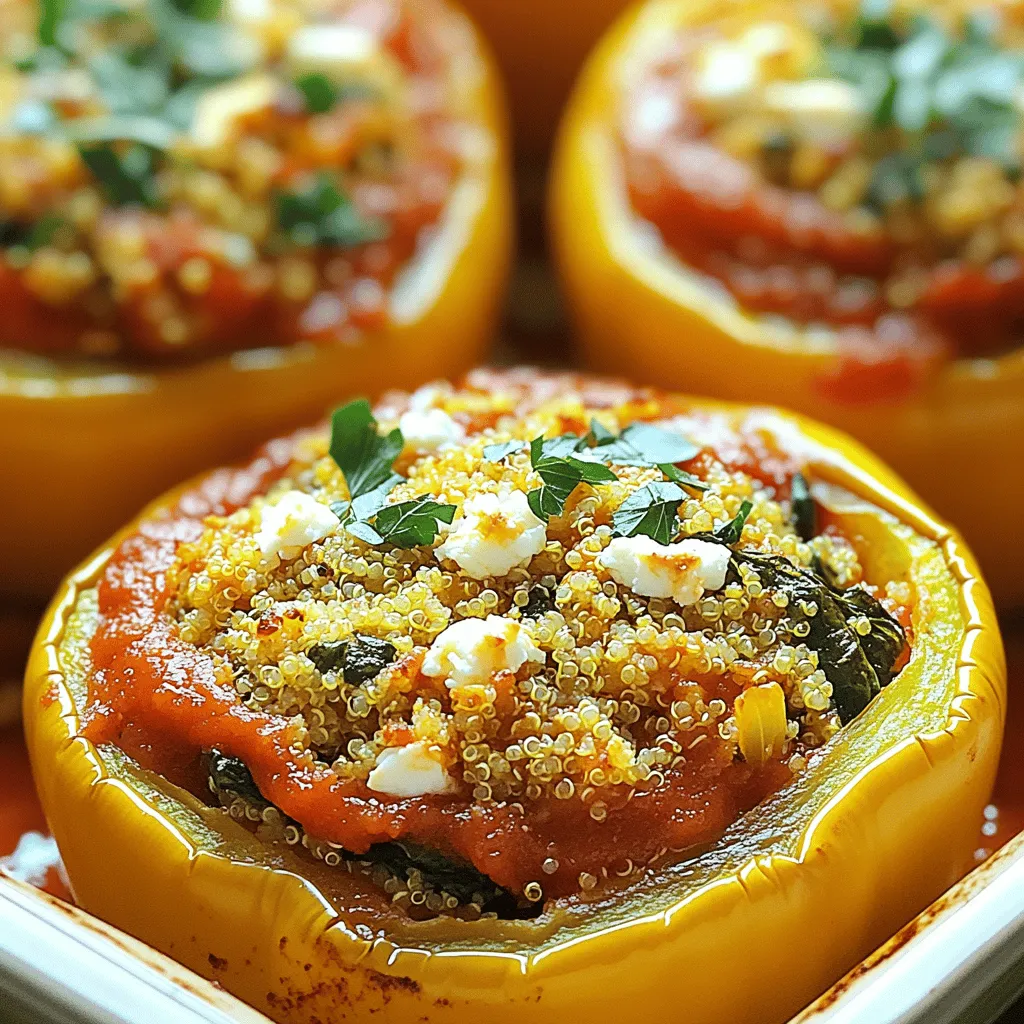
Are you ready to elevate your dinner game? My Spinach and Feta Stuffed Peppers recipe brings vibrant flavors and healthy ingredients to your table. This dish is not only simple to prepare but also packed with nutrients. You’ll love the satisfying blend of spinach, tangy feta, and savory spices. Let’s dive into the details so you can impress your family and friends with this delightful meal!
Ingredients
Complete list of ingredients for Spinach and Feta Stuffed Peppers
To make the best spinach and feta stuffed peppers, gather these items:
– 4 large bell peppers (any color)
– 2 cups fresh spinach, chopped
– 1 cup crumbled feta cheese
– 1 cup cooked quinoa
– 1 small onion, diced
– 2 cloves garlic, minced
– 1 tablespoon olive oil
– 1 teaspoon dried oregano
– Salt and pepper to taste
– ½ cup marinara sauce (for topping)
– Fresh parsley for garnish (optional)
Nutritional benefits of key ingredients
Each ingredient in this recipe offers great health benefits.
– Bell peppers are rich in vitamins A and C. They can boost your immune system.
– Spinach is a powerhouse of iron and calcium. It supports strong bones and blood.
– Feta cheese adds protein and healthy fats. It can aid in muscle recovery.
– Quinoa is a complete protein. It provides all nine essential amino acids.
– Garlic can help reduce blood pressure and improve heart health.
Recommended brands or organic options
I suggest choosing organic options when possible. Organic vegetables taste better and are free of pesticides.
– For bell peppers, look for brands like Organic Valley.
– Feta cheese from brands like Athenos is solid and tasty.
– When selecting quinoa, try Ancient Harvest for quality grains.
Using these brands can help you enjoy a fresher, healthier meal.
Step-by-Step Instructions
Prepping the bell peppers
Start by washing the bell peppers. Choose any color you like. Cut the tops off each pepper. Remove the seeds and membranes inside. Set the cleaned peppers aside. This step is fun and easy.
Sautéing the filling ingredients
Next, grab a skillet. Heat one tablespoon of olive oil over medium heat. Add the diced onion and minced garlic. Cook for about three to four minutes until they smell good and look clear. Then, add the chopped spinach. Stir it in and cook for two to three minutes until it wilts. This mix adds great flavor to our filling.
Stuffing and baking the peppers
In a large bowl, mix the sautéed veggies with cooked quinoa, crumbled feta, oregano, salt, and pepper. Stir it well. Now, fill each bell pepper with this tasty mix. Place the stuffed peppers upright in a baking dish. Pour marinara sauce over each pepper. Cover the dish with aluminum foil and bake at 375°F (190°C) for 25 minutes. Then, remove the foil and bake for another 10-15 minutes until the peppers are soft and brown on top. This will make your kitchen smell amazing! Let them cool a bit before serving. You can garnish with fresh parsley if you want.
Tips & Tricks
How to make perfect stuffed peppers
To make perfect stuffed peppers, choose large, firm bell peppers. Red, yellow, or green all work well. Cut off the tops and remove the seeds. You want them to stand upright, so pick ones with a flat bottom. For the filling, mix spinach, feta, and quinoa well. This will help the flavors blend. Stuff each pepper generously, packing the filling in tightly. Bake them covered first to help steam and soften the peppers. Remove the cover later to brown the tops.
Common mistakes to avoid
One common mistake is overcooking the peppers. Keep an eye on the time. If they cook too long, they can become mushy. Another mistake is underseasoning the filling. Taste it before stuffing the peppers to adjust flavor. Also, don’t skip the marinara sauce on top. It adds moisture and extra flavor. Finally, remember to let them cool a bit after baking. This helps the filling set and makes them easier to eat.
Flavor enhancement suggestions
To enhance flavor, try adding herbs like fresh basil or dill. These herbs pair well with spinach and feta. You can also mix in sun-dried tomatoes for a tangy kick. If you like spice, add red pepper flakes to the filling. For a richer taste, drizzle a bit more olive oil over the top before baking. Pair the stuffed peppers with a fresh salad or crusty bread for a complete meal.
Variations
Alternative ingredients for different dietary needs
You can easily adjust this recipe for different diets. For a vegan option, replace feta cheese with a plant-based alternative. Use tofu or chickpeas instead of quinoa for a protein boost. If gluten-free is your goal, quinoa works well since it is naturally gluten-free. You can also use brown rice or cauliflower rice for a low-carb choice.
Flavor profile variations (like adding spices)
Feel free to play with spices to change the taste. Adding cumin gives a warm, earthy flavor. Paprika adds a nice kick, while crushed red pepper can spice things up. You might want to include fresh herbs like basil or dill for a fresh taste. Each spice or herb can change the dish, making it fun to experiment.
Suggestions for serving or pairing with sides
These stuffed peppers shine on their own but pair well with sides. A simple green salad adds a fresh touch. Grilled vegetables can complement the flavors nicely. Serve with crusty bread to soak up any sauce. You could also add a dollop of yogurt or sour cream for creaminess.
Storage Info
How to store cooked stuffed peppers
To keep your cooked stuffed peppers fresh, let them cool first. Place them in an airtight container. Store them in the fridge for up to four days. Make sure to separate layers with parchment paper if they stack.
Reheating instructions
Reheat your stuffed peppers in the oven for best results. Preheat the oven to 350°F (175°C). Place the peppers in a baking dish and cover them with foil. Bake for about 20 minutes or until heated through. You can also use the microwave. Just place one pepper on a microwave-safe plate and heat for 2-3 minutes.
Freezing options and tips
You can freeze stuffed peppers for later. First, cool them completely. Wrap each pepper in plastic wrap, then place them in a freezer bag. They can last for up to three months. To thaw, leave them in the fridge overnight. You can then reheat them in the oven as mentioned above.
FAQs
Can I use other types of cheese?
Yes, you can use other cheeses. Feta gives a tangy taste. You could try goat cheese for creaminess. Mozzarella will melt well, adding a lovely texture. If you want a sharper flavor, try cheddar. Just remember, the flavor will change with different cheese.
How long do stuffed peppers last in the fridge?
Stuffed peppers will last about 3 to 5 days in the fridge. Make sure to keep them in an airtight container. This keeps them fresh and tasty. If you want them to last longer, consider freezing them instead.
What can I substitute for quinoa in the recipe?
You can use rice instead of quinoa. Brown rice works well and adds fiber. Couscous is another good choice. If you want something lighter, try using cauliflower rice. Each option changes the flavor and texture a bit, so choose what you like best.
Spinach and feta stuffed peppers are easy to make and full of flavor. We discussed the key ingredients and their nutrients, plus brand suggestions. I shared step-by-step instructions to prep, fill, and bake the peppers. Tips covered common pitfalls and ways to boost flavor. We explored variations for different diets and sides. Finally, I shared how to store and reheat leftovers.
Now, you can enjoy tasty stuffed peppers anytime, fresh or frozen. Simple recipes bring joy and good health to your meals.