
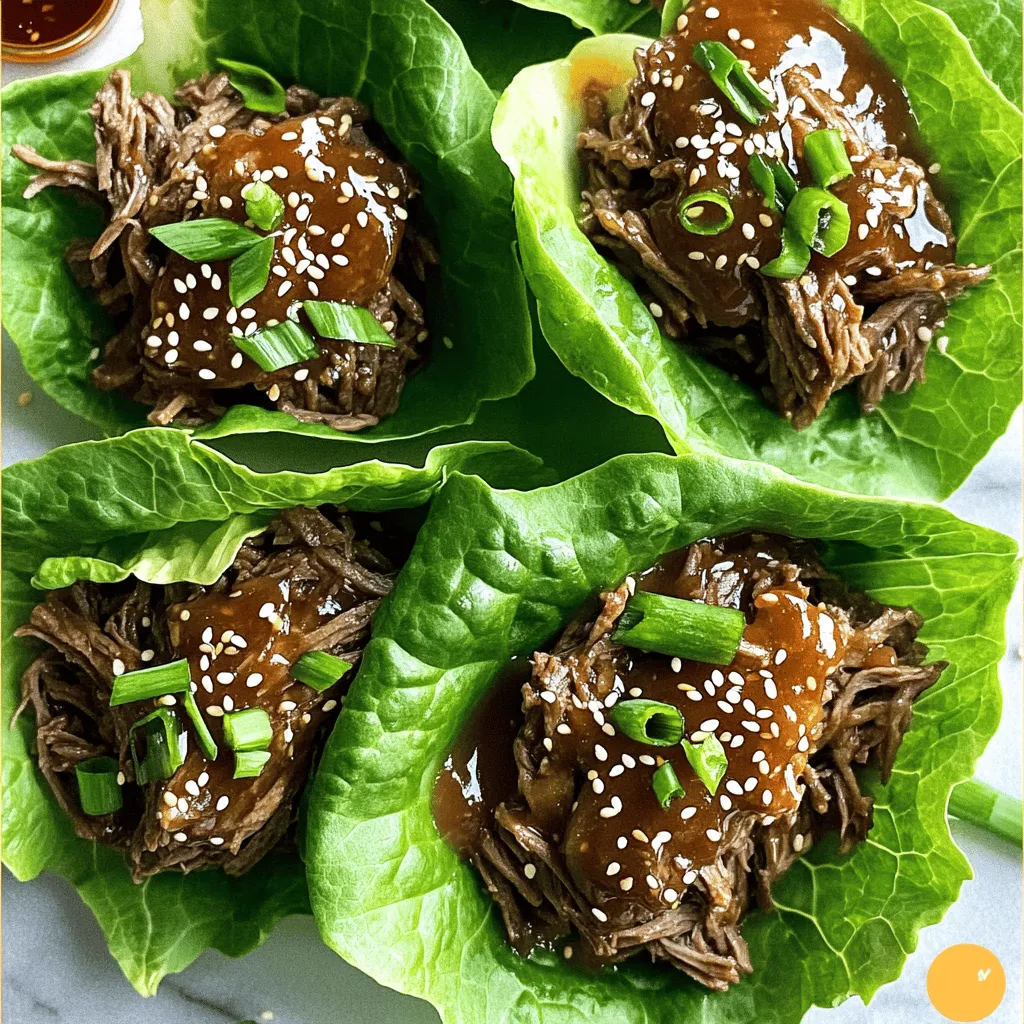
Slow Cooker Honey Sesame Beef Lettuce Wraps Delight
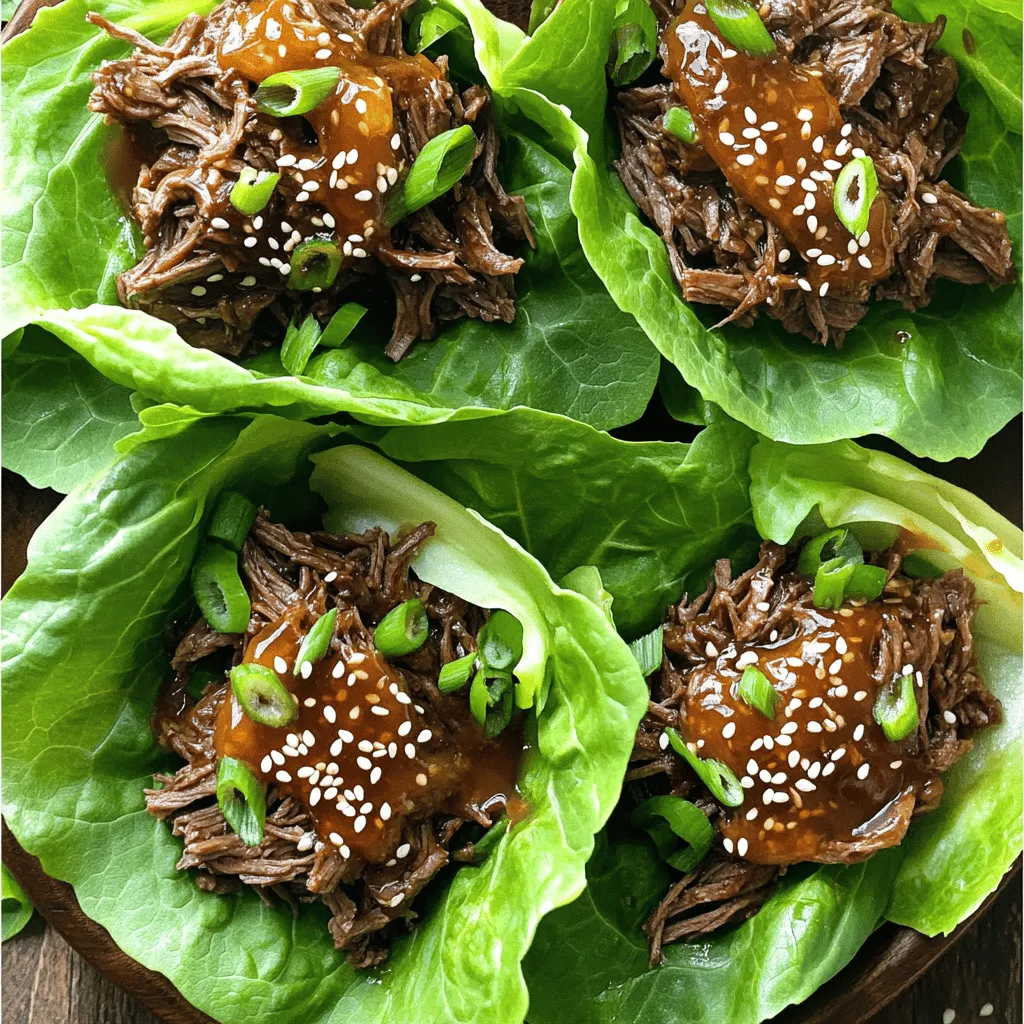
Craving a fun and tasty meal? Slow Cooker Honey Sesame Beef Lettuce Wraps are here to impress! This easy recipe brings sweet, savory, and crunchy together for a dish that shines. You’ll love the tender beef soaked in honey-soy sauce and wrapped in fresh lettuce. Ready to wow your friends and family? Let’s dive into the delightful steps to make this delicious meal right now!
Ingredients
Main Ingredients
– 1 lb flank steak
– 1/4 cup soy sauce (low sodium)
Flavor Enhancers
– 1/4 cup honey
– 2 tablespoons sesame oil
– 1 tablespoon rice vinegar
– 2 cloves garlic
– 1 inch ginger
Garnishes and Serving Suggestions
– 1/4 cup green onions
– 1 tablespoon sesame seeds
– Butter or romaine lettuce leaves
– Sriracha sauce (optional)
Gather these ingredients to create a tasty dish. The flank steak gives a rich taste. Low sodium soy sauce adds flavor without too much salt. Honey brings sweetness, balancing the savory notes. Sesame oil gives a nutty aroma, while rice vinegar adds brightness. Fresh garlic and ginger enhance the flavor with their zesty kick.
For garnishes, chopped green onions add crunch and color. Sesame seeds provide a delightful crunch when sprinkled on top. The lettuce leaves serve as a fresh wrap for the beef. If you like heat, Sriracha sauce is a great addition. Each of these ingredients plays a big role in making this dish amazing.
Step-by-Step Instructions
Preparing the Sauce
– In a slow cooker, combine the soy sauce, honey, sesame oil, rice vinegar, minced garlic, and grated ginger.
– Mix the ingredients well until they blend into a smooth sauce.
– Once mixed, add the thinly sliced flank steak.
– Stir gently to ensure the beef is evenly coated with the sauce.
Cooking the Beef
– Cover the slow cooker and set it on low.
– Cook for 6 to 8 hours. The beef should become tender and easy to shred.
– After cooking, use two forks to shred the beef right in the slow cooker.
– Let the shredded beef soak in the sauce for an extra 15 minutes for more flavor.
Assembling the Wraps
– Take a leaf of butter or romaine lettuce.
– Spoon a portion of the honey sesame beef into the center of the leaf.
– If you like heat, drizzle with Sriracha sauce.
– Top with extra chopped green onions for a fresh touch.
Tips & Tricks
Ingredient Substitutions
What meats can I use instead of flank steak?
You can use several meats. Sirloin or chuck roast works well. Chicken or turkey breast can also be good. For a plant-based option, try mushrooms or tofu.
What can I use instead of honey?
If you want a different sweetener, use maple syrup or agave nectar. Brown sugar can also add sweetness. Just keep in mind that each sweetener may change the taste a bit.
Cooking Tips
How do I get the best beef texture?
To get a tender texture, cook on low heat. This allows the meat to break down slowly. Slicing the beef thinly helps too. It cooks evenly and absorbs more flavor.
How can I adjust the sauce flavor?
Taste the sauce before serving. If it needs more salt, add a bit more soy sauce. For a sweeter touch, add a little more honey. You can also add chili flakes for heat.
Serving Suggestions
What sides pair well with this dish?
Serve with jasmine rice or steamed veggies. A fresh salad balances the meal. You can also offer some crispy rice cakes for extra crunch.
How can I prep this meal ahead?
Make the beef and sauce a day before. Store in the fridge until you’re ready to serve. You can also wash and separate the lettuce leaves in advance. This saves time on busy nights.
Variations
Different Cooking Methods
You can make honey sesame beef in different ways.
Instant Pot adaptation: Use the same ingredients. Combine them in the pot. Set it to high for 30 minutes. Let it release naturally for 10 minutes. Shred the beef and mix it with the sauce.
Stovetop instructions: Start by heating a pan over medium heat. Add the sauce mix. Once it simmers, add the sliced beef. Cook for about 10-15 minutes until the beef is tender. Stir often for even cooking.
Flavor Variations
Adding your favorite vegetables can boost flavor. Carrots, bell peppers, or snap peas work well. Just chop them and add them to the slow cooker. They will cook nicely with the beef.
You can also swap out the sauce. Try teriyaki sauce or hoisin sauce for a different taste. Each option adds a unique twist to your wraps.
Dietary Modifications
If you need gluten-free options, use tamari instead of soy sauce. It has a similar taste without gluten.
For low-carb diets, skip the honey or use a sugar substitute like erythritol. You can also serve the beef with cabbage leaves instead of lettuce for fewer carbs.
Storage Info
Short-Term Storage
After you make your Slow Cooker Honey Sesame Beef, let it cool down first. Place it in a container with a good seal. A glass or plastic container works well. Make sure to store it in the fridge. It keeps the beef fresh and tasty.
Long-Term Storage
For long-term storage, you can freeze the honey sesame beef. Pack it in a freezer-safe bag or container. Remove as much air as you can to prevent freezer burn. This dish freezes well for up to three months. When you’re ready to eat it, thaw it overnight in the fridge.
To reheat, you can use the microwave or stove. If using a microwave, heat it in short bursts. Stir it often to ensure even heating. If using the stove, add a splash of water and heat gently.
Shelf Life
In the fridge, the honey sesame beef lasts about three to four days. In the freezer, it can stay fresh for about three months. Always check for any off smells or changes in texture when you store food. This helps keep your meals safe and enjoyable!
FAQs
What can I substitute for flank steak?
You can use other beef cuts. Skirt steak or sirloin work well. They have similar textures.
For non-beef alternatives, try chicken or turkey. These meats soak up the flavor nicely. You can also use tofu for a plant-based option.
Can I make this recipe ahead of time?
Yes, you can make this recipe ahead of time. Cook the beef in the slow cooker and let it cool. Store it in the fridge for up to three days.
When ready to serve, reheat the beef gently. It tastes just as good after a day or two.
How do I make adjustments for more servings?
To make more servings, scale the ingredients. For every additional pound of meat, add equal parts of the sauce ingredients.
Cooking time may not change much. Just check that the beef is tender before serving. Adjust as needed for larger portions.
This blog covers a tasty flank steak wrap recipe with easy steps. You learned about key ingredients, how to cook the beef, and assemble wraps. We explored tips for perfecting the dish and noted storage options. You can easily adapt this recipe for different diets and tastes.
Enjoy making these wraps at home; they are great for family meals or gatherings. Your cooking skills will shine, and your friends will love the flavors.

. Cooking this dish is fun and easy. With these ingredients, you will make a meal that impresses everyone. First, set your oven to 400°F (200°C). This is the perfect heat for baking salmon. While the oven warms up, grab a baking sheet. Line it with parchment paper and lightly grease it. This helps the salmon cook evenly and keeps it from sticking. In a small bowl, whisk together 2 tablespoons of olive oil and the juice from one lemon. Add 3 tablespoons of chopped dill, 1 teaspoon of garlic powder, and a pinch of salt and pepper. If you want more flavor, mix in 1 tablespoon of Dijon mustard. This sauce is bright, fresh, and easy to make! Place 4 salmon fillets on the prepared baking sheet. Generously brush the lemon dill sauce over each fillet. Next, lay lemon slices on top for extra flavor. Bake the salmon in the oven for about 12 to 15 minutes. You want it to reach an internal temperature of at least 145°F. Let the salmon rest for 5 minutes before serving. Enjoy your Lemon Dill Salmon! For the complete instructions, check out the Full Recipe. To get the best salmon, choose fresh fillets. Look for bright color and no strong odor. Preheat your oven to 400°F (200°C) for even cooking. Cook salmon for 12-15 minutes. The fish is done when it flakes easily with a fork. The internal temperature should reach 145°F. If you want to check, use a meat thermometer. This will help you avoid overcooking your salmon. Let it rest for 5 minutes after baking. This keeps the juices inside. For a bright taste, use fresh lemon juice. This adds a tangy kick that complements salmon. Fresh dill enhances the dish with a herbal note. If you want more depth, add Dijon mustard to the olive oil mixture. Garlic powder gives a warm flavor to the sauce. Remember to season with salt and pepper. This simple step can make a big difference. You can also try adding a pinch of red pepper flakes for heat. Adjust flavors to your liking as you go along. Presentation is key for any dish. Arrange cooked salmon on a clean plate. Use lemon slices and fresh dill sprigs for garnish. This adds color and makes the dish pop. Serve with seasonal vegetables or rice for a complete meal. Consider using a drizzle of olive oil over the top for shine. You can even sprinkle some extra dill on the plate. This not only looks nice but also adds more flavor. Make your dish appealing to both the eyes and the palate. For the complete list of steps and ingredients, check out the Full Recipe. {{image_2}} Grilling salmon adds a smoky flavor. You can easily make grilled lemon dill salmon. Start by marinating the salmon fillets in the lemon dill sauce for about 30 minutes. Heat your grill to medium-high. Place the fillets skin-side down on the grill. Cook for about 6-8 minutes. Flip the salmon and grill for another 5-7 minutes until cooked through. The grill marks will add a nice touch. Adding Dijon mustard gives your lemon dill salmon a sharp twist. Simply mix 1 tablespoon of Dijon mustard into your lemon dill sauce. This adds a zesty flavor that pairs well with the salmon. Follow the same baking steps from the recipe. The mustard will caramelize slightly, giving a tasty crust. If you want a vegan option, use tofu or tempeh. Marinate the tofu in the lemon dill sauce just like the salmon. You can bake or grill it in the same way. For a lighter choice, try using zucchini or eggplant slices. These veggies soak up the flavors well. Just remember to adjust cooking times based on what you use. Explore the full recipe to discover how to create these delicious variations. To keep your leftover lemon dill salmon fresh, store it in an airtight container. Make sure to let it cool first. Place the salmon in the fridge within two hours of cooking. It will last for up to three days. If you want to enjoy it later, consider freezing it. When reheating salmon, do it gently to keep it moist. You can use the oven or the microwave. If using the oven, preheat it to 350°F (175°C). Place the salmon in a baking dish with a splash of water. Cover it with foil, then heat for about 10-15 minutes. For the microwave, heat in short bursts of 30 seconds. Check for warmth, so you don’t overcook it. Freezing lemon dill salmon is simple. Wrap each fillet tightly in plastic wrap. Then, place them in a freezer-safe bag. Remove as much air as possible. Frozen salmon can last for up to three months. When you are ready to eat it, thaw it in the fridge overnight. This keeps the flavor and texture intact. You can follow the full recipe again to enjoy it fresh! The best way to tell if salmon is done cooking is by checking its color and texture. Cooked salmon should look opaque and flaky. You can also use a food thermometer. Aim for an internal temperature of 145°F. If you don't have a thermometer, gently poke it with a fork. If it flakes easily, it's ready to eat. Yes, you can use dried dill instead of fresh. However, fresh dill offers a brighter taste. Use about one-third of the amount when using dried dill. So, if the recipe calls for three tablespoons of fresh dill, use just one tablespoon of dried. Mix it into the olive oil mixture for flavor. Many side dishes pair well with Lemon Dill Salmon. Here are some great options: - Steamed asparagus - Roasted vegetables - Garlic mashed potatoes - Quinoa salad - Rice pilaf Each of these sides complements the light, zesty flavor of the salmon. Enjoy experimenting with your favorites! For the full recipe, check out the Lemon Dill Salmon Delight. This blog post covered the key ingredients for Lemon Dill Salmon, along with step-by-step instructions. You learned how to make a tasty sauce, cook salmon perfectly, and add different flavors. The tips helped you present and store your meal well. Plus, we discussed fun variations, including grilling and vegan options. In summary, making Lemon Dill Salmon can be easy and fun. Enjoy creating your dish and impressing everyone with the taste!](https://dailydishly.com/wp-content/uploads/2025/07/811fb225-badc-4aa2-b5b2-7775fc921ea0-768x768.webp)
![- 4 large bell peppers - 2 cups cooked chicken, shredded - 1/2 cup buffalo sauce - 1/2 cup cream cheese - 1 cup shredded cheddar cheese - 1/2 cup celery, finely chopped - 1/4 cup green onions, sliced - Fresh parsley for garnish - Salt and pepper to taste The ingredients for Buffalo Chicken Stuffed Peppers are simple and fun to work with. Start with four large bell peppers. These can be any color you like. Next, use two cups of cooked chicken, shredded well. This can be leftover chicken or even rotisserie chicken for ease. Now, for the star of the show: the buffalo sauce. You need half a cup, but feel free to adjust it based on how spicy you want your dish. Then, add half a cup of cream cheese. This makes the filling creamy and rich. Next, grab a cup of shredded cheddar cheese. This cheese will melt beautifully and top off your stuffed peppers. For optional crunch and flavor, consider adding half a cup of finely chopped celery and a quarter cup of sliced green onions. These add freshness and texture to the filling. Finally, don't forget salt and pepper to taste. This enhances all the flavors. If you want to make your dish pop, garnish with fresh parsley before serving. For the full recipe, check out the [Full Recipe]. - Preheat the oven to 375°F (190°C). - Cut the tops off the bell peppers and remove the seeds and membranes. Set them aside. - In a large bowl, combine the shredded chicken with the buffalo sauce. - Add the softened cream cheese and 1 cup of shredded cheddar cheese. - Toss in the finely chopped celery and sliced green onions. - Mix until everything is well combined. Season with salt and pepper to taste. - Spoon the buffalo chicken mixture into each prepared bell pepper. Pack it in generously. - Place the stuffed peppers upright in a baking dish. Cover them with foil. - Bake in the preheated oven for 25 minutes. - After 25 minutes, remove the foil. Sprinkle the remaining cheddar cheese on top. - Bake for an additional 10-15 minutes until the cheese is bubbly and golden. - Let them cool for a few minutes before serving. - If you like, garnish with fresh parsley before serving. For the full recipe, check out the details above. Enjoy your meal! To make the perfect spicy filling, adjust the buffalo sauce. If you want more heat, add more sauce. For milder flavors, use less sauce. The right amount can make or break your dish! Also, think about cheese. You can use different types like mozzarella or pepper jack. They can change the flavor and spice level. Check the doneness of your peppers while cooking. They should be tender but not mushy. A fork can help test them. Covering the peppers with foil keeps them moist and helps cook evenly. After some time, you can remove the foil to let the cheese get bubbly and golden. Garnishing with fresh parsley adds color and a fresh taste. It makes your dish look appealing. You can serve the stuffed peppers on a nice plate or in a bowl for a cozy meal. Pair them with a side salad or some crunchy veggies to round out your dinner. For more details, check the Full Recipe. {{image_2}} You can switch up the protein in your stuffed peppers. Ground turkey works well. It has a mild flavor that blends nicely with buffalo sauce. Use a 1:1 ratio when swapping it in. Rotisserie chicken is another great option. It saves time and adds flavor. Shred the chicken and mix it with the buffalo sauce, just like in the full recipe. This gives your dish a tasty and easy twist. Adding veggies can boost nutrition and flavor. Black beans are a good choice. They add protein and fiber. Just rinse and drain them before mixing. Quinoa can add a nice texture. Cook it according to package instructions and fold it into the filling. This makes your peppers heartier and more satisfying. You can mix and match these options to fit your tastes. Switching sauces can change the whole dish. Try BBQ sauce instead of buffalo sauce for a sweet twist. Just use the same amount so the filling stays creamy. You can also experiment with other hot sauces. If you like it spicy, go for a habanero sauce. For a milder touch, try a sriracha or even a chipotle sauce. Each sauce brings its own flavor, making your stuffed peppers unique every time. To keep your buffalo chicken stuffed peppers fresh, use airtight containers. Glass containers work best, as they do not absorb smells. Plastic containers are good too, but ensure they are BPA-free. Store your leftovers in the fridge. They last for about three days. You can reheat your stuffed peppers in the oven or microwave. The oven gives the best taste. Preheat your oven to 350°F (175°C). Place the peppers in an oven-safe dish and cover with foil. Heat for about 15-20 minutes. If using a microwave, place the stuffed pepper on a microwave-safe plate. Heat for two to three minutes, checking every minute. To freeze stuffed peppers, cool them first. Wrap each pepper in plastic wrap and then in foil. This helps prevent freezer burn. Store them in a freezer bag for extra protection. They can last up to three months. To thaw, place them in the fridge overnight. Reheat as mentioned above. Enjoy your buffalo chicken stuffed peppers fresh out of the oven! For the full recipe, check the earlier section. To make Buffalo Chicken Stuffed Peppers vegan, you can use several substitutes. Instead of chicken, try shredded jackfruit or tofu. For cheese, use vegan cream cheese and shredded vegan cheese. These swaps keep the dish creamy and flavorful while fitting a vegan diet. You can still use buffalo sauce because many brands are vegan-friendly. This way, you enjoy the same spicy kick without animal products. Yes, you can prepare these stuffed peppers ahead of time. Mix the filling and stuff the peppers a day before. Cover them well and store them in the fridge. When ready to cook, take them out and bake as directed. You may need to adjust the baking time if they are cold from the fridge. This makes meal prep easy and quick for busy days. Buffalo Chicken Stuffed Peppers taste great with fresh sides. Here are some ideas: - Simple Green Salad: A mix of greens, tomatoes, and cucumbers. - Veggie Sticks: Carrots and celery with ranch or blue cheese dip. - Rice or Quinoa: A flavorful grain to balance the spice. - Corn on the Cob: Sweet corn adds a nice touch. These sides make your meal complete and delicious! For the full recipe, check out the detailed instructions above. You now know how to make Buffalo Chicken Stuffed Peppers, plus some great tips. Remember to use the right mix of flavors and adjust spices to your taste. Don't forget the fun in trying new ingredients and variations. Enjoy your meal and share it with others! This dish is simple to make, and leftovers can be stored well. Get creative and have fun in the kitchen!](https://dailydishly.com/wp-content/uploads/2025/06/c965f089-28dc-4039-a3b8-814f40f3cab4-768x768.webp)
![- 2 cups cooked rotini pasta - 2 cups cooked chicken, shredded - 2 cups broccoli florets, steamed - 1 cup Alfredo sauce - 1 cup shredded mozzarella cheese - 1/2 cup grated Parmesan cheese - Seasoning ingredients: - 1 teaspoon garlic powder - 1/2 teaspoon onion powder - Salt and pepper to taste - 1/4 teaspoon red pepper flakes (optional) - 1 tablespoon olive oil - Fresh parsley, chopped (for garnish) The base of this dish is simple. You need rotini pasta, cooked chicken, and steamed broccoli. The Alfredo sauce brings creaminess. Cheese adds flavor and texture. You can change the chicken to turkey or tofu for a twist. Instead of rotini, use penne or any pasta you like. For a dairy-free option, use a plant-based Alfredo sauce. Gluten-free pasta works well too. Pick fresh broccoli for the best taste. When choosing chicken, look for moist and tender pieces. High-quality cheese melts better and tastes great. Use homemade Alfredo sauce for a richer flavor. First, you need to preheat your oven. Set it to 350°F (175°C). This step is key for even cooking. While the oven heats, you can prepare your other ingredients. Next, grab a large mixing bowl. Combine the cooked rotini pasta, shredded chicken, and steamed broccoli. These three ingredients create a hearty base. Pour in the Alfredo sauce, and sprinkle in the garlic and onion powders. Add salt, pepper, and red pepper flakes if you like some heat. Gently stir everything until well mixed. Now, it’s time to transfer the mixture to your casserole dish. Lightly grease a 9x13-inch dish with olive oil. Spread the pasta mixture evenly in the dish. Sprinkle the mozzarella and Parmesan cheese on top. Cover the dish with aluminum foil to keep moisture in. Bake it in the preheated oven for 20 minutes. After that, remove the foil and bake for another 10-15 minutes. Look for bubbly, golden cheese. Once done, let it cool for a few minutes before serving. Enjoy your comforting meal! To get the best texture and taste from your Chicken and Broccoli Alfredo Casserole, follow these tips: - Cook Pasta Al Dente: Make sure to cook the rotini just right. This means it should be firm to the bite. It will soak up some sauce while baking, so this is key. - Use Fresh Broccoli: Fresh broccoli gives better taste and texture than frozen. Steam it just until bright green. - Mix Well: When adding the Alfredo sauce, ensure every piece of chicken and broccoli gets coated. This makes each bite delicious. - Cover with Foil: Cover your casserole while it bakes. This keeps moisture in and helps the cheese melt evenly. Serving your casserole nicely can make it even more enjoyable. Here are some ideas: - Garnish with Parsley: A sprinkle of fresh chopped parsley adds color and a fresh taste. - Serve with a Side Salad: A light salad balances the creamy casserole. Think about a simple green salad with vinaigrette. - Use Individual Dishes: For a fun twist, serve in small, individual baking dishes. This adds a nice touch for guests. If you want to add more flavor or ingredients, consider these options: - Add More Veggies: You can mix in bell peppers, spinach, or even carrots. They add color and nutrients. - Spice It Up: Add more red pepper flakes or some cayenne for heat. Just a pinch can make a big difference. - Use Different Cheeses: Try adding gouda or cheddar for a different flavor. Mixing cheeses often creates a richer taste. - Top with Breadcrumbs: For a crunchy top, sprinkle some seasoned breadcrumbs before baking. It gives a nice contrast to the creamy dish. These tips can help you create a Chicken and Broccoli Alfredo Casserole that everyone will love. For the complete recipe, check out the [Full Recipe]. {{image_2}} You can change the proteins and veggies in this dish. Instead of chicken, try turkey or shrimp. Both add a nice twist. For veggies, swap broccoli for spinach or peas. You could even mix in bell peppers for extra flavor. If you prefer a meatless option, use tofu or more veggies. This makes the casserole feel fresh and new each time. The sauce and cheese can change the flavor too! Try using different Alfredo sauces. Some brands offer garlic or herb versions that can add a new taste. You could also make your own sauce with cream and cheese. For cheese, use cheddar or gouda instead of mozzarella. Each cheese gives a different touch. Mixing cheeses can create a rich flavor profile. There are many ways to cook this casserole. You can use a slow cooker for a hands-off approach. Just mix the ingredients and let it cook on low for about 4 hours. For a quick option, use a skillet. Cook everything on the stove and then bake it for a short time. This keeps it nice and hot. Each method brings out different textures and flavors. To keep your Chicken and Broccoli Alfredo Casserole fresh, store leftovers in an airtight container. Let the casserole cool completely before sealing it. This helps to prevent moisture buildup. You can keep it in the fridge for up to three days. When you’re ready to eat it, just reheat in the oven or microwave until warm. If you want to save some for later, freezing is a great option. First, let the casserole cool down. Then, wrap it tightly in plastic wrap or aluminum foil. You can also use a freezer-safe container. Chicken and Broccoli Alfredo Casserole can last up to three months in the freezer. When you’re ready to enjoy it, thaw it in the fridge overnight. Reheat it in the oven at 350°F (175°C) until it’s hot all through. In the fridge, Chicken and Broccoli Alfredo Casserole stays good for about three days. If you freeze it, you can enjoy it for about three months. Always check for signs of spoilage before eating. If it looks or smells off, it’s best to toss it. Proper storage helps you enjoy every last bite of this creamy comfort food. For the full recipe, check back to the top! How to make this dish ahead of time? You can make this casserole ahead of time. Just prepare the dish as normal but do not bake it. Cover it with foil and place it in the fridge. When you are ready to eat, simply bake it at 350°F for about 30-35 minutes. This method helps save time on busy nights. Is this casserole suitable for different diets? Yes, this casserole can fit many diets. If you need a gluten-free option, use gluten-free pasta. You can also make it dairy-free by using plant-based Alfredo sauce and cheese. For a lower-calorie version, use lean chicken and a lighter sauce. This way, everyone can enjoy it. What to do if the casserole turns out too dry or too wet? If your casserole is dry, add a splash of chicken broth or extra Alfredo sauce. Mix it in well before serving. If it is too wet, bake it a bit longer uncovered to let the moisture evaporate. This way, you can fix your dish and make it tasty again. For the full recipe, check out the detailed steps. This blog post covered a comforting Chicken and Broccoli Alfredo Casserole recipe. We detailed essential ingredients, possible substitutions, and tips for quality. You learned step-by-step instructions for preparation and baking. I shared helpful tips for serving and enhancing the dish. Additionally, we explored variations and storage guidelines. In closing, this recipe is versatile and easy to make. Enjoy trying out different ingredients to make it your own!](https://dailydishly.com/wp-content/uploads/2025/06/758c3e25-adc9-448d-9aec-bad37cea0959-768x768.webp)
