Cheesy Sausage Gnocchi One Pan Delightful Meal

Are you ready to simplify dinner with a delicious twist? My Cheesy Sausage Gnocchi One Pan Delight brings hearty flavors together in one easy dish. This creamy, cheesy meal is perfect for busy nights or any occasion. I’ll guide you through each step, share smart tips, and offer tasty variations. Let’s jump into this mouthwatering recipe and make dinner a breeze!
Ingredients
List of Ingredients
To make Cheesy Sausage Gnocchi One Pan, you will need:
– 1 lb Italian sausage (mild or spicy)
– 1 package (16 oz) gnocchi (store-bought or homemade)
– 2 cups cherry tomatoes, halved
– 1 cup baby spinach
– 1 cup shredded mozzarella cheese
– 1/2 cup grated Parmesan cheese
– 2 tablespoons olive oil
– 2 cloves garlic, minced
– 1 teaspoon Italian seasoning
– 1/2 teaspoon red pepper flakes (optional)
– Salt and pepper to taste
– Fresh basil or parsley for garnish
Ingredient Substitutions
You can easily swap some ingredients based on your taste or what you have.
– Use chicken sausage if you want a lighter option.
– For a twist, try using sweet potatoes instead of gnocchi.
– Replace mozzarella with cheddar for a sharper flavor.
– If you don’t have cherry tomatoes, use diced regular tomatoes.
– Spinach can be swapped for kale or arugula for a different taste.
Tips for Selecting Fresh Ingredients
Fresh ingredients make a big difference. Here’s how to pick the best:
– Choose Italian sausage that feels firm and has a fresh smell.
– Look for gnocchi that is plump and has a smooth texture.
– Pick tomatoes that are bright and firm to the touch.
– For spinach, select leaves that are crisp and vibrant green.
– When buying cheese, look for packages that are sealed and cold.
– Always check for any signs of spoilage or bruising.
By following these tips, you ensure your Cheesy Sausage Gnocchi One Pan tastes amazing!
Step-by-Step Instructions
Detailed Cooking Steps
1. Brown the Sausage: Start by heating 2 tablespoons of olive oil in a large skillet over medium heat. Add 1 pound of Italian sausage. Break it up with a spatula. Cook until it is browned and cooked through, about 6 to 8 minutes. This gives a nice flavor base.
2. Add Garlic & Tomatoes: Next, stir in 2 cloves of minced garlic and 2 cups of halved cherry tomatoes. Cook these for another 2 to 3 minutes until the tomatoes soften. This step adds sweetness and depth to the dish.
3. Combine Gnocchi: Now, add 1 package of gnocchi to the pan. Pour in enough water to cover the gnocchi, about 2 to 3 cups. Add 1 teaspoon of Italian seasoning, and season with salt and pepper. If you like heat, sprinkle in 1/2 teaspoon of red pepper flakes. Stir everything well to mix.
4. Simmer: Bring the mix to a gentle simmer. Cover the pan with a lid and let it cook for about 5 to 7 minutes. Stir occasionally to prevent sticking. The gnocchi should be soft and tender.
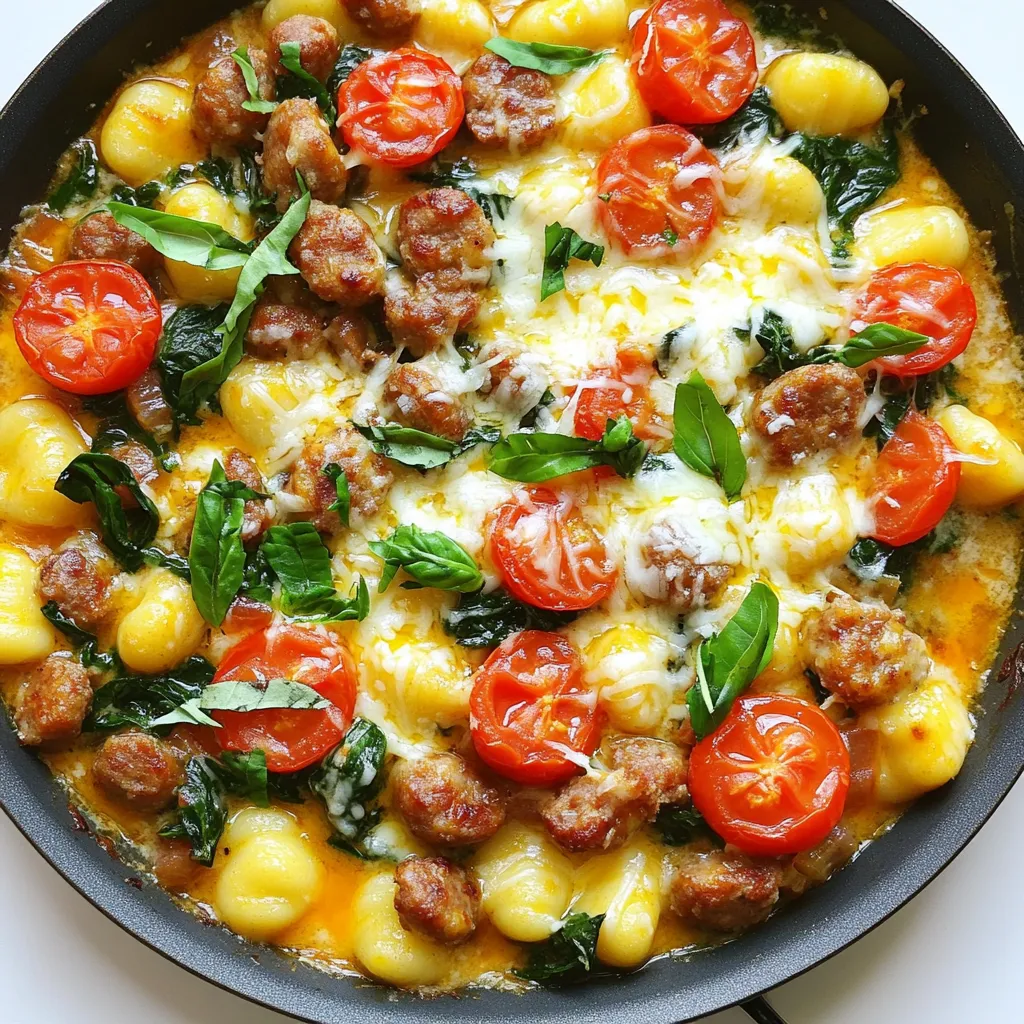
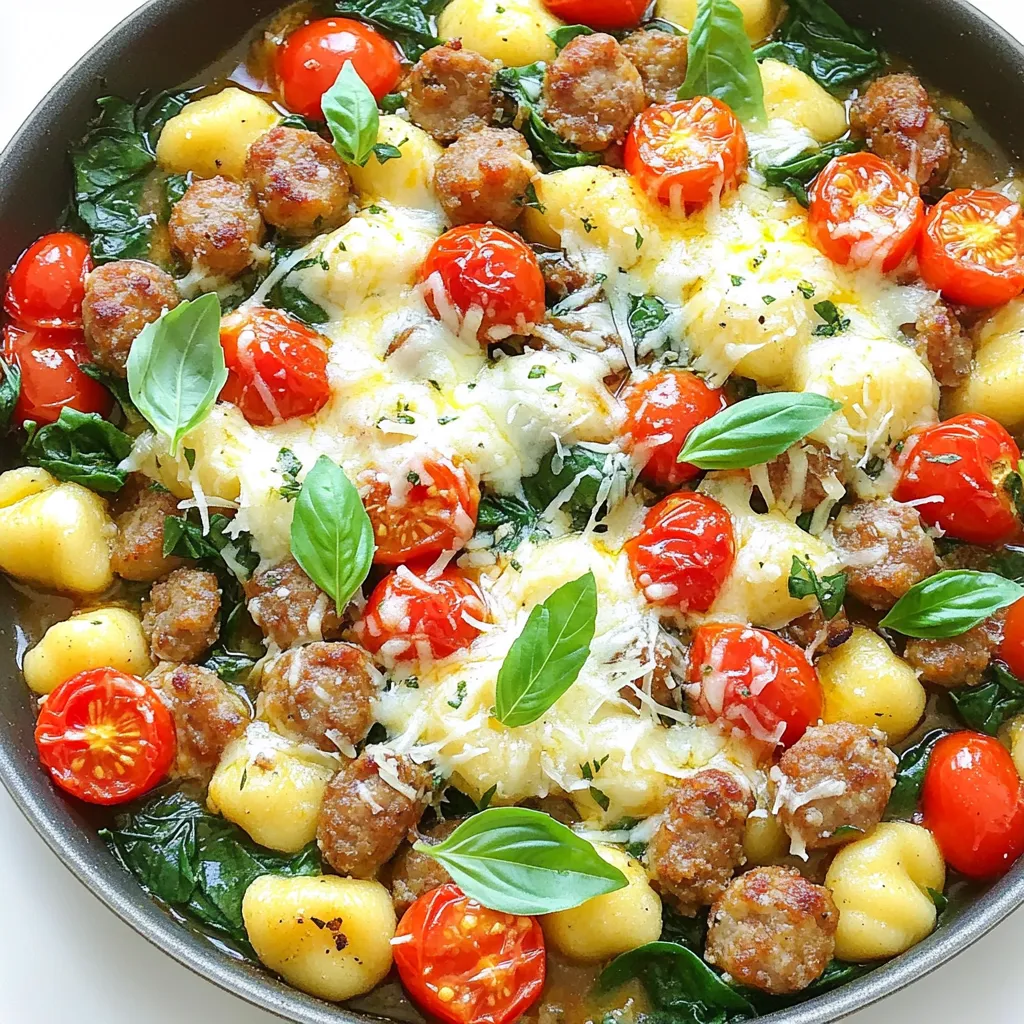
5. Add Spinach & Cheeses: After the gnocchi is cooked, remove the lid and fold in 1 cup of baby spinach until it wilts. Then, sprinkle 1 cup of shredded mozzarella cheese and 1/2 cup of grated Parmesan cheese over the top. Cover again for a few minutes to let the cheese melt.
6. Final Touches: When the cheese is gooey and melted, taste your dish. Adjust salt and pepper if needed. Then, remove from heat.
7. Garnish & Serve: Divide the cheesy gnocchi among plates. Garnish with fresh basil or parsley for a pop of color.
Cooking Times and Tips
– Prep Time: This dish takes just 10 minutes to prepare.
– Cook Time: The total cook time is around 30 minutes.
– Serving Size: This recipe serves 4 people.
Importance of Stirring and Timing
Stirring is key to avoid sticking. It helps the gnocchi cook evenly. Timing is also crucial. Overcooking can make the gnocchi mushy. Follow the suggested times for the best results. Enjoy your meal!
Tips & Tricks
How to Achieve Creamy Cheese Sauce
To get a creamy cheese sauce, start with the right cheeses. Use mozzarella and Parmesan, as they melt well. Add the cheeses after cooking the gnocchi. Cover the pan to help the cheese melt evenly. This keeps it smooth and gooey. Stir the cheese in gently to combine.
Avoiding Common Mistakes
One common mistake is adding too much water. Only add enough to cover the gnocchi. Too much water makes the dish watery, not creamy. Also, avoid cooking the spinach too long. It should just wilt in the heat. Overcooking can make it lose flavor and color.
Best Practices for One-Pan Cooking
One-pan cooking is fun and easy. Start by browning the sausage well. This builds great flavor. Use a large enough pan to avoid crowding. Stir the ingredients often to prevent sticking. Covering the pan helps cook everything evenly. This keeps the flavors locked in and makes cleanup a breeze!
Variations
Add-ins and Enhancements
You can make this dish even better with some add-ins. Try adding mushrooms for extra flavor. Peppers or zucchini also work well. They add color and nutrition. You can mix in some peas or corn for a sweet touch. If you want more heat, toss in jalapeños or extra red pepper flakes.
Different Meat Options
While Italian sausage shines in this recipe, other meats can fit too. Ground turkey or chicken makes a lighter choice. For a smoky flavor, use chorizo. If you want a richer taste, try using pancetta or bacon. Each meat brings a unique flavor, so choose what you love.
Vegetarian and Vegan Alternatives
To make this dish vegetarian, swap the sausage for plant-based sausage. You can also use beans or lentils for protein. For a vegan option, replace cheese with a vegan version. Nutritional yeast gives a cheesy taste without dairy. You can also add more veggies for extra flavor and texture.
Storage Info
Best Ways to Store Leftovers
To keep your Cheesy Sausage Gnocchi fresh, store it in an airtight container. This helps prevent moisture loss. Make sure it cools down before sealing. Place it in the fridge. It will last for about 3 to 4 days.
Reheating Instructions
To reheat, you can use the stove or microwave. For the stove, add a splash of water to a pan. Heat it on low, stirring gently. This helps keep the gnocchi soft. In the microwave, use a microwave-safe dish. Cover it with a damp paper towel. Heat in short bursts, stirring in between.
Freezing Recommendations
If you want to freeze leftovers, do it soon after cooking. Use a freezer-safe container or bag. It’s best to freeze in single servings. This makes it easy to thaw what you need. It can last up to 3 months in the freezer. To thaw, move it to the fridge overnight before reheating.
FAQs
Can I make this recipe ahead of time?
Yes, you can prepare this dish ahead of time. Cook it fully and let it cool. Store it in an airtight container in the fridge for up to three days. When ready to eat, reheat it on the stove over medium heat. Add a splash of water to keep it moist.
What to serve with Cheesy Sausage Gnocchi?
This meal pairs well with a simple green salad. A light Caesar salad works great too. You can add garlic bread for a crunchy side. If you want a drink, try a nice red wine. It complements the flavors well.
How can I make this dish spicier?
To spice it up, add more red pepper flakes. You can also use spicy Italian sausage. For extra heat, toss in sliced jalapeños or hot sauce while cooking. Start with a little, then taste as you go. Adjust to your spice level.
Is there a gluten-free option available?
Yes, you can use gluten-free gnocchi. Many stores sell gluten-free options now. Make sure to check labels for gluten-free Italian sausage too. This way, you can enjoy the dish without gluten.
This blog post walks you through making a tasty dish with cozy ingredients. We explored ingredient choices, cooking steps, and how to keep your meal creamy. You learned tips to avoid mistakes and ways to customize your cooking. We also covered how to store leftovers and answered common questions.
Use these insights to create your own cheesy sausage gnocchi. Enjoy making it perfect each time!


![- 1 lb boneless, skinless chicken breasts, diced - 2 cups cooked brown rice - 1 cup black beans, drained and rinsed - 1 cup corn (fresh or frozen) - 1 medium tomato, diced - 1 avocado, sliced The chicken is the star here. I prefer boneless, skinless chicken breasts for their ease. They cook fast and are tender. Dice them into small pieces for even cooking. Brown rice adds fiber and nice texture. If you want, you can use white rice too. Black beans and corn bring a sweet, hearty touch to the dish. Fresh tomatoes and avocado add color and creaminess. - 1 tablespoon olive oil - 1 teaspoon cumin - 1 teaspoon chili powder - 1 teaspoon garlic powder - Salt and pepper to taste Spices make the burrito bowls come alive. I start with olive oil to cook the chicken. Cumin gives a warm, earthy taste. Chili powder adds a bit of heat, while garlic powder adds depth. A sprinkle of salt and pepper enhances all the flavors. - 1/2 cup shredded cheese (cheddar or taco blend) - 1/4 cup fresh cilantro, chopped - 1 lime, cut into wedges Don’t skip the toppings! Shredded cheese melts nicely over the warm chicken. I love using a taco blend for extra flavor. Fresh cilantro adds brightness. Squeeze fresh lime over everything for a zesty finish that brightens up the dish. For the full recipe, check out the [Full Recipe]. First, grab a large skillet. Pour in one tablespoon of olive oil. Heat the oil over medium heat. Once hot, add one pound of diced chicken breasts. Now, let’s add some flavor! Sprinkle one teaspoon each of cumin, chili powder, and garlic powder over the chicken. Don’t forget to add salt and pepper to taste. Cook the chicken for about six to eight minutes. Stir occasionally. You want it to turn golden brown and be fully cooked. While the chicken cooks, it’s time to prepare the brown rice. If you don’t have it cooked yet, just follow the package instructions. You’ll need two cups of cooked brown rice for this recipe. This step is simple, but it gives the bowl a great base. Once the chicken is ready, reduce the heat. Add one cup of black beans and one cup of corn to the skillet. Stir everything together and heat for another two to three minutes. Now for the fun part! Grab your bowls. Place a portion of brown rice at the bottom of each one. Spoon the chicken mixture over the rice. Next, add diced tomatoes and sliced avocado on top. Finish it off with some shredded cheese and a sprinkle of fresh cilantro. Don’t forget the lime wedges! Serve them on the side for a zesty squeeze. For the full recipe, check out the detailed instructions. To ensure your chicken is cooked through, always check the internal temperature. It should reach 165°F. Use a meat thermometer for the best results. Cook the chicken for about 6-8 minutes. Stir it often to get an even golden brown color. For flavor enhancements, don't be afraid to add extras. Consider adding fresh lime juice while cooking for a zesty kick. Try marinating the chicken in spices for an hour before cooking. This will add depth to the taste and make it more juicy. Pair your burrito bowls with sides for a complete meal. Chips and salsa are a great choice. A fresh side salad can add crunch and color. You can also serve with guacamole for extra creaminess. For presentation ideas, use clear bowls to show off the layers. Arrange each ingredient in sections for a colorful look. Add a sprinkle of cilantro on top for a fresh pop of color. A wedge of lime on the side adds a nice touch. To make it kid-friendly, consider simple swaps. Use plain cheese instead of a blend if your kids are picky. Swap diced tomatoes for mild salsa for some added flavor. You can also use less spice in the chicken seasoning. If your kids prefer, serve the ingredients separately. Let them build their own burrito bowls. This way, they can choose what they like. Making it fun can help them try new foods! {{image_2}} You can switch up the protein in your burrito bowls for fun. Try using ground turkey instead of chicken for a leaner option. Turkey cooks fast and tastes great with the spices. If you want a meatless meal, swap the chicken for tofu. Firm tofu absorbs flavors well. Just press it first to remove water and then cube it. Both options keep the dish tasty and satisfying. Rice is great, but you can change it up! Quinoa is a smart choice. It’s high in protein and has a nice nutty taste. Just cook it like rice. If you’re looking for a low-carb option, use cauliflower rice. Simply pulse cauliflower florets in a food processor until they look like rice. Sauté it lightly for a fresh, veggie-packed base. Want to kick up the flavor? Add hot sauce to your chicken while it cooks. This gives it a spicy kick. You can also mix in different spices. Try paprika for a smoky taste or oregano for a fresh, herbal note. Experimenting with flavors can make each bowl unique and exciting. For the full recipe, check out Easy Chicken Burrito Bowls . After enjoying your meal, store leftovers right away. Let the food cool first. Place the chicken burrito bowl in an airtight container. This keeps it fresh and safe. You can store it in the fridge for up to three days. Use clear containers. This helps you see what’s inside. When reheating, use the microwave for quick results. Place your bowl in the microwave for about two minutes. Stir halfway through to heat evenly. If you want to keep the flavor, add a splash of water. This will help it stay moist. You can also reheat on the stove. Place the mixture in a pan over low heat. Stir often until warmed through. Want to save some for later? You can freeze the chicken burrito bowls! Pack them in freezer-safe containers. Make sure to leave some space for expansion. You can freeze them for up to three months. To thaw, move the bowl to the fridge overnight. Reheat as mentioned above. This way, you’ll enjoy the same great flavors later. Yes, you can prep this meal in advance. Cook the chicken, rice, and veggies. Store them separately in airtight containers. This way, you can mix and heat them when ready to eat. To reheat, place the bowl in the microwave for 1-2 minutes. Stir halfway through to heat evenly. You can also use a skillet on medium heat for a few minutes, stirring often. You can use turkey or tofu for a different protein. Grilled shrimp or beans work well too. Just adjust the cooking time based on what you choose. Leftovers last about 3-4 days in the fridge. Make sure to store them in airtight containers. Always check for any signs of spoilage before eating. Yes, you can serve the burrito bowls cold. They make a great salad-like dish. Just add some extra lime juice for fresh flavor. Enjoy it on a hot day! This article covered how to make tasty burrito bowls. We looked at the main ingredients like chicken, rice, and veggies. Spices like cumin and chili powder add great flavor. Cooking tips help ensure your meal is delicious and fun for kids. You can also try different proteins or grains for variety. Remember, store leftovers properly to enjoy later. With these steps and ideas, you can create a meal everyone will love. Enjoy your cooking adventure!](https://dailydishly.com/wp-content/uploads/2025/07/17ff2273-159b-4b6c-be57-1cae59bb2708-768x768.webp)