
Teriyaki Meatball Bowls Flavorful and Easy Recipe


Craving a delicious meal that’s simple to make? You’re in the right place! My Teriyaki Meatball Bowls combine tasty meatballs with a sweet and savory sauce. This easy recipe is perfect for weeknight dinners or meal prep. I’ll guide you through each step, from ingredients to tips and variations. Get ready to impress your family or friends with this flavorful dish you can whip up in no time!
Why I Love This Recipe
- Quick and Easy: This recipe comes together in just 45 minutes, making it perfect for a weeknight dinner.
- Flavorful and Satisfying: The combination of teriyaki sauce and meatballs creates a deliciously satisfying meal.
- Healthy Ingredients: Made with ground chicken or turkey and plenty of veggies, it’s a wholesome choice for the whole family.
- Customizable: Easily adapt the toppings and sides to suit your taste, from extra veggies to different sauces!
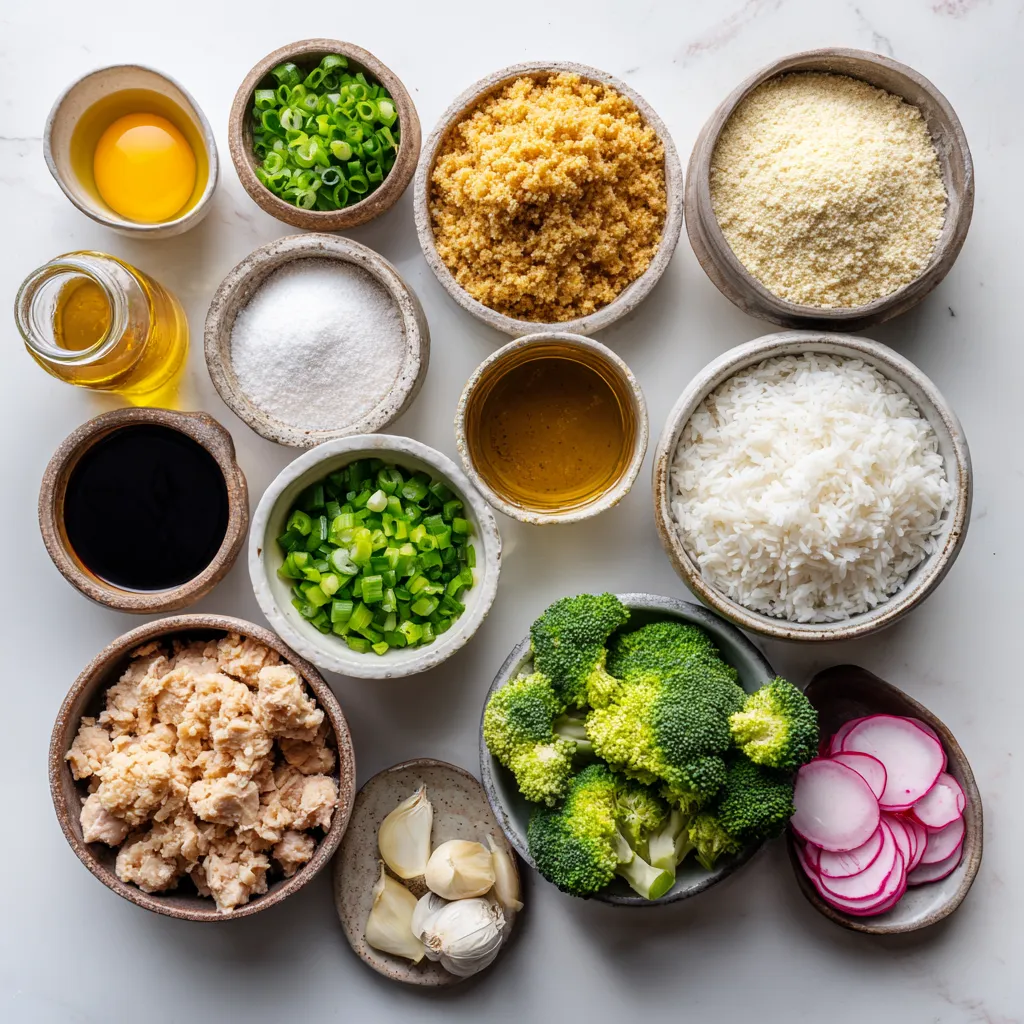
Ingredients
Main Ingredients for Teriyaki Meatballs
For the meatballs, use these key items:
– 1 lb ground chicken (or turkey)
– 1/2 cup Panko breadcrumbs
– 1/4 cup grated parmesan cheese
– 1/4 cup green onions, chopped
– 1 egg, beaten
– 1 tablespoon ginger, grated
– 2 cloves garlic, minced
These ingredients create a mix of flavors and textures. The ground chicken keeps it light. The Panko adds a nice crunch. Parmesan brings a hint of cheese that blends well. Green onions add freshness. Ginger and garlic give a warm, savory taste.
Teriyaki Sauce Components
Next, make the teriyaki sauce with these items:
– 1/4 cup low-sodium soy sauce
– 1/4 cup honey
– 2 tablespoons rice vinegar
– 1 tablespoon sesame oil
This sauce is sweet and salty. The soy sauce provides depth. Honey adds a natural sweetness. Rice vinegar gives a tang, while sesame oil adds a nutty flavor. Together, they coat the meatballs in a rich sauce.
Optional Toppings and Serving Suggestions
To make your bowls more exciting, consider these toppings:
– Sesame seeds
– Additional green onions
– Sliced radish
– Pickled ginger
These toppings bring extra crunch and flavor. Sesame seeds add a nutty bite. Green onions give freshness. Radish adds a peppery crunch, and pickled ginger provides a zing. Serve the meatballs over rice and steamed broccoli for a complete meal.
Step-by-Step Instructions
Preparing the Meatball Mixture
To start, grab a large bowl. Add 1 pound of ground chicken or turkey. Then, mix in 1/2 cup of Panko breadcrumbs. Next, add 1/4 cup of grated parmesan cheese. Toss in 1/4 cup of chopped green onions. Now, crack an egg and beat it before adding it to the mix. Grate 1 tablespoon of ginger and mince 2 cloves of garlic. Combine all these ingredients well but don’t overmix.
Baking the Meatballs
Preheat your oven to 400°F (200°C). While that heats, line a baking sheet with parchment paper. Shape your meat mixture into 1-inch meatballs. Place them on the prepared baking sheet. Bake for 20 to 25 minutes. You want them to be golden brown and cooked through.
Making the Teriyaki Sauce
While the meatballs bake, it’s time for the teriyaki sauce. In a small saucepan, combine 1/4 cup of low-sodium soy sauce, 1/4 cup of honey, 2 tablespoons of rice vinegar, and 1 tablespoon of sesame oil. Heat this on medium until it simmers. Stir until the honey dissolves into the sauce.
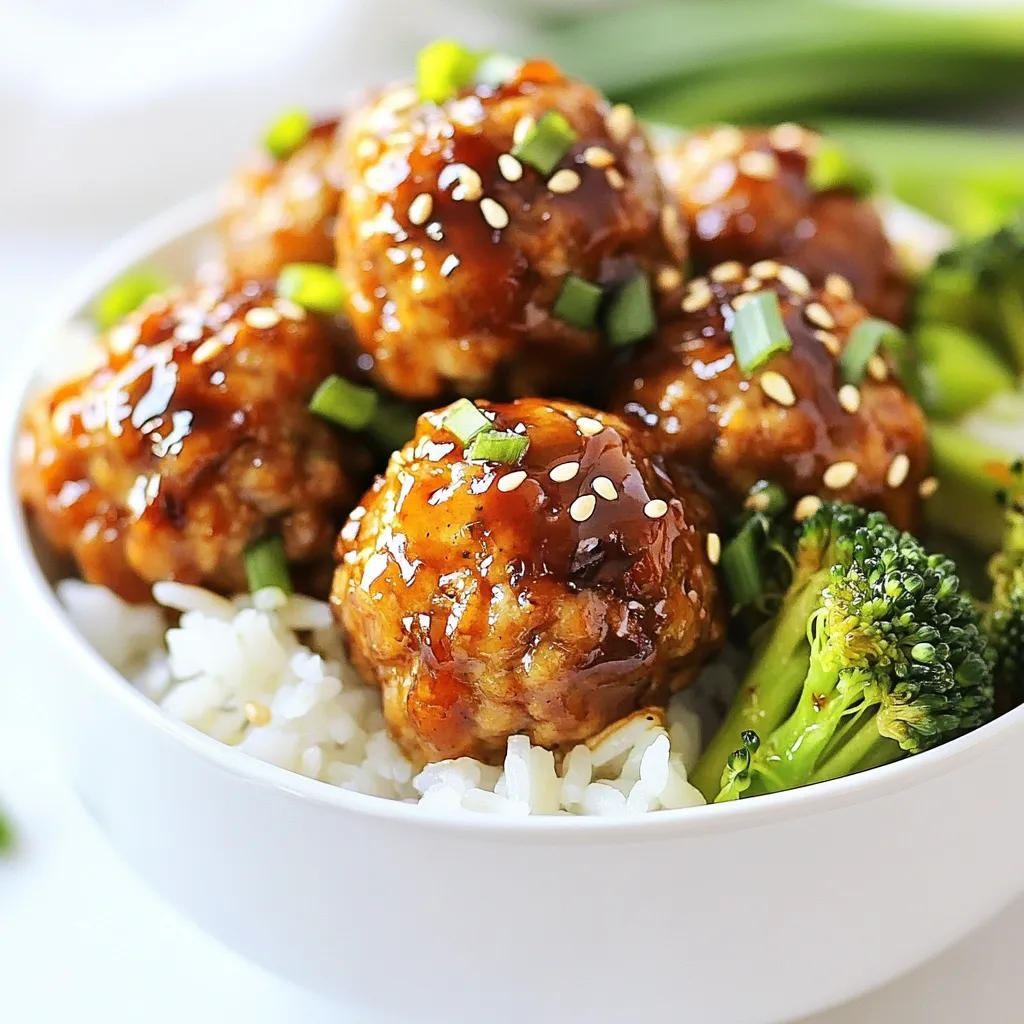
Assembling the Teriyaki Meatball Bowls
Once the meatballs are baked, move them to the saucepan with the teriyaki sauce. Stir gently to coat them well. Now, grab your serving bowls. Place 2 cups of cooked rice in each bowl. Top the rice with those sticky, teriyaki meatballs. Add 1 cup of steamed broccoli florets on top. You can also sprinkle optional toppings like sesame seeds, sliced radish, or pickled ginger. Drizzle any extra teriyaki sauce over everything before serving. Enjoy your meal!
Tips & Tricks
Perfecting the Meatballs
To make the best meatballs, use ground chicken or turkey. They stay moist and tender. Mix your meat with Panko breadcrumbs and grated cheese. This gives them a nice texture. Don’t overmix your meatball mixture. Just combine until it’s mixed. This helps keep them soft.
Enhancing the Teriyaki Flavor
For a richer taste, use low-sodium soy sauce. It lets the sweet honey shine through. Add ginger and garlic to the sauce for a fresh kick. Simmer the sauce gently. This helps all the flavors mix well. You can also add a splash of rice vinegar for a tangy touch.
Quick Cooking Techniques
Baking the meatballs is easy and keeps them juicy. Preheat your oven to 400°F (200°C). This ensures even cooking. If you want a quicker method, try pan-frying them. Just use a bit of sesame oil in a hot pan. Cook until they’re brown on all sides. This gives a lovely flavor, too.
Pro Tips
- Use Fresh Ingredients: Fresh garlic and ginger will enhance the flavor of your meatballs significantly. Opt for freshly grated ginger instead of jarred for the best taste.
- Chill the Meatball Mixture: After mixing your meatball ingredients, let the mixture chill in the fridge for 15-30 minutes. This helps the meatballs hold their shape while baking.
- Customize Your Sauce: Feel free to adjust the sweetness or saltiness of the teriyaki sauce to your preference. Adding a splash of lime or orange juice can give it a fresh twist!
- Perfectly Steamed Broccoli: To keep broccoli bright green and crisp, steam it for just 3-4 minutes. It should be tender but still have a bit of crunch!
Variations
Substituting Protein Options
You can switch ground chicken for other proteins. Ground turkey works well and tastes great. For a beef option, use ground beef. You can even try ground pork or tofu for a meatless choice. Each protein brings its own flavor while still holding the teriyaki sauce nicely.
Alternative Vegetables for Serving
While broccoli is a classic, you can add other veggies. Try steamed snap peas for crunch. Carrots, sliced thin, add a sweet touch. Bell peppers bring color and flavor too. You can also use bok choy or zucchini for a fresh twist. Mix and match to find your favorite combinations.
Different Sauces and Flavor Profiles
Teriyaki sauce is sweet and savory, but you can change it up. For a spicy kick, add sriracha or chili paste. A hoisin sauce twist gives a sweet and fragrant flavor. If you want a tangy taste, try a citrus-based sauce. Experiment with different sauces to create your own unique meatball bowl.
Storage Info
Storing Leftover Meatballs
If you have leftover meatballs, store them in an airtight container. Make sure they cool first. Place a piece of parchment paper between layers to avoid sticking. They will stay good in the fridge for 3 to 4 days.
Reheating Guidelines
When ready to eat, heat the meatballs in the microwave. Use a microwave-safe dish and cover it. Heat for about 1 to 2 minutes, checking every 30 seconds. You can also reheat them on the stovetop. Just add a bit of water or teriyaki sauce and warm them gently.
Freezing Instructions
To freeze meatballs, let them cool completely. Place them on a baking sheet in a single layer. Freeze for about 1 hour. Once frozen, transfer them to a freezer bag. They can stay in the freezer for up to 3 months. When you want to eat them, thaw in the fridge overnight before reheating.
FAQs
Can I use ground beef instead of chicken?
Yes, you can use ground beef instead of chicken. Ground turkey works too. Both will taste great. Just adjust cooking time if needed. Beef may need a bit longer to cook.
What can I use if I don’t have Panko breadcrumbs?
If you don’t have Panko breadcrumbs, use regular breadcrumbs. You can also crush crackers or stale bread. Just make sure the texture is similar for binding.
How do I make this dish gluten-free?
To make this dish gluten-free, use gluten-free breadcrumbs. Swap low-sodium soy sauce for gluten-free tamari. Check your rice vinegar to ensure it is gluten-free too.
Can I prepare the meatballs in advance?
Yes, you can prepare the meatballs ahead of time. Shape them and store in the fridge for up to a day. You can also freeze them for later use.
How can I add spice to Teriyaki Meatball Bowls?
To add spice, mix in red pepper flakes or sriracha to the meat mixture. You can also drizzle spicy sauce on top before serving. Adjust the spice to your liking.
Teriyaki meatballs are fun, tasty, and easy to make. We covered key ingredients, from the meatball mix to the teriyaki sauce. I shared tips to help you perfect your dish and suggested fun variations. Remember, you can store leftovers and reheat them easily. Feel free to get creative with proteins and toppings. Your cooking adventure starts here! Enjoy making these flavorful bowls with your own twis

Teriyaki Meatball Bowls
Ingredients
- 1 lb ground chicken (or turkey)
- 1/2 cup Panko breadcrumbs
- 1/4 cup grated parmesan cheese
- 1/4 cup green onions, chopped
- 1 large egg, beaten
- 1 tablespoon ginger, grated
- 2 cloves garlic, minced
- 1/4 cup low-sodium soy sauce
- 1/4 cup honey
- 2 tablespoons rice vinegar
- 1 tablespoon sesame oil
- 2 cups cooked rice (white or brown)
- 1 cup steamed broccoli florets
- to taste optional toppings: sesame seeds, additional green onions, sliced radish, or pickled ginger
Instructions
- In a large mixing bowl, combine ground chicken, Panko breadcrumbs, grated parmesan, chopped green onions, beaten egg, grated ginger, and minced garlic. Mix until just combined.
- Preheat your oven to 400°F (200°C). Line a baking sheet with parchment paper.
- Shape the meat mixture into 1-inch meatballs and place them on the prepared baking sheet. Bake for 20-25 minutes until cooked through and golden brown.
- While the meatballs are baking, prepare the teriyaki sauce. In a small saucepan, combine soy sauce, honey, rice vinegar, and sesame oil. Bring to a simmer over medium heat, stirring until the honey dissolves.
- Once the meatballs are done baking, transfer them to the saucepan with the teriyaki sauce. Stir gently to coat the meatballs evenly.
- To assemble the bowls, place a serving of cooked rice in each bowl. Top with teriyaki meatballs, steamed broccoli, and any optional toppings you desire such as sesame seeds or sliced radish.
- Drizzle any remaining teriyaki sauce over the top before serving.
![- 1 lb boneless, skinless chicken breasts - 2 tablespoons olive oil - Seasonings: chili powder, cumin, smoked paprika, garlic powder - Salt and pepper - Vegetables: red bell pepper, green bell pepper, yellow onion - Tortillas: flour or corn - Garnishes: fresh cilantro, lime wedges When you make easy chicken fajitas, you need fresh and tasty ingredients. Start with 1 pound of boneless, skinless chicken breasts. Cut them into thin strips for quick cooking. Next, add 2 tablespoons of olive oil. This oil helps the flavors stick. For the seasonings, use: - 1 teaspoon chili powder - 1 teaspoon cumin - 1 teaspoon smoked paprika - 1 teaspoon garlic powder These spices give the chicken a bold taste. Don't forget salt and pepper to enhance the flavor. Now, gather your vegetables. You will need: - 1 red bell pepper, sliced - 1 green bell pepper, sliced - 1 yellow onion, sliced These veggies add color and crunch. You will also need tortillas. Choose either 8 small flour or corn tortillas. Finally, fresh cilantro and lime wedges make great garnishes. The cilantro adds freshness, and the lime gives a zesty kick. With these ingredients, you can create a flavorful family dinner that everyone will enjoy. Check the Full Recipe for more tips! Start by mixing the marinade. In a large bowl, combine the olive oil with chili powder, cumin, smoked paprika, garlic powder, salt, and pepper. Stir it well until all the spices blend into the oil. Next, add the sliced chicken to the bowl. Toss the chicken strips in the marinade. Make sure each piece gets coated. Let it sit for 15 to 20 minutes. If you have more time, marinate it in the fridge for up to 2 hours. This gives the chicken great flavor. Heat a large skillet over medium-high heat. Once hot, add the marinated chicken to the skillet. It should sizzle when it hits the pan. Cook for about 5 minutes. Stir occasionally to make sure it cooks evenly. You want the chicken to be cooked through and browned. Check that it is no longer pink in the center. Now it’s time for the veggies! Add the sliced bell peppers and onions to the skillet with the chicken. Stir everything together. Cook for another 5 to 7 minutes. You want the vegetables to be tender but still crisp. This adds a nice texture to the dish. The colors from the peppers and onion will make your fajitas look amazing. For the complete recipe, check the [Full Recipe]. To make the best chicken fajitas, marinating is key. I suggest marinating the chicken for at least 15-20 minutes. If you have more time, try marinating for up to 2 hours in the fridge. This extra time allows the flavors to soak in deeply. For cooking, use medium-high heat. This ensures the chicken gets a nice sear without drying out. When it's time to serve, think about how to make your fajitas pop. I like to serve them on a large platter. You can layer the filling beautifully. Add a sprinkle of fresh cilantro on top for a bright touch. Lime wedges are a must-have for squeezing. They add a nice zing! For sides, consider guacamole, salsa, or a fresh salad. These pair well and add more flavors to your meal. One common mistake is overcooking the chicken. This can make it dry and tough. Keep an eye on it while it cooks. You want juicy, tender pieces. Another mistake is not choosing the right tortillas. Flour tortillas are soft and chewy, while corn tortillas are more traditional. Make sure to warm them up before serving. This step makes them easier to fold and enjoy. For the full recipe, check out the Easy Chicken Fajitas section above. {{image_2}} You can easily swap chicken for other proteins. Beef works great if you slice it thin. Use flank steak or sirloin for the best flavor. Shrimp is another tasty option. Just make sure to cook shrimp until it turns pink. Both options keep the dish fun and delicious. If you want a meatless meal, try using plant-based proteins. Tofu or tempeh can be great choices. You can also load up on veggies. Try mushrooms, zucchini, or even eggplant for a hearty bite. The mix of colors makes your fajitas look as good as they taste. To amp up the flavor, add jalapeños. They give a nice heat to the dish. You can also play with different spices. Try adding oregano or coriander for a unique twist. A squeeze of lime juice brightens the flavors, making your fajitas even more amazing. For the full recipe, check out the Easy Chicken Fajitas. To keep your leftover fajitas fresh, store them in airtight containers. Make sure the fajitas cool down to room temperature first. This helps prevent condensation, which can make them soggy. If you have extra tortillas, store them separately to keep them soft. Reheating chicken fajitas is easy. You can do this in a skillet over medium heat. Add a splash of water to steam them slightly and keep them moist. Stir occasionally for about 5 minutes. If you prefer the microwave, place them in a microwave-safe dish and cover with a damp paper towel. Heat for 1 to 2 minutes, checking every 30 seconds. Freezing chicken fajitas is a great way to save time. First, let the cooked fajitas cool completely. Then, portion them into freezer bags or containers. Remove as much air as possible to prevent freezer burn. You can freeze both the chicken and vegetables together. When you’re ready to eat them, thaw overnight in the fridge. Reheat as mentioned above for a quick meal. To add heat, you can use jalapeños. Slice them thin and toss in with the chicken. You could also add a pinch of cayenne pepper to the marinade. If you want more flavor, try a chipotle in adobo sauce. Just a small amount packs a punch. Adjust the spice to your taste. Yes, you can add many vegetables. Here are some great options: - Zucchini - Mushrooms - Corn - Asparagus - Cherry tomatoes These veggies will add color and flavor to your fajitas. Fajitas are great with various sides. Here are some tasty ideas: - Mexican rice - Refried beans - Guacamole - Salsa - Sour cream - Fresh corn salad These sides will complement your chicken fajitas well. You can find the full recipe for Easy Chicken Fajitas in the earlier section. You’ve learned how to make easy chicken fajitas that burst with flavor. We covered the key ingredients, easy steps, and helpful tips. You can customize your fajitas with different proteins and veggies, too. Remember, the right cooking method and storage will keep them fresh. Enjoy crafting your own delicious meals at home! Now, go ahead and impress your family or friends with your fajita skills!](https://dailydishly.com/wp-content/uploads/2025/06/bddc0842-410c-41cd-a0e7-7c4486f739b3-768x768.webp)


![- Chicken and Vegetables - 2 boneless, skinless chicken breasts, sliced into thin strips - 1 red bell pepper, sliced - 1 cup broccoli florets - 1 cup snap peas - 1 carrot, julienned - Sauces and Seasonings - 2 tablespoons honey - 4 cloves garlic, minced - 2 tablespoons soy sauce (low sodium) - 1 tablespoon sesame oil - 2 tablespoons vegetable oil - Salt and pepper to taste - Optional Garnishes - Sesame seeds - Green onions, sliced This dish shines with fresh ingredients. Each one adds a unique flavor and texture. The chicken provides protein, while the vegetables give crunch and color. Honey and garlic create a sweet and savory sauce that ties everything together. Using low sodium soy sauce keeps the dish healthy. Sesame oil adds depth and richness. Don’t skip the garnishes; they add a lovely finish. You can find the full recipe in the detailed section above. Enjoy your cooking! Whisking the Honey Garlic Sauce In a small bowl, combine honey, minced garlic, soy sauce, and sesame oil. Use a whisk to mix until smooth. This sauce gives the dish a sweet and savory flavor. Set it aside for later. Seasoning the Chicken Take your sliced chicken and sprinkle salt and pepper over it. This adds flavor and prepares the chicken for cooking. Make sure to coat all sides evenly. Preparing the Vegetables Wash and chop your vegetables. Slice the red bell pepper, julienne the carrot, and get the broccoli florets and snap peas ready. Fresh veggies add color and crunch to the dish. Sautéing the Chicken Heat one tablespoon of vegetable oil in a large skillet or wok over medium-high heat. Once hot, add the seasoned chicken strips. Cook for 5 to 7 minutes, stirring often. The chicken should turn golden and be fully cooked. Remove it from the skillet and set aside. Stir-Frying the Vegetables In the same skillet, add the remaining tablespoon of vegetable oil. Toss in the red bell pepper, broccoli, snap peas, and carrot. Stir-fry for about 3 to 4 minutes. You want them crisp-tender, not mushy. Combining Chicken and Sauce Return the cooked chicken to the skillet with the veggies. Pour your prepared honey garlic sauce over everything. Stir well to coat all the ingredients evenly. Cook for an additional 2 to 3 minutes to let the sauce thicken slightly. Plating the Dish Serve your honey garlic chicken stir fry in shallow bowls. A bed of fluffy rice or noodles makes it even better. This adds substance and absorbs the sauce. Garnishing Tips Top your dish with sesame seeds and sliced green onions for extra flavor and color. A wedge of lime on the side gives a nice citrus kick. For the complete recipe, check out the [Full Recipe]. Optimal Cooking Temperature Heat is key for a great stir fry. Start with medium-high heat. This temperature helps brown the chicken and keeps veggies crisp. Too low, and your food stews instead of fries. Too high, and you might burn everything. Keep an eye on the pan! Avoiding Overcooked Chicken and Vegetables Cook the chicken until it's just done. It should be golden, not dry. Remove it from the pan as soon as it’s cooked. For the veggies, stir-fry for 3-4 minutes. They should be bright and a bit crunchy. Overcooked veggies lose their color and nutrients. Choosing the Best Chicken Cuts I always use boneless, skinless chicken breasts for this dish. They cook quickly and stay juicy. You can also use thighs if you prefer more flavor. Just cut them into thin strips for even cooking. Freshness of Vegetables Fresh veggies make a big difference. Look for bright colors and firm textures. Bell peppers, broccoli, and snap peas should feel crisp. Avoid any limp or brown spots. The better the veggies, the better your stir fry will taste. Pairing Suggestions (Rice, Noodles, etc.) Serve this stir fry over fluffy rice or noodles. Both absorb the honey garlic sauce well. For rice, jasmine or basmati works great. If you choose noodles, try egg noodles or rice noodles for a nice touch. Customizing for Dietary Preferences You can easily adapt this recipe. Want it vegetarian? Use firm tofu instead of chicken. Gluten-free? Swap soy sauce for tamari or coconut aminos. Make it your own while keeping the flavor! For more ideas, check out the Full Recipe. {{image_2}} You can mix it up with different proteins. Tofu works great for a vegetarian option. Beef strips add a rich flavor. Just remember to adjust cooking times for each protein. When it comes to veggies, the options are endless. You can add mushrooms for an earthy touch. Zucchini gives a nice crunch. Carrots, bell peppers, and snap peas are also good choices. Feel free to use what you have in your fridge. Want to boost the flavor? Try adding new sauces or spices. A splash of sriracha can add heat. Ginger adds a nice zing. Experiment with different flavors to find your perfect mix. Adjust the sweetness to your liking too. If you prefer less sweetness, cut the honey by half. For a sweeter taste, add more honey. Taste as you go to find what works best for you. You can make this dish in an Instant Pot or slow cooker. For the Instant Pot, sauté first, then pressure cook for quick results. In a slow cooker, let it simmer for a few hours. Grilling or baking can also work well. Grill the chicken for a smoky flavor. Bake it in the oven for a hands-off approach. No matter the method, the taste will still be amazing. If you're looking for the full recipe, check out the Honey Garlic Chicken Stir Fry ! To keep your honey garlic chicken stir fry fresh, store any leftovers in an airtight container. Place the container in the fridge right after the meal. This helps lock in flavors and prevent bacteria growth. You should enjoy your leftovers within 3 to 4 days for the best taste. If you want to save your stir fry for later, freezing is a great option. First, let the dish cool completely before packing it. Use freezer-safe bags or containers for best results. Be sure to remove as much air as possible to prevent freezer burn. Your honey garlic chicken stir fry can last up to 3 months in the freezer. When you're ready to eat, thaw the stir fry overnight in the fridge. Then, reheat it on the stovetop over low heat. Stir occasionally until it’s hot. You can also microwave it, but ensure you stir it every minute to heat evenly. Enjoy your meal all over again! Can I use frozen vegetables? Yes, you can use frozen vegetables. They save time and are easy to find. Just add them directly to the pan. You might need to cook them a bit longer. This will help them get warm and tender. How to make this dish gluten-free? To make this dish gluten-free, use tamari instead of soy sauce. Tamari is a great gluten-free option. Check the labels to ensure no gluten ingredients are included. What to do if the sauce is too thick? If the sauce is too thick, add a little water or chicken broth. Stir it in slowly. This will help loosen the sauce and keep it tasty. How do I know when the chicken is fully cooked? Check the chicken's color and texture. It should be white and firm. The safest way is to use a meat thermometer. The internal temperature should reach 165°F (75°C). Can this recipe be made ahead of time? Yes, you can prepare the chicken and sauce ahead of time. Store them in the fridge for up to two days. Then, cook the stir fry when you are ready to eat. What's the best way to reheat stir fry? Reheat the stir fry in a skillet over medium heat. Add a splash of water to keep it moist. Stir often until it’s hot. This will help keep the flavors fresh. For the full recipe, check out the Honey Garlic Chicken Stir Fry. To make a great Honey Garlic Chicken Stir Fry, we discussed all the key ingredients, steps, and tips. Start with fresh chicken and vibrant vegetables. Whisk together a yummy sauce and cook everything just right. Don’t forget to play with flavors or cooking methods to suit your taste. Proper storage keeps leftovers tasty for later. With a few variations, this dish can easily fit your dietary needs. Enjoy your stir-fry and impress family or friends with your new skills!](https://dailydishly.com/wp-content/uploads/2025/07/ad7e2fa8-e610-4152-a96e-e496d4740468-768x768.webp)
![- 1.5 lbs Brussels sprouts, trimmed and halved - 3 tablespoons maple syrup - 2 tablespoons olive oil - 1 teaspoon garlic powder - 1 teaspoon salt - ½ teaspoon black pepper - ½ cup pecans, roughly chopped (optional) - 1 tablespoon balsamic vinegar (optional) When I make maple roasted Brussels sprouts, I love using fresh, vibrant Brussels sprouts. They have a sweet, nutty taste that pairs perfectly with maple syrup. The maple syrup adds a lovely sweetness that balances the slight bitterness of the sprouts. Olive oil is essential here. It helps in roasting and gives a nice, rich flavor. Garlic powder adds depth, while salt and pepper enhance the natural taste. If you want some crunch, add pecans. They bring a great texture and flavor. I sometimes drizzle balsamic vinegar at the end for a tangy twist. - Baking sheet - Large mixing bowl - Measuring spoons - Knife and cutting board For this recipe, you need a few simple tools. A baking sheet helps with even roasting. A large mixing bowl makes it easy to combine everything. Measuring spoons ensure you get the right amounts. Finally, a knife and cutting board are needed to trim the Brussels sprouts. With these ingredients and tools, you're all set to create a delicious dish. You can check out the [Full Recipe] for step-by-step instructions. Enjoy your cooking adventure! - Preheat your oven to 400°F (200°C). - Trim and halve the Brussels sprouts. This helps them cook evenly and taste great. - In a large mixing bowl, mix Brussels sprouts with olive oil, maple syrup, garlic powder, salt, and pepper. Make sure every sprout gets a nice coat. This mixture adds sweetness and flavor. - Spread the sprouts in a single layer on a baking sheet. This step is key for good roasting. - Roast for 20-25 minutes, shaking the pan halfway. This helps them brown evenly. You want them golden and crispy on the edges. For extra crunch, sprinkle chopped pecans during the last five minutes. You can find the full recipe [here](#). To get crispy Brussels sprouts, spread them out on the baking sheet. Make sure they are in a single layer. This helps them roast evenly. Shake the pan halfway through cooking. This allows hot air to reach all sides. You can add balsamic vinegar for a bit of tang. It gives a nice balance to the sweetness of the maple. Garlic adds depth, too. You can also try spices like paprika or cayenne for extra heat. This way, you can customize the flavors to your taste. These Brussels sprouts go well with proteins like chicken or fish. They make a great side dish. You can also serve them as a healthy snack or appetizer. They are delicious warm or at room temperature. For more ideas, check out the Full Recipe. {{image_2}} You can easily make this dish nut-free. Just omit the pecans. The Brussels sprouts will still taste great with the maple syrup and spices. You won't miss the nuts at all! If you want a vegan version, you can keep it simple. Use maple syrup as your only sweetener. This recipe already has olive oil, so it’s vegan-friendly. Just make sure to check your balsamic vinegar for any added ingredients that aren’t vegan. Want to make your Brussels sprouts special for the season? Add some seasonal spices! A sprinkle of cinnamon or nutmeg gives a warm, festive touch. This twist makes your dish stand out and adds a new flavor layer. Try it next time for a fun change! For the full recipe, check out the [Full Recipe]. Store leftovers in an airtight container in the fridge. Make sure the sprouts cool down first. This keeps them fresh and tasty for your next meal. Reheat in the oven for best texture. Set the oven to 350°F (175°C) and warm for about 10 minutes. If you're in a hurry, you can use the microwave. Heat them for 1-2 minutes, checking often to avoid overcooking. These delicious Brussels sprouts last for up to 3 days in the fridge. If you freeze them, the texture can change, making them mushy. For the best quality, enjoy them fresh or stored in the fridge. Yes, but fresh is recommended for better texture. Frozen Brussels sprouts often lose their crunch. They may also release more water, making them less crispy. If you use frozen ones, be sure to thaw and drain them first. All ingredients are naturally gluten-free; ensure seasonings are free of gluten. Check labels on packaged items. Some sauces or spices may contain hidden gluten. Using fresh ingredients helps keep this dish safe for gluten-free diets. Honey or agave can be used as a replacement, though it will alter flavor. Maple syrup provides a unique taste that is hard to match. If you choose honey, use a little less, as it is sweeter. Agave has a milder flavor and can work well, too. This recipe shows you how to make tasty roasted Brussels sprouts. You need simple ingredients and basic tools. Preheat your oven, mix the sprouts, and roast them for a perfect dish. Remember to try different flavors and store any leftovers properly. These sprouts pair well with any meal or stand alone as a snack. Enjoy trying this recipe and make it your own! Happy cooking!](https://dailydishly.com/wp-content/uploads/2025/07/86ea6ed0-8750-4297-97a9-678adfd456c4-768x768.webp)