Skip to content
About
Contact
Cookie Policy
Copyright Policy
Disclaimer
Search
Home
Dinner
Appetizer
Desserts
Drinks
About
Contact
Privacy Policy
Toggle Menu
Home
/
Dinner
- Page 17
Dinner
Zesty Fiesta Taco Salad Flavorful and Fresh Meal
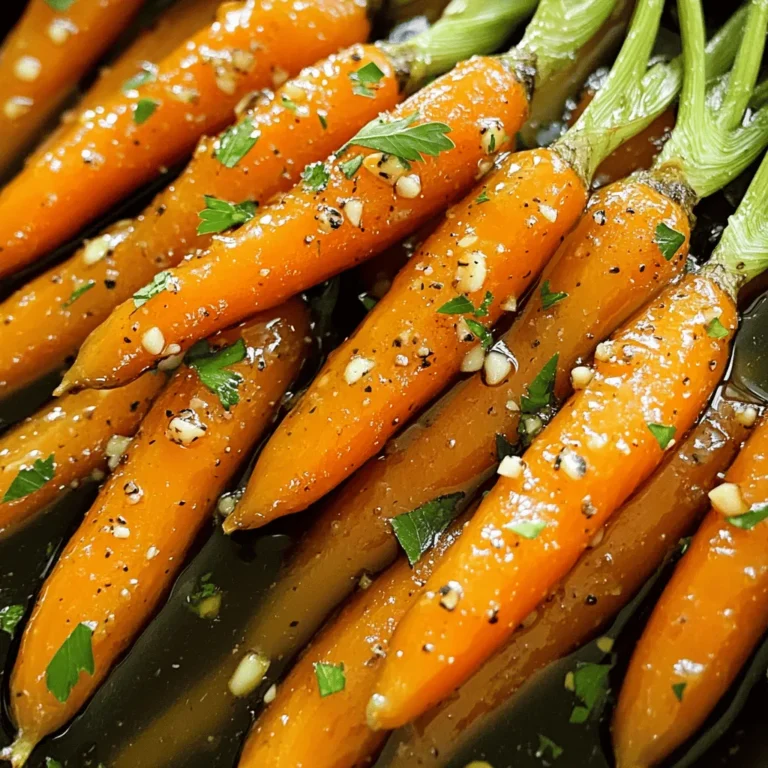
Honey Garlic Glazed Carrots for a Flavorful Side
Creamy Roasted Red Pepper Pasta Simple and Tasty Dish
Honey Garlic Chicken Stir Fry Flavorful Dinner Delight
Easy Greek Lemon Potatoes Flavorful and Simple Recipe
One Pan Honey Garlic Chicken Quick and Yummy Meal
Chicken Pesto Pasta Salad Fresh and Flavorful Meal
BBQ Chicken Salad Bowls Flavorful and Healthy Meal
Sweet and Spicy Sesame Noodles Quick and Easy Meal
Creamy Tomato Basil Pasta Flavorful and Simple Recipe
Page navigation
Previous Page
Previous
1
…
15
16
17
18
19
…
31
Next Page
Next
Home
Dinner
Appetizer
Desserts
Drinks
About
Contact
Privacy Policy
Toggle Menu Close
Search for:
Search


![For creamy roasted red pepper pasta, you need: - 12 oz pasta (penne or fusilli) - 2 large red bell peppers - 1 cup heavy cream - 1/2 cup grated Parmesan cheese - 2 cloves garlic, minced - 2 tablespoons olive oil - 1 teaspoon dried basil - 1/2 teaspoon red pepper flakes (adjust for spice level) - Salt and pepper to taste - Fresh basil leaves for garnish These ingredients work together to create a rich and flavorful dish. The roasted red peppers give a sweet taste, while the cream adds a smooth texture. If you want to make this dish vegan, you can swap the heavy cream for coconut cream or a cashew cream. Use nutritional yeast instead of Parmesan cheese for a cheesy flavor. For gluten-free pasta, look for pasta made from rice, lentils, or chickpeas. If you want to make more or less pasta, here’s how to adjust the ingredients: - For every 4 oz of pasta, use about 1/3 cup of heavy cream. - For every 1 oz of cheese, use 2 tablespoons of cream. - Adjust the red bell peppers: 1 large pepper equals about 1 cup chopped. This way, you can easily scale the recipe to fit your needs. If you want the full recipe, refer to the top of the article. Start by preheating your oven to 400°F (200°C). This heat helps the peppers roast well. Place the two red bell peppers on a baking sheet. Drizzle with olive oil for flavor and moisture. Roast them for 25-30 minutes. You want the skins to char and blister. When done, take them out and let them cool. Once cool, peel off the charred skin and remove the seeds. Chop the flesh into small pieces. This step gives your pasta its rich flavor. While the peppers roast, bring a pot of water to a boil. Add salt to the water, which helps flavor the pasta. Add 12 oz of pasta, like penne or fusilli. Cook it according to the package instructions until it's al dente. This means it should be firm but not hard. Drain the pasta and save about 1 cup of the pasta water. This water helps create a creamy sauce later. Now, it’s time to make the sauce. In a blender, add the roasted red peppers, 1 cup of heavy cream, 2 cloves of minced garlic, and 1 teaspoon of dried basil. For a bit of heat, include 1/2 teaspoon of red pepper flakes. Add a pinch of salt too. Blend everything until it's smooth and creamy. In a large skillet, combine the creamy mixture with the drained pasta over medium heat. If the sauce is too thick, add a splash of reserved pasta water. Stir in 1/2 cup of grated Parmesan cheese until it melts. Taste and adjust with more salt and pepper if needed. Serve your dish hot. Garnish with fresh basil leaves and more Parmesan cheese if you like. For the full details, refer to the Full Recipe. To get the perfect pasta, cook it in a big pot of salted water. Use about a tablespoon of salt per quart. This adds flavor to your pasta. Cook it until it's al dente, which means it should still have a little bite. After draining, don't rinse your pasta. This keeps the starch that helps the sauce stick. If you like more heat, add extra red pepper flakes. Start with a pinch and taste. You can always add more later. If it's too spicy, balance it with more cream or cheese. The goal is to make it just right for your taste. For a smooth sauce, blend the roasted peppers well. Add the heavy cream slowly while blending. If the sauce is too thick, use some reserved pasta water to thin it. This water has starch that helps the sauce cling to the pasta. Don't forget to stir in the Parmesan cheese at the end. It adds creaminess and flavor. For the complete recipe, check out the Full Recipe. {{image_2}} You can make this dish vegetarian by using vegetable broth instead of chicken broth. Swap out the Parmesan for a plant-based cheese. You can also add veggies like spinach or mushrooms for extra flavor. They will add texture and nutrients. For a heartier meal, consider adding chicken or shrimp. Cook the protein separately and add it to the pasta after mixing in the sauce. Grilled chicken breast or sautéed shrimp both work well. They soak up the creamy flavors nicely. If you need a gluten-free option, use gluten-free pasta. Brands like brown rice or chickpea pasta are great choices. They cook similarly and absorb the sauce well. Just remember to adjust cooking times as needed for different pasta types. You can find the full recipe for this dish here: [Full Recipe]. To store leftovers, let the pasta cool first. Use an airtight container. This keeps the flavors fresh. Place in the fridge for up to three days. If you want to keep it longer, freeze it. When reheating, add a splash of water or cream. This helps restore the creamy texture. Warm it slowly on the stove over low heat. Stir often to avoid burning. You can also use the microwave, but watch it closely. You can freeze the roasted red pepper sauce. Let it cool, then pour it into freezer bags. Flatten the bags to save space. It will last up to three months. When ready to use, thaw it overnight in the fridge before reheating. Yes, you can use many types of pasta. Options like spaghetti, fettuccine, or even gluten-free pasta work well. The key is to choose a shape that holds sauce nicely. Try different types to find your favorite! You can make the sauce cream-free by using cashews or silken tofu. Blend soaked cashews or tofu with roasted peppers and a little vegetable broth. This gives a creamy texture while keeping it dairy-free. Adjust seasonings to taste. This dish pairs well with a fresh salad or garlic bread. You can also serve it with grilled vegetables or a light protein, like chicken or shrimp. These sides enhance the meal and make it more filling. For more ideas, check the Full Recipe. This blog post covered all you need for creamy roasted red pepper pasta. I shared ingredient lists, cooking steps, and tips for the best results. You can explore variations for diets and learn how to store leftovers. Remember, cooking is about having fun and trying new things. Your creations can be as unique as you are. Enjoy each bite and keep experimenting in the kitchen!](https://dailydishly.com/wp-content/uploads/2025/07/67c62068-3baa-44bf-b117-e4c3c451c449-768x768.webp)
![- Chicken and Vegetables - 2 boneless, skinless chicken breasts, sliced into thin strips - 1 red bell pepper, sliced - 1 cup broccoli florets - 1 cup snap peas - 1 carrot, julienned - Sauces and Seasonings - 2 tablespoons honey - 4 cloves garlic, minced - 2 tablespoons soy sauce (low sodium) - 1 tablespoon sesame oil - 2 tablespoons vegetable oil - Salt and pepper to taste - Optional Garnishes - Sesame seeds - Green onions, sliced This dish shines with fresh ingredients. Each one adds a unique flavor and texture. The chicken provides protein, while the vegetables give crunch and color. Honey and garlic create a sweet and savory sauce that ties everything together. Using low sodium soy sauce keeps the dish healthy. Sesame oil adds depth and richness. Don’t skip the garnishes; they add a lovely finish. You can find the full recipe in the detailed section above. Enjoy your cooking! Whisking the Honey Garlic Sauce In a small bowl, combine honey, minced garlic, soy sauce, and sesame oil. Use a whisk to mix until smooth. This sauce gives the dish a sweet and savory flavor. Set it aside for later. Seasoning the Chicken Take your sliced chicken and sprinkle salt and pepper over it. This adds flavor and prepares the chicken for cooking. Make sure to coat all sides evenly. Preparing the Vegetables Wash and chop your vegetables. Slice the red bell pepper, julienne the carrot, and get the broccoli florets and snap peas ready. Fresh veggies add color and crunch to the dish. Sautéing the Chicken Heat one tablespoon of vegetable oil in a large skillet or wok over medium-high heat. Once hot, add the seasoned chicken strips. Cook for 5 to 7 minutes, stirring often. The chicken should turn golden and be fully cooked. Remove it from the skillet and set aside. Stir-Frying the Vegetables In the same skillet, add the remaining tablespoon of vegetable oil. Toss in the red bell pepper, broccoli, snap peas, and carrot. Stir-fry for about 3 to 4 minutes. You want them crisp-tender, not mushy. Combining Chicken and Sauce Return the cooked chicken to the skillet with the veggies. Pour your prepared honey garlic sauce over everything. Stir well to coat all the ingredients evenly. Cook for an additional 2 to 3 minutes to let the sauce thicken slightly. Plating the Dish Serve your honey garlic chicken stir fry in shallow bowls. A bed of fluffy rice or noodles makes it even better. This adds substance and absorbs the sauce. Garnishing Tips Top your dish with sesame seeds and sliced green onions for extra flavor and color. A wedge of lime on the side gives a nice citrus kick. For the complete recipe, check out the [Full Recipe]. Optimal Cooking Temperature Heat is key for a great stir fry. Start with medium-high heat. This temperature helps brown the chicken and keeps veggies crisp. Too low, and your food stews instead of fries. Too high, and you might burn everything. Keep an eye on the pan! Avoiding Overcooked Chicken and Vegetables Cook the chicken until it's just done. It should be golden, not dry. Remove it from the pan as soon as it’s cooked. For the veggies, stir-fry for 3-4 minutes. They should be bright and a bit crunchy. Overcooked veggies lose their color and nutrients. Choosing the Best Chicken Cuts I always use boneless, skinless chicken breasts for this dish. They cook quickly and stay juicy. You can also use thighs if you prefer more flavor. Just cut them into thin strips for even cooking. Freshness of Vegetables Fresh veggies make a big difference. Look for bright colors and firm textures. Bell peppers, broccoli, and snap peas should feel crisp. Avoid any limp or brown spots. The better the veggies, the better your stir fry will taste. Pairing Suggestions (Rice, Noodles, etc.) Serve this stir fry over fluffy rice or noodles. Both absorb the honey garlic sauce well. For rice, jasmine or basmati works great. If you choose noodles, try egg noodles or rice noodles for a nice touch. Customizing for Dietary Preferences You can easily adapt this recipe. Want it vegetarian? Use firm tofu instead of chicken. Gluten-free? Swap soy sauce for tamari or coconut aminos. Make it your own while keeping the flavor! For more ideas, check out the Full Recipe. {{image_2}} You can mix it up with different proteins. Tofu works great for a vegetarian option. Beef strips add a rich flavor. Just remember to adjust cooking times for each protein. When it comes to veggies, the options are endless. You can add mushrooms for an earthy touch. Zucchini gives a nice crunch. Carrots, bell peppers, and snap peas are also good choices. Feel free to use what you have in your fridge. Want to boost the flavor? Try adding new sauces or spices. A splash of sriracha can add heat. Ginger adds a nice zing. Experiment with different flavors to find your perfect mix. Adjust the sweetness to your liking too. If you prefer less sweetness, cut the honey by half. For a sweeter taste, add more honey. Taste as you go to find what works best for you. You can make this dish in an Instant Pot or slow cooker. For the Instant Pot, sauté first, then pressure cook for quick results. In a slow cooker, let it simmer for a few hours. Grilling or baking can also work well. Grill the chicken for a smoky flavor. Bake it in the oven for a hands-off approach. No matter the method, the taste will still be amazing. If you're looking for the full recipe, check out the Honey Garlic Chicken Stir Fry ! To keep your honey garlic chicken stir fry fresh, store any leftovers in an airtight container. Place the container in the fridge right after the meal. This helps lock in flavors and prevent bacteria growth. You should enjoy your leftovers within 3 to 4 days for the best taste. If you want to save your stir fry for later, freezing is a great option. First, let the dish cool completely before packing it. Use freezer-safe bags or containers for best results. Be sure to remove as much air as possible to prevent freezer burn. Your honey garlic chicken stir fry can last up to 3 months in the freezer. When you're ready to eat, thaw the stir fry overnight in the fridge. Then, reheat it on the stovetop over low heat. Stir occasionally until it’s hot. You can also microwave it, but ensure you stir it every minute to heat evenly. Enjoy your meal all over again! Can I use frozen vegetables? Yes, you can use frozen vegetables. They save time and are easy to find. Just add them directly to the pan. You might need to cook them a bit longer. This will help them get warm and tender. How to make this dish gluten-free? To make this dish gluten-free, use tamari instead of soy sauce. Tamari is a great gluten-free option. Check the labels to ensure no gluten ingredients are included. What to do if the sauce is too thick? If the sauce is too thick, add a little water or chicken broth. Stir it in slowly. This will help loosen the sauce and keep it tasty. How do I know when the chicken is fully cooked? Check the chicken's color and texture. It should be white and firm. The safest way is to use a meat thermometer. The internal temperature should reach 165°F (75°C). Can this recipe be made ahead of time? Yes, you can prepare the chicken and sauce ahead of time. Store them in the fridge for up to two days. Then, cook the stir fry when you are ready to eat. What's the best way to reheat stir fry? Reheat the stir fry in a skillet over medium heat. Add a splash of water to keep it moist. Stir often until it’s hot. This will help keep the flavors fresh. For the full recipe, check out the Honey Garlic Chicken Stir Fry. To make a great Honey Garlic Chicken Stir Fry, we discussed all the key ingredients, steps, and tips. Start with fresh chicken and vibrant vegetables. Whisk together a yummy sauce and cook everything just right. Don’t forget to play with flavors or cooking methods to suit your taste. Proper storage keeps leftovers tasty for later. With a few variations, this dish can easily fit your dietary needs. Enjoy your stir-fry and impress family or friends with your new skills!](https://dailydishly.com/wp-content/uploads/2025/07/ad7e2fa8-e610-4152-a96e-e496d4740468-768x768.webp)
![- 2 lbs baby potatoes, halved - 1/4 cup olive oil - 1/4 cup fresh lemon juice The main ingredients for Greek lemon potatoes are simple and fresh. Baby potatoes are best for this dish. Their small size ensures even cooking and a tender bite. Olive oil gives richness. Fresh lemon juice adds a bright, zesty flavor that makes the dish pop. - 3 cloves garlic, minced - 2 teaspoons dried oregano - 1 teaspoon salt - 1/2 teaspoon black pepper Next, we add seasoning. Minced garlic brings depth and aroma. Dried oregano gives that classic Greek taste. Salt enhances all the flavors, while black pepper adds a hint of heat. Together, they create a balanced mix that makes these potatoes shine. - 1 tablespoon fresh parsley, chopped - Lemon wedges (for serving) For garnishing, fresh parsley adds color and freshness. It brightens up the dish visually and in taste. Lemon wedges serve two purposes. They add extra zing and allow guests to adjust the flavor to their liking. This simple touch elevates the meal. For the complete recipe, check the [Full Recipe]. - Preheat your oven to 400°F (200°C). - In a large bowl, whisk together the olive oil and lemon juice. This mix brings bright flavor to the potatoes. - Toss the baby potatoes in the lemon-oil mixture. Ensure they are well coated. This step is key for flavor. - Arrange the potatoes in a large baking dish. Spread them out in a single layer. This helps them roast evenly. - Toss the potatoes halfway through cooking. This ensures all sides get crispy and golden. - Once cooked, garnish with chopped parsley. Serve with lemon wedges for an extra zest. Enjoy your Easy Greek Lemon Potatoes! For the full recipe, check the section above. To choose the best baby potatoes, look for firm, smooth ones. Avoid potatoes with dark spots or soft areas. Uniform size helps them cook evenly. When you cut them in half, keep the pieces about the same size. This way, they roast nicely. Even coating in the oil mixture is key. Use a large bowl to mix the olive oil, lemon juice, and spices. When you add the halved potatoes, toss them well. Make sure every piece gets coated. This coating helps create that tasty, crispy skin. Fresh herbs bring more life to your dish than dried ones. If you have fresh oregano or parsley, use them. They brighten the flavor and add a nice touch. Dried herbs work if fresh ones are not available, but fresh is always better. For extra zest, add a bit of lemon zest to the mix. You can also sprinkle some feta cheese on top before serving. This adds a salty kick that pairs well with the lemony flavor. Roasting times can vary based on your oven. Keep an eye on the potatoes. They should turn golden brown and tender, which takes about 40 to 45 minutes. Toss them halfway through to ensure even cooking. If you want to try alternative cooking methods, consider using an air fryer. It cooks faster and gives a crispier finish. You can also cook them on the stovetop. Just sauté them in a pan with the oil and spices until they are tender and golden. For the full recipe, check out the link provided earlier. {{image_2}} You can easily change this recipe to fit your taste. Adding other vegetables can make it more colorful and tasty. Try mixing in: - Carrots, sliced - Bell peppers, chopped These veggies add sweetness and crunch. You can also switch up the citrus. Instead of lemon, use: - Lime for a tangy twist - Orange for a hint of sweetness These changes will keep the dish fresh and exciting. Want to make your Greek lemon potatoes vegan-friendly? Just use vegetable broth instead of the olive oil. This keeps the flavor rich and tasty. For gluten-free options, this recipe is already safe. Just make sure your broth or any added toppings are gluten-free. You can also boost the flavors of your potatoes. Adding olives and feta gives a great Mediterranean touch. Here are some ideas: - Mix in black or green olives for a briny taste. - Crumble feta cheese for creaminess and saltiness. If you like heat, add chili flakes for a spicy kick. Just a pinch will do, but adjust to your taste. These flavors will make your dish pop. For the full recipe, check out the [Full Recipe]. To store leftover Greek lemon potatoes, let them cool first. Place them in an airtight container. This helps them stay fresh. You can keep them in the fridge for up to 4 days. Use a glass or plastic container with a tight seal. These containers work best to keep the potatoes tasty. You have two main ways to reheat your potatoes: the oven or the microwave. The oven gives a better texture. Preheat it to 350°F (175°C) and spread the potatoes on a baking sheet. Heat for about 10-15 minutes. If you use the microwave, place them in a bowl and cover it. Heat in short bursts, stirring in between. This helps keep them from getting soggy. You can freeze Greek lemon potatoes for later use. Let them cool completely before freezing. Place them in a freezer-safe container or bag. They can last up to 3 months in the freezer. When you are ready to eat them, thaw them overnight in the fridge. Reheat them in the oven to regain their crispy texture. Enjoy your flavorful dish anytime! You can check the Full Recipe for more details. Can I use different types of potatoes for this recipe? Yes, you can use other types of potatoes. I like baby potatoes for their size and flavor. You can also try Yukon Gold or red potatoes. They all work well, but cooking times may vary slightly. How can I make these potatoes crispy? To achieve crispy potatoes, ensure they are well-coated in oil. Spread them out in a single layer on the baking dish. Toss them halfway through cooking for even browning. You can also broil them for a few minutes after roasting. Can I substitute lemon juice with vinegar? You can use vinegar, but it will change the flavor. Lemon juice gives a fresh and zesty taste. If you use vinegar, try white wine vinegar for a milder flavor. What are alternatives to olive oil? If you need an oil substitute, try avocado oil or canola oil. Both have a mild flavor and high smoke point, making them great for roasting. What should I serve with Greek lemon potatoes? These potatoes pair well with grilled meats, fish, or a fresh salad. They can be a side dish for chicken, lamb, or even a veggie platter. How to pair with protein dishes? Try serving these potatoes with lemon herb chicken or grilled shrimp. The bright flavors of the potatoes enhance the taste of any protein dish. For a vegetarian option, serve them with stuffed bell peppers or a hearty bean salad. For the full recipe, check out the [Full Recipe]. In this post, I detailed a simple recipe for Greek lemon potatoes. You learned about the main ingredients, seasoning, and garnishing tips. I shared steps for preparation and cooking, plus clever tips for perfecting your dish. I also explored variations and storage tips. By following these instructions, you can make delicious potatoes that suit any meal. Enjoy your cooking and feel free to get creative with this recipe. Your kitchen can be a space for tasty experiments!](https://dailydishly.com/wp-content/uploads/2025/06/9ec2dfc2-ebd8-4d91-9e7c-548975c099b6-768x768.webp)
![One Pan Honey Garlic Chicken is a simple dish that packs a big flavor punch. It combines juicy chicken thighs with sweet honey and rich garlic. The colorful veggies add crunch and nutrition. This dish is quick to make and perfect for busy nights. You can find the Full Recipe at the end. - 4 boneless, skinless chicken thighs - 3 tablespoons honey - 3 tablespoons soy sauce - 4 cloves garlic, minced - 1 tablespoon fresh ginger, grated - 2 tablespoons olive oil - 1 teaspoon sesame oil - 1 red bell pepper, sliced - 1 green bell pepper, sliced - 1 cup snap peas - Salt and pepper to taste - Sesame seeds for garnish - Chopped green onions for garnish To make this recipe, you need a few basic tools: - A large skillet for cooking - A mixing bowl for marinating - A cutting board and knife for chopping - A measuring spoon for accuracy - A meat thermometer to check chicken doneness With these ingredients and tools, you can create a meal that delights your taste buds and impresses your friends and family! To start, you need to marinate the chicken. In a bowl, mix honey, soy sauce, minced garlic, and grated ginger. This mix gives the chicken a sweet and savory taste. Take your chicken thighs and add them to the bowl. Make sure they are well coated. Let the chicken marinate for at least 20 minutes. This step helps the flavors soak in. Next, it’s time to prepare the pan. Heat olive oil and sesame oil in a large skillet. Set the heat to medium-high. The oils will help the chicken cook nicely and add flavor. Once the pan is hot, take the chicken out of the marinade. Reserve the marinade for later. Add the chicken thighs to the pan. Sear each side for about 5-6 minutes. You want them to be golden brown. After that, add the sliced red and green bell peppers and snap peas. Sauté the vegetables for 3-4 minutes. They should be tender but still crisp. Pour the reserved marinade over the chicken and vegetables in the skillet. Lower the heat to medium. Let it simmer for about 5 minutes. This will thicken the sauce a bit. Check the chicken’s internal temperature. It should reach 165°F (74°C). Don’t forget to season with salt and pepper to taste. Once done, remove from heat and let it rest for a couple of minutes. Finally, sprinkle sesame seeds and chopped green onions on top before serving. Enjoy your One Pan Honey Garlic Chicken! To make the best marinade, use fresh ingredients. Combine honey, soy sauce, garlic, and ginger. This mix gives a sweet and savory taste. Let the chicken soak in the marinade for at least 20 minutes. If you have more time, an hour is even better. This helps the chicken absorb all the flavors. For juicy chicken, avoid overcooking. Use a meat thermometer to check the temperature. Aim for 165°F (74°C) for safe eating. Searing the chicken first locks in the juices. Cook each side for about 5-6 minutes until golden brown. Let the chicken rest after cooking to keep it moist. Cook vegetables until they are tender-crisp. You want them to stay bright and colorful. Add them to the pan after the chicken has browned. This keeps them from getting too soft. Sauté the sliced bell peppers and snap peas for 3-4 minutes. This way, they retain their crunch and freshness. Remember, for the full recipe, check out the [Full Recipe]. Enjoy creating this quick and yummy meal! {{image_2}} You can switch up the protein in this recipe for quick meals. Chicken thighs are great, but you can use chicken breasts, shrimp, or tofu. Each choice adds a unique taste. If you use shrimp, cook them just until they turn pink. For tofu, press it to remove extra water and cube it. Marinate as you would the chicken for the same sweet and savory flavor. Feel free to swap vegetables based on your taste or what you have. Broccoli, carrots, and zucchini work well. Use any crunchy vegetable you like. Just cut them into similar sizes so they cook evenly. Remember to sauté until they are tender yet crisp. This keeps them vibrant and full of flavor! For those who enjoy heat, add crushed red pepper flakes or sliced jalapeños. This gives your dish a nice kick. You can also mix in lime juice or rice vinegar for a tangy twist. Both will enhance the honey garlic sauce. Experiment with these ideas to find your favorite taste! Check out the Full Recipe for more details! After enjoying your One Pan Honey Garlic Chicken, let the leftovers cool. Place the chicken and vegetables in an airtight container. This keeps them fresh and tasty. Store in the fridge for up to three days. Always label your container with the date. To reheat, use a microwave or a skillet. If using the microwave, warm on medium for about 2-3 minutes. Stir halfway through for even heating. If you prefer a skillet, heat a small amount of oil over medium heat. Add the chicken and vegetables, stirring for about 5 minutes until warm. If you want to save some for later, freezing works great. First, let the dish cool completely. Then, transfer it to a freezer-safe container. Make sure to remove as much air as possible. You can freeze it for up to three months. When ready to eat, thaw it overnight in the fridge before reheating. For the best taste, marinate the chicken for at least 20 minutes. This allows the flavors to soak in. If you have more time, marinating for up to 2 hours gives even better results. Just remember, don’t marinate too long, as it can make the chicken mushy. Yes, you can use chicken breasts. They will work fine in this recipe. However, chicken thighs have more fat, which keeps them juicy and tasty. If you use breasts, be sure to watch the cooking time. They cook faster than thighs. You can serve this dish with rice or quinoa. Both soak up the sweet sauce well. Steamed veggies or a fresh salad also make great sides. They add color and balance to your meal. You can even serve it with noodles for a fun twist. Yes, this dish is perfect for meal prep. It stores well in the fridge for up to four days. Just keep the chicken and veggies in an airtight container. You can heat it up easily for quick lunches or dinners. Enjoy your yummy meal without the fuss! For the full recipe, check out the details above. We covered the key steps for making One Pan Honey Garlic Chicken. You learned about the ingredients, kitchen tools, and the cooking process. I shared tips to perfect your dish, including marination and vegetable cooking. You also saw fun variations to try and how to store your leftovers. This dish is simple and tasty for any meal. Enjoy making it your own!](https://dailydishly.com/wp-content/uploads/2025/06/cad806aa-ae3a-4121-b5f5-07eae0f4869e-768x768.webp)


