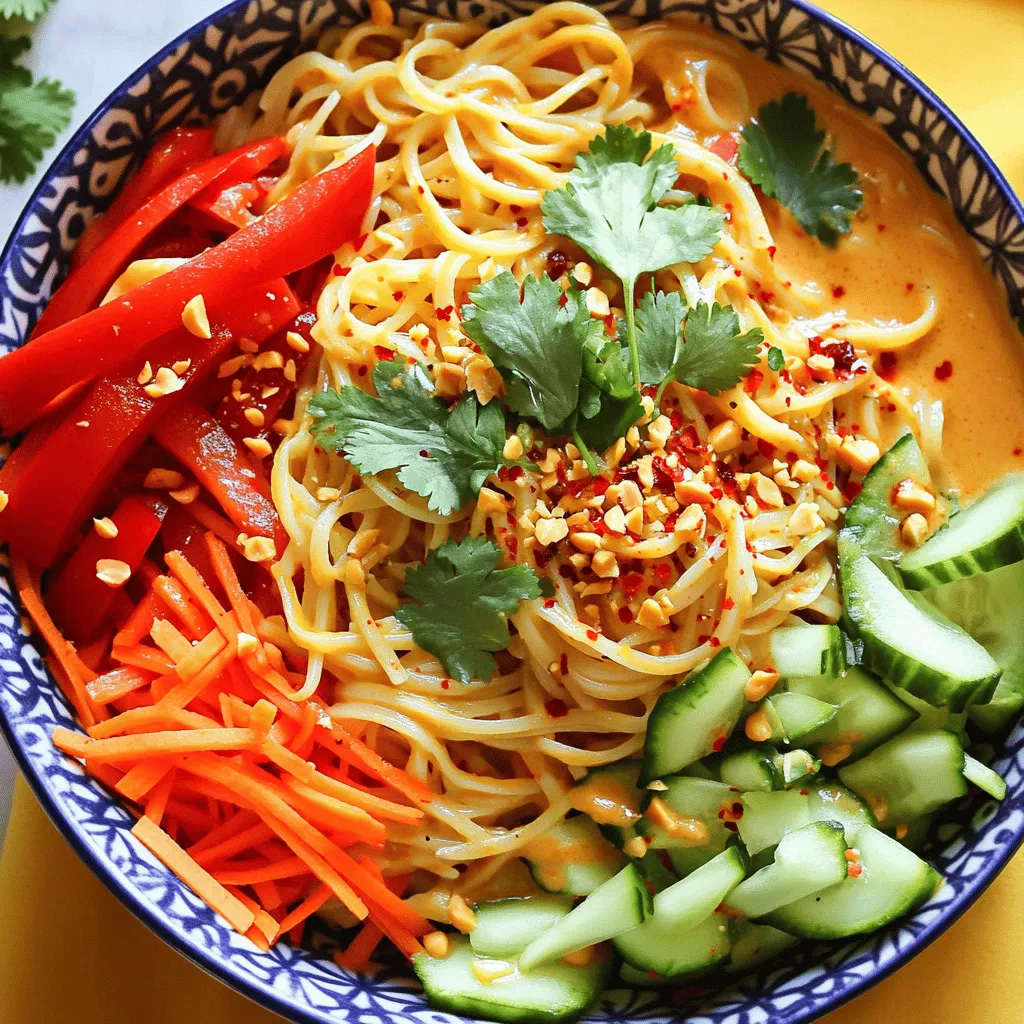
Easy Thai Peanut Noodles Simple and Flavorful Recipe

Are you ready to whip up a delicious, quick meal? My Easy Thai Peanut Noodles recipe is here to save your dinner time! Made with just a few tasty ingredients like creamy peanut butter and fresh veggies, it’s both simple and so flavorful. In this blog post, I’ll guide you through every step, plus share tips to make it your own. Let’s dive into this mouthwatering dish!
Ingredients
Main Ingredients
– 8 oz rice noodles
– 1/2 cup creamy peanut butter
– 1/4 cup soy sauce
Additional Ingredients
– 2 tablespoons honey or maple syrup
– 1 tablespoon lime juice
– 1 teaspoon sesame oil
Fresh Vegetables
– 1 red bell pepper, sliced
– 1 cup shredded carrots
– 1/2 cucumber, julienned
– 4 green onions, sliced
Garnishes
– 1/4 cup crushed peanuts
– Fresh cilantro
– Red pepper flakes (optional)
To make Easy Thai Peanut Noodles, you need simple, fresh ingredients. The rice noodles serve as a great base. They soak up the sauce well. Creamy peanut butter gives the dish its rich flavor. Soy sauce adds a nice saltiness, balancing the sweetness from honey or maple syrup.
Adding lime juice brings a bright taste to the sauce, while sesame oil adds depth. Fresh veggies like red bell pepper, carrots, cucumber, and green onions give the dish a nice crunch and color.
For garnishes, crushed peanuts add extra texture. Fresh cilantro brightens the overall flavor. If you like heat, sprinkle some red pepper flakes on top.
Step-by-Step Instructions
Cooking the Noodles
To start, follow the package instructions for the rice noodles. Bring a pot of water to a boil. Add the rice noodles and cook them for about 3-5 minutes. Stir them often to prevent sticking. You want them soft but not mushy. Once cooked, drain the noodles in a colander.
Next, rinse the noodles under cold water. This stops the cooking process. Rinsing also helps keep the noodles from sticking together. After rinsing, set the noodles aside.
Making the Peanut Sauce
In a small bowl, combine the creamy peanut butter, soy sauce, honey (or maple syrup), lime juice, and sesame oil. Use a whisk to mix everything until smooth. If the sauce is too thick, add a little water to thin it out. Always taste the sauce. You can adjust the flavors to your liking.
Mixing It All Together
In a large mixing bowl, add the cooked noodles. Then, toss in the sliced red bell pepper, shredded carrots, and julienned cucumber. Pour the peanut sauce over the noodle mixture. Toss everything together until the noodles are well coated.
Serving Suggestions
When serving, place the noodles in bowls. For a nice touch, top them with sliced green onions, crushed peanuts, and fresh cilantro. If you like some heat, sprinkle red pepper flakes on top. This adds flavor and a fun kick! Enjoy creating a beautiful presentation that will impress everyone.
Tips & Tricks
Perfecting the Sauce
To get the best sauce, start with the right balance. Adjust the sweetness by adding more honey or maple syrup. If you prefer a saltier flavor, mix in a bit more soy sauce.
You can also control the sauce’s thickness. If you want it creamier, add more peanut butter. To make it thinner, simply whisk in a little water or lime juice until it reaches your desired texture.
Noodle Cooking Hacks
Prevent your rice noodles from clumping together. After cooking, rinse them under cold water. This cools them down and stops the cooking process. Toss them with a little sesame oil to keep them separate.
If you cannot find rice noodles, don’t worry! You can use spaghetti or whole wheat noodles. Just cook them according to package instructions.
Quick Prep Ideas
For quick meals, consider meal prepping. Cook a large batch of noodles and make the sauce ahead of time. Store them separately in the fridge for up to three days.
Using pre-cut vegetables saves time too. You can find sliced bell peppers, shredded carrots, and julienned cucumbers at many grocery stores. This makes your cooking process faster and easier.
Variations
Protein Additions
You can add protein to your Easy Thai Peanut Noodles. Tofu, chicken, or shrimp work well.
– Tofu: Use firm or extra-firm tofu. Press it to remove moisture. Cut it into cubes and sauté until golden. This gives it a nice texture.
– Chicken: Use boneless, skinless chicken breasts. Cut them into thin strips. Cook them in a pan until fully cooked and slightly browned.
– Shrimp: Use fresh or frozen shrimp. If frozen, thaw them first. Cook shrimp in a hot pan until they turn pink and opaque.
Each protein option adds flavor and makes the dish more filling.
Flavor Variations
You can change the flavors in your Easy Thai Peanut Noodles too. Add spices or herbs for extra taste.
– Spices: Try adding garlic powder or ginger. These spices add warmth and depth. You can also add red pepper flakes for some heat.
– Herbs: Fresh basil or mint can brighten the dish. Chop them finely and mix them in right before serving.
You can also swap out peanut butter. Try almond or cashew butter for a different taste.
Diet-Specific Adjustments
You can easily adjust the recipe for different diets.
– Vegan adaptations: Use maple syrup instead of honey. This keeps it plant-based while still being sweet.
– Gluten-free options: Make sure to use gluten-free soy sauce or tamari. This way, people with gluten allergies can enjoy the noodles too.
These adjustments make the dish accessible for all.
Storage Info
Storing Leftovers
You should refrigerate leftovers within two hours of cooking. This keeps the noodles safe to eat. Use an airtight container for the best results. Glass or plastic containers work well. Make sure to cool the noodles before sealing them. This helps avoid moisture build-up.
Reheating Techniques
The best way to reheat noodles is in the microwave. Place the noodles in a bowl. Add a splash of water to keep them moist. Cover the bowl with a damp paper towel. Heat in short bursts, stirring often. You can also use a skillet. Heat the noodles on low with a bit of oil. This keeps the dish fresh and tasty.
Freezing Tips
Yes, you can freeze leftovers! To freeze, let the noodles cool completely. Place them in a freezer-safe container. Label the container with the date. When you’re ready to eat, thaw the noodles in the fridge overnight. Reheat them gently to keep the texture nice.
FAQs
What type of noodles can I use for Easy Thai Peanut Noodles?
You can use rice noodles for this dish. They are light and soak up flavors well. If you need gluten-free options, rice noodles are perfect. You can also try other noodles like:
– Soba noodles (buckwheat)
– Udon noodles (thick wheat)
– Whole wheat spaghetti
Each type brings its own taste and texture, so feel free to experiment.
Can I make the peanut sauce ahead of time?
Yes, you can easily make the peanut sauce ahead of time. Just mix all the ingredients as stated in the recipe. Then, store the sauce in an airtight container. You can keep it in the fridge for about one week.
If you want to prepare it even earlier, you can freeze the sauce. Just thaw it in the fridge before using. This helps save time on busy days.
Is this dish suitable for meal prep?
Absolutely! Easy Thai Peanut Noodles work great for meal prep. To meal prep, cook the noodles and veggies in advance. Store them in separate containers. This keeps them fresh and crunchy.
When you’re ready to eat, mix them with the peanut sauce. You can also add some protein like tofu or chicken for a balanced meal. Enjoy your delicious meal throughout the week!
In this post, we explored how to make delicious Easy Thai Peanut Noodles. We looked at the main and additional ingredients, focusing on rice noodles and peanut sauce. I provided step-by-step instructions to help you create a tasty meal. You learned about variations like proteins, flavor changes, and storage tips.
Now, you have the tools to enjoy this dish. Get creative with the flavors and ingredients. Whether for a quick meal or a dinner party, these noodles are sure to please. Enjoy your cooking adventure!


![- Chicken and rice requirements - 4 boneless, skinless chicken thighs - 2 cups long-grain rice - Seasoning and flavor enhancers - 4 tablespoons unsalted butter - 5 cloves garlic, minced - 1 onion, finely chopped - 3 cups chicken broth - 1 teaspoon dried oregano - 1 teaspoon paprika - Salt and pepper to taste - Optional garnishes and additions - 1 cup frozen peas - Fresh parsley, chopped (for garnish) Gathering these ingredients sets the stage for a dish that bursts with flavor. Each item plays a key role. The chicken thighs offer rich taste and tenderness. The long-grain rice absorbs all the savory broth. Butter and garlic create a lovely aroma and depth. Onions bring sweetness, while seasonings elevate the whole dish. Feel free to add peas for a pop of color and nutrition. Fresh parsley adds a lovely touch on top. This simple yet flavorful dish uses ingredients you can find easily. Check out the Full Recipe to see how everything comes together! 1. Sautéing onion and garlic Start by melting 2 tablespoons of butter in a large skillet over medium heat. Add the finely chopped onion. Sauté for about 5 minutes until it turns translucent. Next, toss in 5 cloves of minced garlic. Cook for another minute until it smells amazing. 2. Cooking chicken thighs Season 4 boneless, skinless chicken thighs with 1 teaspoon of dried oregano, 1 teaspoon of paprika, salt, and pepper. Move the onion and garlic to the side of the skillet. Place the chicken thighs in the center. Cook for 6-7 minutes on each side until they are browned and cooked through. Once done, remove the chicken and set it aside. 3. Toasting rice and adding broth In the same skillet, add the other 2 tablespoons of butter. Stir in 2 cups of long-grain rice. Let it toast for about 2-3 minutes. Then, pour in 3 cups of chicken broth. Stir to combine and bring the mixture to a boil. 1. Combining chicken and rice Once the broth boils, reduce the heat to low. Carefully place the cooked chicken thighs on top of the rice. Cover the skillet and let it simmer for 15-20 minutes. You want the rice to be tender and soak up most of the broth. 2. Simmering for perfect texture In the last 5 minutes of cooking, add 1 cup of frozen peas on top of the rice. Do not stir. Let the peas steam with the rice for added color and flavor. 3. Final touches before serving After cooking, turn off the heat. Let the dish sit covered for another 5 minutes. Fluff the rice with a fork and gently mix in the peas. Serve warm and garnish with fresh chopped parsley for a beautiful finish. For the full recipe, check out the complete instructions and tips! To get the best flavor from your chicken, use the right seasonings. I like to mix oregano, paprika, salt, and pepper. This blend gives the chicken a tasty kick. Let the chicken sit for a few minutes after seasoning. This helps the spices soak in. When cooking, aim for a golden brown on each side. Cook the chicken for about 6-7 minutes per side. This timing ensures juicy chicken. Use a meat thermometer to check the inside. It should reach 165°F. To avoid mushy rice, rinse it before cooking. This removes excess starch. Use a 1:1.5 ratio of rice to liquid. For this recipe, use 3 cups of chicken broth for 2 cups of rice. Bring the broth to a boil before adding rice. Once boiling, reduce the heat and cover the skillet. Let the rice simmer for 15-20 minutes. This technique gives you fluffy rice that absorbs all the flavors. Garnishing adds a nice touch. Fresh herbs like parsley brighten the dish. Chop the parsley finely and sprinkle it on before serving. For a great look, serve the chicken on top of the rice. This way, the colors mix well. You can also add a lemon wedge on the side for a pop of freshness. Enjoy your meal! For the full recipe, check [Full Recipe]. {{image_2}} You can switch out the chicken for other meats. Try boneless pork chops or even tofu. Each option brings a new taste. If you want a different grain, choose quinoa or farro. These grains add unique textures and flavors to the dish. Adding vegetables is a great way to boost flavor and nutrition. Consider bell peppers, carrots, or spinach. These veggies cook well and add color. You can also use different herbs and spices. Basil, thyme, or even a kick of chili flakes can change the whole dish. To make this dish gluten-free, use rice and check your broth. Many brands offer gluten-free options. For low-carb choices, replace rice with cauliflower rice. It’s a great substitute and keeps the meal light. You don’t lose flavor, and it stays filling. Explore the [Full Recipe] for more tips and ideas! To keep your Garlic Butter Chicken and Rice fresh, refrigerate it within two hours. Use an airtight container for best results. Store it in the fridge for up to three days. For longer storage, freezing is a great option. Place the dish in a freezer-safe container. It can last up to three months in the freezer. Just remember to label it with the date. When it's time to enjoy leftovers, reheating is key. For rice, add a splash of water before reheating. This helps keep the rice fluffy. You can use a microwave or a stovetop for this. For chicken, use a low heat setting. This keeps the chicken juicy and flavorful. Make sure to cover it while reheating to trap moisture. Enjoy your delicious meal again! For the full recipe, check out the section above. What can I serve with Garlic Butter Chicken and Rice? You can serve this dish with a side of steamed veggies. Broccoli or green beans work well. A fresh salad adds crunch. Garlic bread can also enhance the meal. Can I make this dish ahead of time? Yes, you can prepare Garlic Butter Chicken and Rice in advance. Cook it, then cool it down. Store in an airtight container in the fridge. Reheat before serving, and it will taste great. How do I ensure my chicken is tender? To keep chicken tender, do not overcook it. Use a meat thermometer to check for doneness. Aim for 165°F. Marinating the chicken can also help it stay juicy. Why is my rice still hard? If your rice is hard, it may need more liquid. Add a bit of broth or water and simmer longer. Cover the pot to trap steam, which helps cook the rice. What if I don't have chicken broth? If you lack chicken broth, you can use water. Add extra seasonings to boost flavor. You can also use vegetable broth as a substitute. Can I use brown rice instead? Yes, you can use brown rice instead of white rice. Just know that brown rice takes longer to cook. Increase the simmer time to about 30-40 minutes. Adjust the liquid as needed. This blog post covered a complete guide to making Garlic Butter Chicken and Rice. You learned about the key ingredients and step-by-step instructions. I shared tips to ensure flavorful chicken and perfect rice. You also discovered variations and storage info. In closing, this dish is simple and flexible. Adjust it to your taste and dietary needs. Enjoy your cooking journey and share this recipe with others!](https://dailydishly.com/wp-content/uploads/2025/05/2b69aced-7351-4258-8c9e-dc4a3c9f0304-768x768.webp)