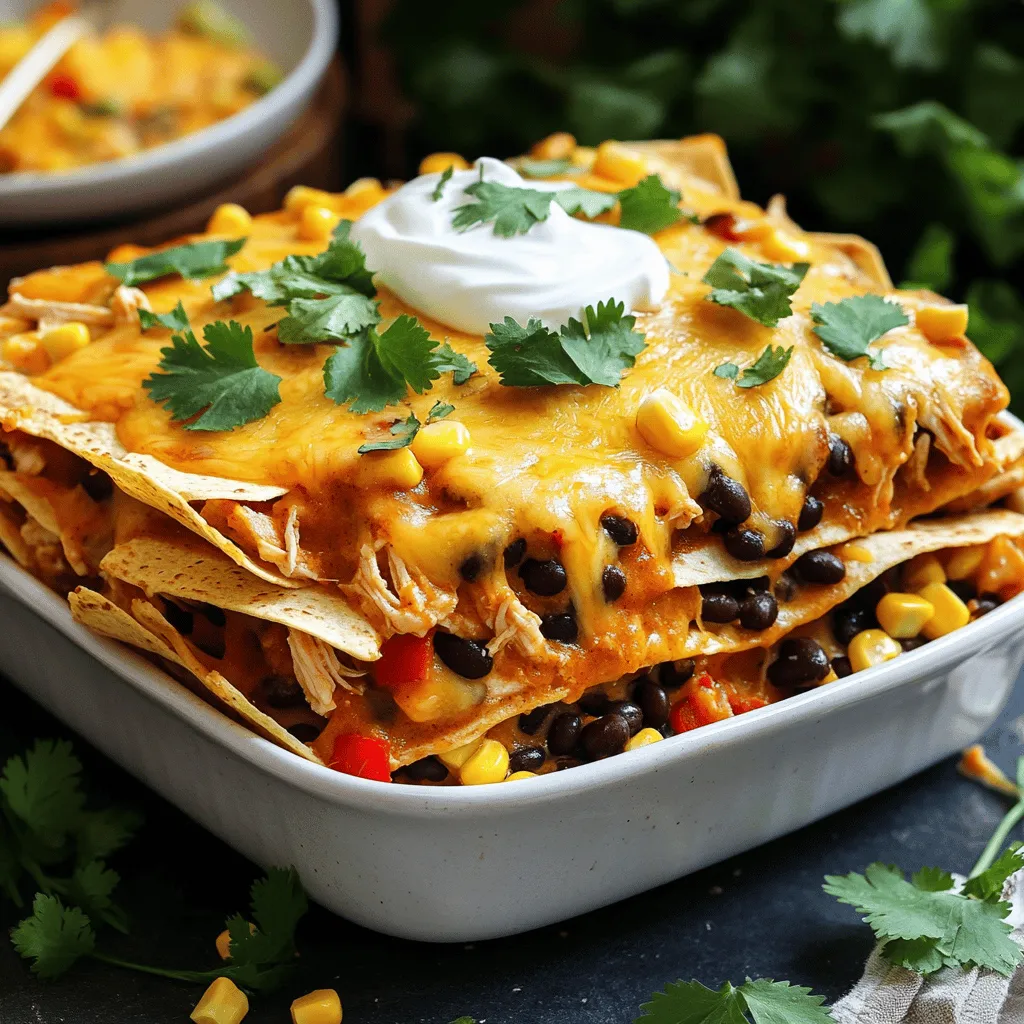
Chicken Enchilada Casserole Easy Family Favorite Meal
![- 2 cups cooked chicken, shredded - 2 cups enchilada sauce (homemade or canned) - 1 can black beans, drained and rinsed - 1 cup corn kernels (fresh, frozen, or canned) - 1 red bell pepper, diced - 1 cup chopped onions - 2 cups shredded cheddar cheese - 8 corn tortillas, cut into strips - 1 teaspoon cumin - 1 teaspoon chili powder - ½ teaspoon garlic powder - Salt and pepper to taste - Fresh cilantro for garnish - Sour cream (optional) for serving You can swap chicken for other proteins. Turkey works well too. If you prefer plant-based options, try tofu or beans. For the enchilada sauce, you can use low-sodium canned sauce. Homemade sauce is another great choice. Just mix tomatoes, spices, and broth. If you follow a gluten-free diet, use corn tortillas. They add a nice crunch. For a vegetarian version, skip the chicken. Add more beans or vegetables. This way, you keep all the flavor without meat. You can also use vegan cheese if you want a plant-based option. 1. Preheat the oven to 350°F (175°C). This step helps cook the casserole evenly. 2. Prepare your baking dish. Use a 9x13 inch dish, as it fits all the layers well. 3. Sauté the vegetables. In a large skillet, heat over medium. Add the chopped onions and diced bell pepper. Cook until soft, about 5 minutes. 4. Combine with chicken. Stir in the cooked chicken, black beans, corn, cumin, chili powder, garlic powder, salt, and pepper. Cook for 3-4 more minutes until heated through. 1. Start with enchilada sauce. Spread a thin layer at the bottom of your baking dish. 2. Add tortilla strips. Layer half of the strips over the sauce. This creates a solid base. 3. Add chicken mixture. Spoon half of the chicken mix on top of the tortillas. This ensures each bite is flavorful. 4. Sprinkle cheese. Add a cup of shredded cheddar cheese on top of the chicken mixture. The cheese melts beautifully in the oven. 5. Repeat the layers. Add more enchilada sauce, the rest of the tortilla strips, the remaining chicken mixture, and finish with the remaining cheese. Even distribution of flavors matters for a tasty casserole. 1. Cover the casserole. Use aluminum foil to cover the dish. This helps steam the ingredients while baking. 2. Bake for 25 minutes. This allows the flavors to meld and the cheese to start melting. 3. Uncover and bake again. Remove the foil and bake for an additional 10-15 minutes. You want the cheese to be bubbly and slightly golden. 4. Check for doneness. Look for a golden top and warm filling. Let it cool for a few minutes before cutting. Garnish with fresh cilantro for a lovely finish. For the complete recipe, check out the [Full Recipe]. To shred chicken well, use two forks. Hold one fork steady and pull the chicken apart with the other. This method gives you nice, even shreds. If you have a stand mixer, you can use it too. Just place the cooked chicken in the bowl and mix on low for a few seconds. When sautéing vegetables, heat the pan first. Add a splash of oil, then toss in the chopped onions and bell peppers. Stir them often until they are soft, about five minutes. This method brings out the sweet flavors and keeps the veggies bright. Boost flavor with garnishes. Fresh cilantro adds a fresh taste. A dollop of sour cream gives a nice creamy touch. You can also add sliced jalapeños for some heat. Pair chicken enchilada casserole with sides like rice, beans, or a simple salad. These add color and balance to the meal. You can serve tortilla chips for a fun crunch. To reheat leftovers, use the oven for the best results. Preheat it to 350°F (175°C). Place the casserole in a baking dish, cover it with foil, and heat for about 20 minutes. If you're in a hurry, the microwave works too. Just heat in short bursts, stirring in between. This helps keep the texture nice. Avoid overheating, as it can dry out the dish. {{image_2}} You can easily change the flavor of your Chicken Enchilada Casserole. Add spices like jalapeños or cayenne for extra heat. These spices can bring a nice kick to the dish. If you love cheese, try using pepper jack or Monterey Jack. These cheeses melt well and add a creamy texture. You can also switch up the style of your casserole. For a vegetarian version, use black beans and your favorite veggies. This version is healthy and full of flavor. You can even try a green enchilada sauce instead of the red. This gives the dish a fresh twist that many enjoy. If you're on a keto diet, you can make some changes. Use cauliflower rice instead of tortillas. This keeps the carbs low. For vegan options, swap chicken for plant-based proteins like lentils or chickpeas. Both options work well and keep the dish hearty and filling. For the full recipe, check out the Cheesy Chicken Enchilada Casserole. To store your Chicken Enchilada Casserole, let it cool first. Then, place it in an airtight container. I recommend using glass or plastic containers with tight lids. This keeps the casserole fresh and prevents any spills in your fridge. If you want to freeze portions, cut the casserole into squares. Wrap each piece tightly in plastic wrap, then place them in a freezer bag. This method saves space and protects the flavors. When ready to eat, take a piece out and thaw it in the fridge overnight. Reheat in the oven at 350°F until warm. In the refrigerator, Chicken Enchilada Casserole lasts about 3 to 4 days. If you freeze it, it can last up to 3 months. Just remember to label your containers with the date. This helps you keep track of freshness. You can swap chicken for many tasty options. If you want a vegetarian dish, use black beans or lentils. For a vegan choice, try jackfruit or tofu. Shredded mushrooms can also add nice texture. If you prefer meat, turkey is a great substitute. You can also use shredded beef or pork for a different flavor. Yes, you can prepare the Chicken Enchilada Casserole in advance! Assemble it in the baking dish, cover it, and store it in the fridge for up to 24 hours. When you're ready, just bake it straight from the fridge. If you want to freeze it, wrap it well and store for up to three months. Thaw it overnight in the fridge before baking. To make a complete meal, pair your casserole with simple sides. A fresh green salad adds crunch. You can serve rice or quinoa for a hearty touch. Guacamole and tortilla chips are also fun options. For a cooling effect, try a dollop of sour cream on the side. Chicken Enchilada Casserole comes from Mexican cuisine. Enchiladas are rolled tortillas filled with meat and sauce. The casserole form makes it easier to serve. It blends flavors from different regions, showcasing spices and fresh ingredients. This dish brings families together at the table and is a favorite for gatherings. This blog post covered how to make a tasty Chicken Enchilada Casserole. We started with a list of ingredients, including different proteins and sauces. Next, we shared easy step-by-step instructions for preparation, layering, and baking. We explored tips for cooking and serving, as well as variations to suit dietary needs. Lastly, we discussed storage options and common questions. Enjoy making this dish your own. It's simple, flexible, and full of flavor!](https://dailydishly.com/wp-content/uploads/2025/07/9970a47c-7c3f-446c-bbbe-f15e5a47e982.webp)
Looking for a delicious, easy meal your whole family will love? You’ve found it! This Chicken Enchilada Casserole combines tender chicken, zesty sauce, and layers of flavor to create a dish that’s both comforting and satisfying. With simple ingredients and easy steps, you can whip up this family favorite in no time. Let’s dive in and get cooking!
Ingredients
List of Ingredients
– 2 cups cooked chicken, shredded
– 2 cups enchilada sauce (homemade or canned)
– 1 can black beans, drained and rinsed
– 1 cup corn kernels (fresh, frozen, or canned)
– 1 red bell pepper, diced
– 1 cup chopped onions
– 2 cups shredded cheddar cheese
– 8 corn tortillas, cut into strips
– 1 teaspoon cumin
– 1 teaspoon chili powder
– ½ teaspoon garlic powder
– Salt and pepper to taste
– Fresh cilantro for garnish
– Sour cream (optional) for serving
Ingredient Substitutions
You can swap chicken for other proteins. Turkey works well too. If you prefer plant-based options, try tofu or beans. For the enchilada sauce, you can use low-sodium canned sauce. Homemade sauce is another great choice. Just mix tomatoes, spices, and broth.
Dietary Considerations
If you follow a gluten-free diet, use corn tortillas. They add a nice crunch. For a vegetarian version, skip the chicken. Add more beans or vegetables. This way, you keep all the flavor without meat. You can also use vegan cheese if you want a plant-based option.
Step-by-Step Instructions
Preparation
1. Preheat the oven to 350°F (175°C). This step helps cook the casserole evenly.
2. Prepare your baking dish. Use a 9×13 inch dish, as it fits all the layers well.
3. Sauté the vegetables. In a large skillet, heat over medium. Add the chopped onions and diced bell pepper. Cook until soft, about 5 minutes.
4. Combine with chicken. Stir in the cooked chicken, black beans, corn, cumin, chili powder, garlic powder, salt, and pepper. Cook for 3-4 more minutes until heated through.
Layering the Casserole
1. Start with enchilada sauce. Spread a thin layer at the bottom of your baking dish.
2. Add tortilla strips. Layer half of the strips over the sauce. This creates a solid base.
3. Add chicken mixture. Spoon half of the chicken mix on top of the tortillas. This ensures each bite is flavorful.
4. Sprinkle cheese. Add a cup of shredded cheddar cheese on top of the chicken mixture. The cheese melts beautifully in the oven.
5. Repeat the layers. Add more enchilada sauce, the rest of the tortilla strips, the remaining chicken mixture, and finish with the remaining cheese. Even distribution of flavors matters for a tasty casserole.
Baking Instructions
1. Cover the casserole. Use aluminum foil to cover the dish. This helps steam the ingredients while baking.
2. Bake for 25 minutes. This allows the flavors to meld and the cheese to start melting.
3. Uncover and bake again. Remove the foil and bake for an additional 10-15 minutes. You want the cheese to be bubbly and slightly golden.
4. Check for doneness. Look for a golden top and warm filling. Let it cool for a few minutes before cutting. Garnish with fresh cilantro for a lovely finish.
Tips & Tricks
Cooking Tips
To shred chicken well, use two forks. Hold one fork steady and pull the chicken apart with the other. This method gives you nice, even shreds. If you have a stand mixer, you can use it too. Just place the cooked chicken in the bowl and mix on low for a few seconds.
When sautéing vegetables, heat the pan first. Add a splash of oil, then toss in the chopped onions and bell peppers. Stir them often until they are soft, about five minutes. This method brings out the sweet flavors and keeps the veggies bright.
Serving Suggestions
Boost flavor with garnishes. Fresh cilantro adds a fresh taste. A dollop of sour cream gives a nice creamy touch. You can also add sliced jalapeños for some heat.
Pair chicken enchilada casserole with sides like rice, beans, or a simple salad. These add color and balance to the meal. You can serve tortilla chips for a fun crunch.
Reheating Tips
To reheat leftovers, use the oven for the best results. Preheat it to 350°F (175°C). Place the casserole in a baking dish, cover it with foil, and heat for about 20 minutes.
If you’re in a hurry, the microwave works too. Just heat in short bursts, stirring in between. This helps keep the texture nice. Avoid overheating, as it can dry out the dish.
Variations
Flavor Variations
You can easily change the flavor of your Chicken Enchilada Casserole. Add spices like jalapeños or cayenne for extra heat. These spices can bring a nice kick to the dish. If you love cheese, try using pepper jack or Monterey Jack. These cheeses melt well and add a creamy texture.
Different Enchilada Styles
You can also switch up the style of your casserole. For a vegetarian version, use black beans and your favorite veggies. This version is healthy and full of flavor. You can even try a green enchilada sauce instead of the red. This gives the dish a fresh twist that many enjoy.
Dietary-Specific Variations
If you’re on a keto diet, you can make some changes. Use cauliflower rice instead of tortillas. This keeps the carbs low. For vegan options, swap chicken for plant-based proteins like lentils or chickpeas. Both options work well and keep the dish hearty and filling.
Storage Info
Storing Leftovers
To store your Chicken Enchilada Casserole, let it cool first. Then, place it in an airtight container. I recommend using glass or plastic containers with tight lids. This keeps the casserole fresh and prevents any spills in your fridge.
Freezing Tips
If you want to freeze portions, cut the casserole into squares. Wrap each piece tightly in plastic wrap, then place them in a freezer bag. This method saves space and protects the flavors. When ready to eat, take a piece out and thaw it in the fridge overnight. Reheat in the oven at 350°F until warm.
Shelf Life
In the refrigerator, Chicken Enchilada Casserole lasts about 3 to 4 days. If you freeze it, it can last up to 3 months. Just remember to label your containers with the date. This helps you keep track of freshness.
FAQs
What can I substitute for chicken in Chicken Enchilada Casserole?
You can swap chicken for many tasty options. If you want a vegetarian dish, use black beans or lentils. For a vegan choice, try jackfruit or tofu. Shredded mushrooms can also add nice texture. If you prefer meat, turkey is a great substitute. You can also use shredded beef or pork for a different flavor.
Can I make this dish ahead of time?
Yes, you can prepare the Chicken Enchilada Casserole in advance! Assemble it in the baking dish, cover it, and store it in the fridge for up to 24 hours. When you’re ready, just bake it straight from the fridge. If you want to freeze it, wrap it well and store for up to three months. Thaw it overnight in the fridge before baking.
What sides pair well with Chicken Enchilada Casserole?
To make a complete meal, pair your casserole with simple sides. A fresh green salad adds crunch. You can serve rice or quinoa for a hearty touch. Guacamole and tortilla chips are also fun options. For a cooling effect, try a dollop of sour cream on the side.
What is the origin of Chicken Enchilada Casserole?
Chicken Enchilada Casserole comes from Mexican cuisine. Enchiladas are rolled tortillas filled with meat and sauce. The casserole form makes it easier to serve. It blends flavors from different regions, showcasing spices and fresh ingredients. This dish brings families together at the table and is a favorite for gatherings.
This blog post covered how to make a tasty Chicken Enchilada Casserole. We started with a list of ingredients, including different proteins and sauces. Next, we shared easy step-by-step instructions for preparation, layering, and baking. We explored tips for cooking and serving, as well as variations to suit dietary needs. Lastly, we discussed storage options and common questions.
Enjoy making this dish your own. It’s simple, flexible, and full of flavor!
![- 2 cups cooked chicken, shredded - 2 cups enchilada sauce (homemade or canned) - 1 can black beans, drained and rinsed - 1 cup corn kernels (fresh, frozen, or canned) - 1 red bell pepper, diced - 1 cup chopped onions - 2 cups shredded cheddar cheese - 8 corn tortillas, cut into strips - 1 teaspoon cumin - 1 teaspoon chili powder - ½ teaspoon garlic powder - Salt and pepper to taste - Fresh cilantro for garnish - Sour cream (optional) for serving You can swap chicken for other proteins. Turkey works well too. If you prefer plant-based options, try tofu or beans. For the enchilada sauce, you can use low-sodium canned sauce. Homemade sauce is another great choice. Just mix tomatoes, spices, and broth. If you follow a gluten-free diet, use corn tortillas. They add a nice crunch. For a vegetarian version, skip the chicken. Add more beans or vegetables. This way, you keep all the flavor without meat. You can also use vegan cheese if you want a plant-based option. 1. Preheat the oven to 350°F (175°C). This step helps cook the casserole evenly. 2. Prepare your baking dish. Use a 9x13 inch dish, as it fits all the layers well. 3. Sauté the vegetables. In a large skillet, heat over medium. Add the chopped onions and diced bell pepper. Cook until soft, about 5 minutes. 4. Combine with chicken. Stir in the cooked chicken, black beans, corn, cumin, chili powder, garlic powder, salt, and pepper. Cook for 3-4 more minutes until heated through. 1. Start with enchilada sauce. Spread a thin layer at the bottom of your baking dish. 2. Add tortilla strips. Layer half of the strips over the sauce. This creates a solid base. 3. Add chicken mixture. Spoon half of the chicken mix on top of the tortillas. This ensures each bite is flavorful. 4. Sprinkle cheese. Add a cup of shredded cheddar cheese on top of the chicken mixture. The cheese melts beautifully in the oven. 5. Repeat the layers. Add more enchilada sauce, the rest of the tortilla strips, the remaining chicken mixture, and finish with the remaining cheese. Even distribution of flavors matters for a tasty casserole. 1. Cover the casserole. Use aluminum foil to cover the dish. This helps steam the ingredients while baking. 2. Bake for 25 minutes. This allows the flavors to meld and the cheese to start melting. 3. Uncover and bake again. Remove the foil and bake for an additional 10-15 minutes. You want the cheese to be bubbly and slightly golden. 4. Check for doneness. Look for a golden top and warm filling. Let it cool for a few minutes before cutting. Garnish with fresh cilantro for a lovely finish. For the complete recipe, check out the [Full Recipe]. To shred chicken well, use two forks. Hold one fork steady and pull the chicken apart with the other. This method gives you nice, even shreds. If you have a stand mixer, you can use it too. Just place the cooked chicken in the bowl and mix on low for a few seconds. When sautéing vegetables, heat the pan first. Add a splash of oil, then toss in the chopped onions and bell peppers. Stir them often until they are soft, about five minutes. This method brings out the sweet flavors and keeps the veggies bright. Boost flavor with garnishes. Fresh cilantro adds a fresh taste. A dollop of sour cream gives a nice creamy touch. You can also add sliced jalapeños for some heat. Pair chicken enchilada casserole with sides like rice, beans, or a simple salad. These add color and balance to the meal. You can serve tortilla chips for a fun crunch. To reheat leftovers, use the oven for the best results. Preheat it to 350°F (175°C). Place the casserole in a baking dish, cover it with foil, and heat for about 20 minutes. If you're in a hurry, the microwave works too. Just heat in short bursts, stirring in between. This helps keep the texture nice. Avoid overheating, as it can dry out the dish. {{image_2}} You can easily change the flavor of your Chicken Enchilada Casserole. Add spices like jalapeños or cayenne for extra heat. These spices can bring a nice kick to the dish. If you love cheese, try using pepper jack or Monterey Jack. These cheeses melt well and add a creamy texture. You can also switch up the style of your casserole. For a vegetarian version, use black beans and your favorite veggies. This version is healthy and full of flavor. You can even try a green enchilada sauce instead of the red. This gives the dish a fresh twist that many enjoy. If you're on a keto diet, you can make some changes. Use cauliflower rice instead of tortillas. This keeps the carbs low. For vegan options, swap chicken for plant-based proteins like lentils or chickpeas. Both options work well and keep the dish hearty and filling. For the full recipe, check out the Cheesy Chicken Enchilada Casserole. To store your Chicken Enchilada Casserole, let it cool first. Then, place it in an airtight container. I recommend using glass or plastic containers with tight lids. This keeps the casserole fresh and prevents any spills in your fridge. If you want to freeze portions, cut the casserole into squares. Wrap each piece tightly in plastic wrap, then place them in a freezer bag. This method saves space and protects the flavors. When ready to eat, take a piece out and thaw it in the fridge overnight. Reheat in the oven at 350°F until warm. In the refrigerator, Chicken Enchilada Casserole lasts about 3 to 4 days. If you freeze it, it can last up to 3 months. Just remember to label your containers with the date. This helps you keep track of freshness. You can swap chicken for many tasty options. If you want a vegetarian dish, use black beans or lentils. For a vegan choice, try jackfruit or tofu. Shredded mushrooms can also add nice texture. If you prefer meat, turkey is a great substitute. You can also use shredded beef or pork for a different flavor. Yes, you can prepare the Chicken Enchilada Casserole in advance! Assemble it in the baking dish, cover it, and store it in the fridge for up to 24 hours. When you're ready, just bake it straight from the fridge. If you want to freeze it, wrap it well and store for up to three months. Thaw it overnight in the fridge before baking. To make a complete meal, pair your casserole with simple sides. A fresh green salad adds crunch. You can serve rice or quinoa for a hearty touch. Guacamole and tortilla chips are also fun options. For a cooling effect, try a dollop of sour cream on the side. Chicken Enchilada Casserole comes from Mexican cuisine. Enchiladas are rolled tortillas filled with meat and sauce. The casserole form makes it easier to serve. It blends flavors from different regions, showcasing spices and fresh ingredients. This dish brings families together at the table and is a favorite for gatherings. This blog post covered how to make a tasty Chicken Enchilada Casserole. We started with a list of ingredients, including different proteins and sauces. Next, we shared easy step-by-step instructions for preparation, layering, and baking. We explored tips for cooking and serving, as well as variations to suit dietary needs. Lastly, we discussed storage options and common questions. Enjoy making this dish your own. It's simple, flexible, and full of flavor!](https://dailydishly.com/wp-content/uploads/2025/07/9970a47c-7c3f-446c-bbbe-f15e5a47e982-300x300.webp)


![- 400g spaghetti - 6 cloves garlic, thinly sliced - ½ cup extra virgin olive oil - 1 teaspoon red pepper flakes - Grated Parmesan cheese for serving - Freshly cracked black pepper - 1 cup fresh parsley, chopped - 1 lemon (zest and juice) - Salt to taste When making Spaghetti Aglio e Olio, you want to keep it simple. The main ingredients shine through. Start with quality spaghetti, as it forms the base of your dish. I always use 400g for four servings. For that distinct flavor, thinly slice 6 cloves of garlic. The garlic adds a rich aroma and taste as it cooks. Don't forget the olive oil! Use ½ cup of extra virgin olive oil to sauté the garlic. To kick it up a notch, consider some optional ingredients. A teaspoon of red pepper flakes adds heat. Adjust it to fit your spice level. If you love cheese, grated Parmesan is a nice touch for serving. Freshly cracked black pepper adds a lovely finish. For freshness, I like to add a cup of chopped parsley. It brings color and taste to the dish. The zest and juice from one lemon brighten the flavors. Salt is essential for enhancing every ingredient. Feel free to adjust the salt to your preference. This recipe is all about balance and freshness. Gather these ingredients for a quick and delicious meal. For the complete recipe, check out the [Full Recipe]. 1. Boil water and salt: Start by filling a large pot with water. Add a generous amount of salt to make it flavorful. Bring it to a rolling boil. 2. Cook until al dente: Add the spaghetti to the boiling water. Stir occasionally. Cook according to package instructions until it is al dente, which means firm to the bite. 3. Reserve pasta water before draining: Before you drain the pasta, remember to save about one cup of that starchy pasta water. It helps to make the sauce creamy later. 1. Heat olive oil in a skillet: In a large skillet, pour in the olive oil. Turn the heat to medium. Let the oil warm up but not smoke. 2. Sauté garlic until golden: Add the thinly sliced garlic to the warm oil. Cook it gently for about 2-3 minutes. Watch it closely until it turns golden and fragrant. Be careful not to let it burn. 3. Mix in red pepper flakes: Stir in the red pepper flakes. Let them cook for an extra minute. This step adds a nice kick to the oil. 1. Toss spaghetti with garlic oil: Add the drained spaghetti to the skillet with the garlic oil. Toss it well to coat every strand. 2. Add reserved pasta water: Pour in a bit of the reserved pasta water. This helps to keep the spaghetti moist and binds the flavors. 3. Incorporate parsley, lemon, and seasoning: Off the heat, mix in the chopped parsley, lemon zest, and juice. Taste it and adjust the salt if needed. This easy recipe gives you a simple yet flavorful dish. For the full recipe, check out the details above. Enjoy every bite of your savory spaghetti aglio e olio! - Avoid overcooking pasta: Cook spaghetti until it's al dente. This means it should be firm when you bite into it. This texture helps the pasta hold up better when you mix it with the sauce. - Importance of seasoning the boiling water: Always add salt to your boiling water. This helps flavor the pasta from the inside. Use about 1-2 tablespoons for every 4 quarts of water. - Timing for sautéing garlic: Add sliced garlic to the oil once it’s hot. Cook it for about 2-3 minutes. This timing helps unlock its rich flavor without going too far. - How to avoid burning garlic: Keep an eye on the garlic as it cooks. If it starts to turn brown too quickly, lower the heat. Burnt garlic can taste bitter and ruin your dish. - Presentation tips for a restaurant-style dish: Serve your spaghetti on warmed plates. This keeps the pasta hot longer. Add a sprinkle of fresh parsley on top for color. A lemon wedge on the side adds a nice touch. - Pairing options for sides or drinks: A simple green salad pairs well with spaghetti. You can also serve it with garlic bread for a full meal. For drinks, a glass of white wine complements the flavors nicely. For more details on how to make this dish, check out the Full Recipe. {{image_2}} You can change some ingredients to fit your needs. If you want gluten-free spaghetti, you can find many great options in stores. These work well in this recipe. If you prefer garlic-infused oil, use it instead of plain olive oil. This option adds even more garlic flavor to your dish. Adding vegetables makes this dish even better. Try mixing in fresh spinach or sweet cherry tomatoes. These add color and nutrients. You can also mix in proteins like shrimp or grilled chicken. Both options create a heartier meal and offer more flavors. Fresh herbs can brighten up this dish. Basil or oregano are great choices. Just chop them finely and mix them in at the end. If you like heat, adjust the spice level. Use different types of peppers, like jalapeños or serranos, to switch things up. Each pepper brings its own unique flavor to your spaghetti. For the Full Recipe, check out the complete details! To keep your Spaghetti Aglio e Olio fresh, store it in the fridge. Place the leftover pasta in an airtight container. This helps to keep moisture in and prevents the pasta from drying out. You can also cover the container tightly with plastic wrap. The best containers for storage are glass or BPA-free plastic. Glass containers allow you to see the food inside. They also do not absorb odors. Plastic containers are lightweight and easy to stack. Just make sure they seal well. When it's time to eat your leftovers, you have two options: the microwave or the stove. The microwave is quick. Place the pasta in a microwave-safe dish. Cover it with a lid or damp paper towel to keep moisture in. Heat for 1-2 minutes, stirring halfway through. Using the stove gives you better results. Add a splash of olive oil or water to a skillet. Heat over low to medium heat. Stir gently until warm. This method helps keep the pasta moist. Yes, you can freeze Spaghetti Aglio e Olio! Freezing is great for making meals ahead of time. First, let the pasta cool completely. Then, place it in a freezer-safe container. Make sure to leave some space at the top for expansion. To freeze, follow these steps: 1. Portion the pasta into single servings. 2. Seal each portion tightly in a plastic bag or container. 3. Label the bags with the date for easy tracking. When you want to eat it, thaw it in the fridge overnight. Reheat as described above. Enjoy your easy dinner later! For the full recipe, check the Full Recipe section above. Spaghetti Aglio e Olio can last in the fridge for up to three days. Store it in an airtight container to keep it fresh. It’s best to eat it within this time for the best flavor. Yes, you can make Spaghetti Aglio e Olio ahead of time. Cook the pasta and sauce, then cool them down. You can store them separately in the fridge. When ready to serve, just reheat and combine. This dish is quick to prepare, so making it fresh is great too. You can serve Spaghetti Aglio e Olio with many tasty options. Consider garlic bread for a crunchy side. A simple salad with fresh greens works well too. You might also enjoy antipasto or bruschetta to start your meal. To reheat Spaghetti Aglio e Olio, follow these steps: 1. Place the pasta in a skillet over low heat. 2. Add a splash of reserved pasta water or olive oil to prevent sticking. 3. Stir gently until heated through, about 5 minutes. 4. Serve hot to enjoy the full flavor of the dish. For the full recipe, check out the detailed instructions for a perfect dish every time! Spaghetti Aglio e Olio is simple yet flavorful. We covered the main and optional ingredients, how to cook and combine them, plus tips for the best results. Variations allow for personal twists, making this dish your own. Proper storage and reheating ensure you enjoy it later. Whether you stick to tradition or experiment, this dish will impress. Enjoy cooking and sharing this tasty meal!](https://dailydishly.com/wp-content/uploads/2025/05/5a127dfa-b261-495f-ad6e-6f110f891143-768x768.webp)