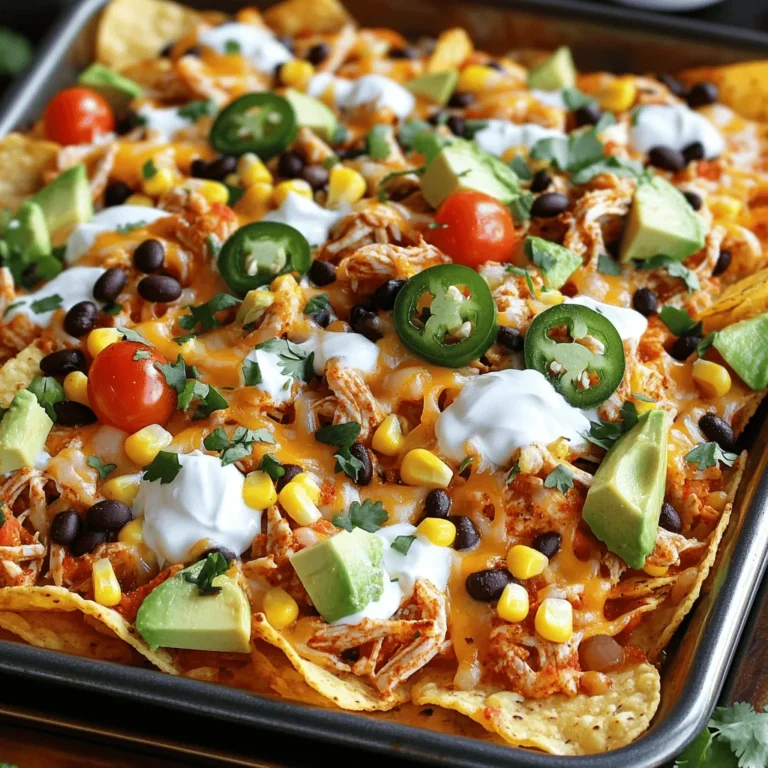
Cheesy Sheet Pan Chicken Quesadillas Easy Dinner Delight
![- 2 cups cooked chicken, shredded - 1 cup shredded cheddar cheese - 1 cup shredded Monterey Jack cheese - 1/2 cup cream cheese, softened - 1/4 cup sour cream The star of this dish is cooked chicken. I love using rotisserie chicken for its ease and flavor. You can shred it quickly. Next, we have the cheeses. Cheddar adds a nice sharpness, and Monterey Jack brings creaminess. Cream cheese and sour cream add richness and help bind everything together. - 1 medium red bell pepper, diced - 1 medium green bell pepper, diced - 1 small red onion, finely chopped For the veggies, I pick bright bell peppers and a red onion. They add color and crunch. Dicing these finely helps them mix well into the filling. You can use other peppers if you like. Feel free to experiment! - 1 tablespoon taco seasoning - 8 large flour tortillas Taco seasoning gives the quesadillas a zesty kick. It’s easy to make your own or buy it pre-made. The tortillas hold all the goodness together. I recommend large flour tortillas for a sturdy base. You can find the full recipe with all the steps right here: [Full Recipe]. Shredding the chicken Start by shredding 2 cups of cooked chicken. I often use rotisserie chicken for this. It saves time and adds great flavor. Use two forks to pull apart the meat into bite-sized pieces. Preparing the vegetables Next, chop up your veggies. Dice 1 medium red bell pepper and 1 medium green bell pepper. Finely chop 1 small red onion. These veggies add color and crunch. Set them aside for later. Layering the filling In a large bowl, mix the shredded chicken with cheese, cream cheese, sour cream, and the chopped veggies. Add 1 tablespoon of taco seasoning to bring it all together. Stir until everything combines well. Creating the quesadilla stacks Lay out 4 large flour tortillas on a flat surface. Spread the chicken filling evenly over each tortilla. Make sure to cover the edges for a tasty bite. Place another tortilla on top of each filled tortilla. Preheating the oven Preheat your oven to 400°F (200°C). This will ensure the quesadillas cook evenly and get that nice golden color. Time and temperature for baking Line a large baking sheet with parchment paper. Carefully transfer the quesadilla stacks to the sheet. Brush the tops with 1 tablespoon of olive oil. Bake for 15-20 minutes until golden brown and the cheese melts. For the full process, check out the Full Recipe. To achieve the right crunch, use high-quality tortillas. Flour tortillas are soft and easy to handle. They also crisp up nicely in the oven. Brush the tops with olive oil before baking. This helps them brown evenly. Bake until golden brown, about 15 to 20 minutes. Let the quesadillas cool for a few minutes. This helps the filling set a bit before you cut them. If you want to mix it up, you can change the protein. Shredded beef or pork works great too. You can even try black beans for a vegetarian option. For cheese, feel free to switch to pepper jack for some heat. You can also use gouda or feta for a different flavor. Just make sure to keep the same amount of cheese. Serve your quesadillas with salsa and guacamole for a fresh touch. You can also add sour cream for extra creaminess. Fresh cilantro makes a great garnish. It adds a pop of color and flavor. Try adding some pickled jalapeños for a spicy kick. These simple sides make your meal even better. Want more ideas? Check out the Full Recipe for more tips! {{image_2}} You can easily change up the taste of your cheesy sheet pan chicken quesadillas. Start by adding spices or herbs. A pinch of cumin or smoked paprika can give a warm, smoky flavor. Fresh herbs like cilantro or parsley add brightness. Try garlic powder for a bold kick. These simple additions can make your dish stand out. Not everyone loves chicken, and that’s okay! You can swap the chicken for beans or veggies. Black beans or pinto beans work great as a protein. Use mushrooms, zucchini, or even spinach for a fresh twist. These vegetarian alternatives are healthy and tasty. You’ll get a whole new dish while keeping it easy and fun. Tortillas don’t have to be boring. You can mix it up by using different types. Try corn tortillas for a gluten-free option. Whole wheat tortillas add extra fiber. You can even use flavored tortillas, like spinach or sun-dried tomato, to add color and taste. These fun twists keep your meal exciting while still being simple to prepare. For the full recipe, be sure to check out the complete details! To keep your cheesy sheet pan chicken quesadillas fresh, store them in an airtight container. Let them cool completely before sealing. This helps prevent sogginess. You can keep them in the fridge for about 3 to 4 days. If you want to enjoy them later, make sure to label the container with the date. If you want to freeze your quesadillas, it’s best to do this before baking. After assembling the quesadillas, wrap each one tightly in plastic wrap. Place the wrapped quesadillas in a freezer bag or container. They can last for up to 3 months in the freezer. When you’re ready to eat, thaw them in the fridge overnight before baking. The best way to reheat quesadillas is in the oven. Preheat your oven to 350°F (175°C). Place the quesadillas on a baking sheet and heat for about 10-15 minutes, or until warm and crisp. You can also use a skillet on the stove. Just heat over medium heat for about 3-4 minutes on each side. This keeps the quesadilla crispy. Avoid using a microwave, as it can make them soggy. Yes, you can use frozen chicken. To thaw it quickly, place the chicken in a sealed bag. Then, submerge the bag in cold water for about 30 minutes. Change the water every 10 minutes to speed up the process. Once thawed, cook the chicken fully before using it in your quesadillas. To make gluten-free quesadillas, use gluten-free tortillas. Many brands offer good options made from corn or rice. Always check the package to ensure they meet your needs. You can find these tortillas at most grocery stores. Quesadillas taste great with many dips. Consider serving them with salsa, guacamole, or sour cream. You can also try a zesty cheese dip for an extra treat. Each dip adds a fun flavor that enhances your meal. Yes, you can make quesadillas ahead of time. Assemble them and store them in the fridge for a day. You can also freeze them for longer storage. Just remember to use parchment paper between layers to keep them from sticking. When ready to eat, just bake them directly from the fridge or freezer. Enjoy your easy dinner delight! For the full recipe, check out the earlier section. In this blog post, I shared how to make delicious quesadillas. We covered the key ingredients like cooked chicken, cheeses, and vibrant veggies. You learned to prep, assemble, and bake your quesadillas perfectly. I also shared tips for crunch, substitutions, and serving ideas. Always remember, you can switch ingredients to suit your taste. Enjoy experimenting with flavors and textures. With these steps, you’ll create satisfying quesadillas that everyone will love. Happy cooking!](https://dailydishly.com/wp-content/uploads/2025/07/9e515845-1856-4bb5-82ee-80ca33afd87d.webp)
If you’re looking for a quick and tasty dinner, look no further! Cheesy Sheet Pan Chicken Quesadillas are your go-to meal. With cooked chicken, fresh veggies, and gooey cheese, you’ll have a flavor-packed dish in no time. Plus, you can bake multiple quesadillas at once for the whole family! Join me as we dive into easy steps to create this delicious dinner delight. Your weeknight meals are about to get a whole lot better!
Ingredients
Main ingredients
– 2 cups cooked chicken, shredded
– 1 cup shredded cheddar cheese
– 1 cup shredded Monterey Jack cheese
– 1/2 cup cream cheese, softened
– 1/4 cup sour cream
The star of this dish is cooked chicken. I love using rotisserie chicken for its ease and flavor. You can shred it quickly. Next, we have the cheeses. Cheddar adds a nice sharpness, and Monterey Jack brings creaminess. Cream cheese and sour cream add richness and help bind everything together.
Vegetables
– 1 medium red bell pepper, diced
– 1 medium green bell pepper, diced
– 1 small red onion, finely chopped
For the veggies, I pick bright bell peppers and a red onion. They add color and crunch. Dicing these finely helps them mix well into the filling. You can use other peppers if you like. Feel free to experiment!
Seasonings and additional items
– 1 tablespoon taco seasoning
– 8 large flour tortillas
Taco seasoning gives the quesadillas a zesty kick. It’s easy to make your own or buy it pre-made. The tortillas hold all the goodness together. I recommend large flour tortillas for a sturdy base.
Step-by-Step Instructions
Prepping the ingredients
Shredding the chicken
Start by shredding 2 cups of cooked chicken. I often use rotisserie chicken for this. It saves time and adds great flavor. Use two forks to pull apart the meat into bite-sized pieces.
Preparing the vegetables
Next, chop up your veggies. Dice 1 medium red bell pepper and 1 medium green bell pepper. Finely chop 1 small red onion. These veggies add color and crunch. Set them aside for later.
Assembling the quesadillas
Layering the filling
In a large bowl, mix the shredded chicken with cheese, cream cheese, sour cream, and the chopped veggies. Add 1 tablespoon of taco seasoning to bring it all together. Stir until everything combines well.
Creating the quesadilla stacks
Lay out 4 large flour tortillas on a flat surface. Spread the chicken filling evenly over each tortilla. Make sure to cover the edges for a tasty bite. Place another tortilla on top of each filled tortilla.
Baking instructions
Preheating the oven
Preheat your oven to 400°F (200°C). This will ensure the quesadillas cook evenly and get that nice golden color.
Time and temperature for baking
Line a large baking sheet with parchment paper. Carefully transfer the quesadilla stacks to the sheet. Brush the tops with 1 tablespoon of olive oil. Bake for 15-20 minutes until golden brown and the cheese melts.
Tips & Tricks
Perfecting the quesadilla
To achieve the right crunch, use high-quality tortillas. Flour tortillas are soft and easy to handle. They also crisp up nicely in the oven. Brush the tops with olive oil before baking. This helps them brown evenly. Bake until golden brown, about 15 to 20 minutes. Let the quesadillas cool for a few minutes. This helps the filling set a bit before you cut them.
Ingredient substitutions
If you want to mix it up, you can change the protein. Shredded beef or pork works great too. You can even try black beans for a vegetarian option. For cheese, feel free to switch to pepper jack for some heat. You can also use gouda or feta for a different flavor. Just make sure to keep the same amount of cheese.
Serving suggestions
Serve your quesadillas with salsa and guacamole for a fresh touch. You can also add sour cream for extra creaminess. Fresh cilantro makes a great garnish. It adds a pop of color and flavor. Try adding some pickled jalapeños for a spicy kick. These simple sides make your meal even better. Want more ideas?

Variations
Flavorful options
You can easily change up the taste of your cheesy sheet pan chicken quesadillas. Start by adding spices or herbs. A pinch of cumin or smoked paprika can give a warm, smoky flavor. Fresh herbs like cilantro or parsley add brightness. Try garlic powder for a bold kick. These simple additions can make your dish stand out.
Different fillings
Not everyone loves chicken, and that’s okay! You can swap the chicken for beans or veggies. Black beans or pinto beans work great as a protein. Use mushrooms, zucchini, or even spinach for a fresh twist. These vegetarian alternatives are healthy and tasty. You’ll get a whole new dish while keeping it easy and fun.
Fun twists
Tortillas don’t have to be boring. You can mix it up by using different types. Try corn tortillas for a gluten-free option. Whole wheat tortillas add extra fiber. You can even use flavored tortillas, like spinach or sun-dried tomato, to add color and taste. These fun twists keep your meal exciting while still being simple to prepare.
Storage Info
Short-term storage
To keep your cheesy sheet pan chicken quesadillas fresh, store them in an airtight container. Let them cool completely before sealing. This helps prevent sogginess. You can keep them in the fridge for about 3 to 4 days. If you want to enjoy them later, make sure to label the container with the date.
Freezing instructions
If you want to freeze your quesadillas, it’s best to do this before baking. After assembling the quesadillas, wrap each one tightly in plastic wrap. Place the wrapped quesadillas in a freezer bag or container. They can last for up to 3 months in the freezer. When you’re ready to eat, thaw them in the fridge overnight before baking.
Reheating methods
The best way to reheat quesadillas is in the oven. Preheat your oven to 350°F (175°C). Place the quesadillas on a baking sheet and heat for about 10-15 minutes, or until warm and crisp. You can also use a skillet on the stove. Just heat over medium heat for about 3-4 minutes on each side. This keeps the quesadilla crispy. Avoid using a microwave, as it can make them soggy.
FAQs
Can I use frozen chicken?
Yes, you can use frozen chicken. To thaw it quickly, place the chicken in a sealed bag. Then, submerge the bag in cold water for about 30 minutes. Change the water every 10 minutes to speed up the process. Once thawed, cook the chicken fully before using it in your quesadillas.
How can I make these quesadillas gluten-free?
To make gluten-free quesadillas, use gluten-free tortillas. Many brands offer good options made from corn or rice. Always check the package to ensure they meet your needs. You can find these tortillas at most grocery stores.
What dips pair well with quesadillas?
Quesadillas taste great with many dips. Consider serving them with salsa, guacamole, or sour cream. You can also try a zesty cheese dip for an extra treat. Each dip adds a fun flavor that enhances your meal.
Is it possible to make them ahead of time?
Yes, you can make quesadillas ahead of time. Assemble them and store them in the fridge for a day. You can also freeze them for longer storage. Just remember to use parchment paper between layers to keep them from sticking. When ready to eat, just bake them directly from the fridge or freezer. Enjoy your easy dinner delight!
In this blog post, I shared how to make delicious quesadillas. We covered the key ingredients like cooked chicken, cheeses, and vibrant veggies. You learned to prep, assemble, and bake your quesadillas perfectly. I also shared tips for crunch, substitutions, and serving ideas.
Always remember, you can switch ingredients to suit your taste. Enjoy experimenting with flavors and textures. With these steps, you’ll create satisfying quesadillas that everyone will love. Happy cooking!
![- 2 cups cooked chicken, shredded - 1 cup shredded cheddar cheese - 1 cup shredded Monterey Jack cheese - 1/2 cup cream cheese, softened - 1/4 cup sour cream The star of this dish is cooked chicken. I love using rotisserie chicken for its ease and flavor. You can shred it quickly. Next, we have the cheeses. Cheddar adds a nice sharpness, and Monterey Jack brings creaminess. Cream cheese and sour cream add richness and help bind everything together. - 1 medium red bell pepper, diced - 1 medium green bell pepper, diced - 1 small red onion, finely chopped For the veggies, I pick bright bell peppers and a red onion. They add color and crunch. Dicing these finely helps them mix well into the filling. You can use other peppers if you like. Feel free to experiment! - 1 tablespoon taco seasoning - 8 large flour tortillas Taco seasoning gives the quesadillas a zesty kick. It’s easy to make your own or buy it pre-made. The tortillas hold all the goodness together. I recommend large flour tortillas for a sturdy base. You can find the full recipe with all the steps right here: [Full Recipe]. Shredding the chicken Start by shredding 2 cups of cooked chicken. I often use rotisserie chicken for this. It saves time and adds great flavor. Use two forks to pull apart the meat into bite-sized pieces. Preparing the vegetables Next, chop up your veggies. Dice 1 medium red bell pepper and 1 medium green bell pepper. Finely chop 1 small red onion. These veggies add color and crunch. Set them aside for later. Layering the filling In a large bowl, mix the shredded chicken with cheese, cream cheese, sour cream, and the chopped veggies. Add 1 tablespoon of taco seasoning to bring it all together. Stir until everything combines well. Creating the quesadilla stacks Lay out 4 large flour tortillas on a flat surface. Spread the chicken filling evenly over each tortilla. Make sure to cover the edges for a tasty bite. Place another tortilla on top of each filled tortilla. Preheating the oven Preheat your oven to 400°F (200°C). This will ensure the quesadillas cook evenly and get that nice golden color. Time and temperature for baking Line a large baking sheet with parchment paper. Carefully transfer the quesadilla stacks to the sheet. Brush the tops with 1 tablespoon of olive oil. Bake for 15-20 minutes until golden brown and the cheese melts. For the full process, check out the Full Recipe. To achieve the right crunch, use high-quality tortillas. Flour tortillas are soft and easy to handle. They also crisp up nicely in the oven. Brush the tops with olive oil before baking. This helps them brown evenly. Bake until golden brown, about 15 to 20 minutes. Let the quesadillas cool for a few minutes. This helps the filling set a bit before you cut them. If you want to mix it up, you can change the protein. Shredded beef or pork works great too. You can even try black beans for a vegetarian option. For cheese, feel free to switch to pepper jack for some heat. You can also use gouda or feta for a different flavor. Just make sure to keep the same amount of cheese. Serve your quesadillas with salsa and guacamole for a fresh touch. You can also add sour cream for extra creaminess. Fresh cilantro makes a great garnish. It adds a pop of color and flavor. Try adding some pickled jalapeños for a spicy kick. These simple sides make your meal even better. Want more ideas? Check out the Full Recipe for more tips! {{image_2}} You can easily change up the taste of your cheesy sheet pan chicken quesadillas. Start by adding spices or herbs. A pinch of cumin or smoked paprika can give a warm, smoky flavor. Fresh herbs like cilantro or parsley add brightness. Try garlic powder for a bold kick. These simple additions can make your dish stand out. Not everyone loves chicken, and that’s okay! You can swap the chicken for beans or veggies. Black beans or pinto beans work great as a protein. Use mushrooms, zucchini, or even spinach for a fresh twist. These vegetarian alternatives are healthy and tasty. You’ll get a whole new dish while keeping it easy and fun. Tortillas don’t have to be boring. You can mix it up by using different types. Try corn tortillas for a gluten-free option. Whole wheat tortillas add extra fiber. You can even use flavored tortillas, like spinach or sun-dried tomato, to add color and taste. These fun twists keep your meal exciting while still being simple to prepare. For the full recipe, be sure to check out the complete details! To keep your cheesy sheet pan chicken quesadillas fresh, store them in an airtight container. Let them cool completely before sealing. This helps prevent sogginess. You can keep them in the fridge for about 3 to 4 days. If you want to enjoy them later, make sure to label the container with the date. If you want to freeze your quesadillas, it’s best to do this before baking. After assembling the quesadillas, wrap each one tightly in plastic wrap. Place the wrapped quesadillas in a freezer bag or container. They can last for up to 3 months in the freezer. When you’re ready to eat, thaw them in the fridge overnight before baking. The best way to reheat quesadillas is in the oven. Preheat your oven to 350°F (175°C). Place the quesadillas on a baking sheet and heat for about 10-15 minutes, or until warm and crisp. You can also use a skillet on the stove. Just heat over medium heat for about 3-4 minutes on each side. This keeps the quesadilla crispy. Avoid using a microwave, as it can make them soggy. Yes, you can use frozen chicken. To thaw it quickly, place the chicken in a sealed bag. Then, submerge the bag in cold water for about 30 minutes. Change the water every 10 minutes to speed up the process. Once thawed, cook the chicken fully before using it in your quesadillas. To make gluten-free quesadillas, use gluten-free tortillas. Many brands offer good options made from corn or rice. Always check the package to ensure they meet your needs. You can find these tortillas at most grocery stores. Quesadillas taste great with many dips. Consider serving them with salsa, guacamole, or sour cream. You can also try a zesty cheese dip for an extra treat. Each dip adds a fun flavor that enhances your meal. Yes, you can make quesadillas ahead of time. Assemble them and store them in the fridge for a day. You can also freeze them for longer storage. Just remember to use parchment paper between layers to keep them from sticking. When ready to eat, just bake them directly from the fridge or freezer. Enjoy your easy dinner delight! For the full recipe, check out the earlier section. In this blog post, I shared how to make delicious quesadillas. We covered the key ingredients like cooked chicken, cheeses, and vibrant veggies. You learned to prep, assemble, and bake your quesadillas perfectly. I also shared tips for crunch, substitutions, and serving ideas. Always remember, you can switch ingredients to suit your taste. Enjoy experimenting with flavors and textures. With these steps, you’ll create satisfying quesadillas that everyone will love. Happy cooking!](https://dailydishly.com/wp-content/uploads/2025/07/9e515845-1856-4bb5-82ee-80ca33afd87d-300x300.webp)

![To make crispy baked sweet potato fries, you need a few key ingredients: - 2 large sweet potatoes, cut into fries - 2 tablespoons olive oil - 1 teaspoon cornstarch - 1 teaspoon paprika - 1/2 teaspoon garlic powder - 1/2 teaspoon onion powder - 1/4 teaspoon cayenne pepper (optional for heat) - Salt and pepper to taste - Fresh parsley, chopped (for garnish) Using quality ingredients makes a big difference in taste. Fresh sweet potatoes give your fries a lovely flavor. Good olive oil adds richness. The cornstarch helps achieve that perfect crispiness. You can enhance your fries with extra seasonings. Try adding: - Chili powder for a smoky kick - Italian herbs for a fresh taste - Parmesan cheese for a savory touch When it comes to dips, the options are endless! Serve your fries with: - Spicy mayo for some heat - Ketchup for a classic combo - Garlic aioli for a fancy twist These additions make your crispy baked sweet potato fries even more fun and tasty! For the complete recipe, check out the [Full Recipe]. 1. Preheat your oven to 425°F (220°C). This helps the fries crisp up well. 2. Line a baking sheet with parchment paper. This keeps the fries from sticking. 3. Cut the sweet potatoes into strips. Aim for uniform sizes for even cooking. 4. In a large bowl, toss the fries with olive oil. Ensure they are nicely coated. 5. Sprinkle cornstarch, paprika, garlic powder, onion powder, cayenne pepper, salt, and pepper. Toss again until all fries are coated. 1. Spread the fries in a single layer on the baking sheet. Do not crowd them. 2. Bake for 25 to 30 minutes. Flip them halfway for even crispiness. 3. Check for a crispy golden brown color on the edges. This means they are done. 1. Once baked, remove the fries from the oven and let them cool for a few minutes. 2. Garnish with fresh parsley for a pop of color. 3. Serve the fries in a cone or basket lined with parchment paper. 4. Add a small bowl of your favorite dip, like spicy mayo or ketchup, for fun. For a full recipe, check the detailed guide provided earlier. To make your sweet potato fries crispy, follow a few key steps. First, coat the fries in olive oil. This helps them brown nicely. Next, add cornstarch to the mix. Cornstarch absorbs moisture and creates a crispy outer layer. When you place the fries on the baking sheet, spread them out. Do not overcrowd the pan. If they are too close, they will steam instead of crisp. Give each fry room to breathe, so they can cook evenly. Avoid cutting the fries too thick. Thin fries cook better and become crispier. Another mistake is not flipping the fries halfway through baking. Flipping ensures even cooking and browning on both sides. If your fries turn out soggy, check the oil and cornstarch amounts. You may need to adjust these. Also, ensure that your baking sheet is not crowded. If you follow these tips, you will have perfect crispy fries every time! {{image_2}} You can change the taste of your crispy baked sweet potato fries with different seasonings. Here are some ideas: - Cajun Spice: Use Cajun seasoning for a bold flavor. - Italian Herbs: Mix in dried oregano and basil for a fresh twist. - Cinnamon Sugar: For a sweet option, dust with cinnamon and sugar after baking. - Taco Seasoning: Add taco seasoning for a fun, zesty kick. Experiment with spice blends and herbs to find your favorite taste. You can cook sweet potato fries in different ways. Each method gives a unique texture and flavor. - Air Frying: This method uses less oil and can make fries even crispier. Cook at 400°F for about 20 minutes. - Deep Frying: For a classic taste, deep fry in hot oil until golden. This method gives a crunchy exterior but uses more oil. - Baking: The original method yields a lighter fry. Bake at 425°F for 25-30 minutes, flipping halfway through. Each method has its pros and cons, so try them all to find your favorite! To store your crispy baked sweet potato fries, first, let them cool completely. This step helps keep them crispy. Place the fries in an airtight container. Use a container that has a tight seal to prevent moisture. You can keep them in the fridge for up to three days. When you're ready to eat them, reheat in the oven at 400°F (200°C) for about 10-15 minutes. This method helps restore their crunch. You can freeze both raw and cooked sweet potato fries. For raw fries, cut and coat them as you would for baking. Spread them in a single layer on a baking sheet. Freeze them for about two hours until solid. Then, transfer the fries to a freezer bag. Remove as much air as possible before sealing. They can stay in the freezer for up to three months. To cook from frozen, preheat the oven to 425°F (220°C). Spread the frozen fries on a baking sheet. Bake for 25-30 minutes, flipping halfway through. This method gives you crispy fries without thawing. Enjoy your delicious fries anytime! For the full recipe, check out the detailed steps above. Bake sweet potato fries at 425°F for 25 to 30 minutes. This time gives you crispy edges and soft centers. Flip them halfway through to ensure even cooking. Keep an eye on them. Ovens can vary, so adjust the time as needed. Look for a golden color to know they are done. Yes, you can use other potatoes. Regular russet potatoes work great for fries. They may not be as sweet, but they can still be crispy. You could also try Yukon gold or purple potatoes. Each type gives a different taste and texture. Just remember to adjust the baking time as needed. To add heat, sprinkle cayenne pepper over the fries. You can also add chili powder or crushed red pepper flakes. Mix spices with olive oil before coating the fries. This helps the heat stick better. Start with a little and taste as you go. Adjust based on your spice tolerance. In this post, we explored how to make perfect sweet potato fries. We covered essential ingredients, preparation steps, and cooking methods. I shared tips to achieve crispiness and avoid common mistakes. You also learned about flavor variations and the best ways to store leftovers. Making great fries can be easy and fun. By using quality ingredients and following the steps, you’ll enjoy delicious, crispy fries every time. Now, gather your supplies and get cooking for a tasty treat!](https://dailydishly.com/wp-content/uploads/2025/07/5c45319a-0858-4d48-b29a-502acd419023-768x768.webp)