
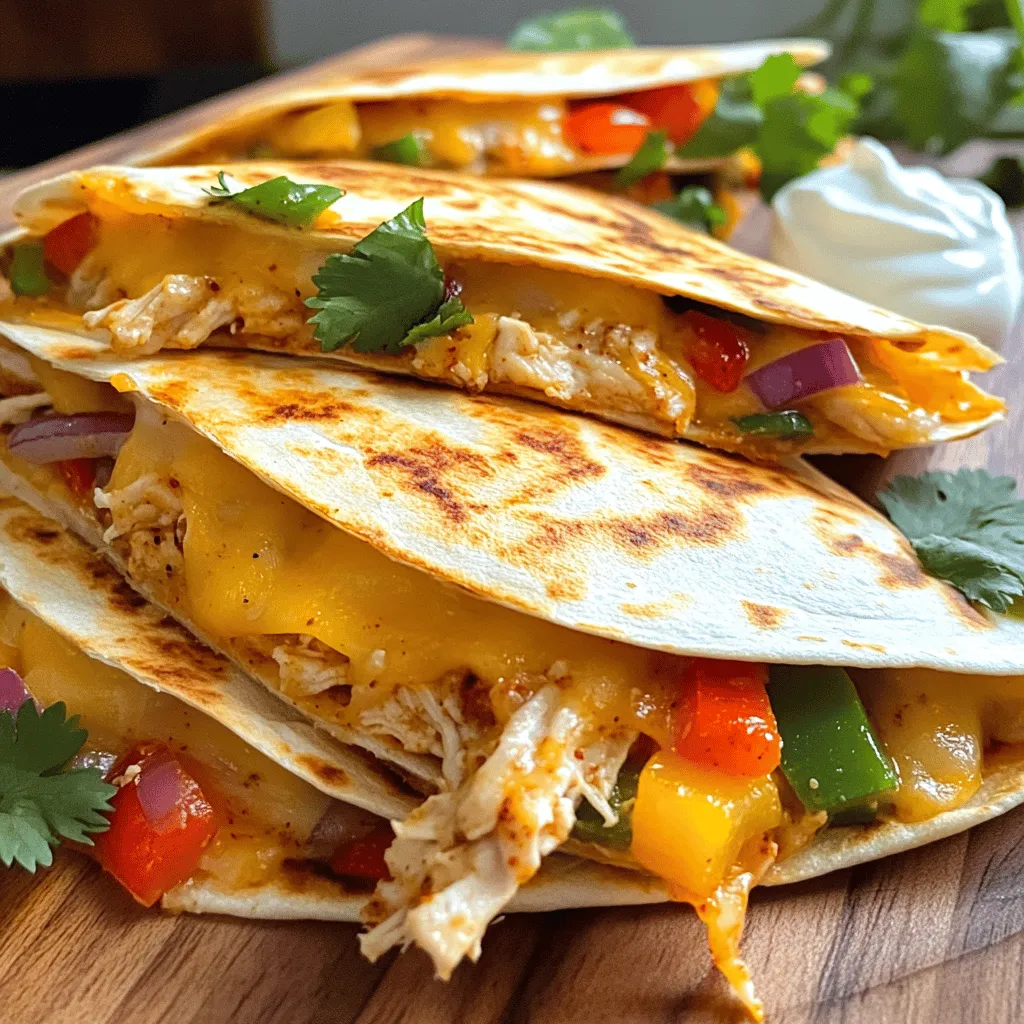
Spicy Chipotle Chicken Quesadillas Flavorful Delight

Get ready to spice up your meal with my Spicy Chipotle Chicken Quesadillas! This easy recipe combines tender chicken, vibrant veggies, and melty cheese. You’ll love the burst of flavor from chipotle peppers. Plus, these quesadillas are quick to make and perfect for any day of the week. Let’s dive into the ingredients and get cooking!
Ingredients
To make spicy chipotle chicken quesadillas, gather these ingredients:
– 2 cups cooked chicken, shredded
– 1 tablespoon chipotle pepper in adobo sauce, minced
– 1 cup shredded Monterey Jack cheese
– 1 cup shredded cheddar cheese
– 1/2 cup bell peppers, thinly sliced
– 1/4 cup red onion, finely chopped
– 4 large flour tortillas
– 2 tablespoons olive oil
– 1 teaspoon garlic powder
– 1 teaspoon cumin
– Salt and pepper, to taste
– Optional toppings: Sour cream and fresh cilantro
These simple ingredients come together to create a tasty treat. The cooked chicken brings a nice base, while the chipotle pepper adds spice. The blend of cheeses gives a creamy texture. Bell peppers and red onion add crunch and sweetness. You can adjust the spice level with more or less chipotle. Don’t forget the olive oil; it helps achieve a crispy quesadilla.
Step-by-Step Instructions
Preparation of Chicken Mixture
To start, I take a large bowl and combine the shredded chicken with a tablespoon of minced chipotle pepper. I add garlic powder, cumin, salt, and pepper. I mix everything well. This step coats the chicken in the spicy chipotle blend. It gives the chicken a bold flavor that excites the taste buds.
Sautéing Vegetables
Next, I heat two tablespoons of olive oil in a large skillet over medium heat. I toss in thinly sliced bell peppers and finely chopped red onion. I sauté the veggies until they are soft, about 3 to 4 minutes. The smell fills the kitchen and adds extra flavor to the quesadillas.
Assembling Quesadillas
Now, I grab a tortilla and place it in the same skillet. I sprinkle half of it with a mix of Monterey Jack and cheddar cheese. Then, I spread half of the spicy chicken mixture over the cheese. I add the sautéed veggies on top and finish with more cheese. This layering creates a tasty filling.
Cooking Quesadillas
I fold the tortilla in half and cook it for about 3 to 4 minutes on each side. I look for a golden brown color and melted cheese. The crispy tortilla gives a nice crunch. I repeat this process with the other tortillas and fillings until I have a stack of golden quesadillas.
Serving Suggestions
Once cooked, I take the quesadillas out of the skillet and let them rest for a minute. I cut them into wedges, making them easy to grab. I serve them warm with dollops of sour cream and fresh cilantro on top. This adds a creamy, fresh touch that pairs perfectly with the spicy flavors.
Tips & Tricks
Cooking Tips
– Ensure your skillet is hot to get a crispy tortilla.
– Avoid overfilling your quesadilla to prevent spills.
Getting the temperature right is key. A hot skillet ensures the tortilla crisps up nicely. If your skillet is too cool, the tortilla may turn soggy. You want that golden color and crunch.
When filling your quesadilla, remember less is more. Too much filling can make it hard to flip. It can also lead to mess as the filling spills out. Stick to a good balance for the best results.
Flavor Enhancements
– Add jalapeños for extra heat.
– Mix in other vegetables like mushrooms or spinach.
If you like heat, try adding sliced jalapeños. They bring a fresh kick that pairs well with chipotle. You can also adjust the amount based on your spice level.
Want more veggies? Toss in mushrooms or spinach. They add flavor and nutrients. Plus, they mix well with chicken and cheese. You can customize this dish to fit your taste.
Variations
Different Proteins
You can change the protein in your quesadillas. If you want steak, use thin slices and season them well. Shrimp is another great choice. Just sauté them until they turn pink and tender. For a meat-free option, black beans work wonders. They add fiber and protein while keeping things hearty.
Cheese Alternatives
Switching up the cheese can give you a new taste. Pepper jack cheese adds a spicy kick that pairs well with the chipotle flavor. If you’re vegan or lactose intolerant, try a vegan cheese option. Many brands melt well and taste great in quesadillas.
Tortilla Options
The type of tortilla can also change your dish. Whole wheat tortillas are a healthier option, packed with fiber. Corn tortillas have a nice, earthy flavor and are gluten-free. If you need a gluten-free option, check for gluten-free tortillas at your store. Each option adds a unique twist to your spicy chipotle chicken quesadillas.
Storage Info
Refrigeration
Store leftovers in an airtight container for up to 3 days. Keeping them sealed helps maintain freshness. If you want to enjoy them later, make sure they cool down before sealing. Reheat them in a skillet or microwave when you’re ready to eat. This way, you keep the flavors intact.
Freezing Quesadillas
To freeze quesadillas, let them cool completely. Place them in a single layer on a baking sheet. Freeze for about 1-2 hours until firm. Then, wrap each quesadilla in plastic wrap and place them in a freezer bag. They can stay frozen for up to 2 months. When you want to enjoy them, simply reheat in a skillet over medium heat for about 5-7 minutes, flipping halfway through until hot. You can also use the microwave, but the skillet gives a better texture. Enjoy your spicy chipotle chicken quesadillas anytime!
FAQs
How can I make quesadillas crispy?
To make your quesadillas crispy, use a hot skillet. Heat your skillet on medium-high heat before adding oil. Use just enough oil to coat the pan. Avoid overfilling the quesadillas. This helps keep the edges sealed. Press down lightly on the quesadilla while it cooks. Flip carefully to get both sides golden brown.
Can I use raw chicken?
Yes, you can use raw chicken. Start by cooking the chicken fully before adding it to the quesadilla. Cut the chicken into small pieces. Sauté the pieces in the skillet until they are no longer pink. Once cooked, mix with the chipotle and spices. This method ensures safe eating and adds flavor.
What sides pair well with spicy chipotle chicken quesadillas?
Several sides work well with spicy chipotle chicken quesadillas. Consider serving a fresh salad. A simple green salad adds crunch and freshness. Guacamole is another great option. It balances the spice with creaminess. You can also serve salsa for an extra kick.
You’ve learned how to make tasty Spicy Chipotle Chicken Quesadillas. We gathered key ingredients and steps to guide you. The tips on cooking and flavor add fun twists. Don’t shy away from trying different fillings or tortillas. Remember, leftovers can be stored and enjoyed later. I hope you feel ready to make this dish at home. Enjoy every bite and share with friends. Your kitchen adventure starts now!


![- 2 cups cooked chicken, shredded - 1 cup shredded cheddar cheese - 1 cup shredded Monterey Jack cheese - 1/2 cup cream cheese, softened - 1/4 cup sour cream The star of this dish is cooked chicken. I love using rotisserie chicken for its ease and flavor. You can shred it quickly. Next, we have the cheeses. Cheddar adds a nice sharpness, and Monterey Jack brings creaminess. Cream cheese and sour cream add richness and help bind everything together. - 1 medium red bell pepper, diced - 1 medium green bell pepper, diced - 1 small red onion, finely chopped For the veggies, I pick bright bell peppers and a red onion. They add color and crunch. Dicing these finely helps them mix well into the filling. You can use other peppers if you like. Feel free to experiment! - 1 tablespoon taco seasoning - 8 large flour tortillas Taco seasoning gives the quesadillas a zesty kick. It’s easy to make your own or buy it pre-made. The tortillas hold all the goodness together. I recommend large flour tortillas for a sturdy base. You can find the full recipe with all the steps right here: [Full Recipe]. Shredding the chicken Start by shredding 2 cups of cooked chicken. I often use rotisserie chicken for this. It saves time and adds great flavor. Use two forks to pull apart the meat into bite-sized pieces. Preparing the vegetables Next, chop up your veggies. Dice 1 medium red bell pepper and 1 medium green bell pepper. Finely chop 1 small red onion. These veggies add color and crunch. Set them aside for later. Layering the filling In a large bowl, mix the shredded chicken with cheese, cream cheese, sour cream, and the chopped veggies. Add 1 tablespoon of taco seasoning to bring it all together. Stir until everything combines well. Creating the quesadilla stacks Lay out 4 large flour tortillas on a flat surface. Spread the chicken filling evenly over each tortilla. Make sure to cover the edges for a tasty bite. Place another tortilla on top of each filled tortilla. Preheating the oven Preheat your oven to 400°F (200°C). This will ensure the quesadillas cook evenly and get that nice golden color. Time and temperature for baking Line a large baking sheet with parchment paper. Carefully transfer the quesadilla stacks to the sheet. Brush the tops with 1 tablespoon of olive oil. Bake for 15-20 minutes until golden brown and the cheese melts. For the full process, check out the Full Recipe. To achieve the right crunch, use high-quality tortillas. Flour tortillas are soft and easy to handle. They also crisp up nicely in the oven. Brush the tops with olive oil before baking. This helps them brown evenly. Bake until golden brown, about 15 to 20 minutes. Let the quesadillas cool for a few minutes. This helps the filling set a bit before you cut them. If you want to mix it up, you can change the protein. Shredded beef or pork works great too. You can even try black beans for a vegetarian option. For cheese, feel free to switch to pepper jack for some heat. You can also use gouda or feta for a different flavor. Just make sure to keep the same amount of cheese. Serve your quesadillas with salsa and guacamole for a fresh touch. You can also add sour cream for extra creaminess. Fresh cilantro makes a great garnish. It adds a pop of color and flavor. Try adding some pickled jalapeños for a spicy kick. These simple sides make your meal even better. Want more ideas? Check out the Full Recipe for more tips! {{image_2}} You can easily change up the taste of your cheesy sheet pan chicken quesadillas. Start by adding spices or herbs. A pinch of cumin or smoked paprika can give a warm, smoky flavor. Fresh herbs like cilantro or parsley add brightness. Try garlic powder for a bold kick. These simple additions can make your dish stand out. Not everyone loves chicken, and that’s okay! You can swap the chicken for beans or veggies. Black beans or pinto beans work great as a protein. Use mushrooms, zucchini, or even spinach for a fresh twist. These vegetarian alternatives are healthy and tasty. You’ll get a whole new dish while keeping it easy and fun. Tortillas don’t have to be boring. You can mix it up by using different types. Try corn tortillas for a gluten-free option. Whole wheat tortillas add extra fiber. You can even use flavored tortillas, like spinach or sun-dried tomato, to add color and taste. These fun twists keep your meal exciting while still being simple to prepare. For the full recipe, be sure to check out the complete details! To keep your cheesy sheet pan chicken quesadillas fresh, store them in an airtight container. Let them cool completely before sealing. This helps prevent sogginess. You can keep them in the fridge for about 3 to 4 days. If you want to enjoy them later, make sure to label the container with the date. If you want to freeze your quesadillas, it’s best to do this before baking. After assembling the quesadillas, wrap each one tightly in plastic wrap. Place the wrapped quesadillas in a freezer bag or container. They can last for up to 3 months in the freezer. When you’re ready to eat, thaw them in the fridge overnight before baking. The best way to reheat quesadillas is in the oven. Preheat your oven to 350°F (175°C). Place the quesadillas on a baking sheet and heat for about 10-15 minutes, or until warm and crisp. You can also use a skillet on the stove. Just heat over medium heat for about 3-4 minutes on each side. This keeps the quesadilla crispy. Avoid using a microwave, as it can make them soggy. Yes, you can use frozen chicken. To thaw it quickly, place the chicken in a sealed bag. Then, submerge the bag in cold water for about 30 minutes. Change the water every 10 minutes to speed up the process. Once thawed, cook the chicken fully before using it in your quesadillas. To make gluten-free quesadillas, use gluten-free tortillas. Many brands offer good options made from corn or rice. Always check the package to ensure they meet your needs. You can find these tortillas at most grocery stores. Quesadillas taste great with many dips. Consider serving them with salsa, guacamole, or sour cream. You can also try a zesty cheese dip for an extra treat. Each dip adds a fun flavor that enhances your meal. Yes, you can make quesadillas ahead of time. Assemble them and store them in the fridge for a day. You can also freeze them for longer storage. Just remember to use parchment paper between layers to keep them from sticking. When ready to eat, just bake them directly from the fridge or freezer. Enjoy your easy dinner delight! For the full recipe, check out the earlier section. In this blog post, I shared how to make delicious quesadillas. We covered the key ingredients like cooked chicken, cheeses, and vibrant veggies. You learned to prep, assemble, and bake your quesadillas perfectly. I also shared tips for crunch, substitutions, and serving ideas. Always remember, you can switch ingredients to suit your taste. Enjoy experimenting with flavors and textures. With these steps, you’ll create satisfying quesadillas that everyone will love. Happy cooking!](https://dailydishly.com/wp-content/uploads/2025/07/9e515845-1856-4bb5-82ee-80ca33afd87d-768x768.webp)
![- 2 pounds baby potatoes, halved - 1/2 cup grated Parmesan cheese - 3 tablespoons olive oil These main ingredients form the base of your dish. The baby potatoes bring a creamy texture when cooked. Grated Parmesan adds a rich, salty flavor. Olive oil helps the potatoes crisp up nicely in the oven. - 2 teaspoons dried oregano - 2 teaspoons dried thyme - 1 teaspoon garlic powder - Salt and pepper to taste The herbs and seasonings elevate the taste. Oregano and thyme provide earthy notes. Garlic powder adds a punch of flavor. Adjust salt and pepper to your liking for the best balance. - Fresh parsley or chives for garnish Using fresh parsley or chives as a garnish adds color and freshness. It makes the dish look more appealing. You can skip this step if you prefer a simpler look. For the full recipe, check out [Full Recipe]. - Preheat the oven to 425°F (220°C). - Prepare the baking sheet with parchment paper. First, set your oven. This will help the potatoes cook well. Next, line your baking sheet with parchment paper. This keeps the potatoes from sticking and makes cleaning easy. - Combine baby potatoes and olive oil. - Add herbs, spices, and stir until well-coated. In a large bowl, add the halved baby potatoes. Pour the olive oil over them. Next, sprinkle in the dried oregano, dried thyme, garlic powder, salt, and pepper. Now, toss everything together. You want the potatoes to be well-coated in the oil and spices. - Sprinkle Parmesan cheese and distribute evenly. - Spread on baking sheet and roast. Now, it's time for the cheese! Sprinkle the grated Parmesan over the potatoes. Stir gently to make sure it spreads evenly. Then, spread the seasoned potatoes on your baking sheet. Make sure they are in a single layer. Roast them in the oven for 25 to 30 minutes. Halfway through, toss the potatoes to ensure even cooking. When they turn golden brown and crispy, they are done. Enjoy these tasty bites with your favorite meal. For the full recipe, check out the link. To get those potatoes nice and crispy, you should toss them halfway through cooking. This helps them brown evenly. Spread the potatoes in a single layer on your baking sheet. Crowding them will make them steam instead of roast, which means less crunch. Before roasting, taste your potato mix. Adjust the salt and pepper to your liking. Don’t be afraid to try new herbs! You can add rosemary or basil for a fun twist. Each herb brings its unique flavor to the dish. The best potatoes for roasting are baby potatoes. Their small size makes them tender and quick to cook. You can also use Yukon Gold or red potatoes for a different texture. Baby potatoes are waxy, while other types may be more starchy. This difference affects how they cook and taste. {{image_2}} You can change the taste of your Parmesan herb roasted potatoes by adding different cheeses. Try cheddar or mozzarella for a creamy twist. You can also spice things up. Adding smoked paprika gives a nice smoky flavor. Cumin adds a warm, earthy taste. Experiment with these options to find your favorite. Mixing in other root vegetables can add color and flavor. Carrots and sweet potatoes roast well and taste great. You can also slice bell peppers or onions to include. These vegetables not only add taste but also make the dish more colorful and fun. Want to make it vegan? Use nutritional yeast instead of Parmesan cheese. This gives a cheesy flavor without dairy. You can also swap olive oil for other oils. Avocado or coconut oil can add unique flavors. These tweaks make the dish fit your diet while keeping it tasty. For the full recipe, you can refer to the main recipe section. To store your leftover Parmesan herb roasted potatoes, let them cool first. Place them in an airtight container. This helps keep them fresh. Glass or plastic containers with tight lids work best. You can also use a resealable bag. Just make sure to squeeze out the air. If you want to save your roasted potatoes for later, freezing is a great option. Spread the cooled potatoes in a single layer on a baking sheet. Freeze them for about an hour until they are firm. Then transfer them to a freezer bag. This helps prevent them from sticking together. When you are ready to eat, thaw them in the fridge overnight. Reheat in the oven at 350°F (175°C) until hot and crispy. Roasted potatoes can last in the fridge for about 3 to 5 days. Check for signs of spoilage before eating. Look for a strange smell or an off texture. If they feel mushy or slimy, it’s best to throw them out. Enjoy your Parmesan herb roasted potatoes with peace of mind! You can find the full recipe [here](#). To get your potatoes crispy, follow these tips: - Cut even pieces: Make sure all potato halves are the same size. This helps them cook evenly. - Dry the potatoes: Before mixing with oil, pat them dry. Less moisture means more crispiness. - Use high heat: Roasting at 425°F (220°C) creates a nice crunch. - Toss halfway: Stir the potatoes halfway through cooking for even browning. - Don’t crowd the pan: Spread the potatoes in a single layer. This allows hot air to reach all sides. Yes, you can prep ahead. Here’s how: - Wash and cut potatoes: You can halve the potatoes a few hours before cooking. Store them in cold water to keep them fresh. - Mix with oil and spices: You can combine the potatoes with olive oil and seasonings up to a day in advance. Just keep them in the fridge. - Add cheese later: Sprinkle the Parmesan right before roasting for best results. These potatoes make a great side for many meals: - Grilled chicken: The herbs complement the chicken's flavors. - Steak: The rich flavors of steak pair nicely with the crispy potatoes. - Roasted vegetables: Serve with mixed roasted veggies for a colorful plate. - Fish: Light fish dishes, like salmon, balance the hearty potatoes. You can find the full recipe for Parmesan Herb Roasted Potatoes in the [Full Recipe]. This will guide you through each step to achieve perfect potatoes! This blog post covered how to make delicious Parmesan Herb Roasted Potatoes. We discussed the key ingredients like baby potatoes, Parmesan cheese, and essential herbs. I shared step-by-step instructions for perfect results, along with tips for crispiness and seasoning. You can even make tasty variations and store leftovers properly. Enjoying this dish is easy and fun. With these simple steps, you’ll impress at any meal. Happy cooking!](https://dailydishly.com/wp-content/uploads/2025/07/9ae8b793-096d-4d00-8893-cd2d2c486076-768x768.webp)
![- 1 lb ground chicken - 1 cup shiitake mushrooms, finely chopped - 1 red bell pepper, diced - 3 tablespoons soy sauce - 1 tablespoon hoisin sauce - 1 tablespoon sesame oil - 1 head of butter lettuce or romaine lettuce leaves, separated - Chopped peanuts or cashews for garnish - Fresh cilantro for garnish The main ingredients in this recipe create a tasty base for your wraps. Ground chicken provides protein and moisture. Shiitake mushrooms add umami and depth. Diced red bell pepper brings sweetness and color. For the sauce, soy sauce gives a salty kick. Hoisin sauce adds sweetness and richness. Sesame oil brings a nutty flavor that ties it all together. Finally, the garnishes are key. Fresh lettuce leaves cradle your filling. Chopped peanuts or cashews add crunch. Fresh cilantro gives a pop of herbiness. You can find the full recipe above for exact measurements and steps. Enjoy crafting these delicious wraps! First, heat sesame oil in a large skillet over medium heat. This oil gives the wraps a nice flavor. Next, add minced garlic and grated ginger. Sauté for about one minute until you smell their aroma. Then, add the ground chicken to the skillet. Break it apart with a wooden spoon. Cook for about 5 to 7 minutes until the chicken is browned and fully cooked. Now, stir in the chopped shiitake mushrooms and diced red bell pepper. Cook these for an additional 3 to 4 minutes until the vegetables are tender. This step adds texture and color to your dish. After that, pour in the soy sauce, hoisin sauce, and rice vinegar. Stir everything together until well mixed. Season with salt and pepper to taste. This mixture brings all the flavors together. To assemble, scoop a generous spoonful of the chicken mixture into a lettuce leaf. This is where the fun begins! Top with chopped peanuts or cashews for some crunch. Add fresh cilantro for a burst of freshness. Serve immediately, letting guests wrap their own lettuce cups. This makes for a fun and interactive meal. For the complete recipe, check out the [Full Recipe]. To cook ground chicken well, heat your skillet first. Add sesame oil and let it get hot. Then, add minced garlic and grated ginger. Cook until fragrant, about one minute. Next, add the ground chicken. Break it apart with a spoon. Cook for five to seven minutes until it's brown. For crunchy veggies, don't overcook them. After adding shiitake mushrooms and red bell pepper, cook for just three to four minutes. This keeps them crisp and fresh. To add heat, try chili paste or sriracha. Start with a small amount. You can always add more if you want it spicier. Also, feel free to play with spices. Try adding a pinch of five-spice powder or a dash of black pepper. Each spice adds a new layer of flavor. For serving, arrange the wraps on a large plate. Place the chicken mixture in the center. This way, guests can serve themselves. To keep the lettuce crisp, wash and dry the leaves well. Store them in a sealed bag with a paper towel. This helps absorb moisture and keeps the leaves fresh. For the full recipe, check the [Full Recipe]. {{image_2}} You can switch the ground chicken for other meats. Ground turkey works great. It has less fat and a mild flavor. Ground beef is another option if you want a richer taste. If you want a vegetarian dish, try using tofu. Press the tofu first to remove extra water. Then crumble it into small pieces. Cook it just like you would the chicken. It will soak up all the nice flavors. The sauce makes the dish pop. You can try different sauces for fun. Teriyaki sauce adds sweetness and a nice glaze. Peanut sauce gives a creamy texture that many love. If you need a gluten-free option, use tamari instead of soy sauce. It tastes similar but is safe for those avoiding gluten. This change will keep your meal flavorful. Adding more veggies makes your wraps even better. Carrots add crunch and sweetness. Water chestnuts give a nice texture. Chop them up small and stir them in with the chicken. Fresh herbs can boost the flavor too. Cilantro adds brightness, while mint gives a fresh taste. Just sprinkle them in before you wrap everything up. You can find more ideas in the Full Recipe. To store your chicken mixture, let it cool first. Place it in a clean, airtight container. This keeps it fresh for up to three days. To keep your lettuce fresh, wrap the leaves in a damp paper towel. Then, place them in a plastic bag. Store this in the vegetable crisper of your fridge. Yes, you can freeze the chicken mixture! Use an airtight container or freezer bag. Be sure to label it with the date. It can last up to three months in the freezer. For thawing, place it in the fridge overnight. Reheat in a skillet over medium heat until hot. Stir well to ensure even warming. Leftovers last about three days in the fridge. After that, they may spoil. Signs of spoilage include a sour smell or a change in color. If you see mold, throw it away. Always trust your senses when checking for freshness. Enjoy the full recipe for more delicious details! I love using butter lettuce for wraps. Its leaves are tender and perfect for holding the filling. Butter lettuce has a nice, soft texture, making it easy to bite into. Romaine is another option. It has a crisp and sturdy texture. Romaine leaves can hold more filling, but they may be a bit tougher to chew. Both types work well, but I prefer butter lettuce for its flavor and feel. Yes, you can prep ahead. Cook the chicken mixture and let it cool down. Then, store it in an airtight container in the fridge. Store the lettuce leaves separately to keep them fresh. This way, you can assemble the wraps right before serving. You can also chop the veggies ahead of time. Just keep them in the fridge until you are ready to cook. You can serve the wraps with a side of rice or quinoa. This adds some heartiness to the meal. Try a simple dip like sweet chili sauce or soy sauce for extra flavor. Fresh vegetables on the side, like carrot sticks or cucumber slices, also make a great addition. Don’t forget to offer chopped peanuts or cashews as a crunchy garnish. To make it gluten-free, switch soy sauce for tamari. Tamari has a similar taste but is gluten-free. You should also check hoisin sauce for gluten. Some brands offer gluten-free versions. Use fresh ingredients and avoid pre-packaged sauces unless they are labeled gluten-free. These small changes let everyone enjoy the meal without worry. For the full recipe, check out the Asian Chicken Lettuce Wraps recipe. Asian Chicken Lettuce Wraps combine simple ingredients and delightful flavors. You learned to prepare juicy ground chicken, fresh veggies, and a tasty sauce. Remember to play with different proteins and sauces for variety. Store leftovers wisely to keep them fresh. These wraps are fun to make and even better to eat. Enjoy creating your versions and impress your family or friends with great snacks!](https://dailydishly.com/wp-content/uploads/2025/07/cde1ffe3-32d5-41af-a230-f4c5c520fc8a-768x768.webp)
