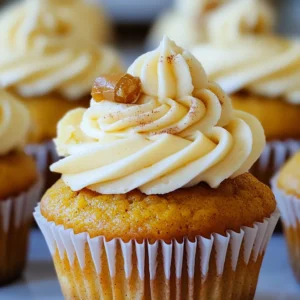
Pumpkin Cream Cheese Cupcakes Delightful and Simple

Do you love the warm, cozy flavors of fall? Get ready to bake Pumpkin Cream Cheese Cupcakes! These treats are not only simple to make, but they’re also rich and tasty. I’ll guide you through each step, from picking the right ingredients to storing your delicious cupcakes. Whether you’re a baking pro or new to the kitchen, you’ll find joy in making these sweet delights. Let’s dive in and start baking!
Ingredients
Overview of Ingredients
For your Pumpkin Cream Cheese Cupcakes, you’ll need simple yet flavorful items. Each ingredient plays a key role in creating moist, delicious cupcakes. The mix of spices adds warmth, while the cream cheese frosting brings a rich, sweet touch.
Detailed List of Ingredients
Here’s what you will need:
– 1 ½ cups all-purpose flour
– 1 teaspoon baking powder
– 1 teaspoon baking soda
– ½ teaspoon salt
– 1 teaspoon cinnamon
– ½ teaspoon nutmeg
– ½ teaspoon ginger
– ½ cup granulated sugar
– ½ cup brown sugar, packed
– ½ cup vegetable oil
– 2 large eggs
– 1 cup canned pumpkin puree
– 1 teaspoon vanilla extract
– 8 oz cream cheese, softened
– ½ cup powdered sugar
– 1 tablespoon milk
– 1 teaspoon vanilla extract (for cream cheese frosting)
Ingredient Substitutions
You can easily swap ingredients if needed. For flour, use whole wheat flour for a healthier option. If you want a lower sugar version, use less granulated sugar or a sugar substitute. Instead of vegetable oil, you can use melted coconut oil. For the cream cheese, try Greek yogurt for a lighter frosting. Feel free to experiment and find what you like best!
Step-by-Step Instructions
Preparation Steps
Start by preheating your oven to 350°F (175°C). Then, line a muffin tin with cupcake liners. This step gets your kitchen ready for baking.
In a medium bowl, mix together the dry ingredients: 1 ½ cups of flour, 1 teaspoon of baking powder, 1 teaspoon of baking soda, ½ teaspoon of salt, 1 teaspoon of cinnamon, ½ teaspoon of nutmeg, and ½ teaspoon of ginger. Whisk until they blend well. Set this bowl aside for later.
Next, grab a large mixing bowl. Beat together ½ cup of granulated sugar, ½ cup of brown sugar, and ½ cup of vegetable oil. Mix until it’s smooth. Add 2 large eggs one by one, mixing well after each egg. Now, stir in 1 cup of canned pumpkin puree and 1 teaspoon of vanilla extract until the mix becomes smooth.
Slowly add your dry ingredients into the wet mix. Gently stir until just combined. Be careful not to overmix; this keeps your cupcakes light and fluffy.
Baking Process
Now it’s time to fill those cupcake liners! Spoon the batter into each liner until they are about two-thirds full. This helps them rise nicely.
Place the muffin tin in your preheated oven. Bake for 20-25 minutes. Check doneness by inserting a toothpick into the center of a cupcake. If it comes out clean, they are ready! After baking, let them cool in the pan for 5 minutes. Then, transfer them to a wire rack for complete cooling.
Frosting the Cupcakes
While your cupcakes cool, let’s make the cream cheese frosting. In a medium bowl, beat 8 oz of softened cream cheese with ½ cup of powdered sugar. Mix until creamy and smooth. Add 1 tablespoon of milk and 1 teaspoon of vanilla extract, mixing well until everything is blended.
Once your cupcakes are cool, you can frost them. Use a spatula or a piping bag to spread or pipe the frosting on top of each cupcake. For a fun touch, sprinkle a bit of cinnamon on top or add a small piece of candied ginger. Enjoy your delightful pumpkin cream cheese cupcakes!
Tips & Tricks
Baking Tips for Perfect Cupcakes
To make your pumpkin cream cheese cupcakes shine, follow these simple tips:
– Preheat your oven: Always preheat to 350°F (175°C). A hot oven helps them rise.
– Don’t overmix: When adding dry ingredients, mix gently. This keeps your cupcakes light.
– Use room temperature ingredients: Eggs and cream cheese should be at room temp for best mixing.
– Fill liners correctly: Fill each cupcake liner about two-thirds full. This helps them bake evenly.
– Check for doneness: Use a toothpick. If it comes out clean, your cupcakes are ready!
Cream Cheese Frosting Tips
Frosting can make or break your cupcakes. Here’s how to nail it:
– Soften your cream cheese: It should be easy to blend. This gives you a smooth frosting.
– Sift powdered sugar: This removes lumps and helps create a creamy texture.
– Add milk slowly: Mix in just enough milk for the perfect spreadable consistency.
– Use a piping bag: For a fancy look, use a piping bag to frost your cupcakes.
– Garnish wisely: A sprinkle of cinnamon or a piece of candied ginger adds flair.
Common Mistakes to Avoid
Avoid these common pitfalls for cupcake success:
– Skipping the dry mix: Always whisk dry ingredients first. This ensures even flavor.
– Opening the oven door too soon: Wait until halfway through baking to check. This keeps heat in.
– Not cooling before frosting: Always let cupcakes cool completely. This stops the frosting from melting.
– Ignoring the measurements: Use exact amounts for flour, sugars, and spices. This affects taste and texture.
– Frosting too early: If you frost warm cupcakes, the frosting will slide off. Wait for them to cool.

Variations
Different Flavor Options
You can change the flavor of these cupcakes easily. Try adding chocolate chips for a sweet twist. You can also mix in some caramel bits for a rich flavor. For a spiced touch, add a pinch of cloves. If you love nuts, chopped walnuts or pecans add crunch. Want a fruity twist? Add a bit of orange zest for brightness. Each option gives a unique taste to your pumpkin cream cheese cupcakes.
Dietary Restrictions Adaptations
If you need gluten-free cupcakes, you can swap all-purpose flour for a gluten-free blend. Check that the baking powder is gluten-free as well. For a dairy-free version, use a dairy-free cream cheese. You can replace eggs with flaxseed meal or applesauce. This way, everyone can enjoy these tasty treats. Just make sure to adjust baking times if needed.
Seasonal Add-Ins
Pumpkin cupcakes shine with seasonal flavors. In fall, add a bit of maple syrup for warmth. During the holidays, mix in cranberries for a tart touch. You can also sprinkle in some chopped candy canes for a festive vibe. In summer, try fresh berries like raspberries or blueberries. These add a pop of color and flavor, making your cupcakes even more special.
Storage Info
Best Storage Practices
To keep your pumpkin cream cheese cupcakes fresh, store them in an airtight container. This will help keep them moist and tasty. Place a piece of parchment paper between layers if you stack them. Keep the container in a cool, dry place. If you live in a warm climate, consider placing them in the fridge.
How Long Do They Last?
When stored properly, these cupcakes last about 3 to 5 days at room temperature. If you keep them in the fridge, they can last up to a week. However, I recommend eating them within the first few days for the best flavor and texture. They taste best fresh!
Freezing Instructions
You can freeze these cupcakes to enjoy later. Allow them to cool completely first. Wrap each cupcake individually in plastic wrap. Then, place them in a freezer-safe bag or container. They can last up to 3 months in the freezer. When you’re ready to eat, thaw them in the fridge overnight. Frost them right before serving for the best taste!
FAQs
Can I use fresh pumpkin instead of canned?
Yes, you can use fresh pumpkin. To do this, first, select a small sugar pumpkin. Cut it in half, scoop out the seeds, and roast the halves face down on a baking sheet. Bake at 350°F for about 45 minutes or until soft. Let it cool, then scoop out the flesh. Blend or mash the pumpkin until smooth. This fresh puree adds a rich taste to your cupcakes. Just make sure the pumpkin is well-drained to prevent excess moisture.
How do I make cupcakes moist?
To keep cupcakes moist, here are some key tips:
– Use oil instead of butter. Oil helps keep moisture in.
– Don’t overmix the batter. Mix until just combined.
– Add a bit of yogurt or sour cream for extra moisture.
– Bake at the right temperature. Too high can dry them out.
– Check for doneness early. Remove them from the oven as soon as a toothpick comes out clean.
These steps ensure your pumpkin cream cheese cupcakes stay soft and delightful.
What can I use instead of cream cheese?
If you need a cream cheese substitute, try these options:
– Mascarpone cheese for a rich, creamy texture.
– Greek yogurt for a tangy and lighter option.
– Silken tofu blended until smooth for a vegan choice.
– Cottage cheese blended until creamy for a low-fat option.
Each alternative brings its unique flavor, so pick one that fits your taste.
In this blog post, we explored the key ingredients for making great cupcakes. We shared step-by-step instructions, tips for perfection, and fun variations. Understanding ingredient substitutions lets you personalize your cupcakes for any diet. Remember the storage tips to keep them fresh longer. If you follow these steps, you will bake delicious cupcakes every time. Enjoy experimenting and sharing your treats!

![- Zucchini and Raisin Essentials - 2 cups grated zucchini - 1 cup raisins Zucchini adds moisture and a soft texture to the bread. Raisins bring sweetness and chewiness. Using fresh, firm zucchini makes the best bread. - Sweeteners and Fats - 1 cup granulated sugar - 1/2 cup packed brown sugar - 1/2 cup vegetable oil - 3 large eggs - 2 teaspoons vanilla extract Granulated sugar gives a crisp crust. Brown sugar adds depth and moisture. Vegetable oil keeps the bread soft. Eggs bind the ingredients and add richness. - Dry Ingredients Overview - 2 cups all-purpose flour - 1 teaspoon baking soda - 1/2 teaspoon baking powder - 1 teaspoon ground cinnamon - 1/2 teaspoon ground nutmeg - 1/4 teaspoon salt Flour provides structure. Baking soda and powder help the bread rise. Cinnamon and nutmeg add warmth and flavor. Salt balances the sweetness. - Optional Add-ins (Nuts, Spices) - 1/2 cup chopped walnuts (optional) Nuts add crunch and a nutty flavor. You can also add spices like ginger or cloves for a twist. Check out the Full Recipe for exact measurements and instructions! Preheating the Oven and Preparing the Pan First, preheat your oven to 350°F (175°C). This step is key for even baking. While the oven heats, grease and flour a 9x5-inch loaf pan. This helps the bread release easily after baking. Mixing Wet Ingredients In a large bowl, combine the grated zucchini, granulated sugar, brown sugar, vegetable oil, eggs, and vanilla extract. Use a whisk or spoon to mix until everything is well blended. This creates a moist base for your bread. Combining Dry Ingredients In another bowl, whisk together the flour, baking soda, baking powder, cinnamon, nutmeg, and salt. This mixture adds structure and flavor to your bread. Make sure there are no lumps. Final Batter Preparation Gradually add the dry ingredients to the wet mixture. Stir gently until just combined. It's important not to overmix. This keeps the bread light and fluffy. Fold in the raisins and walnuts if you choose to use them. This adds texture and sweetness. Pouring Batter into the Pan Carefully pour the batter into your prepared loaf pan. Use a spatula to smooth the top. This helps the bread bake evenly and look nice. Baking Duration and Temperature Place the pan in the preheated oven. Bake for 50-60 minutes. The bread is ready when a toothpick inserted in the center comes out clean. Checking for Doneness To check if your bread is done, look for a golden-brown color on top. If the toothpick has wet batter, bake for a few more minutes. Let it bake fully for the best taste. You can find the full recipe above for more details on this delightful zucchini raisin bread! - Ensuring Moisture with Grated Zucchini Grated zucchini adds moisture to your bread. Use a box grater or food processor to shred it finely. Before adding it to the mix, squeeze out excess water. This step keeps your bread from being too wet or soggy. - Avoiding Overmixing When mixing the wet and dry ingredients, stir just until combined. Overmixing makes the bread tough. It’s okay if some lumps remain. This helps keep the bread light and fluffy. - Proper Cooling Techniques After baking, let the bread cool in the pan for about 10 minutes. This helps it firm up. Then transfer it to a wire rack. Cooling it completely helps avoid sogginess and allows the flavors to settle. - Ideal Pairings and Presentation Ideas Serve slices warm with butter or cream cheese. For a special touch, sprinkle cinnamon on top. You can also pair it with a hot cup of tea or coffee. This makes for a cozy snack or breakfast. - Storage Tips for Maximum Freshness Store leftover bread in an airtight container at room temperature. This keeps it soft for several days. For longer storage, wrap it in plastic wrap and freeze. When you want to eat it, thaw it at room temperature. Enjoy fresh slices whenever you like! For the complete recipe, refer to the Full Recipe section above. {{image_2}} You can make your zucchini raisin bread even better with simple tweaks. Adding spices beyond cinnamon and nutmeg works wonders. Try ginger or allspice for a warm, fragrant touch. A pinch of cardamom also brings a lovely depth. Incorporating other fruits or nuts boosts flavor and texture. Chopped apples or crushed pineapple add sweetness and moisture. You can swap raisins for dried cranberries for a tart burst. If you prefer nuts, walnuts or pecans lend a delightful crunch. If you're looking for vegan substitutions, replace eggs with flaxseed meal or applesauce. Use a plant-based oil too. Almond or coconut milk can replace regular milk if you choose to add some. Using whole wheat flour is a smart swap. It adds fiber and nutrients while keeping the bread moist. You can use half all-purpose and half whole wheat flour for a balanced taste. Reducing sugar content is another way to make this bread healthier. You can cut the granulated sugar by a third. The zucchini adds natural sweetness, so you won’t miss much. Using ripe bananas or unsweetened applesauce can also help cut sugar while adding flavor. For the full recipe, check out the section above! To keep your zucchini raisin bread fresh, store it at room temperature. Wrap it in plastic wrap or place it in an airtight container. This helps keep the bread moist and flavorful. Enjoy it within a few days for the best taste. If you want to keep it longer, consider refrigerating it. But remember, the cold may change the texture slightly. If you want to save your zucchini raisin bread for later, freezing is a great option. First, let the bread cool completely after baking. Then, wrap it tightly in plastic wrap, followed by aluminum foil. This dual layer helps prevent freezer burn. You can freeze it for up to three months. To thaw your bread, simply remove it from the freezer. Leave it wrapped at room temperature for a few hours. When it's soft, you can slice it. If you want it warm, pop a slice in the toaster. This makes a delicious treat. Don't forget, you can use the [Full Recipe] to make more for your freezing needs! Can I use frozen zucchini in this recipe? Yes, you can use frozen zucchini. Just thaw it first and drain any extra water. This helps keep your bread moist. Frozen zucchini works well in baked goods. It still adds great flavor and texture. How can I make this recipe gluten-free? To make this recipe gluten-free, swap the all-purpose flour for gluten-free flour. Many brands offer blends that work well in baking. Just ensure they contain xanthan gum or add it separately. This helps with the bread's structure and texture. What are the nutritional benefits of zucchini in baking? Zucchini is low in calories and high in fiber. It adds moisture to your bread without extra fat. Zucchini also contains vitamins A and C, which are good for your health. Plus, it has antioxidants. These benefits make zucchini a smart choice for baking. For the complete recipe, take a look at the Full Recipe section. In this post, we explored the step-by-step process of making delicious zucchini raisin bread. We discussed essential ingredients, baking tips, and storage methods. You learned how to mix wet and dry components effectively and check for perfect doneness. Remember, don’t skip on the grated zucchini for moisture, and feel free to add your favorite nuts or spices. Whether you enjoy it fresh or stored, this bread is sure to please. Happy baking!](https://dailydishly.com/wp-content/uploads/2025/06/9b9e6e77-b918-4e2e-978b-be2d7f9f5a48-768x768.webp)