Easy Avocado Pasta Creamy and Flavorful Meal Delight

If you’re searching for a quick, creamy meal that’s packed with flavor, you’ll love this Easy Avocado Pasta! With just a handful of fresh ingredients like ripe avocados and vibrant basil, you can whip up a satisfying dish in minutes. Perfect for a busy weeknight or a cozy weekend dinner, this recipe offers a delightful twist on traditional pasta. Join me as I guide you through this simple and tasty experience!
Ingredients
Main Ingredients
– 2 ripe avocados, pitted and peeled
– 2 cups fresh basil leaves
– 2 cloves garlic, minced
Additional Ingredients
– 2 tablespoons lemon juice
– 1/4 cup olive oil
– Salt and pepper to taste
– 12 oz spaghetti or your choice of pasta
– 1/4 cup grated Parmesan cheese (optional)
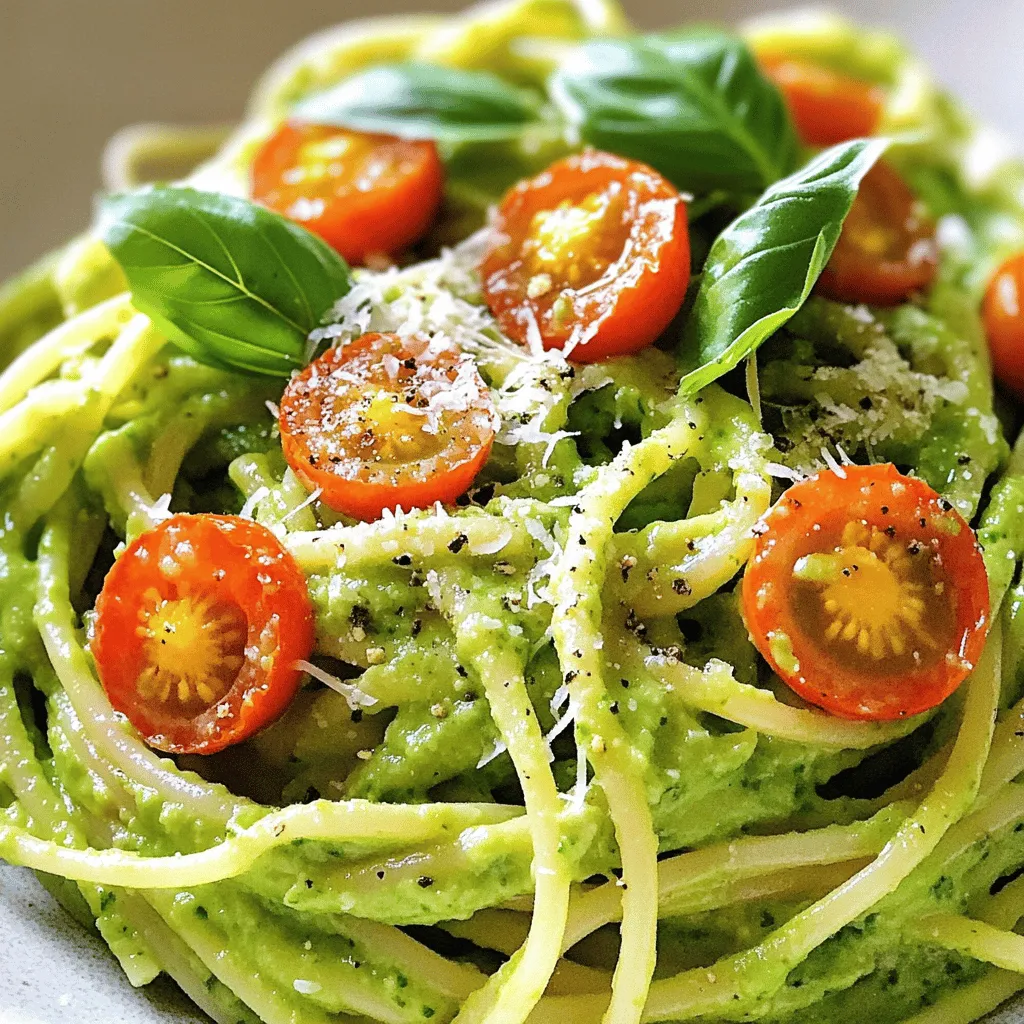
– Cherry tomatoes, halved (for garnish)
When I make Easy Avocado Pasta, I always start with fresh, ripe avocados. They should feel soft but firm. Next, I grab a bunch of bright green basil leaves, which add a lovely aroma. I also use garlic for a little kick.
For the extra ingredients, I squeeze fresh lemon juice. This adds a bright flavor that balances the creaminess. I use high-quality olive oil for richness and depth. Simple salt and pepper bring everything together.
I usually choose spaghetti, but you can use any pasta that you love. If I want to make it extra special, I sprinkle in some grated Parmesan cheese. And for a pop of color, I love adding halved cherry tomatoes on top.
This dish is a perfect blend of creamy and tangy flavors.
Step-by-Step Instructions
Cooking the Pasta
Start by boiling a pot of salted water. Once it boils, add your pasta. Follow the package instructions for the cooking time. Remember to reserve 1 cup of pasta water before you drain the pasta. This water is key for your sauce later.
Preparing the Avocado Sauce
Next, grab a food processor. Add in your ripe avocados, fresh basil leaves, minced garlic, lemon juice, and olive oil. Blend everything until it’s smooth and creamy. If the sauce is too thick, slowly add some of the reserved pasta water. This will help you reach a nice, creamy texture.
Mixing Everything Together
Now, it’s time to season the avocado sauce. Add salt and pepper to taste. In a large bowl, combine the cooked pasta with the avocado sauce. Toss well to coat the pasta evenly. If the sauce needs more moisture, add a bit more reserved pasta water. For a tasty touch, mix in some grated Parmesan cheese if you like. Enjoy your creamy avocado pasta!
Tips & Tricks
Enhancing Flavor
To make your avocado pasta even better, consider these simple tips:
– Adding more lemon juice for tanginess: Lemon juice brightens the dish. If you like a zesty kick, squeeze in more lemon juice. Start with one tablespoon and taste. You can always add more if you want.
– Using fresh herbs for extra flavor: Fresh herbs can change the game. Try adding parsley, cilantro, or chives. Chop them finely and mix them in. This will give your dish a fresh and vibrant taste.
Perfecting Consistency
Getting the right consistency is key for a creamy sauce. Here’s how to do it:
– How to adjust sauce thickness with pasta water: Pasta water is your secret weapon. If your sauce is thick, add a little pasta water. Mix well until you reach the creaminess you want. This makes all the difference.
– Avoiding browning of avocados: Avocados can brown quickly. To prevent this, use them right away. If you have leftovers, cover the dish tightly. You can also sprinkle lemon juice on top to help keep the color fresh.
These tips will help you create a creamy and flavorful avocado pasta that everyone will love.
Variations
Vegan Version
To make this dish vegan, you can easily swap out the Parmesan cheese. Use nutritional yeast instead. This ingredient gives a cheesy flavor without any dairy. It works great and keeps the dish creamy.
You might also want to add nuts, like cashews or pine nuts. They add richness and a nice texture. Just blend them in with the avocado for a creamy sauce that everyone will enjoy.
Gluten-Free Option
If you need a gluten-free meal, choose gluten-free pasta like brown rice or quinoa pasta. These options cook well and taste great. They keep the dish light and tasty.
To maintain the texture of the dish, make sure not to overcook the gluten-free pasta. Check it a minute or two before the package says it’s done. This way, it stays firm and delicious.
Feel free to explore these variations to suit your diet. They keep the essence of the dish while offering new tastes.
Storage Info
Storing Leftovers
To keep your avocado pasta fresh, place it in an airtight container. This helps prevent the dish from absorbing odors in the fridge. I recommend storing it in the fridge within two hours of making it. This will help keep it safe to eat.
Avocado pasta stays fresh for up to three days. However, the color may darken over time due to the avocados. To slow this down, add a bit of lemon juice to the top before sealing the container.
Reheating Instructions
When you are ready to eat the leftovers, use gentle heat to warm the pasta. A skillet works well for this. Add a splash of olive oil or pasta water. This keeps the sauce creamy and prevents it from drying out.
You can also use a microwave. Place the pasta in a safe dish and cover it. Heat it for 30 seconds at a time, stirring in between. If the dish seems dry, add a bit of water.
For a tasty twist, toss in fresh herbs or extra cherry tomatoes after reheating. This adds a pop of freshness back into your meal. Enjoy your creamy avocado pasta as if it were fresh!
FAQs
How long does avocado pasta last in the fridge?
Avocado pasta stays fresh for about three days in the fridge. To store it, place the pasta in an airtight container. Cover the top with plastic wrap to limit air exposure. This helps slow down browning. If you notice any browning, you can mix in a little lemon juice before serving. This will brighten the color and taste.
Can I make this dish ahead of time?
Yes, you can prepare this dish ahead of time. Cook the pasta and make the avocado sauce separately. Store them in the fridge in airtight containers. When you are ready to eat, mix them together. If the sauce thickens, add a bit of reserved pasta water to loosen it. This keeps the dish fresh and tasty without losing flavor.
What can I add to avocado pasta for extra protein?
You can add many protein options to make this dish heartier. Chicken is a great choice; just grill or sauté it before adding. Chickpeas add a nice texture and flavor. Simply rinse and toss them in. Tofu is another option; pan-fry it for a crispy bite. All these additions make the avocado pasta more filling and nutritious.
This blog post covered a simple and tasty avocado pasta recipe. You learned about the main ingredients and step-by-step cooking instructions. There are also tips for enhancing flavor and keeping your sauce perfect. I shared options for vegan and gluten-free versions. Finally, we discussed how to store leftovers and reheat them well.
Enjoy making this healthy dish. It is easy and full of flavor. You can customize it to fit your taste. Happy cooking!

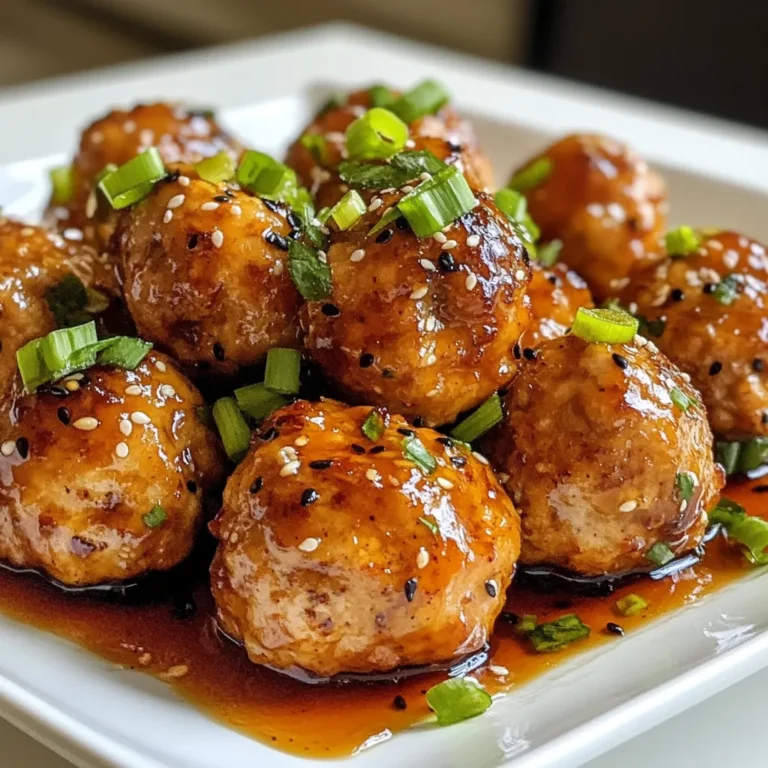
![- 4 chicken thighs, bone-in and skin-on - 1/4 cup honey - 4 cloves garlic, minced - 2 tablespoons soy sauce (or tamari for gluten-free) - 1 tablespoon apple cider vinegar - 1 tablespoon olive oil - 1 teaspoon grated fresh ginger - 1/2 teaspoon black pepper - Chopped green onions - Sesame seeds The main ingredients in this dish are simple yet powerful. Chicken thighs offer rich flavor and juicy texture. Honey adds sweetness that balances the savory notes. Garlic brings a punch that enhances every bite. The additional ingredients work together to create a delicious marinade. Soy sauce adds umami depth, while apple cider vinegar brings brightness. Olive oil helps keep the chicken moist during cooking. For seasoning, fresh ginger adds warmth. Black pepper gives a slight kick. The green onions and sesame seeds make for a lovely garnish, adding color and crunch. You can find the complete process in the Full Recipe. These ingredients blend to create a honey garlic glaze that makes this chicken dish truly special. Preparing the marinade To start, grab a medium bowl. Whisk together the honey, minced garlic, soy sauce, apple cider vinegar, olive oil, grated ginger, black pepper, and a small pinch of salt. Mix until all ingredients blend well. This sauce will give your chicken a sweet and savory flavor. Marinating the chicken Next, take your chicken thighs and place them in a zip-lock bag or shallow dish. Pour the marinade over the chicken, making sure each piece gets coated. Seal the bag or cover the dish. Refrigerate for at least one hour. For deeper flavor, marinate overnight. Preheating the oven While the chicken marinates, preheat your oven to 400°F (200°C). A hot oven helps the chicken cook evenly and crisp the skin. Baking the chicken After marinating, remove the chicken from the marinade. Don’t throw the marinade away; you will use it later. Place the chicken thighs skin side up on a baking tray lined with parchment paper. Bake in the preheated oven for 30-35 minutes. The chicken is ready when it reaches an internal temperature of 165°F (74°C) and the skin is crispy. Cooking the sauce While your chicken bakes, pour the reserved marinade into a small saucepan. Heat it over medium heat. Let it simmer for about 5-7 minutes until it thickens slightly. This will be your delicious glaze. Glazing and serving When the chicken is done, brush the thickened glaze over the thighs. Return the tray to the oven for another 5 minutes to caramelize the glaze. Once done, remove and sprinkle with chopped green onions and sesame seeds. Let the chicken rest for a few minutes before serving. Enjoy your Honey Garlic Glazed Chicken Thighs! For the full recipe, check the earlier section. - The best time to marinate chicken thighs is at least one hour. For deeper flavor, marinate overnight. - Use a zip-lock bag for even coating. Squeeze out air to let the marinade soak in well. - To get crispy skin, bake the chicken thighs skin side up. This allows the fat to render and crisp up. - Check the internal temperature with a meat thermometer. It should reach 165°F (74°C) for safe eating. - Pair your honey garlic glazed chicken with steamed rice or roasted vegetables. - For a nice look, garnish with chopped green onions and sesame seeds. This adds color and crunch. For the full recipe, refer to the instructions above. Enjoy your cooking! {{image_2}} You can switch up the protein in this dish. Chicken breast works well if you want less fat. For a plant-based option, try tofu. Just press it to remove excess water and cut it into cubes. You can also change the sweetener. If you want a lower sugar option, use maple syrup or agave nectar. These alternatives blend nicely with the other flavors. Make this dish even better by adding spices or herbs. Try ginger or chili flakes for a kick. Fresh herbs like cilantro or basil can bring a nice twist too. You can also play with acids. Lime juice adds a bright flavor, while balsamic vinegar gives a sweet tang. Try adding a splash during cooking for a new taste. Grilling the chicken gives it a smoky flavor. Just marinate as usual and grill over medium heat. It takes about 20 minutes, and you’ll get nice grill marks. If you own an Instant Pot, you can use it for this recipe too. Cook the marinated chicken on high for 10 minutes, then let it naturally release. This method keeps the chicken super juicy. For the full recipe, check out the complete instructions and details. To keep your honey garlic glazed chicken thighs fresh, store them in the fridge. Place the cooked chicken in an airtight container. It can last up to 3 days in the refrigerator. If you want to store it longer, consider freezing it. Wrap the chicken tightly in plastic wrap, then place it in a freezer-safe bag. This way, it can stay good for up to 3 months. When it's time to enjoy leftovers, reheating can be simple. The best way to reheat is in the oven. Set your oven to 350°F (175°C). Place the chicken on a baking sheet and cover it with foil. This helps keep the chicken moist. Heat it for about 15-20 minutes or until it's warm. You can also use a microwave, but use a lower power setting to avoid drying it out. Cover the chicken with a damp paper towel to keep moisture in. You can store your honey garlic glazed chicken thighs safely for a few days. In the fridge, they stay good for 3 days. In the freezer, they last for 3 months. Signs of spoilage include a strange smell, changes in color, or a slimy texture. Always check before eating to stay safe. For more details on how to make this dish, check the Full Recipe. Can I use boneless chicken thighs? Yes, you can use boneless chicken thighs. They will cook faster than bone-in thighs. Check the internal temperature to ensure they reach 165°F (74°C). How to make the glaze thicker? To thicken the glaze, simmer it longer. Cook it on medium heat until it reduces and becomes syrupy. You can also add a cornstarch slurry for extra thickness. How to make it gluten-free? Use tamari instead of soy sauce. Tamari is a gluten-free option that tastes great. Can I add vegetables to the dish? Yes, you can add vegetables. Try bell peppers, broccoli, or carrots. Toss them on the baking tray with the chicken. How many servings does this recipe yield? This recipe makes four servings. It’s perfect for a small family meal. Can I double the recipe for a larger group? Yes, you can double the recipe. Just ensure your baking tray has enough space. You may need to adjust cooking time slightly. For the complete recipe, check out the [Full Recipe]. This recipe uses simple ingredients like chicken thighs, honey, and garlic. You learned how to prepare and cook tasty chicken with an easy glaze. I shared tips to help with marinating and cooking for the best results. Feel free to explore variations and enjoy leftovers too. Try different flavors and cooking methods. Cooking should be fun and personal. Use your taste to create amazing meals. Enjoy making this dish with friends and family!](https://dailydishly.com/wp-content/uploads/2025/07/b9cba3e0-ee7f-4dbf-9eac-9b8411a1c4fd-768x768.webp)