No-Bake Salted Caramel Pumpkin Bars Delightful Treat
Are you ready to indulge in a delightful treat that’s easy to make? No-Bake Salted Caramel Pumpkin Bars bring together creamy pumpkin, rich caramel, and a buttery crust without turning on the oven. Whether you’re planning a gathering or just need a sweet snack, I’ll guide you through the simple steps. Join me as we create a dessert that will impress everyone, with all the fall flavors you love!
Ingredients
Essential Ingredients for No-Bake Salted Caramel Pumpkin Bars
To make these delicious bars, you will need the following ingredients:
– 1½ cups graham cracker crumbs
– ½ cup unsweetened cocoa powder
– ½ cup unsalted butter, melted
– ½ cup brown sugar, packed
– 1 cup canned pumpkin puree
– ½ teaspoon ground cinnamon
– ¼ teaspoon ground nutmeg
– ¼ teaspoon ground ginger
– 1 cup cream cheese, softened
– ½ cup powdered sugar
– 1 teaspoon vanilla extract
– ½ cup caramel sauce (store-bought or homemade)
– Sea salt flakes for garnish
Quality matters when you cook. Fresh, high-quality ingredients make a big difference. For the graham cracker crumbs, I recommend using whole graham crackers instead of pre-packaged crumbs for better flavor. If you can find organic cocoa powder, it will elevate the taste of your bars.
You can swap brown sugar with coconut sugar for a deeper flavor. If you prefer a lighter filling, use low-fat cream cheese. For the pumpkin puree, look for brands without added sugars or preservatives.
Tips for Selecting Ingredients
Choosing the right pumpkin puree can change your dish. Canned pumpkin is easy and reliable. Look for brands like Libby’s or Farmer’s Market. They offer consistent quality. If you want to try homemade, roast fresh pumpkins, scoop out the flesh, and blend until smooth.
For caramel sauce, I suggest brands like Ghirardelli or Smucker’s. They have great flavors and textures. If you want a fun twist, try making your own caramel sauce. It’s simple and adds a personal touch to your bars.
Step-by-Step Instructions
Preparation of the Crust
To start, gather your ingredients for the crust. In a medium bowl, mix together 1½ cups of graham cracker crumbs, ½ cup of unsweetened cocoa powder, ½ cup of melted unsalted butter, and ½ cup of packed brown sugar. Stir until the mixture looks crumbly and well mixed. Next, grab a 9×9-inch baking dish. Press the crumbly mixture evenly into the bottom of the dish. I use the back of a measuring cup to get a nice flat surface. Then, place the dish in the fridge while you work on the filling.
Making the Pumpkin Cream Cheese Filling
Now, let’s make the pumpkin filling. In a large bowl, combine 1 cup of canned pumpkin puree with ½ teaspoon of ground cinnamon, ¼ teaspoon of ground nutmeg, and ¼ teaspoon of ground ginger. Mix until everything is fully combined. In another bowl, beat 1 cup of softened cream cheese with an electric mixer. Mix until smooth. Gradually add in ½ cup of powdered sugar and 1 teaspoon of vanilla extract. Keep mixing until the mixture is creamy and well blended. Finally, fold the pumpkin mixture into the cream cheese mixture. Be gentle to keep it fluffy.
Assembling the Bars
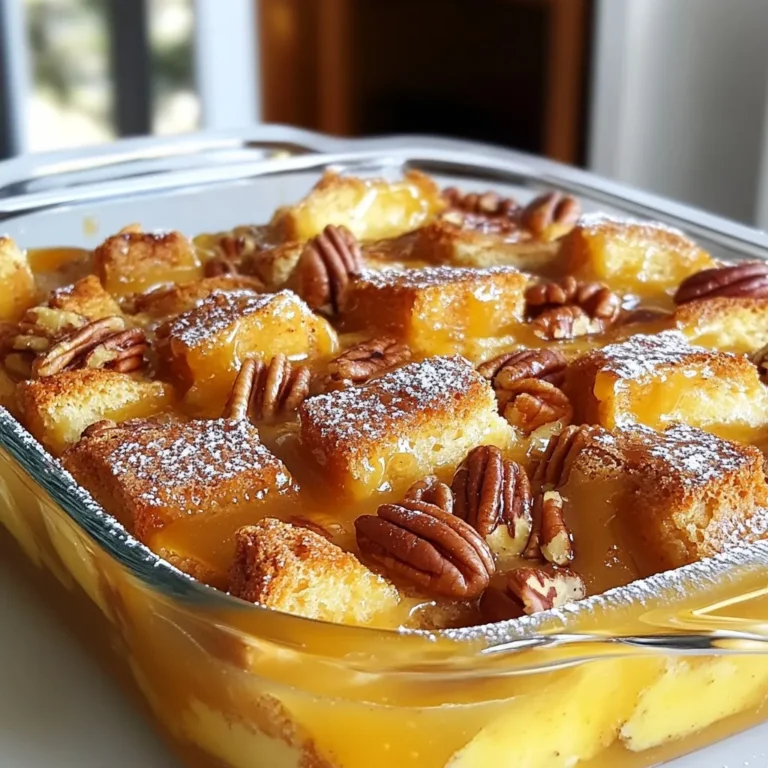
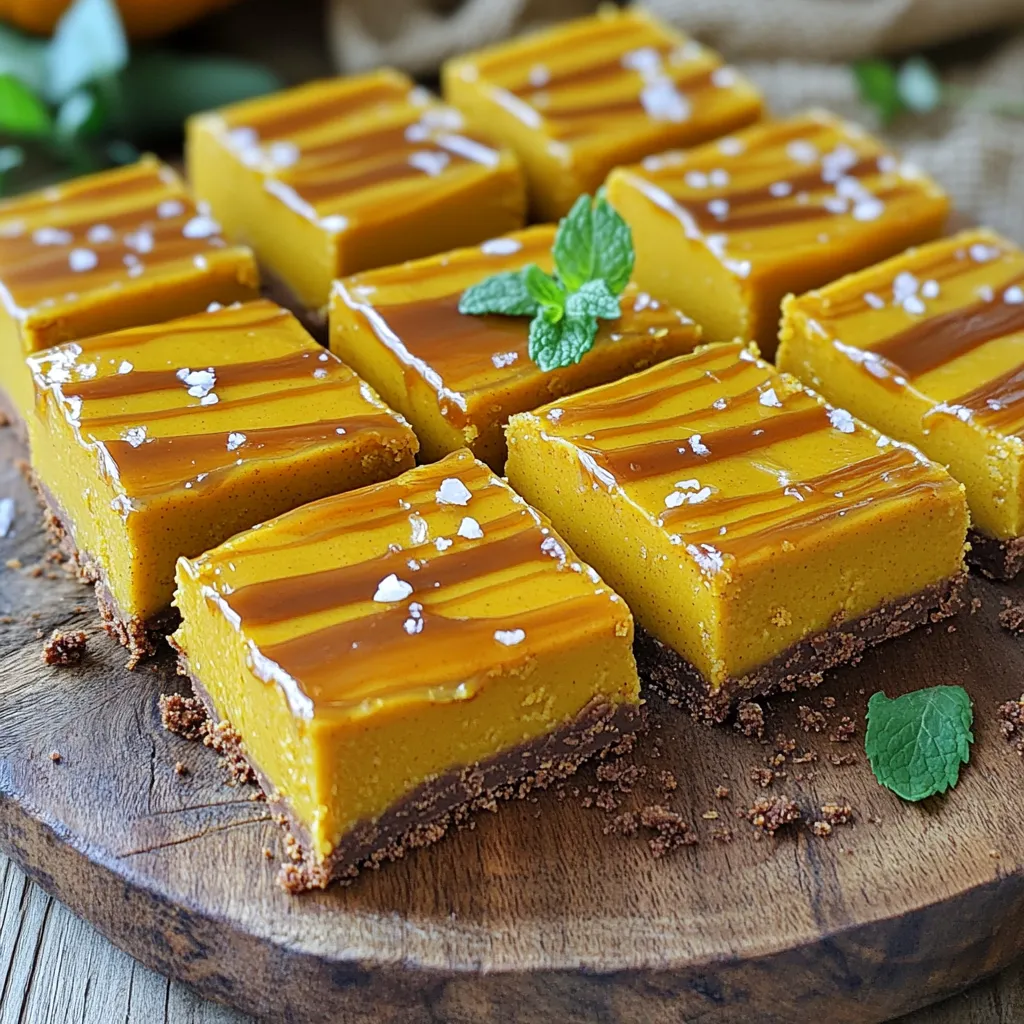
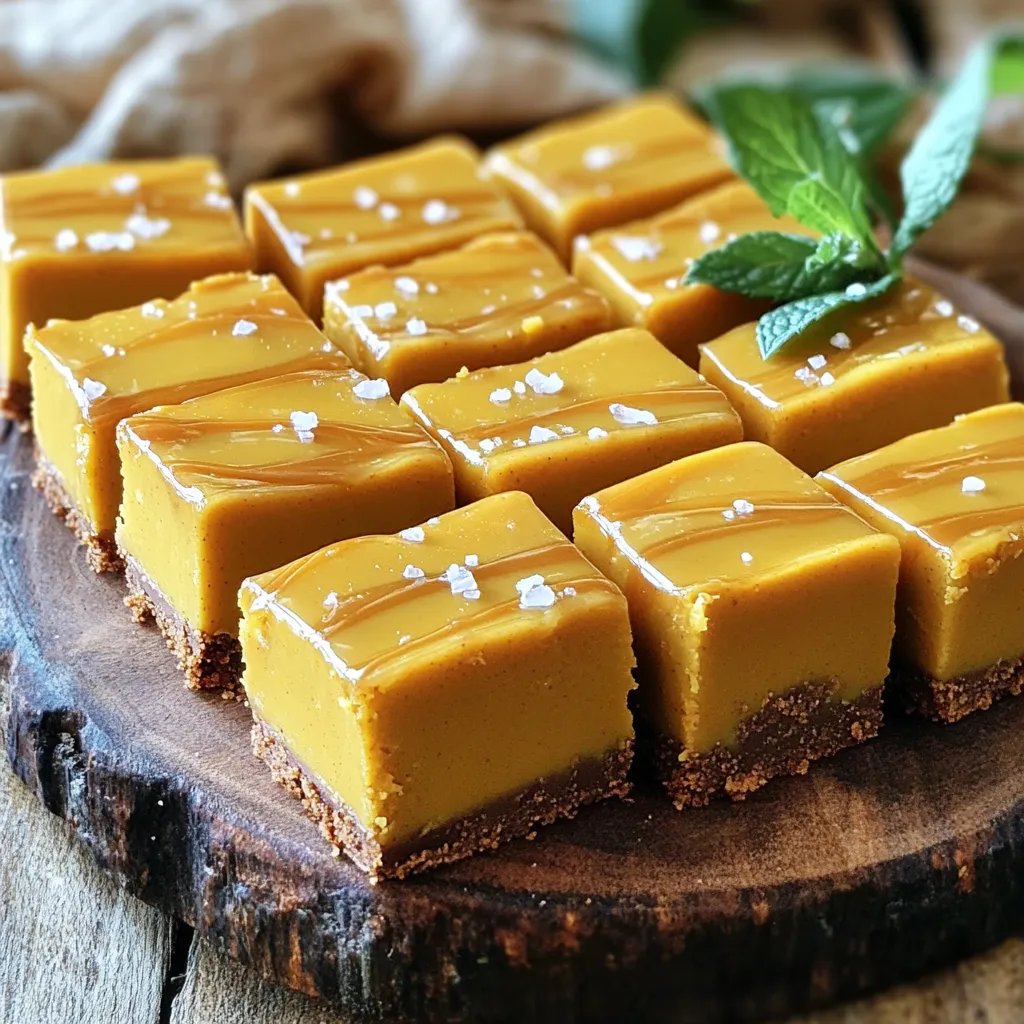
It’s time to put it all together! Take the crust from the fridge and spread the pumpkin cream cheese filling evenly over it. Use a spatula to smooth out the top. Next, drizzle ½ cup of caramel sauce over the pumpkin filling. Use a knife to swirl the caramel gently around for a marbled look. After that, sprinkle a few sea salt flakes on top to enhance the flavors. Cover the dish with plastic wrap and refrigerate for at least 4 hours. This helps the bars set up nicely. Once they are set, you can cut them into bars and serve chilled. Enjoy!
Tips & Tricks
How to Ensure Perfect Texture
To avoid lumps in the filling, mix the pumpkin puree well first. Use a whisk to blend the spices in before adding the cream cheese. Beat the cream cheese until smooth, then add the powdered sugar slowly. This helps keep the mixture creamy. Always fold the pumpkin mix in gently to prevent air bubbles.
Chilling Time and Best Practices
Chill the bars for at least four hours. This allows the filling to set properly. If you can, let them chill overnight for best results. Keep the bars covered to avoid drying out. The longer they chill, the better the flavors meld together.
Presentation Ideas
For a beautiful presentation, serve the bars on a nice platter. Drizzle extra caramel sauce on top before serving. Add small sprigs of mint for a pop of color. Cut the bars neatly to show off the layers. This makes them look as good as they taste!
Variations
Alternative Flavor Add-ins
You can easily change the flavor of these bars. Here are some fun ideas:
– Chocolate Chips: Fold in some mini chocolate chips for a sweet twist.
– Nutmeg: Add more nutmeg for a warm, spicy taste.
– Maple Syrup: Swap some caramel for maple syrup for a unique flavor.
– Chopped Nuts: Pecans or walnuts can add a nice crunch.
Feel free to experiment! Mixing these add-ins makes each batch special.
Dietary Substitutions
You can make these bars fit different diets too. Try these options:
– Gluten-Free: Use gluten-free graham crackers or almond flour. This keeps the crust tasty and safe.
– Dairy-Free: Replace cream cheese with a dairy-free version. Coconut cream works great.
– Healthier Alternatives: Use honey instead of brown sugar. This cuts down on refined sugars.
These swaps still keep the bars delicious while fitting your needs!
Storage Info
Best Storage Practices
To keep your no-bake salted caramel pumpkin bars fresh, store them in the fridge. Use an airtight container to protect them from air and moisture. If you have leftovers, cut the bars into squares before storing. This makes it easy to grab a piece later!
Freezing Instructions
You can freeze these bars for later enjoyment. First, let the bars chill in the fridge until set. Then, cut them into squares. Wrap each square in plastic wrap or foil. Place them in a freezer bag or container. When you want to eat one, take it out and let it thaw in the fridge for a few hours.
Shelf Life
These delicious bars will last about 5 days in the fridge. If you freeze them, they can stay good for up to 2 months. Just remember to label your containers with the date you made them!
FAQs
Can I use fresh pumpkin instead of canned?
Yes, you can use fresh pumpkin. You need to cook and puree it first. Fresh pumpkin gives a great taste and texture. However, canned pumpkin is easier and saves time. Both options work well in these bars.
How long do the bars need to set?
The bars need to chill for at least 4 hours. This allows them to firm up nicely. I recommend chilling them overnight for the best results. The longer they sit, the better the flavors blend.
Can I make these bars ahead of time?
Absolutely! These bars are perfect for making ahead. You can prepare them a day or two in advance. Just store them in the fridge covered. This makes them a great treat for gatherings or special events.
You now have everything you need to make no-bake salted caramel pumpkin bars. Remember the importance of choosing quality ingredients, like fresh pumpkin and a good caramel sauce. Follow the step-by-step instructions carefully, and consider the tips for a perfect texture. These bars are not only delicious but also customizable. They store well, so you can enjoy them later. Don’t hesitate to try different flavors or dietary swaps. With these tips, I believe you will create a treat everyone will love. Enjoy your baking!

. - 1 cup all-purpose flour (heat-treated) - 1/2 cup unsweetened cocoa powder - 1 cup brown sugar, packed - 1/2 cup granulated sugar - 1/2 cup unsalted butter, softened - 1 teaspoon vanilla extract - 1/4 teaspoon salt - 1/2 cup cream cheese, softened - 2 tablespoons milk (or more for desired consistency) - 1/2 cup mini chocolate chips This dip is so easy to make! You just mix some simple ingredients. Start with softened butter and cream cheese. Add both sugars and beat them together until smooth. This gives your dip a nice creamy base. Next, mix in vanilla extract. This adds a lovely flavor that pairs well with chocolate. In another bowl, whisk the heat-treated flour, cocoa powder, and salt. Mixing these dry ingredients separately helps ensure even mixing later. Now, slowly add the dry mix to your creamy base. Mix on low speed until just combined. Do not overmix; you want a nice texture. Add milk to reach your desired dip thickness. Some like it thick, while others prefer a smoother dip. Finally, fold in the mini chocolate chips. They add fun bursts of flavor throughout. Transfer your dip to a bowl and enjoy! You learned how to make a delicious Brownie Batter Dip. We covered the ingredients, easy steps, and great tips. You can customize it with flavors and mix-ins to fit your taste. Storing it correctly keeps it fresh for your next snack. Look back at the section on FAQs for extra help. Now, you’re ready to impress friends and family with this tasty treat! Enjoy every bite and share your new skill.](https://dailydishly.com/wp-content/uploads/2025/08/7e42f289-f06d-4b29-b8c2-85b163823be7-768x768.webp)
![- 1 cup rolled oats - 1 ½ cups almond milk (or any milk of your choice) - 1 medium carrot, finely grated - 1 tablespoon chia seeds - 1 tablespoon maple syrup (or honey) - ½ teaspoon ground cinnamon - ¼ teaspoon nutmeg - ¼ cup crushed pineapple, drained - 2 tablespoons raisins - 2 tablespoons chopped walnuts (optional) - Pinch of salt - Greek yogurt for topping (optional) - Shredded coconut for garnish (optional) To make carrot cake overnight oats, gather the ingredients. Rolled oats serve as the base, giving a hearty texture. Almond milk adds creaminess, but you can use any milk. The finely grated carrot brings sweetness and color. Chia seeds help thicken the mix and add nutrients. Maple syrup sweetens it, but honey works too. Ground cinnamon and nutmeg lend warmth and spice. Crushed pineapple gives a nice tang and moisture. Raisins add chewiness, while walnuts add crunch if you choose to include them. A pinch of salt balances the sweetness. Greek yogurt and shredded coconut are great toppings for added flavor and texture. This mix is simple yet full of flavor. You can find the full recipe in the article. It’s a great way to enjoy breakfast that tastes like dessert! 1. Combine the rolled oats and almond milk in a mixing bowl. This is where the magic starts. The oats soak up the milk and become soft. 2. Add grated carrot, chia seeds, and sweetener. The carrot adds a nice flavor and texture. The chia seeds bring a boost of nutrition. 3. Incorporate spices and remaining ingredients. Mix in cinnamon, nutmeg, crushed pineapple, raisins, and walnuts. These ingredients make your oats taste like carrot cake. 4. Divide mixture into jars or containers. This helps with easy serving. You can use any jar you have at home. 5. Seal and refrigerate overnight or for at least 6 hours. This gives the oats time to soak. The longer they sit, the better they taste. 6. Stir and check consistency in the morning. If the oats are too thick, just add a splash of almond milk. This will make them creamy. 7. Top with yogurt and garnishes before serving. A dollop of Greek yogurt and some shredded coconut look great. Enjoy your tasty, carrot cake-flavored breakfast! For the full recipe, check the [Full Recipe]. To make your carrot cake overnight oats sing, use fresh, finely grated carrot. This brings a sweet, earthy taste that makes each bite special. Also, you can adjust the sweetness to fit your taste. If you like it sweeter, add more maple syrup or honey. For a fun twist, add extra toppings like nuts and fruits. Chopped walnuts or sliced bananas add crunch and flavor. I recommend using Greek yogurt on top for a creamy finish. It makes the oats rich and satisfying. Feel free to experiment with different types of milk. Almond, oat, or coconut milk all work well. You can also add more spices or sweeteners. A dash of ginger or a scoop of maple syrup can take your oats to the next level. {{image_2}} You can make small changes to keep your oats healthy. Try swapping maple syrup for agave syrup. This gives you a lower glycemic index option. You can also use unsweetened coconut yogurt instead of regular yogurt. This choice cuts down on calories and adds a nice flavor. Get creative with your carrot cake overnight oats by adding other fruits. Sliced banana or chopped apple works great. You can also spice things up with ginger or cardamom. These spices will bring out the flavors and make your breakfast even more exciting. Want to keep your meal plant-based? Make sure all your toppings are vegan. You can substitute dairy yogurt with coconut or almond yogurt. This makes your dish creamy while staying true to vegan principles. You still get the great taste without any animal products. If you want to check out the full recipe, you can find it above. Enjoy the fun of making these variations to fit your taste! To keep your carrot cake overnight oats fresh, use airtight containers. This step helps keep the oats moist. I recommend eating them within 3-5 days for the best taste. If you wait too long, the flavor might change. You want that sweet, spiced flavor to shine! Can carrot cake overnight oats be frozen? Yes, you can freeze them! This option is great for meal prep. To freeze, place the oats in airtight containers. Make sure to leave some space for expansion. How to defrost and reheat properly? Simply take them out of the freezer and place them in the fridge overnight. If you need them faster, microwave them for 1-2 minutes. Add a splash of almond milk to help with consistency. Enjoy your meal any time! Overnight oats pack a punch of nutrition. They are high in fiber, which helps with digestion. This means you feel full longer, making them a great choice for breakfast. The oats also provide whole grains, which are good for your heart. With the added carrots and chia seeds, you get vitamins and healthy fats too. They are easy to make, so they fit well into a busy schedule. You can prep them in advance, saving time in the morning. Yes, you can make carrot cake overnight oats in advance. I recommend prepping them the night before. This way, they are ready to grab in the morning. For the best taste, keep them in the fridge for up to five days. Store them in airtight containers to keep them fresh. Just remember, the longer they sit, the softer the oats will become. You can use quick oats, but they change the texture. Quick oats cook faster and absorb liquid more. This might make your oats mushy instead of creamy. Rolled oats give a chewier texture, which is nice in overnight oats. If you prefer quick oats, reduce the soaking time to avoid too much mush. Carrot cake overnight oats combine taste and nutrition. You mix oats, milk, carrots, and spices to create a healthy meal. Refrigerate overnight for an easy breakfast. Customize with fresh fruits, nuts, or yogurt as you like. This dish is fun to make and offers many choices. Store in airtight containers to keep them fresh. Enjoy your easy, tasty start to the day!](https://dailydishly.com/wp-content/uploads/2025/07/5c4a7baf-1a25-4f66-936a-feb9751b1df9-768x768.webp)